Juniper Junos Space JA2500 Hardware Manual
Hide thumbs
Also See for Junos Space JA2500:
- Hardware manual (206 pages) ,
- Quick start manual (29 pages) ,
- Hardware manual (210 pages)

Related Manuals for Juniper Junos Space JA2500


Summary of Contents for Juniper Junos Space JA2500
- Page 1 JA2500 Junos Space Appliance Hardware Guide Published: 2014-03-28 Copyright © 2014, Juniper Networks, Inc.
- Page 2 END USER LICENSE AGREEMENT The Juniper Networks product that is the subject of this technical documentation consists of (or is intended for use with) Juniper Networks software. Use of such software is subject to the terms and conditions of the End User License Agreement (“EULA”) posted at http://www.juniper.net/support/eula.html.
-
Page 3: Table Of Contents
Junos Space Appliance Rack Requirements ......25 Tools and Parts Required to Install the Junos Space Appliance ....26 Copyright © 2014, Juniper Networks, Inc. - Page 4 Troubleshooting the JA2500 Appliance ......83 Troubleshooting Junos Space Ethernet Interface eth3 Connectivity ... 83 Copyright © 2014, Juniper Networks, Inc.
- Page 5 Qualified Personnel Warning ......... . 117 Copyright © 2014, Juniper Networks, Inc.
- Page 6 Compliance Statements for Acoustic Noise for JA2500 ....158 Declaration of Conformity for JA2500 Junos Space Appliance ....159 Copyright © 2014, Juniper Networks, Inc.
- Page 7 Index ............163 Copyright © 2014, Juniper Networks, Inc.
- Page 8 JA2500 Junos Space Appliance Hardware Guide viii Copyright © 2014, Juniper Networks, Inc.
-
Page 9: About The Documentation
® To obtain the most current version of all Juniper Networks technical documentation, see the product documentation page on the Juniper Networks website at http://www.juniper.net/techpubs/ If the information in the latest release notes differs from the information in the documentation, follow the product Release Notes. - Page 10 [edit protocols directories; configuration hierarchy levels; ospf area area-id] hierarchy level. or labels on routing platform The console port is labeled CONSOLE components. < > (angle brackets) Encloses optional keywords or variables. stub <default-metric metric>; Copyright © 2014, Juniper Networks, Inc.
-
Page 11: Documentation Feedback
We encourage you to provide feedback, comments, and suggestions so that we can improve the documentation. You can provide feedback by using either of the following methods: Online feedback rating system—On any page at the Juniper Networks Technical Documentation site at http://www.juniper.net/techpubs/index.html... -
Page 12: Requesting Technical Support
7 days a week, 365 days a year. Self-Help Online Tools and Resources For quick and easy problem resolution, Juniper Networks has designed an online self-service portal called the Customer Support Center (CSC) that provides you with the following features: Find CSC offerings: http://www.juniper.net/customers/support/... -
Page 13: Appliance And Components Overview And Specifications
PART 1 Appliance and Components Overview and Specifications JA2500 Appliance Overview on page 3 Component Descriptions and Specifications on page 11 Copyright © 2014, Juniper Networks, Inc. - Page 14 JA2500 Junos Space Appliance Hardware Guide Copyright © 2014, Juniper Networks, Inc.
-
Page 15: Ja2500 Appliance Overview
NTP Time Source for a Junos Space Appliance on page 9 Junos Space Appliance Overview The Juniper Networks Junos Space Appliance is a dedicated hardware device that is engineered to provide the computing power and meet specific requirements to be able to install and run the Junos Space Network Management Platform. -
Page 16: Ja2500 Appliance Hardware Overview
Front Panel of a JA2500 Appliance on page 5 Documentation Rear Panel of a JA2500 Appliance on page 6 Junos Space Appliance Rack Requirements on page 25 Mounting the JA2500 Junos Space Appliance on page 32 Copyright © 2014, Juniper Networks, Inc. -
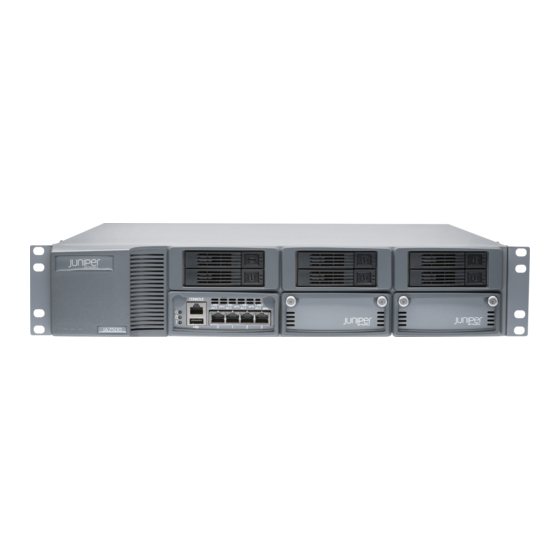
Page 17: Front Panel Of A Ja2500 Appliance
Hardware Fault LED (red), which indicates that a fan, power supply, or temperature alarm has occurred. Hard Disk Activity LED (yellow), which indicates that the hard disk is in use. Power LED (green), which indicates that the appliance is powered on. Copyright © 2014, Juniper Networks, Inc. -
Page 18: Rear Panel Of A Ja2500 Appliance
Cooling fans The JA2500 appliance has two hot-swappable cooling fans that provide the required airflow to cool the appliance. Power switch The appliance power switch is used to power on or power off the appliance. Copyright © 2014, Juniper Networks, Inc. - Page 19 (standby mode). Related Front Panel of a JA2500 Appliance on page 5 Documentation Chassis Physical Specifications for the JA2500 Appliance on page 4 Junos Space Appliance Overview on page 3 Copyright © 2014, Juniper Networks, Inc.
-
Page 20: Junos Space Ethernet Interfaces Overview
Any static route configured manually is populated in the main routing table, which is used to route traffic through the eth0 interface. Table 6 on page 9 describes the functions of Ethernet interfaces on the Junos Space Appliance. Copyright © 2014, Juniper Networks, Inc. -
Page 21: Ntp Time Source For A Junos Space Appliance
To ensure this behavior, all nodes in a fabric must use the same external NTP source that you configure for the first appliance. The Copyright © 2014, Juniper Networks, Inc. - Page 22 Configuring a Junos Space Appliance as a Junos Space Node on page 46 Configuring a Junos Space Appliance as a Standalone or Primary FMPM Node on page 51 Changing Network and System Settings for a Junos Space Appliance on page 58 Copyright © 2014, Juniper Networks, Inc.
-
Page 23: Component Descriptions And Specifications
DC power supply Cold-swappable, if the appliance has only one power supply module Hot-swappable, if the appliance has an additional redundant, functioning power supply module that is plugged into a separate power circuit Hard disks Hot-swappable Copyright © 2014, Juniper Networks, Inc. -
Page 24: Ac Power Cord Specifications For Junos Space Appliances
CEE (7) VII Type VIIG CBL-GP-JX-PWR-EU Switzerland, and United Kingdom) Italy 250 VAC, 10 A, 50 Hz CEI 23-16 Type I/3G CBL-GP-JX-PWR-IT Japan 125 VAC, 12 A, 50 Hz or 60 Hz JIS 8303 CBL-GP-JX-PWR-JP Copyright © 2014, Juniper Networks, Inc. -
Page 25: Ac Power Supply In Junos Space Appliances
AC and DC power supply modules, we recommend that you do not provide redundancy in this manner. Instead, use two AC power supply modules or two DC power supply modules if you want to provide redundancy. Copyright © 2014, Juniper Networks, Inc. - Page 26 50 to 60 Hz Peak Inrush Current 40 A maximum at 115 VAC and 77° F (25° C) 80 A maximum at 240 VAC and 77° F (25° C) Maximum Output Power 250 W Copyright © 2014, Juniper Networks, Inc.
-
Page 27: Dc Power Supply In Junos Space Appliances
Figure 5: DC Power Supply Module Table 10 on page 15 shows details of the DC power supply module for a Junos Space Appliance. Table 10: Details of a DC Power Supply Module Item Details Model number UNIV-560W-PS-DC Copyright © 2014, Juniper Networks, Inc. -
Page 28: Chassis Console Port Pinouts
Chassis Console Port Pinouts This topic applies to the following Junos Space Appliances: JA1500 and JA2500. Table 11 on page 17 describes the details of RJ-45 chassis console port pinouts for the JA1500 and JA2500 appliances. Copyright © 2014, Juniper Networks, Inc. - Page 29 Related Connecting a Junos Space Appliance to a Management Console on page 41 Documentation Connecting a Junos Space Appliance to the Network on page 42 Front Panel of a JA2500 Appliance on page 5 Copyright © 2014, Juniper Networks, Inc.
- Page 30 JA2500 Junos Space Appliance Hardware Guide Copyright © 2014, Juniper Networks, Inc.
-
Page 31: Planning For Appliance Installation
PART 2 Planning for Appliance Installation Site Preparation on page 21 Mounting Requirements on page 25 Copyright © 2014, Juniper Networks, Inc. - Page 32 JA2500 Junos Space Appliance Hardware Guide Copyright © 2014, Juniper Networks, Inc.
-
Page 33: Site Preparation
General Electrical Safety Guidelines and Warnings on page 139 General Safety Guidelines and Warnings on page 113 Preventing Electrostatic Discharge Damage on page 140 Site Electrical Wiring Guidelines This topic applies to the following Junos Space Appliances: JA1500 and JA2500. Copyright © 2014, Juniper Networks, Inc. -
Page 34: Environmental Requirements And Specifications For Junos Space Appliances
Ensure that the following environmental guidelines are followed: Keep the site as dust-free as possible because dust can clog air intake vents and filters, reducing the efficiency of the appliance cooling system. Copyright © 2014, Juniper Networks, Inc. - Page 35 The appliance can be stored safely in the temperature range of –40° F to 158° F (-40° C to 70° C) Related General Safety Guidelines and Warnings on page 113 Documentation General Site Guidelines for Junos Space Appliances on page 21 Copyright © 2014, Juniper Networks, Inc.
- Page 36 JA2500 Junos Space Appliance Hardware Guide Copyright © 2014, Juniper Networks, Inc.
-
Page 37: Mounting Requirements
Clearance The outer edges of the mounting brackets extend the width of either chassis to 19 in. (48.3 cm). The front of the chassis extends approximately 0.5 in. (1.27 cm) beyond the mounting ears. Copyright © 2014, Juniper Networks, Inc. -
Page 38: Tools And Parts Required To Install The Junos Space Appliance
Phillips (+) screwdriver, number 1 for connecting the power supply wires and the grounding wire for the DC power supply module. Packing the appliance Electrostatic bag or antistatic mat, for each component (Optional) ESD grounding wrist strap Copyright © 2014, Juniper Networks, Inc. - Page 39 Chapter 4: Mounting Requirements Related Junos Space Appliance Rack Requirements on page 25 Documentation Mounting the JA2500 Junos Space Appliance on page 32 Copyright © 2014, Juniper Networks, Inc.
- Page 40 JA2500 Junos Space Appliance Hardware Guide Copyright © 2014, Juniper Networks, Inc.
- Page 41 PART 3 Installing and Connecting the JA2500 Appliance and Appliance Components Installing the Appliance on page 31 Connecting the Appliance on page 37 Performing Initial Configuration on page 45 Copyright © 2014, Juniper Networks, Inc.
- Page 42 JA2500 Junos Space Appliance Hardware Guide Copyright © 2014, Juniper Networks, Inc.
-
Page 43: Installing The Appliance
Open the top flaps on the shipping carton. Pull out the packing material holding the appliance in place. Read the “General Safety Guidelines and Warnings” on page 113 carefully. Remove the appliance from the shipping carton. Copyright © 2014, Juniper Networks, Inc. -
Page 44: Mounting The Ja2500 Junos Space Appliance
Save the shipping carton and packing materials in case you need to move or ship the appliance later. Table 17: Items in the JA2500 Appliance Shipping Carton Component Quantity Junos Space JA2500 appliance chassis Power cable Mounting kits RJ–45 to DB–9F cable with adapter, 7 ft console cable 7-ft, blue, Category 5e cable... -
Page 45: Rack
Remove the rear screws on each side of the appliance’s front rails and the two small screws toward the front of the chassis. Loosen the side-rail screws of the chassis and slide the front rails of the system backward, as far as they will move. Copyright © 2014, Juniper Networks, Inc. -
Page 46: Midmounting The Junos Space Appliance In A Two-Post Rack
To mount the appliance in a two-post rack, do the following: Remove the two front-mount rails from either side of the chassis. Insert one midmount bracket to the center on either side of the chassis. Copyright © 2014, Juniper Networks, Inc. - Page 47 Front-and-Rear Mounting the JA2500 Junos Space Appliance Recessed in a Rack on page 33 Junos Space Appliance Rack Requirements on page 25 Tools and Parts Required to Install the Junos Space Appliance on page 26 Copyright © 2014, Juniper Networks, Inc.
- Page 48 JA2500 Junos Space Appliance Hardware Guide Copyright © 2014, Juniper Networks, Inc.
-
Page 49: Connecting The Appliance
Each power supply module must be connected to a dedicated power source outlet. Ensure that you have the following parts and tools available: (Optional) Electrostatic discharge (ESD) grounding strap A power cord appropriate for your geographical location Copyright © 2014, Juniper Networks, Inc. - Page 50 (not powering the appliance). Related AC Power Supply in Junos Space Appliances on page 13 Documentation General Electrical Safety Guidelines and Warnings on page 139 Copyright © 2014, Juniper Networks, Inc.
-
Page 51: Connecting Dc Power To The Junos Space Appliance
DC circuit. To ensure that all power is off, locate the circuit breaker on the panel board that services the DC circuit, switch the circuit breaker to the OFF position, and tape the switch handle of the circuit breaker in the OFF position. Copyright © 2014, Juniper Networks, Inc. - Page 52 Remove the screw on the grounding terminal by using the screwdriver. Save the screw. The grounding terminal is located to the right and above the terminals, as shown in Figure 11 on page Copyright © 2014, Juniper Networks, Inc.
-
Page 53: Connecting A Junos Space Appliance To A Management Console
Ensure that you have an Ethernet cable with an RJ-45 connector available. An RJ-45 cable, as shown Figure 12 on page 42, and an RJ-45 to DB-9 serial port adapter are supplied with the appliance. Copyright © 2014, Juniper Networks, Inc. -
Page 54: Connecting A Junos Space Appliance To The Network
To connect the appliance to the network, do the following: (Optional) Attach an electrostatic discharge (ESD) grounding strap to your bare wrist and connect the strap to an external ESD point. For a JA1500 appliance, do the following: Copyright © 2014, Juniper Networks, Inc. - Page 55 Plug one end of the Ethernet cable into the port labeled , as shown in Figure 14 on page 43, on the front panel. Figure 14: JA2500 Appliance Front Panel b. Plug the other end of the Ethernet cable into the network. Copyright © 2014, Juniper Networks, Inc.
- Page 56 Ethernet cable into the network that contains the devices being managed by Junos Space. Related Connecting a Junos Space Appliance to a Management Console on page 41 Documentation Booting the Junos Space Appliance on page 45 Copyright © 2014, Juniper Networks, Inc.
-
Page 57: Performing Initial Configuration
Connected the Junos Space Appliance to a management console. Configured a console terminal or terminal emulation utility to use the following serial connection parameters: Baud rate: 9600 bits per second Data: 8 bits Flow control: None Parity: None Stop bits: 1 Copyright © 2014, Juniper Networks, Inc. -
Page 58: Configuring A Junos Space Appliance As A Junos Space Node
IP address and subnet mask for the Ethernet interface eth0 IP address of the default gateway IP address of the name server (Optional) IP address and subnet mask for the Ethernet interface eth3, if you are configuring two Ethernet interfaces for IP connectivity Copyright © 2014, Juniper Networks, Inc. - Page 59 Enter the new password to log in to the appliance. Type to proceed with the configuration of the appliance as a Junos Space node with full Junos Space Network Management Platform functionality. Every Junos Space installation requires at least one Junos Space node. Copyright © 2014, Juniper Networks, Inc.
- Page 60 The IP address for accessing Junos Space via the Web GUI must be in the same subnet as the IP address configured for the Ethernet interface eth0, but must be a different IP address. Copyright © 2014, Juniper Networks, Inc.
- Page 61 Q> Quit and set up later R> Redraw menu Choice [ACQR]: Review the settings that you configured. You can change the settings, quit without applying the settings, or apply the settings. Do one of the following: Copyright © 2014, Juniper Networks, Inc.
- Page 62 If you quit the configuration without applying the settings, then all the settings are discarded. (Optional) If you have applied the settings, then type to quit. You are taken to the console login prompt. Copyright © 2014, Juniper Networks, Inc.
-
Page 63: Configuring A Junos Space Appliance As A Standalone Or Primary Fmpm Node
IP address of the name server. Virtual IP (VIP) address of the FMPM nodes that is used for communications between Junos Space nodes and FMPM nodes. This IP address must be in the same subnet Copyright © 2014, Juniper Networks, Inc. - Page 64 FMPM node. Type the IP address (in dotted decimal notation) for the Ethernet interface eth0 and press Enter. The configured IP address is used as the IP address of the FMPM node. Copyright © 2014, Juniper Networks, Inc.
- Page 65 Junos Space Settings Menu is displayed, as follows: Junos Space Settings Menu 1> Change Password 2> Change Network Settings 3> Change Time Options 4> Retrieve Logs 5> Security 6> (Debug) run shell Copyright © 2014, Juniper Networks, Inc.
- Page 66 Changing Network and System Settings for a Junos Space Appliance on page 58 Configuring a Junos Space Appliance as a Junos Space Node on page 46 Installing a Junos Space Image on a Junos Space Appliance Using a USB Drive on page 64 Copyright © 2014, Juniper Networks, Inc.
-
Page 67: Configuring A Junos Space Appliance As A Backup Or Secondary Fmpm Node For High Availability
To configure an appliance as a backup or secondary FMPM node, do the following: At the serial console login prompt, type the default username ( ) and press Enter. admin Type the default password ( abc123 ) and press Enter. You are prompted to change your password. Copyright © 2014, Juniper Networks, Inc. - Page 68 Type the IP address (in dotted decimal notation) of the default gateway for the Ethernet interface eth0 and press Enter. NOTE: The default gateway address must be the same as the one that you configured for the primary FMPM node. Copyright © 2014, Juniper Networks, Inc.
- Page 69 To quit the configuration without applying the settings, type CAUTION: If you quit the configuration without applying the settings, then all the settings are discarded. (Optional) If you have applied the settings, then type to quit. Copyright © 2014, Juniper Networks, Inc.
-
Page 70: Changing Network And System Settings For A Junos Space Appliance
Alternatively, you can connect to the appliance via telnet or SSH if the appliance is accessible via the network. Copyright © 2014, Juniper Networks, Inc. -
Page 71: Changing The Password For The Default User
To change the password, do the following: On the Junos Space Settings Menu, type at the prompt. Type when you are prompted to change the password for the admin user. Enter the current password and press Enter. Copyright © 2014, Juniper Networks, Inc. -
Page 72: Changing Network Settings
(Optional) To add or delete DNS servers, type at the prompt on the Change Network Settings menu. The DNS name server options menu is displayed. You can do the following: Type to add a DNS server. Copyright © 2014, Juniper Networks, Inc. - Page 73 We recommend that you ensure that the access to the gateway is available before adding a static route. To delete an existing static route, type the number corresponding to the static route that you want to delete, and follow the prompts on the CLI. Copyright © 2014, Juniper Networks, Inc.
-
Page 74: Changing The Time Zone And Ntp Servers
On the Junos Space Settings Menu, type at the prompt. On the subsequent menu, you can do the following: To save the log files to a USB device, type and follow the prompts on the CLI. Copyright © 2014, Juniper Networks, Inc. -
Page 75: Changing Firewall And Ssh Settings
You can access a shell and run shell commands that can help during debugging. Do the following: On the Junos Space Settings Menu, type at the prompt. You are prompted to enter a password. Type the password for the administrator (admin user). Copyright © 2014, Juniper Networks, Inc. -
Page 76: Applying Or Cancelling Changes To Settings
NTP Time Source for a Junos Space Appliance on page 9 Installing a Junos Space Image on a Junos Space Appliance Using a USB Drive This topic applies to the following Junos Space Appliances: JA1500 and JA2500. Copyright © 2014, Juniper Networks, Inc. - Page 77 DEL or Control-? character. Typically, this is accomplished by configuring the terminal utility to send a DEL or Control-? character when the Backspace key on the keyboard is pressed. Copyright © 2014, Juniper Networks, Inc.
- Page 78 To install a software image on a Junos Space Appliance using a USB drive, do the following: Plug the USB drive into the USB port of a laptop or PC that is connected to the Internet. Using a Web browser, navigate to the Juniper Networks software download site ), click http://www.juniper.net/support/downloads/...
- Page 79 You do this by sending the DEL or Control-? character three times as soon as you power the on the appliance. To access the appliance boot menu, do the following: a. Power on the appliance. Copyright © 2014, Juniper Networks, Inc.
- Page 80 At the boot prompt, type reinstall and press Enter. NOTE: If no input is provided for 30 seconds, the appliance boots from the local disk by default. Copyright © 2014, Juniper Networks, Inc.
-
Page 81: Powering Off The Junos Space Appliance
Network Management Platform User Guide (available at http://www.juniper.net/techpubs/en_US/release-independent/junos-space/index.html for details. This topic includes the following sections: Powering Off Using the Management Console on page 70 Powering Off Using the Appliance Power Switch on page 70 Copyright © 2014, Juniper Networks, Inc. -
Page 82: Powering Off Using The Management Console
Locate the appliance power switch on the back panel of the appliance chassis. Press the power switch and release it. The appliance displays output messages on the management console and then powers off. Copyright © 2014, Juniper Networks, Inc. - Page 83 Power Supply Module LED turns amber. Related General Electrical Safety Guidelines and Warnings on page 139 Documentation General Safety Guidelines and Warnings on page 113 Installing and Removing JA2500 Junos Space Appliance Hardware Components on page 89 Copyright © 2014, Juniper Networks, Inc.
- Page 84 JA2500 Junos Space Appliance Hardware Guide Copyright © 2014, Juniper Networks, Inc.
-
Page 85: Hardware Monitoring And Troubleshooting
PART 4 Hardware Monitoring and Troubleshooting Monitoring the Hardware on page 75 Troubleshooting the JA2500 Appliance on page 83 Copyright © 2014, Juniper Networks, Inc. - Page 86 JA2500 Junos Space Appliance Hardware Guide Copyright © 2014, Juniper Networks, Inc.
-
Page 87: Monitoring The Hardware
Purpose For optimal cooling of the Junos Space appliance, verify the condition of the fans. NOTE: This topic applies to the Junos Space JA1500 and Junos Space JA2500 appliances; each appliance has two hot-swappable cooling fans. Action Monitor the status of the fans. The cooling fans work in unison to cool the appliance components. - Page 88 In the output, fans 3 and 4 represent the two rear chassis fans. The speed of the fans (in revolutions per minute [RPM]) and an indication of an alarm, if any, are displayed. Related Maintaining the Junos Space Appliance on page 87 Documentation Copyright © 2014, Juniper Networks, Inc.
-
Page 89: Monitoring The Power Supply In A Junos Space Appliance
Monitoring the Power Supply in a Junos Space Appliance Purpose This topic applies to the Junos Space JA1500 and Junos Space JA2500 appliances. For optimal performance of the Junos Space appliance, verify the condition of the power supply module or modules installed in the appliance. -
Page 90: Monitoring The Raid Array For The Ja2500 Junos Space Appliance
Monitoring the RAID Array for the JA2500 Junos Space Appliance Purpose For optimal performance of the JA2500 appliance, monitor the status of the RAID volume installed in the appliance. Action Monitor the RAID controller for RAID failure events: Copyright © 2014, Juniper Networks, Inc. - Page 91 : SAS2308_1 BIOS version : 7.25.00.00 Firmware version : 16.00.00.00 Channel description : 1 Serial Attached SCSI Initiator ID Maximum physical devices : 1007 Concurrent commands supported : 8192 Slot : 33 Segment Device Copyright © 2014, Juniper Networks, Inc.
- Page 92 Device is a Hard disk Enclosure # Slot # SAS Address : 5000c50-0-33e6-0015 State : Optimal (OPT) Size (in MB)/(in sectors) : 953869/1953525167 Manufacturer : SEAGATE Model Number : ST91000640SS Firmware Revision : 0003 Copyright © 2014, Juniper Networks, Inc.
- Page 93 Protocol : SAS Drive Type : SAS_HDD ------------------------------------------------------------------------ Enclosure information ------------------------------------------------------------------------ Enclosure# Logical ID : 50010f30:00002de0 Numslots StartSlot ------------------------------------------------------------------------ SAS2IRCU: Command DISPLAY Completed Successfully. SAS2IRCU: Utility Completed Successfully. Run RAID consistency checks every month: Copyright © 2014, Juniper Networks, Inc.
- Page 94 Related Maintaining the Junos Space Appliance on page 87 Documentation Monitoring the Cooling Fans in a Junos Space Appliance on page 75 Monitoring the Power Supply in a Junos Space Appliance on page 77 Copyright © 2014, Juniper Networks, Inc.
-
Page 95: Troubleshooting The Ja2500 Appliance
-I eth3 interface ip address destination ip address If no packets are received, do the following: Verify the gateway IP address in the devint routing table by executing the following command from the shell: ip route show table devint Copyright © 2014, Juniper Networks, Inc. - Page 96 System Settings for a Junos Space Appliance” on page 58 for information about changing the default gateway for device management traffic. Check the physical connectivity of Ethernet interface eth3. Related Junos Space Ethernet Interfaces Overview on page 8 Documentation Copyright © 2014, Juniper Networks, Inc.
-
Page 97: Hardware Maintenance And Replacement
PART 5 Hardware Maintenance and Replacement Maintaining the Hardware on page 87 Replacing Hardware Components on page 89 Copyright © 2014, Juniper Networks, Inc. - Page 98 JA2500 Junos Space Appliance Hardware Guide Copyright © 2014, Juniper Networks, Inc.
-
Page 99: Maintaining The Hardware
Monitoring the Cooling Fans in a Junos Space Appliance on page 75 Documentation Monitoring the Power Supply in a Junos Space Appliance on page 77 Monitoring the RAID Array for the JA2500 Junos Space Appliance on page 78 Copyright © 2014, Juniper Networks, Inc. - Page 100 JA2500 Junos Space Appliance Hardware Guide Copyright © 2014, Juniper Networks, Inc.
-
Page 101: Replacing Hardware Components
Replacing the AC Power Supply Cord on a Junos Space Appliance on page 90 Replacing the DC Power Supply Module on a Junos Space Appliance on page 95 Replacing the DC Power Supply Cable on a Junos Space Appliance on page 94 Copyright © 2014, Juniper Networks, Inc. -
Page 102: Replacing The Ac Power Supply Cord On A Junos Space Appliance
L-shaped ends of the wire clip into the holes in the bracket on each side of the AC power cord inlet on the power supply module, as shown in Figure 15 on page Copyright © 2014, Juniper Networks, Inc. -
Page 103: Replacing The Ac Power Supply Module On A Junos Space Appliance
This topic applies to the following Junos Space Appliances: JA1500 and JA2500. Ensure that you have the following parts and tools available to remove the power supply module from the appliance chassis: (Optional) Electrostatic discharge (ESD) grounding strap Copyright © 2014, Juniper Networks, Inc. -
Page 104: Removing The Ac Power Supply Module
Figure 16: Removing the AC Power Supply Module 1— Power supply ejector lever Grasp the power supply handle and pull firmly to slide the power supply module halfway out of the appliance. Copyright © 2014, Juniper Networks, Inc. -
Page 105: Installing The Ac Power Supply Module
(not powering the appliance). Related AC Power Cord Specifications for Junos Space Appliances on page 12 Documentation AC Power Supply in Junos Space Appliances on page 13 Copyright © 2014, Juniper Networks, Inc. -
Page 106: Replacing The Dc Power Supply Cable On A Junos Space Appliance
Carefully remove the power cable from the DC power source. NOTE: Ensure that the cable is not touching or in the way of any components, and that it does not drape where people could trip on it. Copyright © 2014, Juniper Networks, Inc. -
Page 107: Connecting The Dc Power Supply Cable
Phillips (+) screwdriver, number 2 An antistatic bag or an antistatic mat NOTE: If only one power supply module is installed in your appliance, you must power off the appliance before replacing the power supply module. Copyright © 2014, Juniper Networks, Inc. -
Page 108: Removing The Dc Power Supply Module
Figure 18: Removing a DC Power Supply Module 1— Power supply ejector lever Grasp the handle of the power supply module and pull firmly to slide the power supply module halfway out of the chassis. Copyright © 2014, Juniper Networks, Inc. -
Page 109: Installing A Dc Power Supply Module
Replacing the DC Power Supply Cable on a Junos Space Appliance on page 94 Replacing the Fan on a Junos Space Appliance This topic applies to the Junos Space JA1500 and Junos Space JA2500 appliances. The Junos Space appliance ships with two field-replaceable fans that are hot-swappable. - Page 110 Ensure that you have the following parts and tools available to remove the fan from the appliance chassis: (Optional) Electrostatic discharge (ESD) grounding strap (Optional) An antistatic bag or an antistatic mat Removing the Fan on page 99 Installing the Fan on page 99 Copyright © 2014, Juniper Networks, Inc.
-
Page 111: Removing The Fan
Remove the replacement fan module from its antistatic bag. Insert the replacement fan into the slot for the fan module, as shown in Figure 23 on page 100, until the latch locks and you hear a clicking sound. Copyright © 2014, Juniper Networks, Inc. -
Page 112: Replacing The Hard Disk On A Ja2500 Junos Space Appliance
89 Replacing the Hard Disk on a JA2500 Junos Space Appliance The Junos Space JA2500 appliance ships with six hard disk drives in RAID 10 array configuration. The hot-swappable drives are externally accessible in field-replaceable trays. You can remove and replace a hard disk without powering off the appliance or disrupting any functions performed by the appliance. -
Page 113: Removing The Hard Disk
(Optional) Attach an ESD grounding strap to your bare wrist, and connect the strap to an external ESD point. Remove the replacement hard disk from its antistatic bag. Slide the hard disk into the hard disk slot. Copyright © 2014, Juniper Networks, Inc. - Page 114 When the drive is rebuilt, the red LED goes out. Related Field-Replaceable Units on the JA2500 Junos Space Appliance on page 11 Documentation Installing and Removing JA2500 Junos Space Appliance Hardware Components on page 89 Copyright © 2014, Juniper Networks, Inc.
-
Page 115: Returning Hardware
PART 6 Returning Hardware Returning the Appliance or Appliance Components on page 105 Copyright © 2014, Juniper Networks, Inc. - Page 116 JA2500 Junos Space Appliance Hardware Guide Copyright © 2014, Juniper Networks, Inc.
-
Page 117: Returning The Appliance Or Appliance Components
Returning a JA2500 Junos Space Appliance or Component for Repair or Replacement If you need to return a JA2500 appliance or hardware component (field-replaceable unit [FRU]) to Juniper Networks for repair or replacement, do the following: Determine the serial number of the appliance or component. For instructions, see “Locating the Serial Number on a JA2500 Junos Space Appliance or Component”... -
Page 118: Listing The Ja2500 Appliance Details Using The Junos Space Cli
Locating the Serial Number on a JA2500 Junos Space Appliance or Component If you are returning a JA2500 Junos Space Appliance or hardware component to Juniper Networks for repair or replacement, you need to provide the serial number of the appliance or component to the Juniper Networks Technical Assistance Center (JTAC) when you contact them to obtain Return Materials Authorization (RMA) number. -
Page 119: Locating The Chassis Serial Number Id Label On A Ja2500 Appliance
Hard Disks—The serial number ID label is on the top of the hard disk. Related Contacting Customer Support to Obtain Return Materials Authorization for Junos Space Documentation Appliances on page 108 Packing a JA2500 Junos Space Appliance or Component for Shipping on page 109 Copyright © 2014, Juniper Networks, Inc. -
Page 120: Contacting Customer Support To Obtain Return Materials Authorization For Junos Space Appliances
Contacting Customer Support to Obtain Return Materials Authorization for Junos Space Appliances If you are returning a Junos Space Appliance or hardware component to Juniper Networks for repair or replacement, obtain a Return Materials Authorization (RMA) number from Juniper Networks Technical Assistance Center (JTAC). -
Page 121: Packing A Ja2500 Junos Space Appliance Or Component For Shipping
Packing a JA2500 Junos Space Appliance or Component for Shipping If you are returning a JA2500 Junos Space Appliance or component (field-replaceable unit [FRU]) to Juniper Networks for repair or replacement, pack the item as described in this topic. Before you begin packing the appliance or component, do the following: Obtain a Return Materials Authorization (RMA) number for the appliance or the component. -
Page 122: Packing Components Of The Ja2500 Appliance For Shipping
Write the RMA number on the exterior of the box to ensure proper tracking. Related Contacting Customer Support to Obtain Return Materials Authorization for Junos Space Documentation Appliances on page 108 Locating the Serial Number on a JA2500 Junos Space Appliance or Component on page 106 Copyright © 2014, Juniper Networks, Inc. -
Page 123: Safety Information
PART 7 Safety Information General Safety Information on page 113 Radiation and Laser Warnings on page 119 Installation and Maintenance Safety Information on page 125 Power and Electrical Safety Information on page 139 Copyright © 2014, Juniper Networks, Inc. - Page 124 JA2500 Junos Space Appliance Hardware Guide Copyright © 2014, Juniper Networks, Inc.
-
Page 125: General Safety Information
Never attempt to lift an object that is too heavy for one person to handle. Never install or manipulate wiring during electrical storms. Never install electrical jacks in wet locations unless the jacks are specifically designed for wet environments. Operate the appliance only when it is properly grounded. Copyright © 2014, Juniper Networks, Inc. -
Page 126: Definitions Of Safety Warning Levels
You need to observe the specified guidelines to avoid minor injury or discomfort to you or severe damage to the device. WARNING: This symbol alerts you to the risk of personal injury from a laser. Copyright © 2014, Juniper Networks, Inc. - Page 127 ¡Atención! Este símbolo de aviso significa peligro. Existe riesgo para su integridad física. Antes de manipular cualquier equipo, considerar los riesgos que entraña la corriente eléctrica y familiarizarse con los procedimientos estándar de prevención de accidentes. Copyright © 2014, Juniper Networks, Inc.
-
Page 128: Fire Safety Requirements
In addition, you should establish procedures to protect your equipment in the event of a fire emergency. Juniper Networks products should be installed in an environment suitable for electronic equipment. We recommend that fire suppression equipment be available in the event of a fire in the vicinity of the equipment and that all local fire, safety, and electrical codes and ordinances be observed when you install and operate your equipment. -
Page 129: Qualified Personnel Warning
To keep warranties effective, do not use a dry chemical fire extinguisher to control a fire at or near a Junos Space appliance or other network device provided by Juniper Networks. If a dry chemical fire extinguisher is used, the unit is no longer eligible for coverage under a service agreement. -
Page 130: Warning Statement For Norway And Sweden
Advarsel Apparatet skal kobles til en jordet stikkontakt. Varning! Apparaten skall anslutas till jordat nätuttag. Related General Safety Guidelines and Warnings on page 113 Documentation Definitions of Safety Warning Levels on page 114 Copyright © 2014, Juniper Networks, Inc. -
Page 131: Radiation And Laser Warnings
The lens in the human eye focuses all the laser power on the retina, so focusing the eye directly on a laser source—even a low-power laser—could permanently damage the eye. Class 1 Laser Product Warning WARNING: Class 1 laser product. Waarschuwing Klasse-1 laser produkt. Copyright © 2014, Juniper Networks, Inc. -
Page 132: Class 1 Led Product Warning
Aviso Produto de classe 1 com LED. ¡Atención! Aviso sobre producto LED de Clase 1. Varning! Lysdiodprodukt av klass 1. Laser Beam Warning WARNING: Do not stare into the laser beam or view it directly with optical instruments. Copyright © 2014, Juniper Networks, Inc. - Page 133 Related General Safety Guidelines and Warnings on page 113 Documentation Grounded Equipment Warning on page 131 Installation Instructions Warning on page 125 Radiation from Open Port Apertures Warning on page 122 Copyright © 2014, Juniper Networks, Inc.
-
Page 134: Radiation From Open Port Apertures Warning
öppningar. Related General Safety Guidelines and Warnings on page 113 Documentation Grounded Equipment Warning on page 131 Installation Instructions Warning on page 125 Copyright © 2014, Juniper Networks, Inc. - Page 135 Chapter 14: Radiation and Laser Warnings Laser and LED Safety Guidelines and Warnings for Junos Space Appliances on page 119 Copyright © 2014, Juniper Networks, Inc.
- Page 136 JA2500 Junos Space Appliance Hardware Guide Copyright © 2014, Juniper Networks, Inc.
-
Page 137: Installation And Maintenance Safety Information
Avvertenza Consultare le istruzioni di installazione prima di collegare il sistema all'alimentatore. Advarsel Les installasjonsinstruksjonene før systemet kobles til strømkilden. Aviso Leia as instruções de instalação antes de ligar o sistema à sua fonte de energia. Copyright © 2014, Juniper Networks, Inc. -
Page 138: Chassis Lifting Guidelines For Junos Space Appliances
Mounting the JA2500 Junos Space Appliance on page 32 Ramp Warning This topic applies to the following Junos Space Appliances: JA1500 and JA2500. WARNING: When installing the device, do not use a ramp inclined at more than 10 degrees. Copyright © 2014, Juniper Networks, Inc. -
Page 139: Rack-Mounting Warnings
If the rack is provided with stabilizing equipment, install the stabilizers before mounting or servicing the device in the rack. Waarschuwing Om lichamelijk letsel te voorkomen wanneer u dit toestel in een rek monteert of het daar een servicebeurt geeft, moet u speciale Copyright © 2014, Juniper Networks, Inc. - Page 140 Les directives ci-dessous sont destinées à assurer la protection du personnel: Le rack sur lequel est monté le Juniper Networks device doit être fixé à la structure du bâtiment. Si cette unité constitue la seule unité montée en casier, elle doit être placée dans le bas.
- Page 141 Le seguenti direttive vengono fornite per garantire la sicurezza personale: Il Juniper Networks device deve essere installato in un telaio, il quale deve essere fissato alla struttura dell'edificio. Questa unità deve venire montata sul fondo del supporto, se si tratta dell'unica unità...
- Page 142 Para garantizar su seguridad, proceda según las siguientes instrucciones: El Juniper Networks device debe instalarse en un bastidor fijado a la estructura del edificio. Colocar el equipo en la parte inferior del bastidor, cuando sea la única unidad en el mismo.
-
Page 143: Grounded Equipment Warning
General Electrical Safety Guidelines and Warnings on page 139 Documentation General Safety Guidelines and Warnings on page 113 Maintenance and Operational Safety Guidelines and Warnings This topic applies to the following Junos Space Appliances: JA1500 and JA2500. Copyright © 2014, Juniper Networks, Inc. -
Page 144: Battery Handling Warning
Aviso Existe perigo de explosão se a bateria for substituída incorrectamente. Substitua a bateria por uma bateria igual ou de um tipo equivalente recomendado pelo fabricante. Destrua as baterias usadas conforme as instruções do fabricante. Copyright © 2014, Juniper Networks, Inc. -
Page 145: Jewelry Removal Warning
Advarsel Fjern alle smykker (inkludert ringer, halskjeder og klokker) før du skal arbeide på utstyr som er koblet til kraftledninger. Metallgjenstander som Copyright © 2014, Juniper Networks, Inc. -
Page 146: Lightning Activity Warning
Aviso Não trabalhe no sistema ou ligue e desligue cabos durante períodos de mau tempo (trovoada). ¡Atención! No operar el sistema ni conectar o desconectar cables durante el transcurso de descargas eléctricas en la atmósfera. Copyright © 2014, Juniper Networks, Inc. -
Page 147: Operating Temperature Warning
To prevent the device from overheating, do not operate it in an area that exceeds the maximum recommended ambient temperature of 104° F (40° C) for network devices of Juniper Networks. To prevent airflow restriction, allow at least 6 in. (15.2 cm) of clearance around the ventilation openings. -
Page 148: Product Disposal Warning
JA2500 Junos Space Appliance Hardware Guide ¡Atención! Para impedir que un encaminador de la serie Juniper Networks device se recaliente, no lo haga funcionar en un área en la que se supere la temperatura ambiente máxima recomendada de 40° C. Para impedir la restricción de la entrada de aire, deje un espacio mínimo de 15,2 cm alrededor... - Page 149 General Safety Guidelines and Warnings on page 113 Grounded Equipment Warning on page 131 Installation Instructions Warning on page 125 Laser and LED Safety Guidelines and Warnings for Junos Space Appliances on page 119 Copyright © 2014, Juniper Networks, Inc.
- Page 150 JA2500 Junos Space Appliance Hardware Guide Copyright © 2014, Juniper Networks, Inc.
-
Page 151: Power And Electrical Safety Information
The addition of primary protectors is not sufficient protection for connecting these interfaces metallically to OSP wiring. CAUTION: Before removing or installing components of a device, attach an electrostatic discharge (ESD) grounding strap to an ESD point and place the Copyright © 2014, Juniper Networks, Inc. -
Page 152: Preventing Electrostatic Discharge Damage
General Safety Guidelines and Warnings on page 113 Multiple Power Supplies Disconnection Warning on page 151 TN Power Warning on page 151 Preventing Electrostatic Discharge Damage This topic applies to the following Junos Space Appliances: JA1500 and JA2500. Copyright © 2014, Juniper Networks, Inc. - Page 153 Figure 28: Place a Component into an Antistatic Bag CAUTION: ANSI/TIA/EIA-568 cables such as Category 5e and Category 6 can get electrostatically charged. To dissipate this charge, always ground Copyright © 2014, Juniper Networks, Inc.
-
Page 154: Ac Power Electrical Safety Guidelines
The socket outlet must be near the AC-powered device and be easily accessible. For devices that have more than one power supply connection, you must ensure that all power connections are fully disconnected so that power to the device is completely Copyright © 2014, Juniper Networks, Inc. -
Page 155: Ac Power Disconnection Warning
Avvertenza Prima di lavorare su un telaio o intorno ad alimentatori, scollegare il cavo di alimentazione sulle unità CA. Advarsel Før det utføres arbeid på kabinettet eller det arbeides i nærheten av strømforsyningsenheter, skal strømledningen trekkes ut på vekselstrømsenheter. Copyright © 2014, Juniper Networks, Inc. -
Page 156: Dc Power Electrical Safety Guidelines
NEC ANSI/NFPA 70. Ensure that the polarity of the DC input wiring is correct. Under certain conditions, connections with reversed polarity might trip the primary circuit breaker or damage the equipment. Copyright © 2014, Juniper Networks, Inc. -
Page 157: Dc Power Disconnection Warning
KATKAISTU-asentoon ja teippaa suojakytkimen varsi niin, että se pysyy KATKAISTU-asennossa. Attention Avant de pratiquer l'une quelconque des procédures ci-dessous, vérifier que le circuit en courant continu n'est plus sous tension. Pour en être Copyright © 2014, Juniper Networks, Inc. - Page 158 DC Power Electrical Safety Guidelines on page 144 Documentation DC Power Grounding Requirements and Warning on page 147 DC Power Wiring Sequence Warning on page 148 DC Power Wiring Terminations Warning on page 149 Copyright © 2014, Juniper Networks, Inc.
-
Page 159: Dc Power Grounding Requirements And Warning
DC Power Electrical Safety Guidelines on page 144 Documentation DC Power Disconnection Warning on page 145 DC Power Wiring Sequence Warning on page 148 DC Power Wiring Terminations Warning on page 149 General Electrical Safety Guidelines and Warnings on page 139 Copyright © 2014, Juniper Networks, Inc. -
Page 160: Dc Power Wiring Sequence Warning
Aviso Ate con alambre la fuente de potencia cc Usando los terminales apropiados en el extremo del cableado. Al conectar potencia, la secuencia apropiada del cableado se muele para moler, +RTN a +RTN, entonces –45 V Copyright © 2014, Juniper Networks, Inc. -
Page 161: Dc Power Wiring Terminations Warning
Varoitus Jos säikeellinen johdin on tarpeen, käytä hyväksyttyä johdinliitäntää, esimerkiksi suljettua silmukkaa tai kourumaista liitäntää, jossa on ylöspäin käännetyt kiinnityskorvat. Tällaisten liitäntöjen tulee olla kooltaan johtimiin sopivia ja niiden tulee puristaa yhteen sekä eristeen että johdinosan. Copyright © 2014, Juniper Networks, Inc. - Page 162 DC Power Grounding Requirements and Warning on page 147 DC Power Wiring Sequence Warning on page 148 General Electrical Safety Guidelines and Warnings on page 139 General Safety Guidelines and Warnings on page 113 Copyright © 2014, Juniper Networks, Inc.
-
Page 163: Multiple Power Supplies Disconnection Warning
¡Atención! El equipo está diseñado para trabajar con sistemas de alimentación tipo TN. Varning! Enheten är konstruerad för användning tillsammans med elkraftssystem av TN-typ. Related General Electrical Safety Guidelines and Warnings on page 139 Documentation General Safety Guidelines and Warnings on page 113 Copyright © 2014, Juniper Networks, Inc. -
Page 164: Action To Take After An Electrical Accident
AC Power Electrical Safety Guidelines on page 142 Documentation DC Power Electrical Safety Guidelines on page 144 General Electrical Safety Guidelines and Warnings on page 139 General Safety Guidelines and Warnings on page 113 Copyright © 2014, Juniper Networks, Inc. -
Page 165: Compliance Information
PART 8 Compliance Information Compliance Information on page 155 Copyright © 2014, Juniper Networks, Inc. - Page 166 JA2500 Junos Space Appliance Hardware Guide Copyright © 2014, Juniper Networks, Inc.
-
Page 167: Compliance Information
Compliance Statements for Acoustic Noise for JA2500 on page 158 Declaration of Conformity for JA2500 Junos Space Appliance on page 159 Agency Approvals for JA2500 The Junos Space JA2500 appliance complies with the following standards: Safety CAN/CSA-C22.2 No. 60950-1 (2007) Information Technology Equipment UL 60950-1 (2nd Ed.) Information Technology Equipment... -
Page 168: Compliance Statements For Emc Requirements For Ja2500
Repairs to certified equipment should be made by an authorized Canadian maintenance facility designated by the supplier. Any repairs or alterations made by the user to this equipment, or equipment malfunctions, might give the telecommunications company cause to request the user to disconnect the equipment. Copyright © 2014, Juniper Networks, Inc. -
Page 169: European Community
This equipment generates, uses, and can radiate radio frequency energy and, if not installed and used in accordance with the instruction manual, Copyright © 2014, Juniper Networks, Inc. -
Page 170: Fcc Part 15 Statement
Compliance Statements for Acoustic Noise for JA2500 on page 158 Compliance Statements for Acoustic Noise for JA2500 This topic applies to the Junos Space JA2500 appliance. Maschinenlärminformations-Verordnung - 3. GPSGV, der höchste Schalldruckpegel beträgt 70 dB(A) oder weniger gemäss EN ISO 7779 Translation: The emitted sound pressure is below 70 dB(A) per EN ISO 7779. -
Page 171: Declaration Of Conformity For Ja2500 Junos Space Appliance
Declaration of Conformity for JA2500 Junos Space Appliance Related Agency Approvals for JA2500 on page 155 Documentation Compliance Statements for Acoustic Noise for JA2500 on page 158 Compliance Statements for EMC Requirements for JA2500 on page 156 Copyright © 2014, Juniper Networks, Inc. - Page 172 JA2500 Junos Space Appliance Hardware Guide Copyright © 2014, Juniper Networks, Inc.
- Page 173 PART 9 Index Index on page 163 Copyright © 2014, Juniper Networks, Inc.
- Page 174 JA2500 Junos Space Appliance Hardware Guide Copyright © 2014, Juniper Networks, Inc.
- Page 175 JTAC...............xii contacting JTAC for hardware return....108 backup FMPM node information required for hardware return...108 configuring................55 battery handling................132 booting, Junos Space Appliance........45 braces, in configuration statements........xi Copyright © 2014, Juniper Networks, Inc.
- Page 176 ESD grounding strap removing................101 verifying resistance............141 replacing................100 ESD wrist strap hard drives verifying resistance............141 serial number label............107 eth3 connectivity hardware components troubleshooting..............83 installing................89 Ethernet cables, connecting..........42 removing................89 Ethernet interfaces, replacing................89 eth0..................8 eth3..................8 overview................8 Copyright © 2014, Juniper Networks, Inc.
- Page 177 Class 1 product warning..........119 password safety guidelines............119 LEDs changing................59 appliance................5 modifying................59 power supply chassis..................5 monitoring.................77 Class 1 product warning..........120 power supply module..............6 Ethernet................5 power switch See appliance power switch hard drive................5 powering down................69 LAN..................5 power..................5 Copyright © 2014, Juniper Networks, Inc.
- Page 178 LEDs..............119 contacting JTAC...............xii lightning activity............134 contacting JTAC for hardware return....108 maintenance and operation........131 information required for hardware return...108 multiple power supplies disconnection....151 temperature, warning............135 Copyright © 2014, Juniper Networks, Inc.
- Page 179 LED..............119 lightning activity............134 maintenance and operational........131 multiple power supplies disconnection....151 open port apertures radiation..............122 operating temperature..........135 product disposal............136 qualified personnel............117 rack-mounting requirements........127 ramp angle..............126 ramps................126 safety..................114 TN power system............151 Copyright © 2014, Juniper Networks, Inc.
- Page 180 JA2500 Junos Space Appliance Hardware Guide Copyright © 2014, Juniper Networks, Inc.