
Related Manuals for Value Hobby Aviator Trainer25 ARF


Summary of Contents for Value Hobby Aviator Trainer25 ARF
-
Page 1: Instruction Manual
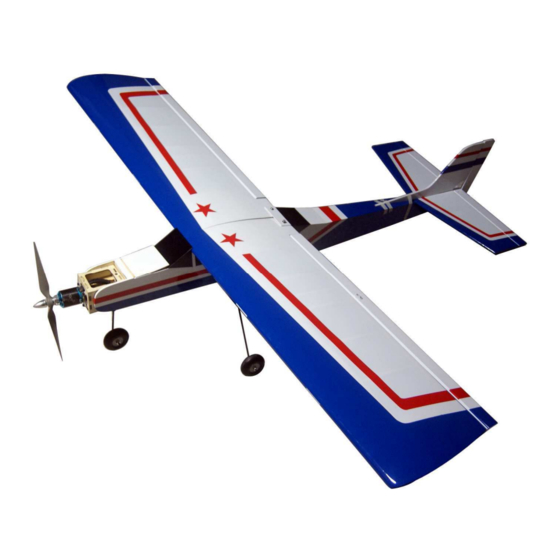
Aviator Trainer25 ARF Instruction Manual Specifications Wingspan: 54.3in (1380mm) Length: 45.2in (1150mm) Wing Area: 438sq in (34sq dm) Flying Weight: 3.8lbs (1700g) -
Page 2: Dear Customer
Further, Value Hobby reserves the right to modify this warranty without notice. Value Hobby has no control over the final stages of assembly or the material used for the final assembly. No liability shall be assumed nor materials used for the final user-assembled product. By the act of using the final product the user accepts all resulting liability. -
Page 3: Safety In Flying
Examination Unpack your airplane and examine the components. Check for damage of any kind. If you see any damage, please contact Value Hobby immediately. Covering Your airplane was packed in plastic at the factory without any wrinkles in the covering. You may notice some wrinkles now;... - Page 4 www.valuehobby.com/aviator-trainer-25-arf.html RECOMMENDED RADIO EQUIPMENT Product Quantity Flysky T6 6CH Radio FLY-RC-2563 Radio 4 electric Servo Towerpro SG5010 Standard Servo TWP-SV-0368 5 nitro Universal Servo Y-Harness 12-Inch (Futaba "J" and JR Compatible) AMS-AC-0869 Y-Harness Universal Servo Extension 12-Inch (Futaba "J" and JR Compatible) AMS-AC-0560 Extension RECOMMENDED POWER SETUP...
- Page 5 www.valuehobby.com/aviator-trainer-25-arf.html Main Parts: Accessories:...
- Page 6 www.valuehobby.com/aviator-trainer-25-arf.html Pack 1: Steering Arm x 1 PU Wheel x 3 Φ55*24mm (1.0inch) Wheel Collar x 7 Landing Gear Strap x 2 Self-tapping Screws for Landing Gear Strap x 4 M3*12mm (0.5inch) Pack2: 180cc Fuel Tank x 1 Pack3: Electric Motor Mount x 1 Socket Head Screw M3*15mm (0.6inch) x 8 M3 Nut x 4 Washer x 4...
-
Page 7: Section1. Aileron Installation
Step4. Saturate each hinges with thin CA. make Section1. Aileron Installation sure to glue both the top and bottom. Once CA has cured, gently pull on the aileron to make sure the Step1. Place T-pin or something similar to this in hinges are secure. -
Page 8: Section2. Aileron Servo & Linkage Installation
www.valuehobby.com/aviator-trainer-25-arf.html Step4. Use a drill bit to drill four mounting holes for Section2. Aileron Servo & Linkage the servo. Installation Step1. Locate the items shown in picture. (Servos sold separately.) Step5. Install the servo onto the wing using four self-tapping screws provided with the servo. Step2. -
Page 9: Section3. Wing Installation
www.valuehobby.com/aviator-trainer-25-arf.html Step8. Thread a clevis to the aileron servo pushrod Step11. With the control surface centered, tighten Φ1.8x150mm (6.0inch)), and connect the the screw to secure the pushrod to the servo arm. clevis to the control horn. Step12. Repeat steps 1 through 11 to install the remaining aileron servo &... -
Page 10: Section4. Tail Set Installation
www.valuehobby.com/aviator-trainer-25-arf.html Step3. Locate the items shown in the picture. Section4. Tail Set Installation Step1. Remove the covering for the slots on the fuselage and horizontal stabilizer. Step4. Use the hobby knife to remove the coverings to expose the holes on the wing and wing bolt plate. - Page 11 www.valuehobby.com/aviator-trainer-25-arf.html Step4. Use a felt-tipped pen to trace the outline of Step6. Use the epoxy to glue the fin and stabilizer the fin on the stabilizer and fuselage. to the fuselage. (Adjust the fin and stabilizer to make it satisfy the requirements in step3.) Step7.
-
Page 12: Section5. Rudder Elevator Servo & Linkage Installation
www.valuehobby.com/aviator-trainer-25-arf.html Step2. Thread a clevis to the pushrod, and connect Section5. Rudder Elevator Servo & a control horn to the clevis. Linkage Installation We recommend you to install the rudder servo on the left tray, elevator servo on the right tray. Step3. - Page 13 www.valuehobby.com/aviator-trainer-25-arf.html Step5. Locate the items for nose wheel installation. Step8. Connect the pushrod for nose wheel to the steering arm. Step6. Assemble the nose wheel as shown. Step9. Install the nose wheel to the fuselage. The nose wheel mount is installed in factory. Step7.
-
Page 14: Section6. Nitro Engine Installation
www.valuehobby.com/aviator-trainer-25-arf.html Step10. Install two servos to the fuselage. With Section6. Nitro Engine Installation rudder elevator and steering arm centered, tighten the screw to secure the pushrods to the arm. Step1. Position the nitro engine on the fuselage. Step11. Install the electric motor to the mount. Step2. - Page 15 www.valuehobby.com/aviator-trainer-25-arf.html Step4. Install the throttle servo. Move the servo Step6. Fit the stopper assembly into the tank with the vent line pointing toward the top of the tank, but not the throttle open position using the radio system. touching. The fuel tubing and clunks (fuel pickup) on Manually move the throttle arm on the carburetor the carburetor and fill lines should almost reach the to the open position.
-
Page 16: Section7. Landing Gear Installation
www.valuehobby.com/aviator-trainer-25-arf.html Step3. Repeat steps 2 through 3 to install the other Section7. Landing Gear Installation wheel. Step1. Locate the items for installing main landing gear Step4. Use a hobby knife to remove the coverings from the fuselage for the landing gear. Step2. -
Page 17: Section8. Set Cg And Control Throws
www.valuehobby.com/aviator-trainer-25-arf.html Section8. Set CG and Control Throws For the first flight, the recommended CG is 83.4mm (3.3inch) behind the leading edge of the wing against the fuselage. Use the battery pack, moving it forward or backward to achieve the correct balance. - Page 18 www.valuehobby.com 2013-4-9...
Need help?
Do you have a question about the Aviator Trainer25 ARF and is the answer not in the manual?
Questions and answers