Table of Contents
Advertisement
Quick Links
Advertisement
Table of Contents
Troubleshooting

Related Manuals for GeoVision GV-Mini


Summary of Contents for GeoVision GV-Mini
- Page 1 GV-Mini DVR System V2 User’s Manual User’s Manual...
- Page 2 Under the copyright laws, this manual may not be copied, in whole or in part, without the written consent of GeoVision. Every effort has been made to ensure that the information in this manual is accurate. GeoVision is not responsible for printing or clerical errors.
- Page 3 GV-Mini DVR System V2 Welcome to the GV-Mini DVR System V2 User’s Manual. The Manual provides an overview of the GV-Mini DVR System V2 and its accessories. It also includes the instructions to guide you through the installation and use of the GV-Mini DVR System V2: •...
-
Page 5: Table Of Contents
3.3 Hot Swap Drive Bay ....................16 3.4 Configuring an IP Address..................27 3.5 Extended Installation ....................29 3.6 Recovery DVD......................31 3.7 Updating GV-Mini DVR System V2 ................33 Chapter 4 DVR Health Analysis ................34 4.1 System Settings......................34 4.2 System Log......................36 4.3 Information of Your Computer System..............37 4.4 Health Analysis Form....................39... -
Page 6: Regulatory Notices
Regulatory Notices FCC Notice This equipment has been tested and found to comply with the limits for a Class A digital device, pursuant to part 15 of the FCC Rules. These limits are designed to provide reasonable protection against harmful interference when the equipment is operated in a commercial environment. -
Page 7: Safety Instructions
Regulatory Notices Safety Instructions Observe these safety instructions to help ensure against injury to yourself and damage to the product. Read all safety and installation instructions before you operate the product. Do not operate the product in high humidity areas or expose it to water or moisture. Do not put the product in an unstable, a slanting or vibrated place. -
Page 8: Chapter 1 Introduction
Chapter 1 Introduction 1.1 Unpacking The GV-Mini DVR V2 package includes the following items: Important: Please keep the original carton and all packing materials for future shipping need. 1. GV-Mini DVR System V2 x 1 2. GV-Keyboard Package x 1 3. - Page 9 Introduction D-Type Audio Cable x 2 (1 x 1-8 Channels Red Cable, 1 x 9-16 Channels Red Cable) *ONLY supplied with GV-1480M V2, GV-1240M V2 and GV-1120M V2 D-Type Audio and Video Cable x 1 *ONLY supplied with GV-2004M V2 D-Type Audio and Video Cable x 2 *ONLY supplied with GV-2008M V2 Self-Stick Rubber Pad x 6...
- Page 10 Surveillance System New Feature Guide x 1 Surveillance System Installation Guide x 1 GV-Mini DVR System V2 User’ s Manual x 1 GV-Mini DVR System V2 Quick Start Guide x 1 If any of the items are missing or damaged, contact your dealer to arrange a replacement.
-
Page 11: Models
Introduction 1.2 Models The GV-Mini DVR V2 has the following models: GV-2008M V2 - Eight-channel digital video recorder - Records up to 240 (NTSC) / 200 (PAL) fps at the D1 resolution GV-2004M V2 - Four-channel digital video recorder - Records up to 120 (NTSC) / 100 (PAL) fps at the D1 resolution... -
Page 12: Options
Swap Drive Bay and two in GV-Mini DVR V2, can be installed. Note: 1. The purchased GV-series cards will be added on the GV-Mini DVR V2 before shipment. 2. Note that the purchase of GV-Multi Quad Card will replace the default installation of... -
Page 13: Chapter 2 Overview
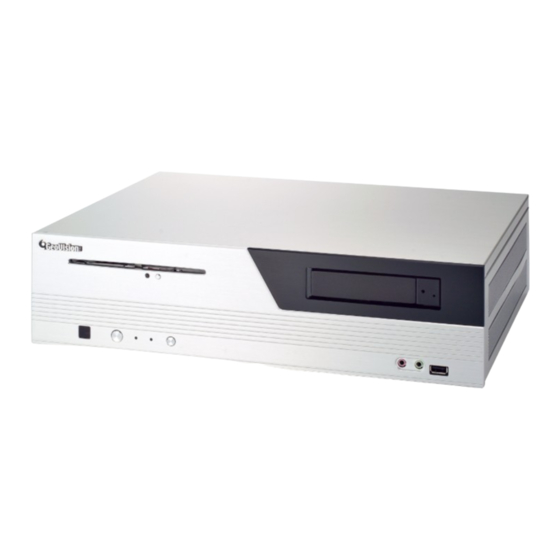
Overview Chapter 2 Overview 2.1 Front View Figure 1 DVD-ROM Drive Microphone DVD-ROM Drive Read LED Reset Button DVD-ROM Drive Eject Button 10 HDD Read / Write LED Hot Swap Drive Bay Power LED Hot Swap Drive Eject Button 12 Power Button USB Port 13 IR Remote Control Receiver Speaker... -
Page 14: Rear View
2.2 Rear View GV-2008M V2 / GV-2004M V2 / GV-1480M V2 / GV-1240M V2 / GV-1120M V2 Figure 2 Important: On the rear panels of GV-2004M V2 and GV-2008M V2, the D-Type Audio Ports (No.3, Figure 2) are not functional. PS/2 Mouse Input Audio Line In Port PS/2 Keyboard Input... - Page 15 GV-800M V2 Owing to the installation of different GV Video Capture Cards, the rear panel may vary from model to model of GV-Mini DVR V2 series. Figure 2 presents the rear panel of GV-2008M V2, GV-2004M V2, GV-1480M V2, GV-1240M V2 and GV-1120M V2.
-
Page 16: Chapter 3 Getting Started
Chapter 3 Getting Started 3.1 Basic Installation Basic installation describes all the equipments required to program and operate the GV-Mini DVR V2. Figure 4 1. Using the RJ-45 cable, connect one end to either of Ethernet ports and the other end to Network. -
Page 17: Turning On The Power
Getting Started 3.2 Turning on the Power Once the above hardware is properly connected, it is the time to turn on the GV-Mini DVR V2. To turn on the power, follow these steps: 1. Turn on the monitor. Figure 5 2. -
Page 18: Hot Swap Drive Bay
3.3 Hot Swap Drive Bay The GV-Mini DVR V2 uses the Hot Swap Drive Bay for video and audio data storage. Before recording, ensure to mount a hard drive in the Drive Bay and format it. Mounting the HDD in the Hot Swap Drive Bay 1. -
Page 19: Getting Started
Figure 10 Formatting the Hard Drive After inserting a hard drive into your GV-Mini DVR V2, you need to format it before it can be used. 1. Go to the GV-Desktop, click the Programs button, and then select Disk Management. - Page 20 2. The Initialize and Convert Disk Wizard appears. Click Next to continue. Figure 12 3. The disk is selected. Click Next to continue. Figure 13...
- Page 21 Getting Started 4. The screen gives you the option to convert the drive from basic to dynamic storage. Leave the drive unchecked, and click Next to continue. Figure 14 5. When the initialization is complete, click Finish to close the wizard. Figure 15...
- Page 22 6. In the Disk Management window, right-click the new drive, and select New Partition… . Figure 16 7. The New Partition Wizard appears. Click Next to continue. Figure 17...
- Page 23 Getting Started 8. The default partition type is primary. Click Next to continue. Figure 18 9. The default partition size is the same as the maximum disk space. Make changes if necessary. Click Next to continue. Figure 19...
- Page 24 10. The default drive path is E. Select Assign the following drive letter: and then click Next. Figure 20 11. Type a name in the Volume label box, and click Next to continue. Figure 21...
- Page 25 Getting Started 12. When the formatting is complete, click Finish to close the wizard. Figure 22 13. In the Disk Management window, if the drive is successfully initialized, partitioned, and formatted, its status description should display “Healthy.” Figure 23...
- Page 26 Adding the Hot Swap Drive to Recording Path Before recording, you need to add the formatted hard drive to the recording path. The default recording path is E:\. 1. On the GV-Desktop, click the Programs button, and then select Hot Swap HDD Tool. Figure 24 2.
- Page 27 Getting Started 3. If a hard drive is not inserted, follow these steps: Insert a hot-swap hard drive or plug a portable hard drive to your GV-Mini DVR V2. This dialog box appears. Figure 25 Select Add to recording path, and select the storage group from the drop-down list.
- Page 28 Replacing the Hard Drive You can replace the hard drive in the Hot Swap Drive Bay without shutting down the GV-Mini DVR V2. 1. If your GV-System is recording, stop it first. 2. Press the key in the lock hole. See Figure 7.
-
Page 29: Configuring An Ip Address
GV-Mini DVR V2 over a network connection. The GV-Mini DVR V2 is enabled for DHCP network. An IP address will be automatically allocated when the GV-Mini DVR V2 is powered up. Despite the DHCP setting, it is recommended that a static IP address be configured on the unit. - Page 30 5. Configure a static IP address on the Windows XP platform. Check your network administrator if you have questions about the configuration. Figure 28 Back to GV-Desktop Click the Windows Start button, point to All Programs, click GVCombo, and click Key Lock Utility.
-
Page 31: Extended Installation
For details on the GV-Keyboard, find the Installation Manual included in its own package. Figure 30 It is also possible to plug the Keyboard into other USB ports of the GV-Mini DVR V2. For this, you must modify the default COM port on the Mulitcam Controller pop-up once the Keyboard... - Page 32 Figure 31-2 IR Remote Control The IR Remote Control provides easy control of the GV-Mini DVR V2. Its receiver is built in the GV-Mini DVR V2. For details on the IR Remote Control, find its User’s Manual included in the Service Pack.
-
Page 33: Recovery Dvd
C and all of your files are still stored at other partitions. 1. Insert the Recovery DVD, and restart the GV-Mini DVR V2. 2. The message “Are you sure want to recover C partition?” will appear. Click Yes. - Page 34 Configuring the GV-Mini DVR V2 for PAL After Recovery The default video standard of the Recovery DVD is set to NTSC. If the video standard in your country is PAL, remember to configure the GV-Mini DVR V2 for PAL after using the Recovery DVD: 1.
-
Page 35: Updating Gv-Mini Dvr System V2
Getting Started 3.7 Updating GV-Mini DVR System V2 GeoVision will periodically release the updated Recovery DVD including the latest GV-System Software (Multicam Surveillance System) and Windows updates. If you like to update your GV-Mini DVR System V2, contact your dealer to get one. -
Page 36: Chapter 4 Dvr Health Analysis
It is recommended to have the health analysis during the first week after you install the GV-Mini DVR V2, and then have the checkup every three months. It will take 5 working days for response. - Page 37 DVR Health Analysis 2. Select Backup System Settings. This dialog box appears. Figure 38 3. Press the Next Step button to back up all your system settings. The Save As dialog box appears. 4. Select the destination drive to store the backup file. When the backup is complete, this message will appear: Successfully Backup MultiCam System Settings.
-
Page 38: System Log
4.2 System Log Please provide the sys*.mdb files of system log. The files by default are saved at D:\Log\database. If you have modified the default location, you can check the path by the following steps: 1. Click the Configure button on the main system, point to General Setting, and then select System Log Setting. -
Page 39: Information Of Your Computer System
DVR Health Analysis 4.3 Information of Your Computer System To get the information of your computer system, please follow the steps below to install the free software PC WIZARD. By using the software, the computer information can be easily collected and saved for analysis: Processor: includes Type, Frequency, Data Cache L1, Trace Cache L1, Cache L2, Voltage, Processor Temperature, FPU Coprocessor. - Page 40 4. In the Save As dialog box, select Format HTML and click OK. Figure 42 5. Select the Save location, type the file name, and then click Save to save the Processor information as HTML file. 6. Repeat Steps 3-5 to save the Drives information as HTML file.
-
Page 41: Health Analysis Form
DVR Health Analysis 4.4 Health Analysis Form Please send the related data for analysis along with this Health Analysis Form to dvrsystem@geovision.com.tw. Health Analysis of GV-Mini DVR V2 Contact Person: Title: Company Name: Telephone: (O) Fax: E-Mail: Model: Bar Code: 4.5 Check List... -
Page 42: Chapter 5 Troubleshooting
The Main System cannot be minimized, and the GV-Desktop toolbar fails to appear. When the GV-Mini DVR V2 is set up in a LAN where its router or server cannot assign the IP addresses through DHCP, the Main System may not be minimized, and the GV-Desktop toolbar may fail to appear. -
Page 43: Troubleshooting
Troubleshooting Right-click System (C:), and select Explore. Figure 44 Select Network Connections, right-click Local Area Connection, and then select Properties. Figure 45... - Page 44 In the Local Area Connection Properties dialog box, select Internet Protocol (TCP/IP) and then click Properties. Figure 46 Select Use the following IP address, and type the IP info in the fields. Figure 47 2. Replace the router or server that can assign the IP addresses through DHCP in a LAN.
- Page 45 If your GV-Mini DVR V2 is not responding to your clicking, typing, or mouse movements, try these steps to get your GV-Mini DVR V2 back on track. Please note that you will lose any unsaved changes in all open applications.
- Page 46 Click the Tools tab in the upper portion of the window. Under Error-checking, click the Check Now button. Figure 50 Select Automatically fix file system errors and Scan for and attempt recovery of bad sectors. Figure 51 Click Start. 2. If the Windows hard disk utility still cannot fix the problem in Partition C, try rebuilding the operating system and GV-System Software by using the Recovery DVD.
- Page 47 The screen image appears distorted or jitters. If the screen image seems to be distorted, jitter, or not to look right, try these steps: 1. Make sure the video standard in your country matches the setting in the GV-Mini DVR V2. See 3.6 Recovery DVD.
-
Page 48: Specifications
Specifications System Model GV-2008M V2 GV-2004M V2 GV-1480M V2 GV-1240M V2 GV-1120M V2 GV-800M V2 Intel Pentium 4 3.0 GHz, 800MHz FSB 1GB (512MB x 2) Dual Channel 1 hot swap drive bay Storage Device Microsoft Windows XP Embedded Intel GMA 900 DirectX 9.0c DVD(±)RW... - Page 49 Specifications Recording Model GV-2008M V2 GV-2004M V2 GV-1480M V2 GV-1240M V2 GV-1120M V2 GV-800M V2 H/W: H/W: S/W: S/W: S/W: S/W: Recording NTSC 240 (D1) 120 (D1) 480 (CIF) 240 (CIF) 120 (CIF) 120 (CIF) Frame H/W: H/W: S/W: S/W: S/W: S/W: 200 (D1)
-
Page 50: Remote Client Software
Remote Client Software WebCam / Twin Server / CenterV2 / VSM / Control Center / Remote Playback Server / Remote View / IP Multicast / Monitoring GView V2 for PDA / MSView V2 for Windows Mobile 5.0 / Environment MSView V3 for Windows Mobile 6.0 / SSView V2 for Symbian Smartphone / SSView V3 for Nokia S60 2nd and 3rd / 3G Mobile Phone Max. - Page 51 Specifications Environment Operating Temp. 10 ~ 45 °C (50 ~ 113 °F) Humidity 0 ~ 80% RH (non-condensing) Physical IPC Case Desktop PC Color Aluminum Silver Dimensions (W x H x D) 395 (W) x 100 (H) x 300 (D) mm (16 x 4 x 12 inch) Weight 6.25 Kg Language...
-
Page 52: Warranty Policy
Other packaged accessories and software (including but not limited to System Software) are excluded. If a defect where due to causes attributable to GeoVision arises and a valid claim is received by GeoVision within the Limited Warranty Period, at its option, GeoVision will (1) repair the... - Page 53 2. Try rebuilding the operating system and GV-System by using the Recovery DVD. 3. Consult your dealer. They are your best sources for current information and support. Or you can call or email GeoVision offshore offices for assistance. When you call or e-mail, please inform us the following:...
- Page 54 2. Securely pack the product in its original carton using the original packing material, or in equivalent packaging. 3. The product shall be returned to GeoVision, Taiwan at your expense for shipping and insurance costs. BEFORE YOU DELIVER YOUR GV-MINI DVR SYSTEM V2 FOR WARRANTY SERVICE, IT IS YOUR RESPONSIBILITY TO BACK UP YOUR DATA.
-
Page 55: Warranty Form
Warranty Form Warranty Form Thank you for purchasing the GV-Mini DVR System V2. To help us validate your purchase and better serve you in the future, please go to http://www.geovision.com.tw/english/4_6.asp or click GeoVision Online Registration in My Favorite for a direct link to register online within 30 days from the date of purchase. - Page 56 Bar code: Shipment Date: GeoVision, Inc. 9F, No. 246, Sec. 1, Neihu Rd., Neihu District, Taipei, Taiwan Tel: +886-2-8797-8377 Fax: +886-2-8797-8335 Email: sales@geovision.com.tw dvrsystem@geovision.com.tw http://www.geovision.com.tw...
Need help?
Do you have a question about the GV-Mini and is the answer not in the manual?
Questions and answers