GeoVision GV-NVR User Manual
System lite v2
Hide thumbs
Also See for GV-NVR:
- Quick start manual (8 pages) ,
- Quick start manual (9 pages) ,
- Quick start manual (13 pages)
Table of Contents
Advertisement
Advertisement
Table of Contents

Related Manuals for GeoVision GV-NVR


Summary of Contents for GeoVision GV-NVR
- Page 1 GV-NVR System Lite V2 (Rev. B) User’s Manual User’s Manual NVRLV2BV10-UM-A...
- Page 2 GeoVision. Every effort has been made to ensure that the information in this manual is accurate. GeoVision, Inc. makes no expressed or implied warranty of any kind and assumes no responsibility for errors or omissions. No liability is assumed for incidental or consequential damages arising from the use of the information or products contained herein.
- Page 3 Welcome to the GV-NVR System Lite V2 (Rev. B) User’s Manual. The Manual provides an overview of the GV-NVR System Lite V2 and its accessories. It also includes the instructions to guide you through the installation and use of the...
-
Page 4: Table Of Contents
Installing Computer Mount ..................7 Basic Installation.....................9 Setting Up IP Cameras ..................11 Changing IP Address of GV-NVR System Lite V2..........18 Formatting the External Hard Drive............... 22 Adding the External Hard Drive to the Recording Path ......... 29 Changing Video Codec and Resolution of GV IP Camera........30 Exiting to Windows .................... - Page 5 Chapter 5 Smart Device Access ................. 40 5.1 iPhone, iPod Touch and iPad ................42 5.2 Android Device ..................... 50 Chapter 6 NVR Health Analysis ................58 6.1 System Settings....................58 6.2 System Log......................60 6.3 Information of Your Computer System..............61 6.4 Health Analysis Form ....................
-
Page 6: Safety Instructions
Safety Instructions Observe these safety instructions to help ensure against injury to yourself and damage to the product. Read all safety and installation instructions before you operate the product. Do not operate the product in high humidity areas or expose it to water or moisture. Do not put the product in an unstable, a slanting or vibrated place. -
Page 7: Bundled Software
Bundled Software The bundled software preinstalled in the GV-NVR System Lite V2 (GV-Desktop < Program button < Multicam Installation) is a lite version, specially designed for the GV-NVR System Lite V2 to implement the GV IP cameras. 1. It includes a lite version of video analysis applications, featuring Advanced Motion Detection, Privacy Mask, Scene Change Detection and Counter only. -
Page 8: Supported Camera And Dongle Options
Supported Camera and Dongle Options The Supported Camera Combinations The GV-NVR Lite V2 (Rev. B) supports connections to GV-IP cameras, third-party IP cameras, GV-Video Servers, and GV-Compact DVRs. You can adopt one of the following combinations: IP cameras excluding GV-Fisheye cameras •... - Page 9 IP cameras including GV-Fisheye cameras • GV-Fisheye Camera 1.3 MP + one of the following options: GV-IP Camera x 15 Third-party Camera (VGA) x 6 Third-party Camera (1 / 1.3 / 2 MP) x 8 Third-party Camera (3 / 4 / 5 MP) x 1 •...
- Page 10 The number of supported channels is based on the following resolution: Dual-stream Resolution Max. Frame Total Frame Section A Rate Rate Stream 1 Stream 2 704 x 480 / 352 x 240 / 30 / 25 fps 480 / 400 fps 704 x 576 352 x 288 1 MP...
- Page 11 If you record the images, access live view and see the playback simultaneously, the CPU loading will increase massively. Therefore, the frame rates may drop. GV-NVR System Lite V2 (Rev. B) Dongle A dongle is required when connecting to third-party IP cameras.
-
Page 13: Chapter 1 Introduction
Introduction Chapter 1 Introduction The GV-NVR System Lite V2 (Rev. B) is an ultimate upgraded mini NVR system, which allows you to record video files directly to the internal hard drive. The GV-NVR System Lite V2 supports up to 16 GV IP cameras or 10 third-party IP cameras for networking surveillance, with the plug-and-play function for GV IP cameras to connect to the unit automatically. -
Page 14: Packing List
1.2 Packing List The GV-NVR System Lite V2 package includes the following items: Important: Please keep the original carton and all packing materials for future shipping need. • GV-NVR System Lite V2 (Rev. B)x 1 • AC Power Cord x 1 •... -
Page 15: Options
The dongle allows you to connect third-party IP cameras to the GV-NVR Lite V2 Dongle GV-NVR System Lite V2. It has the options of 2, 4, 6, 8, and 10 channels. GV-Data Capture V3 Box can integrate the GV-NVR System... -
Page 16: Chapter 2 Overview
Front and Left-side View Figure 2-1 No. Name Description Turns on the power of GV-NVR System Lite V2. The LED Power Button & LED shines when the power is on. HDD Activity LED The LED shines when the HDD is writing or reading data. -
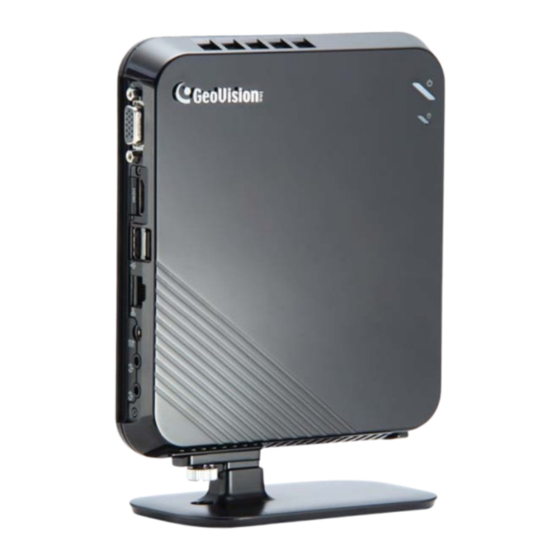
Page 17: Right-Side View
Overview Right-side View Figure 2-2 No. Name Description USB 3.0 Port Connects USB devices. USB 2.0 Port Connects USB devices. -
Page 18: Chapter 3 Getting Started
Chapter 3 Getting Started There are two methods to mount the GV-NVR System Lite V2. One is to use the base stand to support the unit to stand. The other is to use the VESA monitor mount to mount the unit on the back of the computer monitor. -
Page 19: Installing Computer Mount
Getting Started 3.2 Installing Computer Mount 1. Using the 4 fix screws, tighten the VESA monitor mount on the back of the computer monitor. Figure 3-2 2. Peel off the liner from the Velcro. Figure 3-3... - Page 20 3. Attach the GV-NVR System Lite V2 to the VESA monitor mount and tighten the stand screw. Stand Screw Figure 3-4 Note: For the mounting method of computer monitor, make sure your monitor is VESA compliant. The supplied VESA monitor mount features the two mounting-hole patterns of 3" x...
-
Page 21: Basic Installation
Optionally connect the GV-USB Dongle for third-party IP cameras' connection. 4. Using the USB cables, connect a keyboard and a mouse to the GV-NVR System Lite V2. 5. There are two ways to connect the monitor to the GV-NVR System Lite V2. - Page 22 IMPORTANT: For automatic setup, make sure all the devices (GV IP cameras and GV-NVR System Lite V2) are connected under the same LAN before you turn on the power of GV-NVR System Lite V2. Note: The monitor you use must support screen resolution of 1280 x 1024 and display color...
-
Page 23: Setting Up Ip Cameras
After you have installed the necessary cables and IP cameras, you are ready to display the channels on GV-NVR System Lite V2. Setting Up GV IP Cameras 1. Power on the GV-NVR System Lite V2. When GV IP cameras with the default IP address, ID and password are detected, this message appears. Figure 3-6 For automatic IP assignment 2. - Page 24 For manual IP assignment 3. To manually assign an IP address and set up the GV IP camera, click Cancel. The IP Device Setup window appears. Figure 3-8 4. Click the IP Device Utility button and click the General Settings tab. The GV IP Device Utility window appears.
- Page 25 Getting Started 5. To modify the IP address, double-click a GV IP camera. This window appears. Figure 3-10 6. Type the default user name (admin), default password (admin) and the new IP information. 7. Click OK. The new IP address will be updated to the camera. 8.
- Page 26 Figure 3-12 13. Click Yes. The GV IP cameras will be connected to the GV-NVR System Lite V2 shortly. Note: Alternatively, you can access the GV IP Device Utility as follows: GV-Desktop < Program button < GV IP Device Utility.
- Page 27 Getting Started 2. Click the Scan Camera button. This dialog box appears. Figure 3-14 3. Click the Start Scan button. The IP devices under the same LAN with the GV-NVR System Lite V2 will be searched and listed. Figure 3-15 4.
- Page 28 Port: Video streaming port number. Stream Type: The GV-NVR System Lite V2 only supports a single stream when connecting to a third-party IP camera. Codec Type: It is highly recommended to choose H.264 codec type for best performance.
- Page 29 3. Type the IP address, Username and Password of the camera. Select the camera brand and device from the drop-down lists. 4. The GV-NVR System will automatically query for the IP camera, and the status will be indicated as “Standby”. If not, modify the HTTP port and streaming port (Figure 3-19) to match those of the IP camera, and click the Query button.
-
Page 30: Changing Ip Address Of Gv-Nvr System Lite V2
Note: 1. If you want to install more than one unit of GV-NVR System Lite V2 under the same LAN, you need to change the IP addresses of the first GV-NVR System Lite V2 and its connected GV IP cameras before installing the second GV-NVR System Lite V2 to avoid IP address conflict. - Page 31 Getting Started 2. Type the ID and password. The default ID and password are “0000”. The Control Panel window appears. Click the View network status and tasks option under the Network and Internet setting. Figure 3-22 3. Click the Change the adapter settings option. Figure 3-23...
- Page 32 4. Right-click Local Area Connection and select Properties. Figure 3-24 5. In the Local Area Connection Properties dialog box, select Internet Protocol (TCP/IP) and click Properties. Figure 3-25...
- Page 33 Getting Started 6. Select Use the following IP address, type the new IP information, and click OK to finish the setting. Figure 3-26...
-
Page 34: Formatting The External Hard Drive
3.6 Formatting the External Hard Drive The GV-NVR System Lite V2 records audio and video to the internal hard drive. You can also use an external hard drive to expand recording space. You must format the hard drive before you can use it. - Page 35 Getting Started 3. The Initialize and Convert Disk Wizard appears. Click Next to continue. Figure 3-29 Note: If the Wizard does not appear, you need to initialize the drives one by one. To manually initialize a drive, right-click on the name of the drive and select Initialize Disk. 4.
- Page 36 5. The screen gives you the option to convert the drives from basic to dynamic storage. Leave all drives unchecked, and click Next to continue. Figure 3-31 6. When the initialization is complete, click Finish to close the wizard. Figure 3-32...
- Page 37 Getting Started 7. Right-click in the unallocated space of a new drive, and select New Partition. Figure 3-33 8. The New Partition Wizard appears. Click Next to continue. Figure 3-34...
- Page 38 9. Select Primary partition, and click Next to continue. Figure 3-35 10. The default partition size is the same as the maximum disk space. Make changes if necessary. Click Next to continue. Figure 3-36...
- Page 39 Getting Started 11. Assign a drive path that is not in use by other devices, and click Next to continue. Figure 3-37 Note: The default drive path starts from E:\. 12. Type a name in the Volume label box, ex. HDD1, and click Next to continue. Figure 3-38...
- Page 40 13. When the formatting is complete, click Finish to close the wizard. Figure 3-39 14. When the drive is successfully initialized, partitioned, and formatted, its status description should display “Healthy.” Figure 3-40...
-
Page 41: Adding The External Hard Drive To The Recording Path
Getting Started 3.7 Adding the External Hard Drive to the Recording Path Before you start recording to the external hard drive, you need to add the formatted external hard drive to the recording path. 1. On the GV-Desktop, click the Programs button, and select Hot Swap HDD Tool. The MediaMan Tools window appears. -
Page 42: Changing Video Codec And Resolution Of Gv Ip Camera
Several resolution, aspect ratio and codec options are available for GV IP cameras, except GV-Fisheye cameras. Once the video resolution and codec of GV IP cameras are changed on the GV-NVR System Lite V2, these configurations will override those set on the camera’s Web interface. -
Page 43: Exiting To Windows
Getting Started 3.9 Exiting to Windows The GV-NVR System Lite V2 is protected by GV-Desktop that is limited to run the selected programs. If you need to exit to Windows desktop, follow these steps. 1. On the GV-Desktop, click the Settings button, and type the valid ID and password. The default ID and Password are “0000”. -
Page 44: Returning To Gv-Desktop
3.10 Returning to GV-Desktop Click the Windows Start button, select All Programs, click GV-NVR, and click Key Lock Utility. Figure 3-46 Windows 7 desktop... -
Page 45: Restoring System
D since it only reformats the partition C. 1. On the GV-Desktop, click the Program button and select Recovery. The system will run this command by itself. Figure 3-47 2. Restart the GV-NVR System Lite V2. 3. Press F11 button several times to avoid accessing the system. - Page 46 4. When the below screen appears, press the Recovery button. Figure 3-48 5. If you can’t successfully start the Recovery Wizard, you may see the below screen. Select SATA PM to start the Recovery Wizard. Figure 3-49 6. When the restoring process is completed, the screen will automatically show the GV-Desktop.
-
Page 47: Updating Gv-Nvr System Lite V2
Getting Started 3.12 Updating GV-NVR System Lite V2 If you like to update your GV-NVR System Lite V2, contact your dealer for more information. Before contacting your dealer, you may check software update news at our website: http://www.geovision.com.tw... -
Page 48: Chapter 4 Firmware Upgrade For Gv Ip Cameras
Do not turn the camera power off in 10 minutes after the firmware is updated. If you use the IP Device Utility for firmware upgrade, the GV-NVR System Lite V2 used to upgrade firmware must be under the same network of the camera. -
Page 49: Using The Web Configuration Interface Of Gv Ip Camera
In the Live View window, click the Show System Menu button and select Remote Config. The Remote Config dialog box appears. Figure 4-1 Click the Browse button to locate the firmware file (.img) saved at your GV-NVR System Lite V2. Click the Upgrade button to start the upgrade. -
Page 50: Using The Ip Device Utility
4.2 Using the IP Device Utility The IP Device Utility provides a direct way to upgrade the firmware to multiple units of GV IP camera. Note GV-NVR System Lite V2 used to upgrade firmware must be under the same network of the camera. - Page 51 Click the Firmware Upgrade tab. This dialog box appears. Figure 4-5 Click the Browse button to locate the firmware file (.img) saved at your GV-NVR System Lite V2. If you like to upgrade all the cameras in the list, select Upgrade all devices.
-
Page 52: Chapter 5 Smart Device Access
Chapter 5 Smart Device Access You can receive live video streaming from the GV-NVR System Lite V2 by using an iPhone, iPad or Android device. The GV mobile phone applications and their major features are listed as below. Overview of GV Mobile Phone Applications... - Page 53 Smart Device Access Enabling Mobile Phone Connection To connect GV-NVR System Lite V2 through your mobile phone devices, you must enable Mobile option in the GV-NVR System Lite V2 beforehand. 1. Click the Network button 2. Select WebCam Server. 3. Click the Mobile tab and activate the settings of communication ports. Then, click OK.
-
Page 54: Iphone, Ipod Touch And Ipad
5.1 iPhone, iPod Touch and iPad GV-iView function is introduced to support iPhone, iPod Touch and iPad for the mobile surveillance application. For the supported operating system version, see the Overview of GV Mobile Phone Applications chart earlier in this chapter. Note: GV-iView is for iPhone and iPod Touch users, while GV-iView HD is for iPad users. - Page 55 Connecting to GV-NVR System Lite V2 1. Activate GV-iView on the mobile device. 2. On the login screen enter the IP address of the GV-NVR System Lite V2, port value (default value is 8866), ID and Password. 3. Press Connect. Once the connection is established, the live display of 6 cameras will appear.
- Page 56 3. On the login screen, tap RPB View 4. Enter the IP address of the GV-NVR System Lite V2, port value (default value is 5511), ID and Password. You can also search the recordings after a specified date and time by...
- Page 57 Smart Device Access Figure 5-5 Figure 5-6...
- Page 58 5. Select the desired recordings from the event list for playback. Tap the Change cam button at the top right corner to switch cameras. Figure 5-7...
- Page 59 Smart Device Access Other Functions After you enlarge one channel, you can find the following buttons for control. Figure 5-8 Button Name Function Enable Record Activates recording controls. Record One The button is available when you tap the Enable Channel Record button.
- Page 60 PTZ Speed Control for PTZ Cameras Tap anywhere on the Live View screen of PTZ camera to bring up the PTZ Speed Setting panel. Select your desirable level of PTZ speed. Higher value means higher speed. Figure 5-9 Accessing I/O Devices 1.
- Page 61 My Favorite On the login screen you can find the My Favorite option, allowing you to add several links of GV-NVR System Lite V2 servers for quick connections. Up to 50 links can be created. Figure 5-11 Import / Export This function allows you to export My Favorite list to iPhone / iPad / iPod Touch device or import My Favorite list from iPhone / iPad / iPod Touch device.
-
Page 62: Android Device
For the supported operating system version, see the Overview of GV Mobile Phone Applications chart earlier in this chapter. Figure 5-13 Activating the GV-AView Function To allow remote access to GV-NVR System Lite V2, you must enable the Create JPEG/GIF file(s) function on the WebCam Server (Figure 5-1) - Page 63 Note: If the default HTTP port of 80 on the WebCam Server of the GV-NVR System Lite V2 is modified, specify the new port number used for HTTP connection at the end of the IP...
- Page 64 3. Tap the created link in the address book. Figure 5-15 4. Tap the Connection button to access the GV-NVR System Lite V2. Figure 5-16...
- Page 65 Smart Device Access 5. Tap the Menu button on the mobile phone to see the following options: Figure 5-17 : Forces I/O devices to be triggered. I/O Trigger : Starts or stops recording the current channel or all channels. Record Event : Changes the image quality between Normal and Good.
- Page 66 4. Type the IP address, port number (default value is 5511), user name and password of the GV-NVR System Lite V2 you want to access. 5. You can tap the button next to RPB with Time and specify a time to see videos recorded after the specified time.
- Page 67 Smart Device Access 7. Tap the connection you just created. Figure 5-19 8. Tap the Connect button to view the playback. Figure 5-20...
- Page 68 9. Tap the Connect button to connect to the GV-NVR System Lite V2. The videos recorded from camera 1 will be displayed. Figure 5-21 10. To play back a recording, tap on the time of the recording. 11. To see more recordings from the same camera, press the Menu button on the mobile phone device and tap Previous page to see more recent recordings or tap Next Page to view older recordings.
- Page 69 Tap the NVR/DVR View tab and then tap the Menu button on the mobile phone device. This page appears. Figure 5-22 : Add the connection information of a GV-NVR System Lite V2 to the address book. : Delete all entries in the address book. : Displays the Installation Guide in two ways—Manual and URL Link.
-
Page 70: Chapter 6 Nvr Health Analysis
It is recommended to have the health analysis during the first week after you install the GV-NVR System Lite V2, and then have the checkup every three months. It will take 5 working days for response. - Page 71 NVR Health Analysis 2. Select Backup MultiCam Settings or Restore Defaults, and select Backup Current System. This dialog box appears. Figure 6-2 3. Press the Next Step button to back up all your system settings. The Save As dialog box appears. 4.
-
Page 72: System Log
6.2 System Log Please provide the sys*.mdb files of system log. The files by default are saved at D:\Log\database. If you have modified the default location, you can check the path on the following System Log Setting dialog box. To open this dialog box, click the Configure button on the Main System, point to System Configure, and then select System Log Setting. -
Page 73: Information Of Your Computer System
NVR Health Analysis 6.3 Information of Your Computer System To get the information of your computer system, please follow the steps below to install the free software PC WIZARD. By using the software, the following computer information can be easily collected and saved for analysis: Processor: includes Type, Frequency, Data Cache L1, Trace Cache L1, Cache L2, Voltage, Processor Temperature, FPU Coprocessor. - Page 74 4. In the Save As dialog box, select Format HTML and click OK. Figure 6-5 5. Select the Save location, type the file name, and then click Save to save the Processor information as HTML file. 6. Repeat Steps 3-5 to save the Drives information as HTML file.
-
Page 75: Health Analysis Form
NVR Health Analysis 6.4 Health Analysis Form Please send the related data for analysis along with this Health Analysis Form to dvrsystem@geovision.com.tw. Health Analysis of GV-NVR System Lite V2 Contact Person: Title: Company Name: Telephone: (O) Fax: E-Mail: Model: Bar Code: 6.5 Check List... -
Page 76: Chapter 7 Troubleshooting
GV-NVR System Lite V2 won’t turn on. If your GV-NVR System Lite V2 won’t turn on or you don't hear a startup sound or any fan or drive noise, try these steps: 1. - Page 77 Troubleshooting GV-NVR System Lite V2’s hard disk corrupts If you are experiencing file system corruption problems, such as lost clusters, cross-linked files or invalid files or directories, try these steps: Use the HD Tune utility to scan the external hard disk for errors. Follow these steps: A.
- Page 78 B. Right-click the desired hard disk and select Properties from the file menu to display the Properties window. Figure 7-3 C. Click the Tools tab in the upper portion of the window. D. Under Error-checking, click the Check Now button. Figure 7-4 E.
- Page 79 If you can not locate all the GV IP cameras by using the IP Device Utility, try the following instructions: 1. Ensure all the GV IP cameras are connected to the same LAN with the GV-NVR System Lite V2 and check the network connectivity.
-
Page 80: Specifications
Specifications GV-NVR Lite System V2 Hardware System Intel Processor 2 GB Storage 1 TB Microsoft Windows 7 Embedded 64-Bit SP1 Power Output: 65W, 19V, 3.42A; Input: 100~240V, 50~60Hz Ethernet RJ-45, 10 / 100 / 1000 Mbps Video Output VGA and HDMI... - Page 81 Monitoring Environment Mobile device (Android Smartphone and tablet; iPad, iPhone and iPod Touch) Max. 16-channel multi views (Up to 200 channels Live View connection to GV-NVR System Lite V2) Network Type LAN, WAN, Internet System Monitoring and Recovery Power Restoration...
-
Page 82: Warranty Policy
Products purchased via authorized distribution and sales channels. If a defect arises and a valid claim is received by GeoVision within Limited Warranties Period, at its option, GeoVision will (1) repair Products at no charge, using new or refurbished... - Page 83 Warranties do not apply to any non-GeoVision products including counterfeited products. GeoVision is not liable for any damage to or loss of any profit, programs, data, or other information stored on any media, or any non-GeoVision Products or part not covered by these warranties.
-
Page 84: Limitation Of Liability
Regardless whether any remedy set forth herein fails of its essential purpose or otherwise, in no event will GeoVision or its suppliers be liable for any lost revenue, profit or lost or damaged data, business interruption, loss of capital, or for special, indirect, consequential, incidental, or... -
Page 85: Warranty Requirements
1. Review troubleshooting sections in the documentation for software and peripheral devices. 2. Try rebuilding the operating system and GV-NVR System Lite V2 from the hidden partition. 3. Consult your dealer. They are your best sources for current information and support. Or you can call or email GeoVision offshore offices for assistance. - Page 86 2. Securely pack the product in its original carton using the original packing material, or in equivalent packaging. 3. The product shall be returned to GeoVision, Taiwan at your expense for shipping and insurance costs. BEFORE YOU DELIVER YOUR GV-NVR SYSTEM LITE FOR WARRANTY SERVICE, IT IS YOUR RESPONSIBILITY TO BACK UP YOUR DATA.
-
Page 87: Warranty Form
Warranty Form User’s Manual for GV-NVR System Lite V2 Thank you for purchasing the GV-NVR System Lite V2. To help us validate your purchase and better serve you in the future, please go to h ttp://www.geovision.com.tw/english/4_6.asp click GeoVision Online Registration in My Favorite for a direct link to register online within 30 days from the date of purchase. - Page 88 GeoVision, Inc. 9F, No. 246, Sec. 1, Neihu Rd., Neihu District, Taipei, Taiwan Tel: +886-2-8797-8376 Fax: +886-2-8797-8335 Email: sales@geovision.com.tw dvrsystem@geovision.com.tw http://www.geovision.com.tw...
Need help?
Do you have a question about the GV-NVR and is the answer not in the manual?
Questions and answers