Sun Microsystems Sun Blade 150 Getting Started Manual
Hide thumbs
Also See for Sun Blade 150:
- Installation manual (20 pages) ,
- Installation manual (19 pages) ,
- Service manual (218 pages)

Related Manuals for Sun Microsystems Sun Blade 150


Summary of Contents for Sun Microsystems Sun Blade 150
- Page 1 Sun Blade™ 150 Getting Started Guide Sun Microsystems, Inc. 4150 Network Circle Santa Clara, CA 95054 U.S.A. 650-960-1300 Part No. 816-1161-10 June 2002, Revision A Send comments about this document to: docfeedback@sun.com...
- Page 2 How, ShowMe TV, Solaris, Solstice DiskSuite, StarOffice, Sun Blade, Sun Forum, Sun OpenGL, Sun PCi, SunService, and SunSolve Online are trademarks or registered trademarks of Sun Microsystems, Inc. in the U.S. and in other countries. The Energy Star logo is a registered trademark of EPA.
-
Page 3: Table Of Contents
Typographic Conventions xiv Shell Prompts xiv Accessing Sun Documentation Online xv Sun Welcomes Your Comments xv Setting Up the Sun Blade 150 Workstation 1 Planning the Installation Process 2 Unpacking the Workstation 4 Front Panel Overview 5 Back Panel Overview 6... - Page 4 Getting Started With CameleoLIGHT 28 Netscape Communicator 28 Getting Started With Netscape Communicator 29 Solstice DiskSuite 29 Getting Started With Solstice DiskSuite 29 Sun OpenGL for Solaris 30 Getting Started With OpenGL 30 Sun Blade 150 Getting Started Guide • June 2002...
- Page 5 PC File Viewer 30 Getting Started With PC File Viewer 31 PC Launcher 31 Getting Started With PC Launcher 31 SunForum 32 Getting Started With SunForum 32 Restoring Preinstalled Software 32 Restoring Preinstalled Software 33 Installing Optional Workstation Hardware 35 Preparing for Installation 36 Powering Off the Workstation 36 Removing Power to the Workstation 38...
- Page 6 Sun Blade 150 Getting Started Guide • June 2002...
- Page 7 Figures Navigational Flow Chart for the Sun Blade 150 Workstation 2 FIGURE 1-1 Unpacking the Workstation 4 FIGURE 1-2 Front Panel Overview 5 FIGURE 1-3 Back Panel Overview 6 FIGURE 1-4 Video and Serial Port Extenders 7 FIGURE 1-5 Cabling the Workstation 9...
- Page 8 Sun Blade 150 Getting Started Guide • June 2002...
- Page 9 Tables Typographic Conventions xiv TABLE P-1 Shell Prompts xiv TABLE P-2 Back Panel Description and Connector Symbols 6 TABLE 1-1 Cabling the Workstation 8 TABLE 1-2 Information Needed to Set Up the Solaris Desktop Operating Environment 14 TABLE 2-1 Power-Indicator LED Status 16 TABLE 2-2 Workstation Internal Layout 44 TABLE 4-1...
- Page 10 Sun Blade 150 Getting Started Guide • June 2002...
-
Page 11: Preface
Preface The Sun Blade 150 Getting Started Guide (816-1161-10) is a detailed description of the hardware, operating environment, and software applications used to support the Sun Blade™ 150 workstation. This guide includes information about: Workstation installation and setup ™ Using the preinstalled Solaris... -
Page 12: Safety And Compliance Information
The Sun Blade 150 Safety and Compliance Information document (816-4778-10) contains a listing of safety precautions for the Sun Blade 150 workstation. The safety and compliance document is located in the packing carton for the Sun Blade 150 workstation. -
Page 13: Using Unix Commands
Using UNIX Commands The Sun Blade 150 Getting Started Guide may not contain all of the information ® needed to perform basic UNIX commands and procedures such as shutting down the system, booting the system, and configuring devices. -
Page 14: Typographic Conventions
To delete a file, type rm filename. Shell Prompts Shell Prompts TABLE P-2 Shell Prompt C shell machine-name% C shell superuser machine-name# Bourne shell and Korn shell Bourne shell and Korn shell superuser xiv Sun Blade 150 Getting Started Guide • June 2002... -
Page 15: Accessing Sun Documentation Online
Accessing Sun Documentation Online A broad selection of Sun™ system documentation is located at: http://www.sun.com/products-n-solutions/hardware/docs A complete set of Solaris documentation and many other titles are located at: http://docs.sun.com Sun Welcomes Your Comments Sun is interested in improving its documentation and welcomes your comments and suggestions. - Page 16 Sun Blade 150 Getting Started Guide • June 2002...
-
Page 17: Setting Up The Sun Blade 150 Workstation
C H A P T E R Setting Up the Sun Blade 150 Workstation Chapter 1 of the Getting Started Guide includes information about the following topics: Planning the Installation Process Unpacking the Workstation Cabling the Workstation Powering On the Workstation... -
Page 18: Planning The Installation Process
See “Setting Up Your Operating Environment” on page 13. READY TO WORK! Also see “Getting Started With the Additional Preinstalled Software” on page 19. Navigational Flow Chart for the Sun Blade 150 Workstation FIGURE 1-1 Sun Blade 150 Getting Started Guide • June 2002... - Page 19 Note – Solaris 8 and several additional software applications are preinstalled on your hard drive. See “Setting Up the Preinstalled Solaris Operating Environment Software” on page 11. Chapter 1 Setting Up the Sun Blade 150 Workstation...
-
Page 20: Unpacking The Workstation
Unpacking the Workstation Carefully unpack all workstation components from the packing cartons. Your workstation configuration might not contain all the components shown. Unpacking the Workstation FIGURE 1-2 Sun Blade 150 Getting Started Guide • June 2002... -
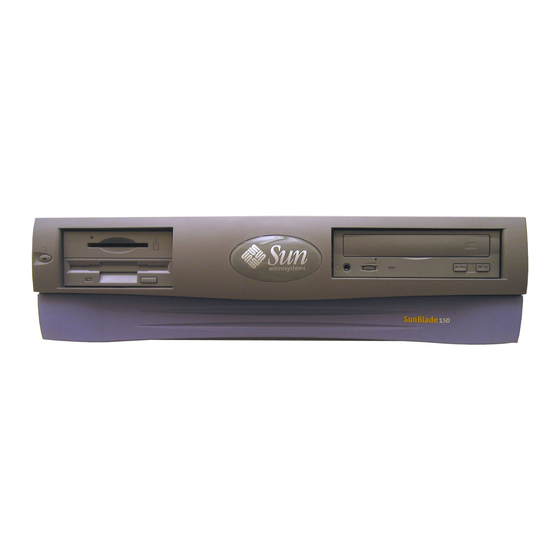
Page 21: Front Panel Overview
The following numbered list corresponds to the numeric captions in FIGURE 1-3 Front Panel Overview FIGURE 1-3 1. Power switch 2. Power-indicator LED 3. Smart card reader 4. Diskette drive (3.5-inch) 5. CD-ROM or DVD-ROM drive (5.25-inch) Chapter 1 Setting Up the Sun Blade 150 Workstation... -
Page 22: Back Panel Overview
Parallel port connector, DB-25 (IEEE 1284A) Serial port connector (RS-232), a serial port SERIAL connector extender is available ( FIGURE 1-5 Audio module headphones connector Audio module line-out connector Audio module line-in connector Sun Blade 150 Getting Started Guide • June 2002... -
Page 23: Figure 1-5 Video And Serial Port Extenders
Extension Kit, (816-5159-01). Serial port extender ( ) See the Sun FIGURE 1-5 Blade 100 and 150 Video and Serial Port Extension Kit, (816-5159-01). Video and Serial Port Extenders FIGURE 1-5 Chapter 1 Setting Up the Sun Blade 150 Workstation... -
Page 24: Cabling The Workstation
Monitor connection to VGA video connector on workstation Twisted-pair Ethernet (TPE) connection to local area network (LAN) Note – If additional cabling instructions are needed, see Setting Up the Sun Blade 150 System (816-1162) poster. Sun Blade 150 Getting Started Guide • June 2002... -
Page 25: Figure 1-6 Cabling The Workstation
Lock Props Undo Page Down PgUp Home Front Copy " Enter Caps Lock < > Enter Open Paste Shift Shift PgDn Find Control Com- pose Graph Cabling the Workstation FIGURE 1-6 Chapter 1 Setting Up the Sun Blade 150 Workstation... -
Page 26: Powering On The Workstation
Tip – After you power on the workstation for the first time, you are ready to set up the preinstalled Solaris 8 operating environment software. Go to “Setting Up the Preinstalled Solaris Operating Environment Software” on page 11. Sun Blade 150 Getting Started Guide • June 2002... -
Page 27: Setting Up The Preinstalled Solaris Operating Environment Software
C H A P T E R Setting Up the Preinstalled Solaris Operating Environment Software Chapter 2 of the Getting Started Guide includes information about the following topics: Planning the Installation Process for Solaris Setting Up Your Operating Environment Power Management Features... -
Page 28: Planning The Installation Process For Solaris
Hard drive swap partition—0.5 Gbytes (512 Mbytes) Hard drive space partition—the remainder of the primary hard drive Note – The Sun Blade 150 workstation requires Solaris 8, software release 2/02 or a subsequent compatible version of Solaris. Sun Blade 150 Getting Started Guide • June 2002... -
Page 29: Setting Up Your Operating Environment
Use the following flow chart as a process tool to assist you with setting up your operating environment. START Power on the workstation. “Powering On the Workstation” on page 10. Install newer version (if any) For instructions, refer to the documentation in Use preinstalled of preinstalled the Solaris Media Kit for you operating... - Page 30 - Subnet (Asks whether the workstation is on a subnet.) - Subnet Mask (Asks for subnet mask for the workstation’s subnet.) Time Zone Asks for local time zone (select by geographic region, GMT offset, or a time zone file). Sun Blade 150 Getting Started Guide • June 2002...
-
Page 31: Power Management Features
As an Energy Star ® partner, Sun Microsystems, Inc. has determined that certain configurations of this product meet the Energy Star guidelines for energy efficiency. For information about which configurations are Energy Star compliant, select the Sun Blade 150 link on the http://www.sun.com web site. ™... -
Page 32: Putting The Workstation Into Low-Power Mode
The workstation completes any in-process activities, then enters low-power mode after a short time-out period. Note – Use the keyboard power switch to place the workstation in low-power mode or to power off the workstation. Sun Blade 150 Getting Started Guide • June 2002... -
Page 33: Figure 2-2 Sun Usb Type-6 Keyboard Power Switch And Power Off Selection Menu
Keyboard power switch Num Lock Caps Lock Scroll Lock Compose Help Print Scroll Pause Screen Lock SysRq Break & Back Space Insert Home Page Stop Again Lock Props Undo Page Down PgUp Home Front Copy " Enter Caps Lock < >... - Page 34 The internal disks drive can take as long as 30 seconds to restart and achieve correct velocity. To suspend operation of the hard drive, see Using Power Management (806-1375). Sun Blade 150 Getting Started Guide • June 2002...
-
Page 35: Getting Started With The Additional Preinstalled Software
C H A P T E R Getting Started With the Additional Preinstalled Software Chapter 3 of the Getting Started Guide includes information about the following topics: Sun Blade 150 Hardware and Software Documentation Collection Solaris Documentation StarOffice XMCD Adobe Acrobat Reader... -
Page 36: Hardware And Software Documentation
The following diagram provides an overview of the Sun Blade 150 preinstalled software. The diagram identifies the page that contains information about getting started with each application. “Hardware and Software Documentation” on page 20 Sun Blade 150 Hardware Documentation Solaris Software Developer Collection... -
Page 37: Viewing Hardware Documentation In Html
Adobe Acrobat Reader. Note – The Sun Blade 150 Hardware Documentation CD-ROM insert (818-0122) contains a list of CD contents and instructions for viewing and installing the Sun Blade 150 Hardware Documentation CD-ROM (705-0122). -
Page 38: Viewing Answerbook2 Documentation
Contents list. StarOffice ™ StarOffice is the optimum in office productivity software from Sun Microsystems. StarOffice is a powerful and comprehensive office suite that integrates word processing, spreadsheets, graphics, HTML, and database components into a single workspace. Key features include: Robust and scalable integrated office productivity tools that include word processing, spreadsheets, graphics, web publishing, and database applications. -
Page 39: Getting Started With Staroffice
StarOffice Calc—a sophisticated application for performing advanced spreadsheet functions, such as analyzing figures, creating lists, and viewing data StarOffice Impress—a tool for creating effective, eye-catching presentations StarOffice Draw—a vector-oriented drawing module for creating 3D illustrations StarOffice Base—a powerful data management tool that enables data to be moved between documents Getting Started With StarOffice To start the preinstalled StarOffice software, click the StarOffice icon on the CDE... -
Page 40: Xmcd
Note – Support for StarOffice is not included with your Sun Blade 150 workstation. StarOffice software support services must be contracted separately. For the latest information on StarOffice support services, see the following web sites: http://www.sun.com/software/star/staroffice/6.0/index.html http://www.sun.com/software/star/starsuite/6.0/index.html XMCD XMCD is a software application for playing audio CD-ROMs when using a Sun Blade 150 workstation. -
Page 41: Apache Server
Apache Server Apache Server is an open-source HTTP server for various modern desktop and server operating systems, such as UNIX and Microsoft Windows NT. Apache Server provides a secure, efficient, and expandable server that provides HTTP services that comply with the current HTTP standards. Getting Started With Apache Server To activate the web server on your workstation, follow the steps below: 1. -
Page 42: Development Tools For The Java Platform
The Java Communications API can be used to write platform-independent communications applications for technologies such as voice mail, fax, and smart cards. For more information, refer to the following web site: http://java.sun.com/products/javacomm Sun Blade 150 Getting Started Guide • June 2002... -
Page 43: Showme Tv
The ShowMe TV application also has its own help system. To start ShowMe TV, type: /opt/SUNWsmtv/bin/showmetv Note – ShowMe How video animations are located on the Sun Blade 150 Hardware Documentation CD-ROM (705-0122). These video animations demonstrate installation and removal procedures for DIMMs, PCI cards, graphic accelerators, hard drives, and CD/DVD drives. -
Page 44: Getting Started With Cameleolight
CameleoLIGHT application and use the right mouse button to select user documentation. This opens the CameleoLIGHT user documentation in a Netscape Communicator browser. Note – The Sun Blade 150 workstation supports the Sun Visual Collaboration Kit, the Sun 1394 camera, and any Solaris-ready 1394 compliant device. Netscape Communicator Netscape Communicator is the world’s premiere browser for the Internet. -
Page 45: Getting Started With Netscape Communicator
Note – The version of Netscape Communicator available from the Netscape site might be more recent, but has not been compatibility-tested by Sun. Getting Started With Netscape Communicator To start Netscape Communicator, click on the globe/clockface icon on the CDE desktop task bar (as shown at left). -
Page 46: Sun Opengl For Solaris
For example, PC file viewer incorporated into the Solaris operating environment allows users to share attachments and files created in Microsoft Word, Excel, PowerPoint, Lotus 1-2-3, and AutoCAD applications. Sun Blade 150 Getting Started Guide • June 2002... -
Page 47: Getting Started With Pc File Viewer
Getting Started With PC File Viewer For details about PC file viewer features and supported file types, refer to the text file installed on your workstation at: /opt/SUNWdtpcv/GettingStarted.txt or the following web site: http://www.sun.com/products-n-solutions/software/ PC Launcher Note – PC launcher requires installation of the SunPCi II pro card. -
Page 48: Sunforum
Some software product companies, such as Netscape, offer different versions of software on their respective web sites. Sun Blade 150 Getting Started Guide • June 2002... -
Page 49: Restoring Preinstalled Software
3. To restore the workstation hardware documentation, reinstall it from the Sun Blade 150 Hardware Documentation CD-ROM (705-0122-10) that is included with your workstation. Use the instructions in the CD-ROM insert document Sun Blade 150 Hardware Documentation (818-0122-10). Chapter 3 Getting Started With the Additional Preinstalled Software... - Page 50 Sun Blade 150 Getting Started Guide • June 2002...
-
Page 51: Installing Optional Workstation Hardware
C H A P T E R Installing Optional Workstation Hardware Chapter 4 of the Getting Started Guide includes information about the following topics: Preparing for Installation Powering Off the Workstation Removing Power to the Workstation Powering Off External Workstation Hardware Disconnecting External Workstation Hardware Removing the Workstation Cover Attaching an Antistatic Wrist Strap... -
Page 52: Preparing For Installation
Sun Blade 150 ShowMe How multimedia documentation. This multimedia documentation is linked to the online version of the Sun Blade 150 Service Manual (816-4379). If necessary, view any or all of the ShowMe How video clips located on the Sun Blade 150 Hardware Documentation CD-ROM (818-0122). -
Page 53: Figure 4-1 Power Switch And Power Indicator Led Location
Caution – The immediate power-off method does not perform an orderly shutdown of the operating system and data may be lost. 3. Verify that the power-indicator LED on the power switch is off. Power switch Power indicator Power Switch and Power Indicator LED Location FIGURE 4-1 Chapter 4 Installing Optional Workstation Hardware... -
Page 54: Removing Power To The Workstation
To remove all power from the workstation, you must disconnect the workstation power cord. 1. Unplug and remove the power cord for the workstation ( FIGURE 4-2 Sun Blade 150 Getting Started Guide • June 2002... -
Page 55: Powering Off External Workstation Hardware
Powering Off External Workstation Hardware Power off external devices: Monitors Peripheral drives (hard drives, smart card readers, tape drives, floppy media, CD- ROM or DVD-ROM drives) Any other external devices Disconnecting External Workstation Hardware Caution – Hazardous voltage present. 1. Disconnect external hardware: Monitor power and signal cables ( FIGURE 4-2 Peripheral Drives power and signal (data) cables... -
Page 56: Figure 4-2 Disconnecting External Devices From The Workstation
Down PgUp Home Front Copy " Enter Caps Lock < > Enter Open Paste Shift Shift PgDn Find Control Com- pose Graph Keyboard Disconnecting External Devices from the Workstation FIGURE 4-2 Sun Blade 150 Getting Started Guide • June 2002... -
Page 57: Removing The Workstation Cover
Removing the Workstation Cover Remove the workstation cover as follows: Caution – Do not operate the workstation with the cover removed. Personal injury and equipment damage can occur. 1. If you have not already done so, disconnect the workstation power cord to ensure all power is removed from the workstation ( FIGURE 4-3 2. -
Page 58: Attaching An Antistatic Wrist Strap
3. Attach the copper foil end of the antistatic wrist strap to the workstation chassis to provide ground for electrostatic discharge ( FIGURE 4-4 Antistatic wrist strap Chassis Attaching the Antistatic Wrist Strap FIGURE 4-4 Sun Blade 150 Getting Started Guide • June 2002... -
Page 59: Installing Optional Internal Hardware
Installing Optional Internal Hardware Workstation Internal Layout The numbered captions in correspond to the part descriptions listed in FIGURE 4-5 TABLE 4-1 Workstation Internal Layout (Top View With Cover Removed) FIGURE 4-5 Chapter 4 Installing Optional Workstation Hardware... -
Page 60: Installing Dimms
Do not use DIMMs from a different system to upgrade or replace the DIMMs in this workstation. Verify with your Sun sales or service representative that the DIMMs you are installing have been Sun-certified for the Sun Blade 150. Sun Blade 150 Getting Started Guide • June 2002... -
Page 61: Figure 4-6 Dimm Installation Order (Top View Of Workstation With Cover Removed)
PCI card or graphics accelerator board Motherboard Ejection lever(8) Fill this DIMM con- nector first Motherboard DIMM connector(4) edge DIMM Installation Order (Top View of Workstation With Cover Removed) FIGURE 4-6 1. Power off the workstation, power off the peripherals, disconnect cables, remove the cover, and attach an antistatic wrist strap as described in “Preparing for Installation”... -
Page 62: Installing A Pci Card Or Graphics Accelerator
PCI cards and/or graphic accelerators that have a combined power consumption of 50 watts or more. 2. Use a No. 2 Phillips screwdriver to remove the screw that secures the PCI card bracket retainer ( FIGURE 4-8 Sun Blade 150 Getting Started Guide • June 2002... -
Page 63: Figure 4-8 Installing A Pci Card Or Graphics Accelerator
PCI card guide Screw Riser board PCI card bracket retainer Chassis Filler panel Bracket tab PCI card or graphics Connector(3) accelerator Installing a PCI Card or Graphics Accelerator FIGURE 4-8 3. Lift the PCI card bracket retainer from the chassis and set it aside. 4. -
Page 64: Installing A Cd-Rom Or Dvd-Rom Drive
Installation” on page 36. Note – Before installing a new CD-ROM or DVD-ROM drive, ensure that the jumpers for the drive are correctly positioned. If necessary, refer to the Sun Blade 150 Service Manual (816-4379). Sun Blade 150 Getting Started Guide • June 2002... -
Page 65: Figure 4-10 Installing A Cd-Rom Or Dvd-Rom Drive
2. Position the drive into the drive opening on the front of the workstation and push the drive in until the screw holes on the drive line up with the screw holes on the chassis ( FIGURE 4-10 3. Using a No. 2 Phillips screwdriver, install two screws that secure the drive to the chassis. -
Page 66: Installing A Second Hard Drive
Primary hard drive data cable Hard drive tray latch Hard drive tray Ejection lever Primary hard drive power cable Chassis Secondary hard drive Screw(4) Hard drive tray Installing a Secondary Hard Drive FIGURE 4-11 Sun Blade 150 Getting Started Guide • June 2002... - Page 67 4. Pull the hard drive tray out of the chassis and set it on an antistatic mat FIGURE 4-11 5. Place the secondary hard drive onto the hard drive tray, then hold the drive in place while you turn the tray upside-down on the antistatic mat ( FIGURE 4-11 Note –...
-
Page 68: Figure 4-12 Reconnecting The Secondary Hard Drive Cables
Connector J503 on the Secondary hard drive riser board (IDE 2) Connector J504 on the CD-ROM/DVD-ROM drive Primary hard drive riser board (IDE 1) 13. Continue with “Finishing Component Installation” on page 53. Sun Blade 150 Getting Started Guide • June 2002... -
Page 69: Finishing Component Installation
Finishing Component Installation 1. Remove your antistatic wrist strap from the chassis. 2. Reconnect the power cord to the workstation and to a grounded AC outlet. Caution – There is a risk of equipment damage. When you reinstall the workstation cover, ensure that you do not damage the data and power cables for the hard drives, CD-ROM or DVD-ROM drives. -
Page 70: For More Information
For More Information The Sun Blade 150 Hardware Documentation CD-ROM (705-0122), which is shipped with your workstation, contains the Sun Blade 150 Service Manual (816-4379) in HTML and PDF formats. Both versions are searchable and printable, but each offers special advantages: The HTML version of the manual includes animated ShowMe How ™... -
Page 71: Troubleshooting And Technical Assistance
A P P E N D I X Troubleshooting and Technical Assistance Appendix A contains information to help you troubleshoot minor workstation problems. If you experience problems while setting up your workstation, refer to the troubleshooting information in the following table. If the problem persists, see“How to Get Technical Assistance”... - Page 72 2. Set your Power Management software to the Minimal setting to turn off power management to the buses. Refer to the “Solaris User Collection” document, Using Power Management (see “Hardware and Software Documentation” on page 20). Sun Blade 150 Getting Started Guide • June 2002...
-
Page 73: How To Get Technical Assistance
Troubleshooting the Workstation (Continued) TABLE A-1 Problem Troubleshooting Pressing the eject button on The drive might be in low-power mode. the CD-ROM or DVD-ROM To activate the peripheral drives that are in low-power mode, move the drive does not eject the mouse or press any key on the keyboard. - Page 74 3. Call a SunService Solution Center. To contact SunService Solution Centers for answers to your technical questions, find the Solution Center closest to you at the following web site: http://www.sun.com/service/contacting/solution.html Sun Blade 150 Getting Started Guide • June 2002...
Need help?
Do you have a question about the Sun Blade 150 and is the answer not in the manual?
Questions and answers