YASKAWA NX100 Instruction Manual
Fieldbus pci-card
Hide thumbs
Also See for NX100:
- Operator's manual (493 pages) ,
- Manual (405 pages) ,
- Instructions manual (309 pages)
Table of Contents
Advertisement
FIELDBUS PCI-CARD
INSTRUCTIONS
FOR NX100, DX100, OR DX200
Upon receipt of the product and prior to initial operation, read these instructions thoroughly, and retain
for future reference.
MOTOMAN INSTRUCTIONS
MOTOMAN-MH50 II INSTRUCTIONS
NX100, DX100 or DX200 INSTRUCTIONS
NX100, DX100 or DX200 OPERATOR'S MANUAL (for each purpose)
NX100, DX100 or DX200 MAINTENANCE MANUAL
The NX100, DX100 or DX200 operator's manual above corresponds to specific usage. Be sure to use the appropriate manual.
Part Number:
170542-1CD
Revision:
0
MANUAL NO.
ME00107EN
2
Advertisement
Table of Contents

Related Manuals for YASKAWA NX100


Summary of Contents for YASKAWA NX100
- Page 1 NX100, DX100 or DX200 INSTRUCTIONS NX100, DX100 or DX200 OPERATOR’S MANUAL (for each purpose) NX100, DX100 or DX200 MAINTENANCE MANUAL The NX100, DX100 or DX200 operator’s manual above corresponds to specific usage. Be sure to use the appropriate manual. Part Number: 170542-1CD Revision: MANUAL NO.
- Page 2 170542-1CD Fieldbus PCI-Card Copyright © 2014, Yaskawa America, Inc. All Rights Reserved. ME00107EN...
- Page 3 If such modification is made, the manual number will also be revised. • If your copy of the manual is damaged or lost, contact a YASKAWA representative to order a new copy. The representatives are listed on the back cover. Be sure to tell the representative the manual number listed on the front cover.
- Page 4 Failure to observe this caution may result in electric shock or injury. • For disassembly or repair, contact your Yaskawa representative. • Do not remove the motor, and do not release the brake. Failure to observe these safety precautions may result in death or serious injury from unexpected turning of the manipulator's arm.
- Page 5 170542-1CD Fieldbus PCI-Card WARNING • Before operating the manipulator, check that servo power is turned OFF pressing the emergency stop buttons on the front door of the controller and the programming pendant. When the servo power is turned OFF, the SERVO ON LED on the programming pendant is turned OFF.
- Page 6 170542-1CD Fieldbus PCI-Card CAUTION • Perform the following inspection procedures prior to conducting manipulator teaching. If problems are found, repair them immediately, and be sure that all other necessary processing has been performed. – Check for problems in manipulator movement. –...
-
Page 7: Instruction Manual
© 2014 Yaskawa Nordic AB · Reg.No. ME00107EN-02 Original instructions Instruction manual Fieldbus PCI-Card... - Page 8 Fieldbus PCI-Card ■ Reference list YASKAWA Nordic AB engineers ■ Revision Third release of this manual. The fieldbus PCI-card was earlier described in Instruction Manual MRS6014GB.3 Fieldbus PCI-card. Page 2 Reg.No. ME00107EN-02...
-
Page 9: Table Of Contents
1 General..........................7 About this manual ..................... 7 1.1.1 Copyright ......................... 7 System requirements....................7 1.2.1 NX100 Software ...................... 7 1.2.2 DX100/DX200 software................... 7 In manual included Fieldbus PCI-cards and NetTools........... 7 Safety.......................... 8 Handling ESD sensitive devices................9 Manufacturer......................9 Introduction ....................... - Page 10 Fieldbus PCI-Card Contents 5 Profibus DPV1 Slave AB3601................26 Profibus Interface Details ..................26 Card .......................... 26 5.2.1 Status LEDs......................26 5.2.2 Connectors 9-pin D-sub..................27 PROFIBUS network setup ..................28 5.3.1 GSD-file ......................... 28 6 Profibus DPV1 Master AB3602 ................29 Profibus interface details ..................
- Page 11 Fieldbus PCI-Card Contents Principle of Input/Outputs in ASI ................41 Configuration interface................... 41 9.4.1 Menu Tree Overwiev ..................... 42 9.4.2 Change settings..................... 47 10 EtherNet/IP Adapter/Modbus TCP Slave AB3606........49 10.1 EtherNet/IP Adapter/Modbus TCP slave interface details ........49 10.2 Card .......................... 49 10.2.1 Status LEDs......................
- Page 12 Fieldbus PCI-Card Contents 15 Interbus-S Slave AB3615 ..................69 15.1 Interbus-S Interface Details..................69 15.2 Card .......................... 69 15.2.1 Status LEDs......................70 15.3 Setup ........................71 16 CanOpen Slave AB3616 ..................72 16.1 CanOpen Interface Details..................72 16.2 Card .......................... 72 16.2.1 Status LEDs......................
-
Page 13: General
This Instruction manual comprises information about: • Installation • Setup The fieldbus PCI-cards are valid for YASKAWA controller NX100 and DX100 (hereafter called the controller). Text written in BOLD letters means command or button. Text written in ITALIC means text shown on display. -
Page 14: Safety
States relating to the EMC-directive (2004/108/EC) as well as the LVD-directives (2006/95/EC) YASKAWA Nordic AB’s responsibility does not cover errors or safety risks that may occur in equipment connected to and/or installed in the machine, nor errors or safety risks that may occur in the machine caused by equipment connected to and/or installed in the machine. -
Page 15: Handling Esd Sensitive Devices
Telefax: +46 486 414 10 Introduction The purposes of this document is to provide instructions for users of the YASKAWA fieldbus PCI- cards and for supporting the configuration process. For further information regarding fieldbus configuration and programming please contact supplier. -
Page 16: Terms
Fieldbus PCI-Card Terms Terms Throughout this document the term “user“, refers to the person or persons who are installing and programming the robot controller with a fieldbus PCI-card installed. The end user of the robot equipment will be referred to as the customer. As in all communication systems the terms “inputs“... -
Page 17: Installation
Never change any of the settings on the PCI-card while controller power is ON. Caution The card contains ESD sensitive components. Observe ESD precautions when handling the card. The following installation instructions apply to all fieldbus PCI-cards delivered by YASKAWA. Reg.No. ME00107EN-02 Page 11... -
Page 18: Nx100 Installation
Fieldbus PCI-Card Hardware installation 2.2.1 NX100 Installation Fig. 2 PCI-card installation A. PCI card B. Hole for securing screw Unplug AC power and remove system cover. If present, remove the bracket opposite the PCI slot. Align the card connector with the slot and press firmly until the card is completely seated. - Page 19 Fieldbus PCI-Card Hardware installation Fig. 3 Remove installation frame Remove the cover and the retaining bracket for the PCI-card. Loosen the indicated screws, see Fig. 4 Cover. Fig. 4 Cover Insert the PCI-card in an available slot. See Fig. 5 PCI-card in slot. Reg.No.
- Page 20 Fieldbus PCI-Card Hardware installation Fig. 5 PCI-card in slot Install the installation frame in the CPU-rack and fasten it using the 4 screws. See Fig. 6 Installed frame. Fig. 6 Installed frame A. Screw Page 14 Reg.No. ME00107EN-02...
-
Page 21: Software Configuration
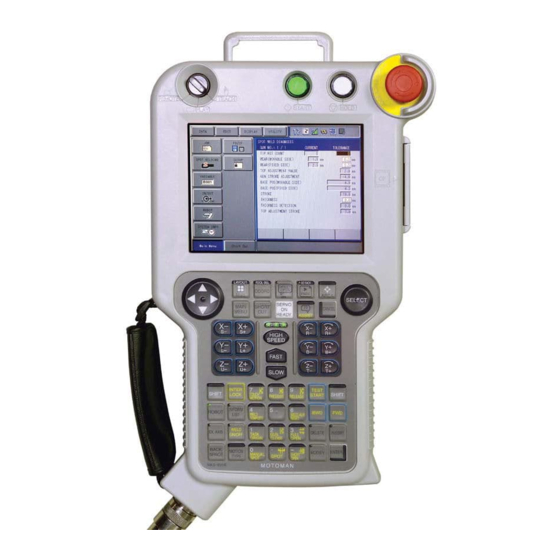
Fieldbus PCI-Card Settings 3 Software configuration Settings To setup the configuration of the system, first enter maintenance mode. S TART HOLD REMOTE TEACH P LAY EDIT DIS P LAY UTILITY OB CONTENT TEST0 S:0 000 CONTROL GROUP :R1 TOOL: 0000 0001 S ET B000 1 0002... - Page 22 Fieldbus PCI-Card Settings Fig. 8 Menu maintenance Security: Step to SYSTEM and press the [SELECT] button Choose SECURITY on the appearing pull down menu. Fig. 9 Security In the MODE box in security window: Press [SELECT], choose MANAGEMENT MODE and press [SELECT]. A password window is shown.
- Page 23 Fieldbus PCI-Card Settings Fig. 10 Password To do a setup: Step to SYSTEM and choose SETUP on the pull down menu. Fig. 11 Setup In SETUP screen: Mark the OPTION BOARD and press [SELECT] Reg.No. ME00107EN-02 Page 17...
- Page 24 Fieldbus PCI-Card Settings Fig. 12 Option board (ASI PCI-card) Step to the PCI-card, object for installation (AB3605 ASI M in this fig). Press [SELECT]. Fig. 13 Setup for the choosen board (AB3604 DeviceNet M) Step to (A) and set the value to USED by [SELECT]. 10.
-
Page 25: Manual I/O Allocation (Fd 134)
Fieldbus PCI-Card Manual I/O allocation (FD 134) Fig. 14 IO MODULE settings 15. In the IO MODULE, press [ENTER]. The card in CPU option 1 will allways be placed as number 16 (card in CPU option 2 as No.17). The amount of desired Inputs and Outputs (I/O’s) are shown (in DeviceNet Master ex. -
Page 26: I/O Map
I/O’s follows a basic octal numbering system, i.e. each input or output group will occur in a grouping of eight. • The NX100 system has the capability of supporting 1024 input and 1024 output signals. • The DX100 system has the capability of supporting 2048 input and 2048 output signals. -
Page 27: Fieldbus Status Byte
Fieldbus PCI-Card Fieldbus status byte Memory map when the I/O size is set to a total of 24 output bits (16 fieldbus output bits) Description Address Contents 30060 Reserved Not available for use 30070 Fieldbus output byte 1 (b0 - 30080 Fieldbus output byte 2 (b8 - b15) -
Page 28: General Installation In Ip-Based Networks
Fieldbus PCI-Card Ping 4 General installation in IP-based networks This chapter is valid for the PCI cards that use IP based communication over Ethernet. Every node on an IP network must have a unique IP address. Ping The IP address on the board is set with the HMS “Anybus IPconfig” tool which can be downloaded from the HMS support web page. -
Page 29: Anybus Ipconfig
Fieldbus PCI-Card Anybus IPconfig The same IP address as example 1, but subnet mask 255.255.255.0. This gives the subnet part of the address to 172.17.20 and the node part to 106. This node can only communicate with nodes which have an IP address starting at 172.17.20. Example 3: It is easier to understand the IP address parts if looking at their binary representations: 172.17.20.106 is in hex 0xAC11146A, 255.255.0.0 is 0xFFFF0000. -
Page 30: The Module Is Not Shown
Fieldbus PCI-Card Anybus IPconfig Fig. 16 Example Configuration of network 4.2.1 The module is not shown If the module not is shown, verify the cabling etc. using the “ping” command, see 4.1 Ping Fig. 17 Settings Anybus IPconfig If the module is still not shown: Press the “Settings”... -
Page 31: The Module Has Ip Address 0.0.0.0
Fieldbus PCI-Card Anybus IPconfig 4.2.2 The module has IP address 0.0.0.0 If the module has IP address 0.0.0.0, check that DHCP is not set by mistake. If setting DHCP without having a DHCP server the IP address shows up as 0.0.0.0. If using DHCP, the server gives IP addresses dynamically to nodes on the network. -
Page 32: Profibus Dpv1 Slave Ab3601
Fieldbus PCI-Card Profibus Interface Details 5 Profibus DPV1 Slave AB3601 Profibus Interface Details • Complete Profibus DPV1 Slave functionality according to extensions of IEC 61158 • Up to 164 bytes input and 164 bytes output • Supports PA baud rate up to 45.45 Kbit/s •... -
Page 33: Connectors 9-Pin D-Sub
Fieldbus PCI-Card Card Meaning Indication State No power or no DPV1 request currently being executed Acyclic Traffic Green A DPV1 request is currently being executed No diagnostics present or no power on the module Red, Flashing 1 Error in configuration data Fieldbus Diagnostics Red, Flashing 2 Error in parameter data... -
Page 34: Profibus Network Setup
Fieldbus PCI-Card PROFIBUS network setup PROFIBUS network setup For a complete network setup See 6.3 PROFIBUS network setup. Each slave device in a PROFIBUS network is associated with an GSD-file which has to be downloaded to the network. 5.3.1 GSD-file The GSD-file, contains all the necessary information about the device. -
Page 35: Profibus Dpv1 Master Ab3602
Fieldbus PCI-Card Profibus interface details 6 Profibus DPV1 Master AB3602 Profibus interface details • Complete Profibus class 1 and class 2 Master according to IEC 61158 • Up to 125 DP/DPV1 slaves can be connected • Up to 255 bytes input and 255 bytes output data •... - Page 36 Fieldbus PCI-Card Card Meaning Indication State Green Operate Mode Green, flashing Clear Mode Master status Stop Mode Offline Green Master has the token Token hold Master does not have the token Green Database OK Green, flashing Database download in progress Database Status Database invalid No database downloaded...
-
Page 37: Profibus Network Setup
Fieldbus PCI-Card PROFIBUS network setup Serial interface Signal Housing PROFIBUS network setup To be able to setup the PROFIBUS fieldbus network, the AnyBus NetTool for PROFIBUS is recommended to use. 6.3.1 AnyBus NetTool for PROFIBUS Anybus NetTool for Profibus is a configuration tool to create complete Profibus-DP network configurations. -
Page 38: Configuration Online
Fieldbus PCI-Card PROFIBUS network setup 6.3.4 Configuration online The network configuration have to be scanned and downloaded to the PCI-card. Before going online a connection must be established to the configuration connector on the PROFIBUS PCI-card. Page 32 Reg.No. ME00107EN-02... -
Page 39: Devicenet Adapter Slave Ab3603
Fieldbus PCI-Card DeviceNet Interface Details 7 DeviceNet Adapter Slave AB3603 DeviceNet Interface Details • Complete DeviceNet 2.0 Adapter implementationaccording to ODVA, group 2 only server • DIP switch select baud rate and MACID • Baud rate 125-500 kbit/s • Optically isolated DeviceNet interface •... -
Page 40: Connectors
Fieldbus PCI-Card DeviceNet network setup Meaning Indication State No power or not online Green Link OK, online, connected Network status Green, flashing Online not connected Critical link failure Red, flashing Connection timeout No power to device Green Device operational Module status Green, flashing Data size greater than configured Unrecoverable fault... - Page 41 Fieldbus PCI-Card DeviceNet network setup The EDS-file contains all the necessary information about the device. The configuration tool uses the EDS-file during configuration of the DeviceNet network. Note The latest version of the EDS-file can either be downloaded from http://www.hms.se or received by contacting HMS.
-
Page 42: Devicenet Scanner Master Ab3604
Fieldbus PCI-Card DeviceNet Interface Details 8 DeviceNet Scanner Master AB3604 DeviceNet Interface Details • Complete DeviceNet 2.0 scanner implementation according to ODVA • Group 2 Client/Server/UCMM support • Optically isolated DeviceNet interface • Baud rate 125-500 kbit/s • Up to 255 bytes input and 255 bytes output data •... -
Page 43: Connectors
Fieldbus PCI-Card DeviceNet network setup Meaning Indication State No power or not initialized Operation mode Green, flashing Idle mode Green Run mode No power, not initialized or no connection established Green, flashing Online, no connection established Green Online, at least one connection Network status established Red, flashing... -
Page 44: Anybus Nettool For Devicenet
Fieldbus PCI-Card DeviceNet network setup 8.3.1 AnyBus NetTool for DeviceNet The AnyBus NetTool for DeviceNet is a Configuration Tool that allows configuration and maintenance of your DeviceNet Network. Setup functions include full Scanner configuration and DeviceNet slave configuration. The AnyBus NetTool-DN lets users configure, manage and troubleshoot any DeviceNet network or network component on a DeviceNet network. -
Page 45: As-Interface Master Ab3605
Fieldbus PCI-Card AS-Interface Master 9 AS-Interface Master AB3605 AS-Interface Master • Complete AS-Interace Master supporting version 2.1 and also backwards compatible with version • Controls up to 62 AS-Interface slaves • Up to 64 bytes input and 64 bytes output data •... -
Page 46: Connectors
Fieldbus PCI-Card Card Meaning Indication State No error, no slave 0, autoprogrammming not possible 8Hz Green Auto programming possible 1Hz Green Slave address 0 exist Auto prog, slave 0 exist Periphery error 8Hz Red Perophery error, auto-programming possible 1Hz Red Periphery error, slave address 0 exist No power or not initialized Green, flashing... -
Page 47: Principle Of Input/Outputs In Asi
The Inputs/Outputs of the nodes in an ASI fieldbus system can be set up as in following example: I/O NO: Function Comment 25-32 8 bits of system status For NX100 specific fieldbus status data 33-36 4 bits of system status For ASI fieldbus system internal status data. -
Page 48: Menu Tree Overwiev
Fieldbus PCI-Card Configuration interface 9.4.1 Menu Tree Overwiev Fig. 29 Menu tree Enable Terminal Interface Menu The module displays the following screen when connecting to the configuaration interface Fig. 30 Enable terminal interface menu Page 42 Reg.No. ME00107EN-02... - Page 49 Fieldbus PCI-Card Configuration interface To activate the configuration interface, press [Enter]. Note that data exchange and mailbox activity will be halted until the RS232 cable is physically disconnected. Main menu The following menu entries are available from the main menu. Detailed information of each menu entry is presented in the following pages.
- Page 50 Fieldbus PCI-Card Configuration interface Fig. 32 Scan-list - = No slave present X = Slave present Page 44 Reg.No. ME00107EN-02...
- Page 51 Fieldbus PCI-Card Configuration interface View all nodes This command displays I/O configuration, ID codes and all parameters for slave Fig. 33 All nodes View all detected nodes This command will display all detected nodes Fig. 34 Detected nodes Reg.No. ME00107EN-02 Page 45...
- Page 52 Fieldbus PCI-Card Configuration interface To alter a setting for a specific node, type the desired node address and press [Enter]. View single node This command displays information about a single node. Fig. 35 Single node To view or alter the settings for a specific node, type the desired node address and press [Enter]. Toggle node This mode is used to alter the current operating mode of the module.
-
Page 53: Change Settings
Fieldbus PCI-Card Configuration interface Auto address This command is used to enable/disable the automatic address programming feature. Fig. 38 Auto address Press [ESC] to cancel. Save configuration Fig. 39 Save configuration Press [Enter] to store the current configuration, or press [ESC] to cancel. Note This command is not allowed in protected mode. - Page 54 Fieldbus PCI-Card Configuration interface Fig. 40 Change settings To alter the value of a parameter, select the desired parameter by typing the corresponding number and press [Enter]. A menu similar to the one below is displayed, allowing the selected parameter to be altered. Type the new value and press [Enter].
-
Page 55: Ethernet/Ip Adapter/Modbus Tcp Slave Ab3606
Fieldbus PCI-Card EtherNet/IP Adapter/Modbus TCP slave interface details 10 EtherNet/IP Adapter/Modbus TCP Slave AB3606 10.1 EtherNet/IP Adapter/Modbus TCP slave interface details • Complete EtherNet/IP Adapter (slave) interface • Baud rate: 10/100 MBit/s • EtherNet/IP level 2 I/O server • Transformer isolated Ethernet interface •... -
Page 56: Status Leds
Fieldbus PCI-Card Card 10.2.1 Status LEDs Meaning Indication State Green Controlled by application Appl. connected Standalone Green, flashing I/O ACCESS Red, flashing I/O ACCESS Activity Green, flashing A packet is received or transmitted Green, Link detected Link not detected Green On-line, one or more connections established (CIP Class 1 or 3) Green, flashing... -
Page 57: Network Setup
Fieldbus PCI-Card Network setup Pin RJ45 (Female) Signal Termination Termination Termination 10.3 Network setup The IP address on the board is set with the HMS “Anybus IPconfig” tool which can be downloaded from the HMS support webpage. See section 4 General installation in IP-based networks. 10.3.1 EIP setup To configure the EtherNet/IP fieldbus network RS-Networx can be used. -
Page 58: Ethernet/Ip Scanner Master Ab3607
Fieldbus PCI-Card EtherNet/IP Scanner master interface details 11 EtherNet/IP Scanner Master AB3607 11.1 EtherNet/IP Scanner master interface details • Complete EtherNet/IP Scanner (master)” interface • Dual Port (DPRAM) parallel interface • EtherNet/IP level 4 I/O client - ODVA certified • Transformer isolated Ethernet interface •... -
Page 59: Status Leds
Fieldbus PCI-Card Card 11.2.1 Status LEDs Meaning Indication State Green Controlled by application Appl. connected Standalone Green, flashing I/O access OK Red, flashing I/O access failure (recoverable) I/O ACCESS No activity Not used Green Link established Green, flashing Activity; receiving/transmitting data Link/Activity No link or power off Green... -
Page 60: Network Setup
This functionality is supported if the robot controller has a HMSAB.DRV version 1.5.15.9 (DX100) or 1.4.18.9 (NX100/NXC100) or later. Date for release is 2013-01-08. All versions for DX200. The AB3607 card must have version 1.08 or newer. Version can be seen in the AnyBus IPConfig tool. - Page 61 Fieldbus PCI-Card Network setup Fig. 46 Anybus Master EtherNet/IP A. Scanner mode Idle B. Scanlist Config Note If Scanlist Config is missing, update the HMSAB.DRV in the robot controller or the firmware on the PCI card. To enter Configuration of Scanlist, select text “Scanlist Config”: Fig.
- Page 62 Fieldbus PCI-Card Network setup Fig. 48 Error:12 To edit a connection in the list, just click on that row. To add a connection press [Add]. To delete a connection select row and press [Delete]. See Fig. 47 Anybus Master EtherNet/IP 2. Example below shows connection 5 bytes from an AnyBus Ethernet/IP adapter.
- Page 63 Fieldbus PCI-Card Network setup Note The default value for the Configuration instance is 0. Reg.No. ME00107EN-02 Page 57...
-
Page 64: Profinet-Io Slave Ab3609
Fieldbus PCI-Card PROFINET-IO Slave Interface Details 12 PROFINET-IO Slave AB3609 12.1 PROFINET-IO Slave Interface Details • Complete PROFINET-IO device functionality • Max. 255 bytes of input and 255 bytes output data • 100 Mbit full duplex transmission • RJ45 connector •... -
Page 65: Status Leds
Fieldbus PCI-Card Card 12.2.1 Status LEDs Meaning Indication State Green Controlled by application Appl. connected Standalone Green, flashing I/O access OK Red, flashing I/O access failure (recoverable) I/O ACCESS No activity Not used Green Link established Green, flashing Receiving/transmitting data Link/Activity No link or power off Green... -
Page 66: Network Setup
Fieldbus PCI-Card Network setup Pin RJ45 (Female) Signal Termination Termination Termination Termination 12.3 Network setup Two unique IDs have to be set on the ProfiNet slave: • IP address • Device Name Set a Device Name for the module when the Anybus PROFINET IO module is to be used for the first time in the network. -
Page 67: Fl-Net Ab3610
Fieldbus PCI-Card FL-Net Interface Details 13 FL-Net AB3610 13.1 FL-Net Interface Details • Complete FL-Net server functionality • Support shielded (STP) and unshielded (UTP) cables • FL-Net class 1 node • Customizable identity/profile information • Up to 255 bytes input and 255 bytes output data •... -
Page 68: Status Leds
Fieldbus PCI-Card Network setup 13.2.1 Status LEDs Meaning Indication State Green Controlled by application Appl. connected Standalone Green, flashing I/O access OK Red, flashing I/O access failure (recoverable) I/O ACCESS No activity Green Packet received or transmitted No activity Green Link established No link established Green... -
Page 69: Fipio Slave Ab3611
Fieldbus PCI-Card FIPIO Interface Details 14 FIPIO Slave AB3611 14.1 FIPIO Interface Details General features: • Supports both FIP and WorldFIP standards • Baudrate. The baud rate is fixed to the standard FIPIO baudrate 1Mbit/s • The FIPIO slave is configured as a Class 0 device, i.e. it cannot change configuration in run-time. It supports all 3 different FIPIO profiles: •... -
Page 70: Status Leds
Fieldbus PCI-Card Setup 14.2.1 Status LEDs Meaning Indication State Green Controlled by application Appl. connected Standalone Green, flashing I/O access OK Red, flashing I/O access failure (recoverable) I/O ACCESS No activity Device not powered or major failure (no communication) Green Normal operation (Device powered up and operating) No bus activity... -
Page 71: Reg.no. Me00107En-02 Page
Fieldbus PCI-Card Setup • must be declared in the remote I/O configuration of the PLC that controls the process. • Addresses 64 - 255 can only be used if supported by the fieldbus control system. 14.3.1 Setup in Schneider’s “UNITY” programming environment The older environment, “PL7”, is described on AnyBus support pages for FIPIO. - Page 72 Fieldbus PCI-Card Setup Fig. 57 Choose profile After configuring the node it creates a number of I/O objects. Note that FRD is addressed via bits and FED/FSD via words FED C32: %IW\2.nod nb\0.0.0.0 - %IW\2.nod nb\0.0.0.31 %QW\2.nod nb\0.0.0.0 - %QW\2.nod nb\0.0.0.31 FSD C8: %IW\2.nod nb\0.0.0.0 - %IW\2.nod nb\0.0.0.8 %IW\2.nod nb\0.0.0.0 - %IW\2.nod nb\0.0.0.8...
- Page 73 Fieldbus PCI-Card Setup Fig. 58 FIPIO address Fig. 59 FIPIO address continued In online mode it looks Fig. 60 Online mode when OK when OK. Fig. 60 Online mode when OK In online mode it looks like Fig. 61 Online mode when NOT OK when not OK. Reg.No.
- Page 74 Fieldbus PCI-Card Setup Fig. 61 Online mode when NOT OK The data in and out can be read in online and debug on a node that is OK. Fig. 62 Online data presentation The data can be read as Decimal, Hexadecimal or binary. Fig.
-
Page 75: Interbus-S Slave Ab3615
Fieldbus PCI-Card Interbus-S Interface Details 15 Interbus-S Slave AB3615 15.1 Interbus-S Interface Details The Interbus-S 2Mbit/s module is a slave node that can be read from/written to by an Interbus master. Being a slave module, it cannot initiate communication to other nodes; it only responds to incoming requests. -
Page 76: Status Leds
Fieldbus PCI-Card Card 15.2.1 Status LEDs Meaning Indication State Green Controlled by application Appl. connected Standalone Green, flashing I/O access OK Red, flashing I/O access failure (recoverable) I/O ACCESS No activity CC/RC Green Cable connection is good and the Interbus master is not in reset mode. Yellow Remote bus disabled Green... -
Page 77: Setup
Fieldbus PCI-Card Setup 15.3 Setup The Interbus-S slave can run on either 500 kbit/s or 2 Mbit/s. The setting is made by switching a jumper on the card when the card is unpowered. Referring to image below: • Moving the jumper to the A-side sets baudrate 2 Mbit/s •... -
Page 78: Canopen Slave Ab3616
Fieldbus PCI-Card CanOpen Interface Details 16 CanOpen Slave AB3616 16.1 CanOpen Interface Details I/O Data is exchanged using Process Data Objects (PDO). The module supports up to 80 RPDO’s and 80 TPDO’s, each capable of carrying up to 8 bytes of data. •... -
Page 79: Status Leds
Fieldbus PCI-Card Card Fig. 68 CanOpen slave card 16.2.1 Status LEDs Meaning Indication State Green Controlled by application Appl. connected Standalone Green, flashing I/O access OK Red, flashing I/O access failure (recoverable) I/O ACCESS No activity Normal operation Status Unrecoverable fault detected Module not powered Power Green... -
Page 80: Setup
Fieldbus PCI-Card Setup Meaning Indication State No error Bus off Red, single flash Warning limit reached Red, double flash Error control event Error Alternating red/ Self test green Module is performing power up test procedures Red, triple flash Sync error Fieldbus interface Fig. - Page 81 Fieldbus PCI-Card Setup Working with CanOpen is often more similar to work with serial protocols like Modbus than compared to working with fieldbuses like Profibus or Devicenet. CanOpen requires more knowledge about the lower-level protocol details as they often need to be modified during network configuration.
-
Page 82: Ethercat Slave Ab3617
Fieldbus PCI-Card General 17 EtherCAT slave AB3617 17.1 General EtherCAT slave is supported by the system sw and the HMSAB.DRV version 1.6.5.9. 17.1.1 Interface details • CANopen over EtherCAT • DS301 v4.02 compliant • Galvanically isolated network electronics • Generic Device Description File provided 17.2 Card Caution The card contains ESD sensitive components. -
Page 83: Status Leds
Fieldbus PCI-Card Card 17.2.1 Status LEDs Meaning Indication State Green Controlled by application Appl. connected Standalone Green, flashing I/O access OK Red, flashing I/O access failure (recoverable) I/O ACCESS No activity No link detected on Ethernet port 1 = In port Link/Activity 1 Green... -
Page 84: Network Setup
Fieldbus PCI-Card Card SAFE-OPERATIONAL Input I/O data (PDOs) can be sent from the module to the master in the SAFE-OPERATIONAL state. No data communication from the master to the module. OPERATIONAL In OPERATIONAL state all kinds of communication are allowed, input I/O data from slave to master, output I/O data from master to slave as well as SDO communication Fieldbus interface Fig. - Page 85 Fieldbus PCI-Card Card Fig. 72 Settings Reg.No. ME00107EN-02 Page 79...
- Page 86 He lge Nie ls e ns AllÈ 7, 2E, DK-8723 L¯ s ning, De nma rk Buda pe s t +3 6-30-951 0065 P hone : +45-7022-2477 YASKAWA Europe Te chnology LTD. YAS KAWA Ibe rica S .L. Ros h Ha · yin +972-3-9004114 Ave nida Ma rina 56 b, P a rce la 90, ES -08830 St.
-
Page 87: Revision History
170542-1CD Fieldbus PCI-Card Revision History Revision History Date CEN / Revision Reason For Revision Initials 7/23/2014 53700 Original Release ME00107EN... - Page 88 FIELDBUS PCI-CARD INSTRUCTIONS FOR NX100, DX100, OR DX200 Specifications are subject to change without notice for ongoing product modifications and improvements. MANUAL NO. ME00107EN...
Need help?
Do you have a question about the NX100 and is the answer not in the manual?
Questions and answers