
Related Manuals for Intellitouch Pool and Spa Control System

Summary of Contents for Intellitouch Pool and Spa Control System
-
Page 1: Installation Guide
® IntelliTouch Pool and Spa Control System Personality Kit Installation Guide IMPORTANT SAFETY INSTRUCTIONS READ AND FOLLOW ALL INSTRUCTIONS SAVE THESE INSTRUCTIONS... - Page 2 © 2008 Pentair Water Pool and Spa, Inc. All rights reserved This document is subject to change without notice 1620 Hawkins Ave., Sanford, NC 27330 • (919) 566-8000 10951 West Los Angeles Ave., Moorpark, CA 93021 • (805) 523-2400 Trademarks and disclaimers IntelliTouch ® , QuickTouch, MobileTouch ® , ScreenLogic ®...
-
Page 3: Table Of Contents
Installing and Connecting Temperature Sensors ............. 20 Water Temperature Sensor ................20 Ambient Air Temperature (Freeze Protection) Sensor ......... 20 Solar Temperature Sensor (Optional) ............20 Connecting IntelliTouch to a Standard Gas Heater ..........21 Connecting the Transformer ..................21 IntelliTouch Personality Kit Installation Guide... - Page 4 Related IntelliTouch Manuals IntelliTouch Load Center Installation Guide (P/N 520100) IntelliTouch Expansion Center Kit User’s Guide (P/N 520471) IntelliTouch i-Link Protocol Interface Adapter User’s Guide (P/N 520450) ScreenLogic ® User’s Guide (P/N 520493) ScreenLogic Video & Lighting Protocol Adapter User’s Guide...
-
Page 5: Important Safety Precautions
10 feet (3.05 m) away, adjacent to, and within sight of, the unit. CAUTION - Except for listed spa-side remote controls, install a minimum of five (5) feet from the inside wall of the pool and spa. IntelliTouch Personality Kit Installation Guide... - Page 6 10 ft. (3.05 m) from the inside wall of the pool. 6. Supply conductor must be sized to support all loads. Maximum supply conductor current must be 125 Amps at 125 VAC or 63 Amps at 240 VAC. IntelliTouch Personality Kit Installation Guide...
-
Page 7: Introduction
IntelliTouch System Overview An IntelliTouch system can include five (5) to 40 high voltage relays circuits that can be used to control any combination of pumps, lights, water features. A maximum of ten (10) relays can be housed in an IntelliTouch Load Center or Power Center. -
Page 8: Intellitouch System Components
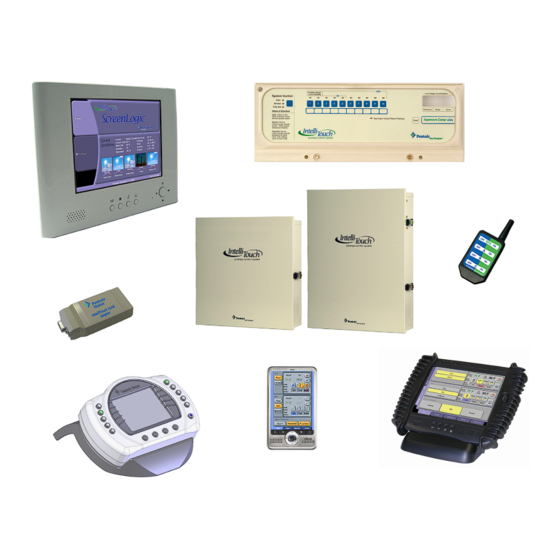
IntelliTouch System Components The main required components of an IntelliTouch system is a Load Center or Power Center, IntelliTouch Personality Kit, and Interface: Load or Power Center • Load Center: Provides a larger footprint (17" W x 23" H) Includes built-in sub panel (125 AMPS) capable of holding up to eight 1”... -
Page 9: Intellitouch Personality Kit Contents
This model also allows HI-TEMP and LO-TEMP settings. IntelliTouch Personality Kit Contents The following items are included in the IntelliTouch Personality Kit. If any item is missing or damaged in the IntelliTouch kit, contact your authorized dealer, or contact Pentair Technical Support (page 9). -
Page 10: Intellitouch Interfaces
Kit (P/N 520500) – Includes Protocol Interface Adapter and wireless router that connects to existing Desktop or Laptop PC. This allows control of IntelliTouch pool and spa systems via PC (requires PC with an Ethernet connection, and Windows XP operating system). - Page 11 MobileTouch Kit (P/N 520906) – 3.75’’ monochrome backlit LCD wireless control panel with Transceiver antenna. Allows any IntelliTouch wired system to also have a wireless remote with all the capabilities of the Indoor Control Panel. With an average range of 300 feet, pool owners have system control anywhere around the home or yard.
-
Page 12: Intellitouch In Your Home
The Tablet is custom configured for IntelliTouch systems. Indoor Control Panel: This control panel consists of a 3.75’’ monochrome backlit LCD and connects to the Personality Board in the Load Center or Power Center for control of IntelliTouch pool and spa systems. -
Page 13: Intellitouch Interface Kits
CD-ROM containing IntelliTouch ScreenLogic PC user interface software IntelliTouch ScreenLogic Interface Accessory Kits Up to a total of four ScreenLogic interfaces can be used with an IntelliTouch system, as shown above. If you need additional interfaces, first order one of the ScreenLogic interface kits, then order one or more of the following accessory interfaces accessory kits: •... -
Page 14: Installation Steps Summary
Power/Load Center (for models i5S, i9+3S, i10+3D only). Tools required • 3/16 in. diameter drill (for mounting Indoor Control Panel). • 5/16 in. diameter drill (for mounting Water Temperature Sensor). IntelliTouch Personality Kit Installation Guide... -
Page 15: Accessory Equipment
Two Telephone remote control for any single circuit, usually Spa mode. 520148 QuickTouch Four-Function Wireless Remote Kit, Transmitter and Receiver. 520406 Dimmer Module. Supports up to 4,000 Watts maximum load (four dimmers handling 1,000 Watts each). IntelliTouch Personality Kit Installation Guide... -
Page 16: Plumbing Requirements
Control System activates the pool cleaner. If a booster pump pool cleaner is being used, plumb the booster pump so that its suction-side is connected to the pool return, after the heater, and as close to the ground as practical. IntelliTouch Personality Kit Installation Guide... -
Page 17: Equipment Location
Equipment Location All equipment, with the exception of the Spa-Side remote, must be located at least 10 ft. from the water’s edge. MobileTouch® wireless remote controller INTELLICHLOR® Recommended Hydraulic Schematic for Shared Equipment System IntelliTouch Personality Kit Installation Guide... - Page 18 SENSOR SENSOR SOLAR SENSOR SOLAR PUMP PUMP HEATER FILTER FILTER INTAKE FILTER FILTER PUMP PUMP HEATER CLEANER PUMP INTELLICHLOR® CVA-24 SKIMMER POOL LIGHT MAIN DRAIN POOL LIGHT WATERFALL Recommended Hydraulic Schematic for Dual Equipment System IntelliTouch Personality Kit Installation Guide...
- Page 19 IntelliTouch®, MobileTouch® Wireless Controller EasyTouch®, SunTouch Load/Power Center INTELLICHLOR® IntelliTouch®, EasyTouch®, SunTouch Load/Power Center MobileTouch® Wireless Controller Check Valve INTELLICHLOR® SCG Recommended Hydraulic Schematic for Single Body System IntelliTouch Personality Kit Installation Guide...
-
Page 20: High Voltage Connections
Front door removal screw Grounding screw terminals GFCI knockout Low voltage (approved rainproof raceway cover required) Mounting bracket Power Center Enclosure (17” H x 17” W x 4.8” D) IntelliTouch Personality Kit Installation Guide... -
Page 21: Load Center (With Built-In Sub-Panel)
Note: Up to three additional Expansion Centers (i5x or i10x) can be added to a base Power/Load Center: i9+3, i9+3S, i10+3D. For more information about using multiple Power/Load Center, refer to the IntelliTouch Systems User’s Guide (P/N 520102) and the IntelliTouch Installation Guide (P/N 520101). -
Page 22: Installing The Outdoor Control Panel
Center receives control inputs from the Personality board and distributes high voltage power to Pentair Valve Actuators (PVA), control pumps, lights, and heater operations. The IntelliTouch remote Indoor Control Panel also controls these and other functions, such as pool and spa lights. -
Page 23: Connecting The Pre-Installed Relays
(P/N 520510) is designed to operate two sets of pool equipment. Each set of a equipment (Pool or Spa) can control one temperature setting. This IntelliTouch Personality Kit can control up to 10 pumps and/or lighting circuits, plus two heater circuits. The Personality Kit includes, eight auxiliary circuits plus a filter pump. -
Page 24: Installing Auxiliary Relays
Note: Install the optional Two-Speed Pump relay (P/N 520198) cable plug into the 2SPD two-pin socket on the Personality board. For installation and operation information, refer to the Two-Speed Relay User’s Guide (P/N 520210). Personality Board Relay Retaining Optional Relays (3x) Screws IntelliTouch Personality Kit Installation Guide... -
Page 25: Installing The Valve Actuator
ON1 and ON2 positions. This will rotate the valve to the correct position. The following diagram shows the standard plumbing and valve actuator position. OUT (Valve A - Suction) IN (Valve B - Return) IntelliTouch Personality Kit Installation Guide... -
Page 26: Installing And Connecting Temperature Sensors
Wiring Diagrams, page 32 and 33. Solar Temperature Sensor (Optional) Run a two-conductor cable between the sensor and the IntelliTouch Load Center. To install the solar sensor: 1 Mount the sensor on a flat surface, with the same exposure to sun as the solar collectors (next to the collectors is recommended) or any sunny location. -
Page 27: Connecting Intellitouch To A Standard Gas Heater
Connecting IntelliTouch to a Standard Gas Heater (Pentair MiniMax, MasterTemp) To connect a Pentair MiniMax, or MasterTemp, or to the IntelliTouch Load Center: The following instructions are for gas heaters and heat pumps with low voltage thermostats. To connect the heater thermostat cable plug to the Personality board: 1. -
Page 28: Installing The Indoor Control Panel
Installing the Indoor Control Panel The Indoor Control Panel controls pool, spa, lights and other functions of the IntelliTouch system from inside the home or a sheltered area. Select a convenient wall location inside the house or other weather-protected area for mounting the Control Panel. -
Page 29: Cabling The Indoor Control Panel At The Load Center
Personality board. For connector locations, refer to the Wiring Diagrams on pages 32 and 33. 6. Proceed with Cabling the Indoor Control Panel, page 24. Personality board (Connector J7 or J8) IntelliTouch Personality Kit Installation Guide... -
Page 30: Cabling The Indoor Control Panel
Notch Front cover Notch Indoor Control Panel (front view) IntelliTouch Personality Kit Installation Guide... - Page 31 9. Mount the control panel cover over back plate and snap in place to secure. Remove the clear protective plastic sheet from the control panel LCD. 1 GND BLACK GREEN +D YELLOW 4 15V Screw Terminal Connector Indoor Control Panel (rear view) IntelliTouch Personality Kit Installation Guide...
-
Page 32: Mobiletouch Wireless Controller
The MobileTouch wireless controller has an operating range of up to 300 ft. from the MobileTouch transceiver antenna (line of sight) which is typically located near the IntelliTouch load center. The optimum wireless transmit and receive range may be affected by physical obstructions, (especially those containing metal), weather conditions, and geographical features. - Page 33 CAUTION Water damage may occur if the case retaining screws are not secured or a new hole is drilled for the cable and not sealed. Do not seal drain holes. Case Antenna Transceiver Circuit Board Mounting point (4x) Screw terminals Back plate Knockout hole Retaining screws Transceiver Module IntelliTouch Personality Kit Installation Guide...
-
Page 34: Connecting The Transceiver To The Personality Board
(5) feet of the pool and spa. Canadian installations require a minimum of three meters from pool water. Do not recharge outdoors. CAUTION The hand-held LCD control panel is NOT intended to be submersible. Remove unit immediately if dropped in water. IntelliTouch Personality Kit Installation Guide... -
Page 35: Setting Up The Mobiletouch Wireless Controller
4. From the MobileTouch controller Advanced screen, press the lower buttons 2 and 4 at the same time. The Service Personnel screen will be displayed. Press button 2 and 4 at the same time to access the Service Personnel screen IntelliTouch Personality Kit Installation Guide... - Page 36 8. Press Exit to return to the main screen or proceed with Step 9 if you are adding multiple MobileTouch controllers while the IntelliTouch outdoor control panel LEDs are flashing. 9. To add another MobileTouch controller at this time, repeat Steps 4 through 8 for each controller, if not, continue with Step 10.
-
Page 37: Charging The Mobiletouch Wireless Controller
The range of the MobileTouch wireless controller can be up to 300 feet from its transceiver antenna (line of sight). The transceiver antenna is typically located outside near the IntelliTouch Load Center. The device can be used all day at full power with a complete battery charge (3 to 4 hours). -
Page 38: System Start-Up
System Start-Up The following information describes basic start-up procedures. For more detailed troubleshooting information, refer to the IntelliTouch Systems User’s Guide (P/N 520102) . Before you power up the Power/Load Center check the following: Check Electronics Check that the following plugs are seated correctly on the Personality board: •... -
Page 39: Solar System Installation
(such as pool fill line or jet air intake). Solar System Start-Up 1. Switch power on to the IntelliTouch Load Center. 2. If pool cleaner protection has been added to the system, the pool cleaner pump motor should be activated whenever the pool cleaner timer is on. Momentarily turn pool cleaner on and off to check the motor is operating correctly. -
Page 40: System Wiring Diagram (Power Center/Load Center)
System Wiring Diagram (Power Center) IntelliTouch Personality Kit Installation Guide... - Page 41 System Wiring Diagram (Load Center) IntelliTouch Personality Kit Installation Guide...
-
Page 42: Glossary
Load Center: Metal enclosure with power relays, transformer, and circuit breakers. The Load Center is Installed prior to Personality Kit installation. Used for distributing power for controlling IntelliTouch Systems. Also known as the “sub-panel.” Low Voltage Compartment: Top compartment of Load Center for all low voltage wiring. - Page 43 Notes IntelliTouch Personality Kit Installation Guide...
- Page 44 Notes IntelliTouch Personality Kit Installation Guide...
- Page 46 *520101* P/N 520101 - Rev D...
Need help?
Do you have a question about the Pool and Spa Control System and is the answer not in the manual?
Questions and answers