Table of Contents
Advertisement
Quick Links
Advertisement
Table of Contents

Subscribe to Our Youtube Channel
Related Manuals for Oce 9600


Summary of Contents for Oce 9600
- Page 1 Océ 9600 Copier/Printer User Manual...
- Page 2 This manual, which can be kept behind the left-hand door of the copier, contains a description of the Océ 9600 and the copy jobs that can be done with it. The introduction (chapter 1) contains general instructions for using the printer.
-
Page 3: Table Of Contents
Display 27 Counter 28 Buttons 29 Printer panel actions 30 Starting up and shutting down the Océ 9600 31 Media type and size on the printer 32 Special media indication 34 Interrupt a print job 34 Select a language 35... - Page 4 Managing print and copy jobs Introduction 74 Structure 74 Icons 77 The connection to a controller 78 Managing print jobs 79 Chapter 6 Scan to file Introduction 82 Make a scan-to-file 83 Settings for scan-to-file 85 File mode 86 Océ 9600 Copier/Printer User Manual...
- Page 5 Structure 106 Icons 110 User operations 111 Chapter 8 Remote Logic Introduction 114 Installation procedure 115 Chapter 9 The Océ 9600 applications Introduction 120 User modes 121 Log in 122 Logout 122 To change the password 122 Table of Contents...
- Page 6 System related settings 176 Single options 177 Localization (group) 177 Job priorities (group) 179 Media (group) 180 Timers (group) 181 Disk clean up (group) 183 Scanner related settings 185 Single options 186 Zoom steps (group) 187 Océ 9600 Copier/Printer User Manual...
- Page 7 Timers (group) 188 Chapter 11 System administrator settings Introduction 192 System Administrator settings 193 Printer related settings 195 Printer Descriptive Language settings (groups) 197 Pen settings 206 System related settings 208 Controller identification settings (group) 209 Set memory reservation settings 211 Connectivity settings 211 Chapter 12 Loading supplies...
- Page 8 Recommended weight limits 292 Instructions for safe use 294 Safety data sheets 295 Safety data sheet Océ 9600 printer and folder 295 Safety data sheet Océ 9600 scanner 295 Safety data sheet Océ 9600 printer 296 EPA Energy Star® 297...
-
Page 9: Introduction
Océ 9600 Copier/Printer User Manual Chapter 1 Introduction This chapter contains a general introduction to the Océ 9600, including a general description of the main features, delivery options and software applications provided with the system. -
Page 10: About This Manual
Chapter 2: Using the Océ 9600 printer actions that can be performed on the printer operating panel of the Océ 9600. contains a brief description of the Chapter 3 Using the Océ 9600 copier actions that can be performed on the scanner operating panel of the Océ... - Page 11 Océ 9600. contains the product specifications for the Appendix A: Overview and tables Océ 9600, a list of available material types and sizes. contains the recommended weight limits, Appendix B: Safety information instructions for safe use, the available safety data sheets and the applicable TAR ®...
-
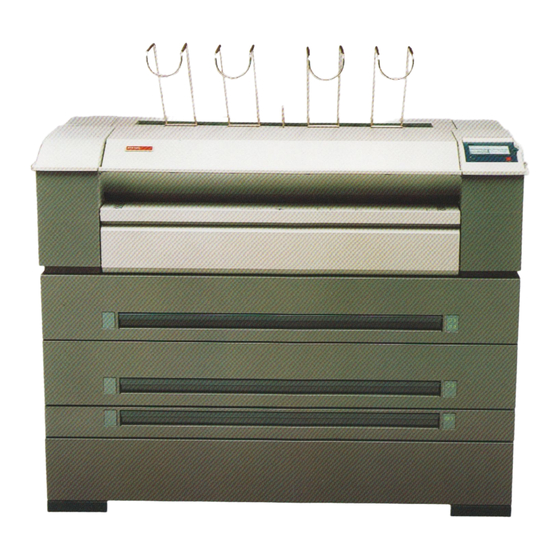
Page 12: The Océ 9600
(with one cassette tray) and three cassette trays (with four rolls). The Océ 9600 is a versatile, highly productive system which offers you a broad range of functions. See ‘Product specifications Océ 9600’ on page 281 for more information. -
Page 13: Océ 9600 Key Concepts
(as required). The Océ 9600 is equipped with a set memory for storing up to 250 A0s, which allows for the creation of identical sets that are sorted either by page or by set. - Page 14 Format (RCF) files or Océ Job Tickets (OJT) and remote applications): Operating panels The Océ 9600 consists of two operating panels for making a wide variety of settings for printing and copying. See ‘Printer operating panel’ on page 26 and ‘Scanner operating panel’ on page 40 for more information.
- Page 15 A Remote Control Format (RCF) file or Océ Job Ticket (OJT) can be used to instruct the Océ 9600 on how to handle a remote print job. The specific settings can be made by a user on a control panel, or by means of the user interface (UI) on a workstation or PC.
-
Page 16: Océ 9600 Users
The Océ 9600 system administrator is responsible for System administrator installing and configuring the Océ 9600 in his or her environment. He defines the printer language settings, pen settings and Automatic Language Sensing (ALS) settings. The system administrator can also provide assistance to normal users who need to install the printer drivers on their workstations. -
Page 17: Océ 9600 Components
Internet at www.oce.com. Océ 9600 printer As a user, you can perform a number of activities at the Océ 9600 printer. You can start up and shut down the printer, set the media type and size, set a special media indication, stop a print job or select your preferred language from the printer operating panel (see chapter 2, ‘Using the Océ... -
Page 18: Océ 9600 Scanner
Océ 9600 scanner The Océ 9600 scanner supports a wide range of copy activities. It provides a large number of functions for defining original and copy-related settings. Users can specify particular layout, media, finishing, feeding and quality enhancement options from the scanner operating panel. In combination with the Océ... -
Page 19: Océ 9600 Controller
Note: Océ 9600 controller The Océ 9600 is equipped with a workstation which helps you to make optimum use of your system. This workstation runs a number of applications which allow you to control your print jobs, make your default printer settings and monitor the printer status. - Page 20 See chapter 10, ‘Key operator settings’ on page 129 for more information about the Océ 9600 Settings Editor application. The system administrator settings in the Océ 9600 Settings Editor application allow the system administrator to configure and set up all aspects related to the infrastructure of the system.
-
Page 21: Océ 9600 Optional Features
Note: available configurations. Each of the rolls and cassette trays on the Océ 9600 may be loaded with print material of a different size or type. The size and type of the available media are indicated on the operating panel. - Page 22 In order to help customers to achieve optimum productivity with Roll loadr their Océ 9600 and at the same time comply with the international safety regulations as far as maximum roll weights are concerned, Océ provides an optional roll loader for use with the Océ 9600. See ‘Recommended weight limits’...
- Page 23 Delivery Tray can be used in combination with the Integrated Receiving Tray (IRT). [5] Copy Delivery Tray If the Océ 9600 is equipped with a folder, the folded copies are fed into Folder the standard delivery of the folder, by default. The folder can be combined with the integrated receiving tray (IRT).
- Page 24 The optional reinforcement unit adds a firm plastic rim Reinforcement unit with punched holes to the copy (see figure 7). [7] Copy with reinforcement unit Océ 9600 Copier/Printer User Manual...
-
Page 25: Using The Océ 9600 Printer
Océ 9600 Copier/Printer User Manual Chapter 2 Using the Océ 9600 Printer This chapter contains a brief description of the operating panel of the Océ 9600 Printer and the actions that can be performed on it. -
Page 26: Printer Operating Panel
At the top of the panel there is an indicator (a light) which starts flashing when operator intervention is required. Up/Down buttons Selection buttons On line button Stop button [8] Printer operating panel Océ 9600 Copier/Printer User Manual... -
Page 27: Display
An empty cassette tray is displayed as an empty paper tray. In the event of an error, a graphical representation of any error location (cover or panel), together with instructions on how to solve the problem is displayed. Using the Océ 9600 Printer... -
Page 28: Counter
Counter On theOcé 9600 Printer operating panel, a counter will be displayed that gives the user feedback about the progress of the job that is currently being printed. The counter, located at the bottom of the upper window on the operating panel, displays the number of sets and/or pages printed. -
Page 29: Buttons
Buttons With the buttons on the operating panel, you can make a number of settings for the Océ 9600 Printer, such as the media type and size or the preferred language. The following buttons are available: Button types Function Selection... -
Page 30: Printer Panel Actions
Printer panel actions On the Océ 9600 printer operating panel you can perform a limited number of actions. These include: Starting up and shutting down the printer Setting media type Setting media type for manual feeder Setting media size Setting a special media indication... -
Page 31: Starting Up And Shutting Down The Océ 9600
Starting up and shutting down the Océ 9600 After starting up the Océ 9600 Printer, it is ready for operation. Start up the system Set the on/off switch at the rear of the printer to position ‘1’ (see figure 9). If the mains is connected correctly, the green switch will light up. -
Page 32: Media Type And Size On The Printer
Media type and size on the printer One of the features of the Océ 9600 printer is the automatic media change function. This function allows the printer to switch to another roll of the same format and copy material when the roll or cassette tray becomes empty during printing. - Page 33 Use the up/down buttons to select the size of the media you just loaded. Press the on line button to put the printer on line again. The printer now knows which media size is used for the specified roll or cassette tray. Using the Océ 9600 Printer...
-
Page 34: Special Media Indication
Interrupt a print job The red ‘Stop’ button on the Océ 9600 Printer operating panel interrupts the active print process. You can cancel or continue the current print job. Cancel a print job Press the ‘Stop’... -
Page 35: Select A Language
Press the ‘On line’ button to continue the current print job. Select a language On the operating panel of the Océ 9600 Printer you can specify which language you want to use for displaying printer information, such as status and error messages. -
Page 36: Off-Line Folding Settings
Off-line folding settings On the Océ 9600 Printer operating panel, you can specify the settings you want to use for off-line folding. These settings include defining the length and width of the folded package, enabling and defining the binding edge, selecting the input method and legend position and cleaning the reinforcement knife. -
Page 37: Positioning The Reinforcement Knives (Optional)
Then the reinforcement knives are placed in the correct position. You can now continue to clean the reinforcement knives (see ‘Maintenance of the reinforcement knives’ on page 241). Using the Océ 9600 Printer... - Page 38 Océ 9600 Copier/Printer User Manual...
-
Page 39: Using The Océ 9600 Copier
Océ 9600 Copier/Printer User Manual Chapter 3 Using the Océ 9600 Copier This chapter contains a brief description of the interface of the Océ 9600 Copier and the actions that can be performed on its operating panel. -
Page 40: Scanner Operating Panel
Scanner operating panel The Océ 9600 is a very user-friendly system. The scanner, in particular, is very easy to operate. Basic copy jobs can be performed by simply pressing the green start button on the scanner’s operating panel. If you want to perform more complex copy jobs, you have to change the default copy settings with the help of the other settings on the scanner operating panel. -
Page 41: Display
Pressing the red button to the left of the display stops the copy process for the current original. You can stop the original transport immediately when an original jam oc- curs. Interrupt button Currently not in use. Using the Océ 9600 Copier... -
Page 42: Section, Function And Arrow Buttons
Océ 9600 Copier. The key operator can change the contents of the ‘Custom’ section from the Settings editor on the controller (see ‘Specify the custom card’... - Page 43 Sheet Feeding Each card contains a number of specific options, as shown below. [13] Original section of the Océ 9600 Copier The ‘Copy’ section contains all settings for the copy, divided Copy section over a number of cards. The following cards are available (top to bottom):...
-
Page 44: Settings On The Océ 9600 Copier Operating Panel
[14] Copy section of the Océ 9600 Copier Settings on the Océ 9600 Copier operating panel On startup of the Océ 9600 Copier, the ‘Custom’ section is displayed. This contains a number of default values that have been defined by the key operator. - Page 45 10. An exception to this rule is the selection of zoom values. The Left arrow button can be used to browse through the predefined reduction steps and the Right arrow button to browse through the predefined enlargement steps. Using the Océ 9600 Copier...
-
Page 46: Perform Basic Copy Jobs
Perform basic copy jobs On the Océ 9600 Copier you can perform a number of basic tasks. These include: Starting up and shutting down the scanner Making copies Selecting the required media Selecting the input mode Specifying the zoom factor... -
Page 47: Starting Up And Shutting Down The Scanner
Starting up and shutting down the scanner TheOcé 9600 Copier can be started up and shut down with the on/off switch, which is located on the scanner underneath the original feed table (see figure 15). The on/off switch has two settings: on: the scanner is switched on off: the scanner is switched off. -
Page 48: Make Copies
Specify the number of copies using the numeric buttons. Specify the desired copy material on the operating panel. If you select ‘Automatic’ the Océ 9600 Copier will try to use a roll format that matches the specified size. After inserting the original, the roll or cassette tray that is used is Note: indicated by the ‘... -
Page 49: Selecting The Required Media
‘ ’ symbol. If you select ‘Automatic’, the Océ 9600 Copier will try to use a roll or cassette tray format that matches the original size. After inserting the original, the roll or cassette tray that is used is indicated by the ‘... -
Page 50: Selecting The Input Mode
Select the desired media with the ‘Input mode’ function button. Interrupt Access to Access to Page [18] Selecting the input mode You can also select the input mode from the ‘Custom’ section (if this Note: setting has been defined for this). Océ 9600 Copier/Printer User Manual... -
Page 51: Specifying The Zoom Factor
You can use the ‘Zoom’ setting to select a zoom factor. If you select ‘Automatic’ with the ‘ ’ symbol, the Océ 9600 Copier will use a zoom factor that is needed to obtain a copy without loss of information. This will be done according to the selected media roll or cassette tray. -
Page 52: Select The Exposure
If you are copying thick or very thin originals, originals that are Note: damaged or originals in a carrier sheet, it is recommended to use the output at the rear side of the scanner to ensure correct delivery (‘Rewind’ function off). Océ 9600 Copier/Printer User Manual... -
Page 53: Defining Settings For The Next Original
If ‘Automatic feed’ is off, press the start button. If ‘Automatic feed’ is on, the original is fed automatically. You can enable or disable this function from the ‘Scanner’ card in the Note: ‘Original’ section. See figure 21 on page 53. Using the Océ 9600 Copier... -
Page 54: Using The Manual Feeder For Copying
If the copy job requires more sheets, the display will ask you to feed Note: in the next sheet. Repeat steps 7 to 11 to complete the job. Collect your output. Océ 9600 Copier/Printer User Manual... -
Page 55: Defining Delivery Of Copies
Normally, your copies are delivered on the integrated receiving tray on top of the Océ 9600 Printer. However, you can specify settings for the delivery of your copies on the optional copy delivery tray or on a folder. If you want to use your copy delivery tray, take the following steps. - Page 56 Océ 9600 Copier/Printer User Manual...
-
Page 57: Performing Special Copy Jobs
Océ 9600 Copier/Printer User Manual Chapter 4 Performing special copy jobs In this chapter, special copy functions are described in greater detail. -
Page 58: Non-Standard Size Originals
For Example: with European sizes, it detects whether the width is A0, A1, A2, A3, A4, 500 mm, or 700 mm. The Océ 9600 system uses a memory table that contains all standard width - standard length combinations to predict the length of the original. -
Page 59: The Scan Width
The scan width To prevent information loss when copying a non-standard original, you can select the ‘non-standard’ scan width. The scanned width will then be larger than the original width. It is also possible to define the scanned width and length yourself. -
Page 60: The Copy Size
Make other settings as required. Feed the original. Refer to table ‘Standard folding settings’ on page 269 for more information about folding copies of non-standard sized originals. Océ 9600 Copier/Printer User Manual... -
Page 61: Scanning Originals With Filing Strip
Scanning originals with filing strip You can adjust the original guide of the scanner to remove a filing strip along the left-hand side (right-hand side in the feed direction, face-down). This side can be reduced by up to 60 mm (2.36 inches) (see figure 26). Face-up: Face-down: Left-hand side... - Page 62 Scan with removed filing strip along the right-hand side Select the required media in the ‘Custom’ section on the operating panel. Select the 100% value for the ‘Zoom’ function. Make other settings as required. Feed the original. Océ 9600 Copier/Printer User Manual...
- Page 63 It is also possible to adjust the length of both the leading and trailing edge to eliminate or add a filing strip. Leading and trailing edges can be extended up to 400 mm (15.7 inches) or shortened up to 100 mm (3.9 inches) (see figure 29).
- Page 64 Adjust the values for the trailing edge using the numeric or arrow buttons. Press the ‘Add strip’ function button again. Adjust the values for the leading edge using the numeric or arrow buttons. Make other settings as required. Feed the original. Océ 9600 Copier/Printer User Manual...
-
Page 65: Improving The Image Quality
Improving the image quality You can improve the image quality by modifying the exposure setting, or making use of special functions. You will learn how to turn on and off automatic background compensation, how to use the lighter and darker buttons to achieve the best possible copy quality, or how to adjust the brightness based on the type of image you want to copy. - Page 66 Specify other settings as required. Feed in the original. The Océ 9600 Copier allows you to adjust the exposure setting according to the type of image on the original. There are five original types available. Select a suitable mode according to the original (see figure 32 on page 65).
-
Page 67: Editing Functions
Editing functions The Océ 9600 Copier is equipped with a number of editing functions. These functions can be set before scanning the original. You can select only one edit function at a time. Note: Auto shift By selecting the automatic shift function you can move your image to one side of the page. - Page 68 If you select ‘Center’, make sure the original width is specified as Note: follows (see ‘The scan width’ on page 59): ‘Standard’ if a standard sized original is used The exact original width (numeric) if a non standard sized original is used. Feed your original. Océ 9600 Copier/Printer User Manual...
-
Page 69: Shift The Image
Shift the image In some cases the margin may be too narrow to accommodate filing strips without loss of information. To avoid this, you can shift the image in horizontal and/or vertical direction, as shown below. [36] Example of shifting the image Performing special copy jobs... - Page 70 When you shift the image vertically, you can only shift up or down. Note: Specify other settings as required. Feed in the original. You can use horizontal and vertical shift simultaneously. Note: Océ 9600 Copier/Printer User Manual...
-
Page 71: Mirror-Image Copies
Mirror-image copies With the Océ 9600 Copier you can make a mirror-image copy of an original, as shown in the next figure: [38] Example of a mirror-image copy Make mirror-image copy Open the ‘Image’ card in the ‘Copy’ section. Roll 2... - Page 72 Océ 9600 Copier/Printer User Manual...
-
Page 73: Managing Print And Copy Jobs
Chapter 5 Managing print and copy jobs This chapter describes how to view the Océ 9600 print/copy queue and how to abort the active print, how to delete and put on hold print and copy jobs in the queue and... -
Page 74: Introduction
Put job(s) in the queue on hold Restart job(s) that were previously put on hold in the queue Structure The Océ 9600 Queue Manager window is divided into the following parts (see figure 40 on page 75): The standard menu bar. - Page 75 [40] Queue Manager window The Océ 9600 Queue Manager has four modes: Modes Anonymous user mode Repro operator mode Key operator mode System administrator mode These different modes are designed to limit access to specific functions to authorized users only.
- Page 76 The priority of print jobs in the Queue Manager is determined by Job priority the order in which they are submitted to the Océ 9600. However, there is a setting in the Settings Editor which allows you to give copy jobs priority over print jobs.
-
Page 77: Icons
Icons The Océ 9600 Queue Manager uses a number of icons to display information about a job in the queue. The following icons are used: The job is in the spool and is currently being transferred to the print queue. -
Page 78: The Connection To A Controller
The Océ 9600 applications are not only available locally or on the controller, but are also delivered as remote or client versions (except for Scan Manager). This means that users can access one or more Océ 9600 systems from their own computer. -
Page 79: Managing Print Jobs
Restart job(s) that were previously put on hold in the queue View the print queue The Océ 9600 Queue Manager displays all jobs sent to the print queue in a list sorted according to the order in which they are expected to be printed. This ordering can be changed by deleting jobs, putting jobs on hold or restarting jobs currently on hold. - Page 80 Shift key and clicking on the last job. You can select a non-consecutive list of jobs to be restarted by clicking on each desired job while holding down the Ctrl key. Click on the Resume button. The selected job(s) will now be restarted. Océ 9600 Copier/Printer User Manual...
-
Page 81: Scan To File
Océ 9600 Copier/Printer User Manual Chapter 6 Scan to file This chapter describes the Océ 9600 scan-to-file function. -
Page 82: Introduction
A scan-to-file is made at the Océ 9600 scanner. On the scanner operating panel you can, among other things, choose at which resolution you want to scan and where you want to store your file. -
Page 83: Make A Scan-To-File
Make a scan-to-file Scanning an original to file is an easy operation. If the settings (see chapter , ‘Settings for scan-to-file’ on page 85) are correct, the only thing you have to do is press the start button on the scanner. Scan-to-file Place your original face-down, aligned to the right along the original guide. - Page 84 [42] Feedback during scan-to-file On the controller, Océ View Station starts automatically, showing the result of the scan (see figure 43). [43] Océ View Station Océ 9600 Copier/Printer User Manual...
-
Page 85: Settings For Scan-To-File
Settings for scan-to-file The settings regarding scan-to-file on the scanner operating panel are divided into two cards: Destination and Image. Destination card: File mode Destination File type Tiff subformat [44] Scanner operating panel: Destination card Image card: Resolution Zoom Optimization Mirror [45] Scanner operating panel: Image card Scan to file... -
Page 86: File Mode
A check plot is a print of the scanned original, ensuring consistency with a later re-print. The Océ 9600 system does not allow you to change the ‘File mode’ Note: setting during a set from ‘On’ to ‘Off ’ or vice versa. However, changing from ‘On’... -
Page 87: Tiff Subformat
environment within which applications can exchange image data. This richness is required to take advantage of the varying capabilities of scanners and other imaging devices. For example, TIFF supports image compression with no loss. Though TIFF is a rich format, it can easily be used for simple scanners and applications as well because the number of required fields is small. -
Page 88: Resolution
Resolution The Océ 9600 scan-to-file option allows you to scan at the following three resolutions: 200 dots per inch (dpi) 300 dpi 400 dpi The higher the resolution, the better the image quality. Higher resolution also leads to larger file sizes. The default value is 200 dpi. -
Page 89: Mirror
Mirror You can use the ‘Mirror’ option to scan a horizontally mirrored image of an original. Mirroring is performed in the vertical axis. Scan to file... -
Page 90: Scan Manager
The right part displays a table view containing the content of the folder currently selected. In 46 on page 90 folder ‘Next Dest(8)’ is selected. [46] Overview of the Océ 9600 Scan Manager application Océ 9600 Copier/Printer User Manual... -
Page 91: Tree View
Not all options are available to all users. You must log into a particular Note: user mode to perform specific tasks with Océ 9600 Scan Manager (see ‘User modes’ on page 121). Tree view The tree view displays: the system name the collapsible destination tree the collapsible temporary store tree. - Page 92 From the ‘View’ menu select ‘Refresh’ or click the ‘Refresh’ button on the toolbar (see figure 47). If the opened destination is also the one which is currently scanned to, the view is automatically updated. [47] ‘Refresh’ button on the toolbar Océ 9600 Copier/Printer User Manual...
-
Page 93: Actions From The Scan Manager
Actions from the Scan Manager The Océ 9600 Scan Manager enables you to choose settings regarding scan-to-file. You can edit and view the destination properties. You can also view the properties of scanned files. Destinations A destination is a place to which you scan your file. You can create, delete and lock destinations. - Page 94 A key operator can determine whether a destination can be modified by an anonymous user. This done by locking and unlocking a destination. Lock a destination Select a destination. Open the ‘File’ menu and select ‘Properties’. Check the ‘Locked’ check box. Océ 9600 Copier/Printer User Manual...
- Page 95 Click Ok to accept the destination settings. The destination properties are now locked. This option is only available if you are logged on as a Key operator (see Note: chapter , ‘User modes’ on page 121). Unlock a destination Select a destination. Open the ‘File’...
-
Page 96: Scanned Files
Change the destination properties as described in ‘Create a destination’ on page 93. Scanned files The right-hand pane of the Océ 9600 Scan Manager contains the scanned files and additional information about the files. You can view, print and delete these files. You can also view the file properties. - Page 97 Delete a scanned file Select a file in the right-hand pane. Open the ‘File’ menu and select ‘Delete’ or click the ‘Delete’ button on the toolbar (see figure 54). [54] ‘Delete’ button on the toolbar. The selected file will be deleted. This option is only available if you are logged on as a Key operator Note: or as a Repro operator.
-
Page 98: Manage The Temporary Store
‘System’ menu. the scanned files from the temporary store, you must To automatically delete choose some settings in the Océ 9600 Settings Editor (see chapter 10, ‘Key operator settings’ on page 129). Océ 9600 Copier/Printer User Manual... -
Page 99: How To Retrieve Scanned Files
How to retrieve scanned files? When you scan to file, your files will be stored in the destination you set. This can be on the local controller or on a remote system. You can retrieve your files from the local host via File Transfer Protocol (FTP) (see figure 57). Also, if during scanning to a remote destination something goes wrong, you can retrieve your files from the local host. - Page 100 ‘unsent’ directory if you want to retrieve a file from ‘unsent’ folder on the local host. Get the data file (for example: bugatti.tif) via the ‘get’ command: ‘get bugatti.tif’. Quit FTP by entering the ‘bye’ command. Océ 9600 Copier/Printer User Manual...
-
Page 101: Océ View Station
Océ View Station With Océ View Station you can view your scanned files. This can be done automatically (see ‘Automatically view a file after scanning’ on page 98) after scanning or via the Scan Manager (see ‘Print a scanned file’ on page 96). Océ... -
Page 102: Menu Options
It serves as a fast means of selecting some File, View, and Pref- erence menu commands. Status bar Status Bar displays and removes the Status Bar at the bottom of the Océ View Station window. The Status Bar displays the pointer co-ordinates and a status line. Océ 9600 Copier/Printer User Manual... -
Page 103: Function Buttons
Preference menu Reference Reference displays or removes a small, usually floating win- dow. This window displays the entire current page in miniature. The crossed box inside the Reference window indicates which part of the page is displayed in the document window. By moving or resizing the crossed box, you change which area of the page is displayed. -
Page 104: View Error
When the memory is almost full, sometimes the viewer does not show the scanned file. Instead it shows a red border with a red cross (see figure 60). [60] Error view in Océ View Station Océ 9600 Copier/Printer User Manual... -
Page 105: System Status
Océ 9600 Copier/Printer User Manual Chapter 7 System status This chapter describes how to view the status of the Océ 9600 system. -
Page 106: Introduction
Overview of the loaded media types and sizes Machine status of the Océ 9600 Copier Memory usage. Structure The Océ 9600 System Control Panel window is divided into the following parts (see figure 61 on page 107): which contains the following menus: The standard menu bar File - Login, Logout, Connect to and Exit. - Page 107 This window displays the current status of the The Scanner status window Océ 9600 scanner. Any error messages displayed on the scanner control panel will also appear in the scanner status window of the System Control Panel. This bar indicates how much set memory is still The set memory meter available to you.
- Page 108 You can hide the scanner status window by de-selecting it in the View Note: menu option. The System Control Panel will display the percentage of Set memory status memory in use. Océ 9600 Copier/Printer User Manual...
- Page 109 The display will be in the form of a status bar divided into three zones to show the current state of the set memory: Green, normal zone Yellow, warning almost full zone Red, error set memory full zone. You can hide the memory status window by de-selecting it in the View Note: menu option.
-
Page 110: Icons
Icons The Océ 9600 System Control Panel uses a number of icons to display information about the media available on the printer. The following icons are used: The material is available and the roll is ready for printing. The roll is enabled but empty. -
Page 111: User Operations
User operations The Océ 9600 System Control Panel allows you to perform the following operations: Making a demo plot Printing your system configuration Changing the display language Clearing the system Shutting down the system Setting up a remote session (only on a remote system) Quitting a remote session (only on a remote system). - Page 112 Note: can click on the Edit... button. A dialog box will appear which allows you to manually add a 9600 system. For this, you will need a valid IP address. Quitting a remote session (only on a remote system) Select the Exit option in the File menu when the System Control Panel has been installed on a remote client.
-
Page 113: Remote Logic
Océ 9600 Copier/Printer User Manual Chapter 8 Remote Logic This chapter describes how to install the remote versions of the Queue Manager, System Control Panel and Settings Editor on a user PC. -
Page 114: Introduction
The controller applications of the Océ 9600 (Queue Manager, System Control Panel and Settings Editor) are also delivered as remote versions. This means that users can access one or more Océ 9600 systems from their own computer. Anonymous users can view the status of both their jobs (Queue Manager) and the entire system (System Control Panel). -
Page 115: Installation Procedure
TCP/IP. Install Remote Logic Insert the Océ 9600 User Documentation / Applications CD-ROM into the CD-ROM drive of your PC. Select the ‘Install remote applications’ option. The installation wizard is started and you are asked to choose a setup language. - Page 116 Exit all Windows programs (as recommended) and click the ‘Next’ button to continue. The ‘Software License Agreement’ window is displayed [64] ’Software License Agreement’ window Click the ‘Yes’ button to accept the specified terms or click the ‘No’ button to refuse. Océ 9600 Copier/Printer User Manual...
- Page 117 If you click the ‘No’ button, the ‘Exit Setup’ window is displayed, Note: prompting you to click on the ‘Resume’ button to return to the ‘Software License Agreement’ window or to click the ‘Exit’ button to terminate the installation procedure. The ‘User Information’...
- Page 118 ‘Start’ menu. To work with the applications you first have to connect to an available Océ 9600 machine. How to connect is described in ‘The connection to a controller’ on page 78. If you plan to work with more than one of the available remote Note: applications, you are advised to use the ‘Applications’...
-
Page 119: The Océ 9600 Applications
Océ 9600 Copier/Printer User Manual Chapter 9 The Océ 9600 applications This chapter describes the general functionality of the Océ 9600 applications. -
Page 120: Introduction
The Océ 9600 applications are available on the local host and as a remote version except for Scan Manager which is only available on the local host. -
Page 121: User Modes
When you are not logged in (in anonymous user mode), the right-hand part of the window where the settings are displayed, is shaded in. The status bar at the bottom displays the active user mode. Note: The Océ 9600 applications... -
Page 122: Log In
To change the password To avoid taking any security risks on the Océ 9600, you may want to change your password on a regular basis. You can change the password for each user mode (except anonymous user mode, for which no password is required) by... -
Page 123: Automatic Login
If you do not want to specify your password every time you log on to the system, you can select the automatic login function. This option allows you to start the Océ 9600 applications automatically in the specified user mode. Enable automatic login: Open the ‘Edit’... -
Page 124: Ease Of Use
Choose the desired first and second language from the two drop-down list boxes. Click ‘OK’ to close the Options window. On a remote client, you must set the languages in all three Océ 9600 Note: applications separately. On the NGC, the languages of the four applications are set at once. -
Page 125: Command Line Parameters
Specifies the second language in combination with the language2=lang parameter ‘country2=country’ Specifies the second language in combination with the country2=country parameter ‘language2=language ’. You must always use a matching combination of ‘lang’ and ‘country’ Note: (see table 68 on page 126). The Océ 9600 applications... - Page 126 Below is an example of how to start the Example command line parameter Océ 9600 applications with the configuration file ‘Myconfig.cfg’, connected to the ‘My9600’ server. The first language is set to US English and the second to French: ‘C\Program Files\Remote Logic\Bin\Clients.exe -configFile=Myconfig.cft...
-
Page 127: Work On A Remote System
Océ 9600 systems. Click ‘Edit...’. The ‘Edit systems’ dialog box appears. Enter the IP address of the Océ 9600 system you want to connect to, in the ‘Systems’ text box. Click ‘Add’. The Océ 9600 is added to the list. You can add more systems. - Page 128 Océ 9600 Copier/Printer User Manual...
-
Page 129: Key Operator Settings
Océ 9600 Copier/Printer User Manual Chapter 10 Key operator settings This chapter describes how to choose key operator settings in the Settings Editor of the Océ 9600. -
Page 130: Introduction
Introduction This chapter is intended for key operators only and contains all details necessary for printer/copier user activities required to keep the Océ 9600 tuned to company requirements. The key operator is responsible for maintaining correct system default settings. These include default settings and groups of default printer settings for recurring print and copy jobs. -
Page 131: Starting Up And Shutting Down The Controller
You can now restart the controller by pressing the ‘Restart’ button. Note: Turn off your computer and display. The Océ 9600 has a sleep mode (see page 182). The sleep mode turns off Note: most of the power supply after a certain time of inactivity. -
Page 132: Settings Editor
Settings Editor The Settings Editor is one of the controller applications for the Océ 9600, which allows users and operators to view and, if authorized, to modify system settings. With the Settings Editor, two groups of settings can be configured:... -
Page 133: General Structure
Also, when you change certain settings, such as measurement unit or paper series, all related settings are instantaneously converted to the new setting (with a bullet for the settings that are changed). [69] Settings Editor General structure The Settings Editor is structured as follows: Menu bar Row of buttons Settings area... -
Page 134: Menu Bar
A shadow highlight is used to indicate which button is activated. [71] Row of buttons Settings area The settings area consists of two parts: a setting tree and an update area. Océ 9600 Copier/Printer User Manual... -
Page 135: General Control Buttons
Most settings are displayed using a tree structure. By clicking Tree structure on the settings, folders can be opened to show all the entries or closed to hide all the entries below these folders. The settings for system components that are not available are not displayed. Therefore, if you do not have a folder, no folder settings are available. -
Page 136: Status Bar
The Settings Editor is disconnected from a system. System name (‘localhost’ if you are working at the controller) User mode (Repro operator, Key operator, System administrator or anonymous) View mode (KO settings or SA settings). Océ 9600 Copier/Printer User Manual... -
Page 137: How To Access The Settings Editor
How to access the Settings Editor In order to perform special key operator functions, you must log on to the Settings Editor as a key operator. Because these functions are restricted to a dedicated key operator, a password is required to access them. The service engineer will provide this password to you upon installation. - Page 138 To change the order of the settings on the card, click on one of the buttons on the right of the ‘Custom card’ window. Click on the ‘Apply’ button to save any changes you have made. Océ 9600 Copier/Printer User Manual...
-
Page 139: Key Operator Settings
When you are finished, make certain you log out of the Key operator Note: mode of the Settings Editor to prevent unauthorized use of the Océ 9600. Make key operator settings in the Settings Editor Maximize the Settings Editor on the screen. -
Page 140: Job-Related Settings For Copying
Output mode (single option) Checkplot (single option) Number of prints/sets (single option) Zoom method (single option) Custom zoom (single option) Mirror (single option) Original (group) Copy (group) File (group) [74] ’Defaults’ Folder for ‘Copy & File’ Océ 9600 Copier/Printer User Manual... -
Page 141: Job-Related Settings For Copying (Single)
Jobs - Copy & File - Defaults - Number of prints/sets - <val- ue> - Apply Zoom method Description The Océ 9600 has a custom, automatic and 1-to-1 scaling option. ‘Custom’ allows you to define the zoom ratio. If you select ‘Automatic’, a zoom ratio will be calculated, based on the original size and the copy media size. - Page 142 You can use the ‘Mirror’ option to print a horizontally mir- rored image of an original. Mirroring is performed in the vertical axis. Min/max values Menu path Jobs - Copy & File - Defaults - Mirror - <value> - Apply Océ 9600 Copier/Printer User Manual...
-
Page 143: Original (Group)
Original (group) The Original group contains the following options (see figure 75 on page 143): Input mode Legend location Remove leading strip Remove trailing strip Scan width method Custom scan width Scan length method Custom scan length Original type Background compensation Exposure [75] ’Original’... - Page 144 Remove leading or trailing strips will always work, unless you try to remove the entire plot. Min/max values Menu path Jobs - Copy & File - Defaults - Original - Sheet - Remove leading / trailing strip - <value> - Apply Océ 9600 Copier/Printer User Manual...
- Page 145 Scan width method Description The ‘Scan width method’ option allows you to select the width that will be scanned: Standard: The width scanned is according to the automati- cally sensed original width. Non-standard: The scan width is extended to the first non-activated original width sensor, or to the maximum orig- inal size.
- Page 146 Min/max values Menu path Jobs - Copy & File - Defaults - Original - Sheet - Scan length method - <value> - Apply Océ 9600 Copier/Printer User Manual...
- Page 147 Custom scan length Description The ‘Custom scan length’ option allows you to select the length that will be scanned. This is useful if the original has an arbitrary length. This set- ting will overrule the automatically detected original format. The setting is used in combination with ‘Scan length meth- od’.
- Page 148 Min/max values Menu path Jobs - Copy & File - Defaults - Original - Image - Exposure - <value> - Apply Océ 9600 Copier/Printer User Manual...
-
Page 149: Copy (Group)
Copy (group) The Copy group contains the following options (see figure 76 on page 149): Align Horizontal shift Vertical shift Automatic media Default paper source Default paper source number Manual feed Cut length method Custom cut length Add leading strip Add trailing strip [76] ’Copy’... - Page 150 Image shift can be used in combination with the align func- tion. Min/max values -48 - 48 inches Menu path Jobs - Copy & File - Defaults - Copy - Layout - Vertical shift - <value> - Apply Océ 9600 Copier/Printer User Manual...
- Page 151 Automatic media Description The ‘Auto format’ option allows you to specify that the se- lected media size should be based on the size of your origi- nal. Note: Only sizes present in the specified paper series will be con- sidered for use with the auto format function, unless nothing appropriate can be selected.
- Page 152 - <value> - Apply Cut length method Description The Océ 9600 determines the length and width of each digi- tal image. Use ‘Print cut method’, to select one of the follow- ing default cut methods: Standard: The print length corresponds to a standard format, depending on the media width.
- Page 153 Add leading / trailing strip Description Use the add leading / trailing strip settings to add, by default, a blank strip at the top or bottom of the image. The print length will increase accordingly. ‘Add leading strip’ will add a blank strip at the top of the im- age.
-
Page 154: File (Group)
The File group contains the following options (see figure 77 on page 154): File format File extension TIFF File extension CALS TIFF compression TIFF organization File resolution Optimization [77] ’File’ Folder for ‘Copy & File’ Océ 9600 Copier/Printer User Manual... - Page 155 File format Description To define the internal organization of the scanned files. Choose between TIFF and CALS. Min/max values Menu path Jobs - Copy & File - Defaults - File - Destination - File for- mat - <value> - Apply File extension TIFF Description You can enter an extension of your own choice for TIFF...
- Page 156 File resolution Description The Océ 9600 scan-to-file option allows you to scan at the following three resolutions: 200 dots per inch (dpi) 300 dpi 400 dpi The higher the resolution, the better the image quality. High- er resolution also leads to bigger file size.
-
Page 157: Zoom Calibration
Zoom calibration On the Océ 9600 there are two options available for zoom calibration: ‘Horizontal zoom calibration’ and ‘Vertical zoom calibration’ (see figure 78). [78] ’Zoom calibration’ Folder for ‘Copy & File’ Horizontal / vertical zoom calibration Description In order to optimize the 1 to 1 copy and print quality, the key operator can adjust the zoom calibration factor to an accura- cy of 0.1%. -
Page 158: Job-Related Settings For Printing
Print error page (single option) Number of prints/sets (single option) Collate (single option) Default print mode (single option) Finishing (group) Sheet (group) Image (group) Layout (group) [79] Tab for ‘Print’ with single options and grouped options Océ 9600 Copier/Printer User Manual... - Page 159 Print error page (single option) Description Use this setting to have error pages printed in case a printing error occurs. Error pages are printed in the following environments: PDL, RCF ticket or OJT ticket. Min/max values Menu path Jobs - Print - Print error pages - <value> - Apply Number of prints/sets (single option) Description The ‘Number of prints/sets’...
-
Page 160: Sheet (Group)
Feed preference Default paper source Default paper source number Print cut method Custom print length Add leading strip Remove leading strip Remove trailing strip Add trailing strip Default roll format [80] ‘Sheet‘ folder for ‘Print’ Océ 9600 Copier/Printer User Manual... - Page 161 - Next smaller: If the specified media size is not available, the original will be printed on the next smaller size. - Exact fit: The 9600 will choose the best possible fit meth- Min/max values Menu path Jobs - Print - Defaults - Sheet - Fit method - <value>...
- Page 162 - <value> - Apply Print cut method Description The Océ 9600 determines the length and width of each digi- tal image. The ‘Print cut method’ option allows you to select one of the following default cut methods: Standard: The print length corresponds to a standard for- mat, depending on the media width.
- Page 163 Custom print length Description The ‘Default paper source number’ option allows you to de- termine the value on the Océ 9600 you can define a specific cut length. The specified cut length is used when the ‘Custom’ cut meth- od is selected. If custom cut is enabled, the copy media length will only depend on this setting, thus any other influ- ence is excluded.
- Page 164 Min/max values 0 - 16 inches Menu path Jobs - Print - Defaults - Sheet - Strip - Add leading / trailing strip - <value> - Apply Océ 9600 Copier/Printer User Manual...
-
Page 165: Finishing (Group)
Finishing (group) The finishing group contains the following options (see figure 81): Folding Drawing method Image orientation Folding length Folding width Binding strip [81] Printer-related finishing options Key operator settings... - Page 166 Determines the folding width Min/max values 7 - 9 inches Menu path Jobs - Print - Defaults - Finishing - Folding width - <value> - Apply Binding strips Description Determines the width of the binding strip Océ 9600 Copier/Printer User Manual...
- Page 167 Min/max values .5 – 1 inch Menu path Jobs - Print - Defaults - Finishing - Binding strips - <value> - Apply Key operator settings...
-
Page 168: Image (Group)
Image (group) The Sheet group contains the following options (see figure 82): Zoom method Custom zoom Mirror Invert Rotate value Legend correction [82] ‘Image’ folder for ‘Print’ Océ 9600 Copier/Printer User Manual... - Page 169 Zoom method Description If you select the ‘Auto zoom’ option, a zoom ratio will auto- matically be calculated, based on the original size and the re- ceiving copy media size. Min/max values Menu path Jobs - Print - Defaults - Image - Zoom method - <value> - Apply Custom zoom Description...
- Page 170 The following values are available: 0 - 90 - 180 - 270 degrees Auto rotate Note: Use ‘Auto rotate’, to make the Océ 9600 choose a ro- tation automatically. When this setting is activated, the image will rotate to the best fitting media format.
- Page 171 The following values are available: 0 - 90 - 180 - 270 degrees Auto rotate Note: Use ‘Auto rotate’, to make the Océ 9600 choose a ro- tation automatically. When this setting is activated, the image will rotate to the best fitting media format.
-
Page 172: Layout (Group)
Layout (group) The Layout group contains the following options (see figure 83): Auto shift Horizontal shift Vertical shift [83] ‘Layout’ folder for ‘Print’ Océ 9600 Copier/Printer User Manual... - Page 173 Auto shift Description The Auto shift function enables you to automatically align the image to one corner, to one side, or to the center of the page. The following buttons are available: - Left up - Up - Right up - Left - Center - Right...
-
Page 174: Printer-Related Settings
Only when all corresponding rolls or cassette trays are empty, will you have to refill media. Note: The Océ 9600 will not switch to a roll or cassette tray which is specially configured. Min/max values Menu path Printer - Automatic roll switch - <value>... - Page 175 Block number with correct light intensity Description As the printer drum gets older, the print quality might slightly deteriorate (printouts get lighter). To avoid this and to guarantee the best possible print quality, you may use the ‘Block number with correct light intensity’ option to adjust the light intensity of the print head.
-
Page 176: System Related Settings
There are two single system-related settings and five groups of settings for a key operator (see figure 85): Scan-to-file password (single) Telephone number (single) Localization (group) Job priorities (group) Media (group) Timers (group) Disk cleanup (group) [85] System-related settings for a key operator Océ 9600 Copier/Printer User Manual... -
Page 177: Single Options
Single options Scan-to-file password (single) Description Scan-to-file is an optional module. To activate this option, a password is required. Call your lo- cal dealer for this password. After you have entered the password, you can use Scan-to-file. Min/max values Menu path System - Scan-to-file - <value>... - Page 178 Use the ‘First language’ option, to specify the first (default) language to be used at the operating panels (printer and scan- ner) on your Océ 9600, for providing information to the us- ers. All settings (also on the system) will be presented in the specified language.
-
Page 179: Job Priorities (Group)
Job priorities (group) In this group there is one setting: Copy priorities (see figure 87). [87] Job priorities settings for key operators. Copy priorities Description When you activate ‘Copy priorities’, the copy job will be placed right behind the active job. When you deactivate the option, the job will be placed at the end of the print queue. -
Page 180: Media (Group)
Description Use ‘Paper series’, to specify which paper range is to be used as the default on your Océ 9600. When the user sets a new media size on the printer operating panel, only the sizes in the selected paper series are available. -
Page 181: Timers (Group)
Timers (group) The Timers group allows you to adjust the following settings (see figure 89): Sleep mode timer Manual feed time out Controller panel time out [89] Timers settings for key operators. Key operator settings... - Page 182 Description Use ‘Sleep mode timer’, to specify how many minutes of in- activity are required before the Océ 9600 switches to Sleep mode. In Sleep mode, most of the power supply is cut off. Note: The sleep mode time out also applies to the scanner and the folder, but NOT to the controller.
-
Page 183: Disk Clean Up (Group)
Disk clean up (group) Use disk clean up to clean the disk in regular intervals. Clean up can be done automatically or manually. Three directories can be cleaned (see figure 90): Temporary store folder Unsent folder Scan spool folder [90] Disk clear up settings for key operators Key operator settings... - Page 184 After completion of the clean up action, this setting is updat- ed according to the frequency setting. Min/max values Menu path System - Disk cleanup - Local storages / Unsent folder / Scan spool cleanup - Next time - <value> - Apply Océ 9600 Copier/Printer User Manual...
-
Page 185: Scanner Related Settings
Scanner related settings There are four single scanner-related settings and two groups of settings for a key operator (see figure 91): Printer family (single) Rewind originals (single) Automatic feed (single) Fit method (single) Zoom steps (group) Timers (group) [91] Scanner-related settings for a key operator Key operator settings... -
Page 186: Single Options
Scanner - Settings - Printer family - <value> - Apply Rewind originals Description Use ‘Rewind originals’, to have the Océ 9600 rewind the originals after they have been scanned. You can then take the scanned original from the front of the scanner. -
Page 187: Zoom Steps (Group)
Next smaller: if the specified media size is not available, the document will be printed on the next smaller size. Best fit: the Océ 9600 will choose the best possible fit meth- od. If the specified media size is not available, larger sizes will have preference above smaller sizes. -
Page 188: Timers (Group)
Enlargement step 4: 400 % Timers (group) There are three scanner-related timer settings a key operator can change (see figure 93): Panel time out Set time out Automatic feed time out [93] Scanner related Timer settings for key operators Océ 9600 Copier/Printer User Manual... - Page 189 Panel time out Description The ‘Panel time out’ option allows you to set the panel time out of the scanner panel. When no settings are being made and no original is being scanned the panel will switch to de- fault settings after this time out has elapsed. Min/max values 30 - 600 seconds Menu path...
- Page 190 Océ 9600 Copier/Printer User Manual...
- Page 191 Océ 9600 Copier/Printer User Manual Chapter 11 System administrator settings This chapter describes how to make System Administrator settings on the Océ 9600 Settings Editor.
- Page 192 Introduction The Océ 9600 system administrator is responsible for: Dithering matrix and Poker settings Printer language controller settings Pen settings Automatic Language Selection (ALS) settings Controller identification settings Set memory reservation settings Connectivity settings. To modify the system administrator settings, you have to access the SA settings in the Settings Editor.
-
Page 193: System Administrator Settings
When you are finished, make certain you log out of the System Note: administrator mode of the Settings Editor to prevent unauthorized use of the Océ 9600. Choose system administrator settings in the Settings Editor Maximize the Settings Editor on the screen. - Page 194 There are two types of system administrator settings (see figure 94): Printer System [94] System administrator settings in the Settings editor Océ 9600 Copier/Printer User Manual...
-
Page 195: Printer Related Settings
Printer related settings The PDLs tab contains 5 single options and 9 groups of settings: Dithering matrix (single option) Poker PDL heap size (single option) Poker min number of vertices in polygons (single option) Poker max number of vertices in polygons (single option) Scale down algorithm (single option) HPGL (group) HPGL-2 (group) - Page 196 Min/max values 1024 - 35000 Menu path Printer - PDLs - Poker min number of vertices in polygons - <value> - Apply The minimum and maximum number should be the same. Note: Océ 9600 Copier/Printer User Manual...
-
Page 197: Printer Descriptive Language Settings (Groups)
CALS and ASCII. You can change the settings for HP-GL, HP-GL/2, Calcomp and ASCII. The other available languages can only be enabled or disabled. On the Océ 9600, a number of settings are available which allow the system administrator to specify, by connection type, which printer languages are accepted for automatic data format recognition and which language is forced. - Page 198 If ALS is enabled, the Océ 9600 automatically recognizes the host data language and adapts the printer to support all the parameters required for printing data from the host. Automatic data format recognition enables the Océ 9600 to switch between files with different formats when working in a multi-format environment, where different printer drivers are being used.
- Page 199 If your plot is not recognized correctly, define the data format in a remote Note: control file or an Océ Job Ticket and then send the plot again. In that case, the selected option only applies to this job. You can also select the appropriate data format manually on the Settings Editor panel and then resend the plot.
- Page 200 White areas are considered opaque. If set to ‘on’, all colors are blended together (merged) at the intersection of vectors and polygons. Océ 9600 Copier/Printer User Manual...
- Page 201 HPGL-2 Pen priori- Pen parameters can be defined in two ways: - In the plot data file - In the Remote Configuration File (RCF) or Océ Job Ticket (OJT) If pen priority is set to 'Language', the pen parameters defined in the plot data file will be used.
- Page 202 White areas are considered opaque. If set to 'On', all colors are blended together (merged) at the intersection of vectors and polygons. Pen width To enable or disable the pen width scaling. scaling If enabled: scaling an image will scale the pen width correspon- dents. Océ 9600 Copier/Printer User Manual...
- Page 203 PostScript Setting Description PS level 2 To activate PostScript level 2, you need a password. This pass- password word is coupled to the system serial number. Call your local dealer for this password. After you have entered the password, you can use the PostScript level 2.
- Page 204 ASCII text. Possible values are: - Standard - Custom Custom The 'Custom page width' option allows you to define the selected page width page width when 'Custom' has been selected as default page type. Océ 9600 Copier/Printer User Manual...
- Page 205 ASCII Custom The 'Custom page height' option allows you to define the selected page page height when 'Custom' has been selected as default page height type. Standard The 'Standard page format' option allows you to define the de- page for- fault size of the formatted text when 'Standard' as file type is se- lected.
-
Page 206: Pen Settings
A pen can be selected by the plot file to draw a line or to fill a Pen pattern polygon. All lines or polygons on the plot can be drawn with a predefined pattern or shade of grey. Default is pen pattern 16 (black). Océ 9600 Copier/Printer User Manual... - Page 207 The following pen patterns are available: white black [96] Available pen patterns Define pen settings Click on the ‘Printer’ button. The Printer settings are displayed Click on the ‘Pens’ tab. The Pen settings are displayed (see figure 95). Type a pen number in the ‘Pen number’ box or select a number with the selection arrows to the right of the box.
-
Page 208: System Related Settings
The system related settings contains one single option and three groups of options (see figure 97): Scan memory reservation (single option) Controller identification (group) Set memory reservation (group) Connectivity (group) [97] System related settings in the Settings Editor Océ 9600 Copier/Printer User Manual... -
Page 209: Controller Identification Settings (Group)
Scan memory reservation Description To specify the maximum amount of the file system disk us- age allowed for all folders to store scanned files, temporary store folder, unsent folder and the scan spool folder Min/max values 1024 -3072 Mb Menu path System - Scan memory reservation - <value>... - Page 210 Host name Description To specify the name with which the Océ 9600 will present itself on the TCP/IP network. To identify the controller, you have to enter the host name. Keep the following: - use no more than 15 characters.
-
Page 211: Set Memory Reservation Settings
Min/max values 50 -1024 Mb Menu path System - Set memory reservation - Red zone limit - <value> - Apply Connectivity settings The Océ 9600 supports a large number of different connection types, including: Centronics Novell TCP/IP IPX/SPX NetBeui... - Page 212 Change the setting in the update area, as appropriate. Click on the ‘Apply’ button to save any changes you have made. See the Océ 9600 Connectivity Manual R 2.1 on the ‘User Documentation and Remote Applications CD-ROM’, which is delivered with the system, for detailed information about making the Océ...
- Page 213 Centronics Setting Description Enable Centron- To define if Centronics communication is enabled or dis- abled. Plot time-out To define the plot time-out on a Centronics connection. 1 - 1000 s Communication To define the communication mode for a Centronics connec- mode tion.
- Page 214 With ‘Print while spool’, the data will be spooled in chunks. With ‘spool then print’, the complete job will be spooled be- fore printing starts. PDL selection To define the PDL enabled for a Novell connection. The Au- tomatic option enables Automatic Language Sensing. Océ 9600 Copier/Printer User Manual...
- Page 215 Domain To specify the network domain name. The network domain name is the TCP/IP address of the domain server where the Océ 9600 controller is connected to. To specify the DNS server. Use semicolons ( ; ) to separate entries.
- Page 216 NetBeui Setting Description Enable To specify whether or not the NetBeui adapter is enabled or disabled. Océ 9600 Copier/Printer User Manual...
-
Page 217: Loading Supplies
Océ 9600 Copier/Printer User Manual Chapter 12 Loading supplies This chapter describes regular maintenance tasks, such as refilling paper and toner, and refilling the folder reinforcement unit. -
Page 218: Introduction
Introduction This chapter covers the important maintenance activities, such as: Loading rolls of print material Loading cut sheet material Adding toner Cleaning the glass platen and the scanner reference roller Refilling the folder reinforcement unit Océ 9600 Copier/Printer User Manual... -
Page 219: Media
Note: available configurations. Each of the rolls and cassette trays on the Océ 9600 may be loaded with print material of a different size or type. The size and type of the available media are indicated on the operating panel. -
Page 220: Rolls
System Control Panel application. You then have to load a new roll of print material. The following media are currently supported on the Océ 9600: Note: Plain paper (Red label plus) 20 lb. bond Plain paper (Red label) 6 lb. - Page 221 Press the green knob inside the roll holder (on the right side) to release the locking mechanism (see figure 100) and remove the core from the holder. [100] Pressing the green knob You can place the new roll in the groove on top of the printer. Note: Slide the roll holder in the new roll of material while pressing the green knob.
- Page 222 Press the green button a second time to cut off the material protruding from the paper path. Remove the scrap material. Close the roll compartment. Press the on line button to put the system off line. Océ 9600 Copier/Printer User Manual...
- Page 223 Roll loader regulations as far as maximum roll weights are concerned, Océ has developed a roll loader for use with the Océ 9600. See ‘Recommended weight limits’ on page 292 for more information about the maximum recommended roll weights with and without a roll loader.
- Page 224 Specify the size and type of material on the operating panel. Press the on line button again. When you alter the size and/or media type, you have to adjust the settings Note: on the operating panel. Océ 9600 Copier/Printer User Manual...
-
Page 225: Cut Sheet Material
Cut sheet material When a cassette tray is empty during a print job, a ‘Cassette tray x empty’ message is displayed at the printer operating panel and in the System Control Panel (SCP) application. You then have to load new cut sheet print material. Polyester cut sheets must be ventilated before use in order to prevent Note: sticking together. - Page 226 This way you can avoid the risk of inadvertently shifting any remaining print material out of place and blocking the path. This could result in a jam. Océ 9600 Copier/Printer User Manual...
-
Page 227: Toner
Toner When a ‘Toner low’ message appears on the printer panel, you should refill toner. From this moment on, you can print a maximum of 260 m2. Refilling toner can be done at any time, even while a job is printing. You will be able to finish your current job. - Page 228 [109] Replacing the waste toner bag Use only Océ B5 toner. Attention: Shake the toner bottle thoroughly and open the bottle. Screw in the bottle clockwise in a slanted position (see figure 110). [110] Screwing in the bottle Océ 9600 Copier/Printer User Manual...
- Page 229 Move the toner bottle to a vertical position (see figure 111). [111] Adding toner Tap the bottle to remove the toner from the bottle. Return the bottle to its original position when the toner bottle is empty. Unscrew the toner bottle counter-clockwise and close it. Close the cover.
-
Page 230: Maintenance Of The Glass Platen And The Reference Roller
Turning off the scanner. Open the top scanner cover (see figure 112). [112] Opening the top scanner cover Clean the glass platen with a soft cloth, moistened with water (see figure 113). [113] Glass platen and reference roller Océ 9600 Copier/Printer User Manual... - Page 231 Clean the white reference roller with soft cloth moistened with a small quantity of Cleaner A (see figure 113). Lift the top cover of the scanner to release the hinge lock, then close the cover (see figure 114). [114] Closing the top scanner cover Turning on the scanner.
-
Page 232: Reinforcement Unit Maintenance
When a tape roll is empty while the engine is running, this message will be accompanied by a picture of the engine with the side door of the reinforcement unit blinking (see figure 115). [115] No tape in reinforcement unit Océ 9600 Copier/Printer User Manual... - Page 233 Inserting a new tape roll Open the side door of the reinforcement unit (see figure 116). [116] Opening the side door of the reinforcement unit Turn the two guide plates away from the pin roller and lock them into their open position (see figure 117).
- Page 234 Insert the new roll and close the side plate. Make sure that the roll is placed with the holes to the back and the protection sheet to the front (see figure 119). [119] Placing the new roll Océ 9600 Copier/Printer User Manual...
- Page 235 Detach the end of the roll and lead the tape over the large guide roller (see figure 120). [120] Guiding the tape around the guide roller Lead the tape between the upper and lower knife and over the pin roller (see figure 121).
- Page 236 (see figure 123). If this is not the case, lift the tape from the pin roller and push the tape further between the two knives until the holes are aligned. [123] Adjusting the holes on the tape Océ 9600 Copier/Printer User Manual...
- Page 237 Close the pin roller guide plates (see figure 124). [124] Closing the guide plates Peel the protection sheet off of the tape (see figure 125). [125] Peeling off the protection sheet Loading supplies...
- Page 238 [126] Leading the protection sheet between upper and lower knife Lift the guide and lead the protection sheet between the protection sheet rollers, pulling the protection sheet tight (see figure 127). [127] Leading the protection sheet between the rollers Océ 9600 Copier/Printer User Manual...
- Page 239 Insert the leading edge of the tape into the closed section of the slide (see figure 128). [128] Inserting the tape into the closed section of the slide Hold the upper guide plate down and cut the tape at the knife section by quickly pulling the edge up so that the tape is cut by the upper knife (see figure 129).
-
Page 240: The Waste Box
Open the waste box by first pulling it to the left-hand side and then pulling it towards you. [130] Opening the waste box Empty the box. Close the waste box by pushing it forward and then pushing it to the right-hand side. [131] Closing the waste box Océ 9600 Copier/Printer User Manual... -
Page 241: Maintenance Of The Reinforcement Knives
Maintenance of the reinforcement knives Because the reinforcement unit knives get sticky from the glue on the reinforcement tape, they have to be cleaned regularly. You are recommended to clean the knives each time you have inserted a new tape roll (see ‘A new tape roll’... - Page 242 The picture on the display disappears, and the ‘Press start to resume job’ or ‘Ready to print’ message appears, depending on whether or not a job was interrupted to clean the knives. Océ 9600 Copier/Printer User Manual...
-
Page 243: Problem Solving
Océ 9600 Copier/Printer User Manual Chapter 13 Problem solving This chapter describes the problems that may occur while using the Océ 9600. -
Page 244: Introduction
Introduction Problems that may occur with the Océ 9600 consist of: Originals jammed in the scanner (see page 245). Jams, (see page 247). Other problems, (see page 266). When an error occurs, the display informs you about: the type of problem... -
Page 245: Original Jams In Scanner
Original jams in scanner If during scanning, an original becomes jammed, you can stop the original transport with the red Stop button. Removing a jammed original Open the top scanner cover (see figure 134). [134] Opening the top scanner cover Remove the original. - Page 246 Use the carrier sheets available from Océ to protect your valuable originals. When working with poor-quality or valuable originals, it is advised to Note: disable the rewind function to avoid the risk of jams during rewind. Océ 9600 Copier/Printer User Manual...
-
Page 247: Jams In Printer
Jams in printer If printing material misfeeds, printing stops and instructions to the operator for solving the media jam appear in the display and the error location is shown by flashing covers or doors. If print material misfeeds: Follow the instructions on the display Thoroughly remove scraps of print material from the machine. -
Page 248: Cut Sheet Feed Section
In that case, you can cut the material manually by pressing the appropriate green load button in the roll compartment. Reload the roll if the system asks you to do so (see ‘Rolls’ on page 220). Close the roll compartment again. Océ 9600 Copier/Printer User Manual... -
Page 249: Manual Feeder
If the roll feed covers are still flashing on the display, re-check the roll Note: feed section. Manual feeder When printing material misfeeds in section C, as in figure 136 on page 247 a jam has occurred in the manual feeder. Clearing a jam in the manual feeder Open the manual feeder by tilting it toward you (see figure 138). -
Page 250: Fuser Section
Open the cover on the left side (see figure 139). During normal use, the left cover has to be closed. This is necessary to Note: ensure proper operation. [139] Opening the left side cover Océ 9600 Copier/Printer User Manual... - Page 251 If the printing material is visible in the manual feed section, remove Note: it from the front side of the Océ 9600 Printer. Pull the green knob to release the fuser section cover and close the cover with the help of the green handle.
-
Page 252: Folder
Clearing a jam in the first fold section Opening the top cover of the folder (see figure 141). The green light on the right of the folder is blinking quickly. [141] Top cover of the folder Remove any jammed printing material. Océ 9600 Copier/Printer User Manual... - Page 253 Open the cover of the first fold section (see figure 142). [142] Opening first fold section Open the guide plate (see figure 143). [143] Opening the guide plate Remove any jammed printing material. Close the guide plate. Close the cover of the first fold section. Close the top cover of the folder.
- Page 254 Open the front door of the second fold section (see figure 145). [145] Opening the front door of the second fold section Remove any jammed printing material at the bottom of the second fold section. Close the front door of the second fold section. Océ 9600 Copier/Printer User Manual...
- Page 255 If you have a belt unit, put the belt in an upright position (see figure 146). [146] Putting the belt in an upright position Open the delivery unit (see figure 147). [147] Opening the delivery unit Problem solving...
- Page 256 [148] Opening the guide plate with the green lever Remove any jammed printing material. Open the vertical transport with the green lever (see figure 149). [149] Opening the vertical transport Remove any jammed printing material. Océ 9600 Copier/Printer User Manual...
- Page 257 Close the vertical transport (see figure 150). [150] Closing the vertical transport Close the guide plate. Close the delivery unit (see figure 151). [151] Closing the delivery unit Problem solving...
- Page 258 Squeeze the two green knobs in the upper section of the belt unit and open the plate (see figure 153). [153] Opening the plate Remove any jammed printing material. Squeeze the two knobs again and put the plate in its original position. Océ 9600 Copier/Printer User Manual...
- Page 259 Release the green lever in the lower section of the belt unit (by slightly lifting it and pulling it forward) to open the lower plate (see figure 154). [154] Opening the lower plate Remove any jammed printing material. Pull up the green lever again (until it locks into position) to close the plate. Close the belt unit door.
-
Page 260: Reinforcement Unit
Paper jams with the reinforcement unit following message is displayed: ‘Paper jam’. A picture of the engine appears on the display with one or two doors blinking, depending on where the jam occurs (see figure 155). [155] Paper jam Océ 9600 Copier/Printer User Manual... - Page 261 Clear a paper jam Open the cover of the transport to the First Fold delivery and remove all paper inside (see figure 156). [156] Open the cover of the folder transport section Close the cover of the folder transport section. Open the front door of the reinforcement unit (see figure 157).
- Page 262 When a tape jam occurs while the engine is running, the message will be accompanied by a picture of the engine with the side door of the reinforcement unit blinking (see figure 159). [159] Tape jammed in reinforcement unit Océ 9600 Copier/Printer User Manual...
- Page 263 Clearing a tape jam Open the front door of the reinforcement unit (see figure 160). [160] Opening the reinforcement unit front door Turn the two guide plates away from the pin roller and lock them into their open position (see figure 161). [161] Opening the guide plates Problem solving...
- Page 264 See if there are loose reinforcement strips in the unit with the protection sheet still on (see situation B in figure 163). [163] Situation A: No mechanical errorSituation B: Mechanical error If there are, remove the tape strips in the reinforcement unit. Océ 9600 Copier/Printer User Manual...
- Page 265 If the protection sheet is not on the reinforcement strip (see situation Note: A in figure 163), there is no mechanical error and you should insert a new tape roll as described in ‘A new tape roll’ on page 232. If this error frequently occurs, you should call the Océ...
-
Page 266: Other Problems
Should there be a problem that cannot be solved in that way, the system displays a ‘Call service’ message. If this happens, you must call the Océ service organization, turn off the system with the main switch and leave the system as it is. Océ 9600 Copier/Printer User Manual... - Page 267 Océ 9600 Copier/Printer User Manual Chapter 14 Folder This chapter contains a description of the optional folder delivered with the Océ 9600.
-
Page 268: Folder
Belt unit. Folder On your Océ 9600 system, a folder can be installed which allows you to have your copies folded (see figure 165). The copies are folded according to the selected folding width and length in combination with a drawing method. It is only possible to fold paper. - Page 269 By default, the standard folding settings defined for Standard folding settings the Océ 9600 system by the key operator are used. The following settings are available: Folded copy delivery (Stacker or Belt) Folding legend (Leading or Trailing). In the drivers, this setting is called the ‘Folding orientation’, with the Note: ‘Portrait’, ‘Landscape’...
- Page 270 Note: with a width of 210 mm (8.3 inches) and a length of more than 305 mm (12 inches) on your Océ 9600. Instead, you are advised to select the Integrated Receiving Tray (IRT). You can also select a drawing method and, if required, a folding length, Note: folding width and binding edge.
- Page 271 Folding settings 75 grams Output length Delivery ‘Stacker’ or ‘Belt’ < 2.73 yd Delivered on stacker or belt selected 2.5 m - 6 m First fold only, delivered in first fold delivery > 6.56 yd Unfolded, delivered in IRT length known at start >...
-
Page 272: Off Line Folding
Off line folding An important productivity feature provided by the Océ 9600 folder, is the possibility to make off line folds. For off line folding the same settings can be made as for normal folding. By default, the predefined settings in the Settings Editor for off line folding are used. -
Page 273: Reinforcement Unit
Also, make sure that you feed in the paper with the legend on the right-hand side (see ‘Océ 9600 folder’ on page 268 for more information). Wait until the light on the folder no longer blinks before you feed in Note: a new sheet. - Page 274 Open the ‘Defaults’ folder. Open the ‘Finishing’ folder. Select the ‘Folding reinforcement’ option. Enable folding reinforcement in the right-hand part of the window. Click on the ‘Apply’ button to save any changes you have made. Océ 9600 Copier/Printer User Manual...
-
Page 275: Belt Unit
Belt unit A belt unit offers a large capacity and more flexibility. On the belt unit, up to 100 A0 prints can be delivered offset and stacked. You can adjust the side guides of the belt, depending on the width of the folded package. See chapter 10, ‘Key operator settings’... - Page 276 Océ 9600 Copier/Printer User Manual...
-
Page 277: Overview And Tables
Océ 9600 Copier/Printer User Manual Appendix A Overview and tables... -
Page 278: Overview Of The Océ 9600 System
Overview of the Océ 9600 system [173] The Océ 9600 system Off line folding input Integrated receiving tray Printer operating panel Manual feed Printer Rolls or cassette trays Scanner Scanner operating panel Scanner feed table Folder Océ 9600 Copier/Printer User Manual... -
Page 279: Printer Operating Panel
Printer operating panel Up/Down buttons Selection buttons On line button Stop button... -
Page 280: Scanner Operating Panel
Scanner operating panel Section buttons Arrow buttons Stop button Interrupt button Function buttons Start button Correction button Numeric buttons Océ 9600 Copier/Printer User Manual... -
Page 281: Product Specifications Océ 9600
Product specifications Océ 9600 The Océ 9600 is a wide format, mid to high volume printing and copying system. - Page 282 Sophisticated local and remote user communication system with: Queue Manager application: view status for each job and cancel, hold/restart the entire job System Control Panel application: view status and set- tings of system components Setting Editor application: customize system settings Océ 9600 Copier/Printer User Manual...
- Page 283 Océ 9600 Controller Platform Océ Controller with embedded Windows NT Memory 128 MByte RAM standard, 256 MByte RAM for scan to file Disk space High-speed hard disk dedicated to file spooling, and a high-speed hard disk dedicated to set memory offer-...
- Page 284 65 dB (A) operating, <45 dB (A) in stand-by Power consumption < 110 W operating, < 10 W in stand-by Electrical require- 120/230 V, 50/60 Hz ments Dimensions 51.7 (W) x 22.9 (H) x 53.3 (D) inches Weight 90 Kg Océ 9600 Copier/Printer User Manual...
- Page 285 Scan to file Applications Océ Scan Manager, integrated scanning solution Scan destinations 10 programmable destinations Scan to controller Scan to network directory File Transfer Protocol (FTP) Resolution 200, 300, 400 dpi Data formats Tiff (G3, G4, uncompressed) CALS type 1 Scan modes Single scan, stream feed productive batch scanning File naming...
- Page 286 Power consumption < 100 W operating Electrical supply 120/230 V, 50/60 Hz Dimensions 86,61 (W) x 39,25 (H) x 49,61 (D) inches Weight 485.02 lb Optional features Reinforcement unit Belt delivery tray for 100 A0 Océ 9600 Copier/Printer User Manual...
- Page 287 Finishing: copy delivery tray Model Wheeled delivery tray with blower unit Capacity Up to 150 sheets (media type dependent) from A4 to A0 Types of media Plain paper, transparent paper, film, vellum and polyes- Power consumption < 40 W Electrical require- 120/230 V, 50/60 Hz ments Dimensions...
-
Page 288: List Of Available Material Types And Sizes
It is therefore recommended that you use only approved Océ materials in the Océ 9600. A full list of Océ materials suited for use in the Océ 9600, including plain paper, transparent paper, colored papers and various polyester films is available from your Océ... -
Page 289: Reinforcement Strips
Avoid storing paper in rooms where temperature and humidity Attention: are high. Also, avoid dust and direct sunlight. Wrap unused paper in plastic to prevent it absorbing moisture. Reinforcement strips Information about the different reinforcement strips is available from your Océ representative. - Page 290 Océ 9600 Copier/Printer User Manual...
-
Page 291: Safety Information
Océ 9600 Copier/Printer User Manual Appendix B Safety information... -
Page 292: Recommended Weight Limits
Recommended weight limits The Océ 9600 can be equipped with 6 rolls. The following recommended weight limits (RWLs) for the roll positions can be calculated based on the NIOSH method (National Institute for Occupational Safety and Health): Weight limits (in kg and lbs.) - Page 293 Weights do not include the 1.3 kg (2.9 lb) roll holder. Note: The weight of a stack of sheets never exceeds the RWL. If the Océ 9600 printer is not equipped with the optional roll Caution: loader, the NIOSH limit for load handling will be exceeded when rolls of imaging materials having a net weight of more than 7 kg (15.5 lbs) (i.e.
-
Page 294: Instructions For Safe Use
Do not block the ventilation openings of the machine. Ensure that the machine is placed on a level, horizontal surface of sufficient strength. See the Océ 9600 safety data sheet in this appendix for information about the weight of the machine. -
Page 295: Safety Data Sheets
To the extent that limitation of liability is permitted under applicable law, we do not accept liability for any inaccuracy that may occur in this information. Safety data sheet Océ 9600 printer and folder NOT YET AVAILABLE Safety data sheet Océ 9600 scanner... -
Page 296: Safety Data Sheet Océ 9600 Printer
Safety data sheet Océ 9600 printer PRODUCT SAFETY DATA SHEET Number E-691-a-US Date May 1999 Model Océ 9600 Printer - engine Description Electrostatic printer, instant printing, console model, plain paper, organic photoconductive drum, powder toner. Max. process speed 5m/min. Dimensions... -
Page 297: Epa Energy Star
Using the energy management features outlined below prevents unnecessary power consumption, which helps to reduce air pollution from electricity-generating plants and saves money on your utility bills. The Océ 9600 is supplied as a printer and as a copier/printer and includes the following separate units: Océ 9600 printer Océ... - Page 298 The Océ 9600 is shipped with the sleep mode default time set at Sleep mode 30 minutes, which means that the device automatically enters the sleep mode 30 minutes after the last copy or print is made.(*) The sleep mode default time can be adjusted by the key-operator to between 20 and 60 minutes.
-
Page 299: Miscellaneous
Océ 9600 Copier/Printer User Manual Appendix C Miscellaneous... -
Page 300: How To Read This Manual
How to read this manual The consistent style that is used in this manual enables you to quickly become familiar with the use of this manual and ultimately the Océ 9600. Each section or subsection contains a description of the feature or Description operation identified in the title. -
Page 301: User Survey
User survey Did you find this manual to be accurate? Were you able to operate the product after reading this manual? Does this manual provide adequate background information? Is the format of this manual convenient in size, easy to read and layed out well? Did you find the information you were looking for? Always Most of the times... - Page 302 Please return this sheet to: Océ-Technologies B.V. Attn: ITC-User Documentation P.O. Box 101 5900 MA Venlo The Netherlands Send you comments by E-mail to : itc-userdoc@oce.nl For the addresses of local Océ organizations see : www.oce.com Océ 9600 Copier/Printer User Manual...
-
Page 303: Addresses Of Local Océ Organizations
Addresses of local Océ organizations Océ-Australia Ltd. Océ-Danmark A.S. P.O.Box 363 Kornmarksvej 6 Brøndby Ferntree Gully MDC VIC 3165 DK 2605 Australia Denmark Océ-Österreich GmbH Océ-France S.A. Postfach 95 32, Avenue du Pavé Neuf, 1233 Vienna 93161 Noisy-le-grand, Cedex Austria France Océ-Belgium N.V./S.A. - Page 304 Singapore 348548 Océ España SA Business Park MAS BLAU C/Osona 2, 2-3a Planta 08820 El Prat del Llobregat (Barcelona) Spain Océ-Svenska AB P.O.box 1231 S-164 28 Kista Sweden Océ-Schweiz AG Sägereistrasse 29 CH8152 Glattbrugg Switzerland Océ 9600 Copier/Printer User Manual...
- Page 305 copying 48 long/short originals 58 Index counter 28 Custom card 138 "Ready to copy" 47 default settings 41 define settings 53 aborting job currently being printed 79 Defining Access 137 original settings 148 add a controller 127 pen settings 206 adding toner 227 set time-out 189 replacing waste toner bag 227...
- Page 306 Queue Manager 20 KOS system System Control Panel 20 introduction 130 Océ 9600 folder 267 Océ 9600 Key Operator Settings (KOS) 10, 129 Océ 9600 printer 12 Océ 9600 System Administrator Settings (SAS) language 124 off line folding 271, 272...
- Page 307 32, 34 setting media type and size 32 safety data sheet starting up and shutting down the printer 31 Océ 9600 OPC drum 296 stopping print job 34 Océ 9600 printer 296 product specifications 281 Océ...
- Page 308 91 file properties 91 temporary store 98 tiff subformat 87 Tree structure 135 tree view 91 destinations 91 Turning off printer 31 turning on printer 31 Undo 136 up/down buttons 31 Update area 135 Océ 9600 Copier/Printer User Manual...
Need help?
Do you have a question about the 9600 and is the answer not in the manual?
Questions and answers