Oce cm4010 Troubleshooting Manual
Oce printers
Hide thumbs
Also See for cm4010:
- Facsimile manual (190 pages) ,
- System settings manual (126 pages) ,
- User manual (69 pages)
Table of Contents
Advertisement
Quick Links
Download this manual
See also:
User Manual
Advertisement
Chapters
Table of Contents

Related Manuals for Oce cm4010


Summary of Contents for Oce cm4010
-
Page 3: About This Manual
ABOUT THIS MANUAL This manual provides solutions to possible problems in a question and answer format. The questions are grouped into the chapters "REMOVING MISFEEDS", "COPYING", "PRINTING", "SCANNING", "DOCUMENT FILING", "INSTALLATION", and "OTHER PROBLEMS". Locate the question that relates to your problem and use the answer to help correct the situation. -
Page 4: Manuals Provided With The Machine
MANUALS PROVIDED WITH THE MACHINE This manual provides solutions to possible problems. For the detailed procedures for using the machine, see the following manuals. Printed manuals Manual name Contents This manual contains instructions for using the machine safely and lists the specifications of the machine Safety Guide and its peripheral devices. -
Page 5: Removing Misfeeds
REMOVING MISFEEDS This chapter explains what to do when a paper misfeed occurs in the machine. Removing misfeeds When a paper misfeed occurs, "A misfeed has occurred." appears in the touch panel and printing stops. In this event, touch the [Information] key in the touch panel. When the key is touched, instructions for removing the misfeed will appear. - Page 6 (When using the cm4010) Open the document feeder Rotate knob and remove the cover and remove the misfed misfed paper.
- Page 7 (5) Paper misfeed in the reversing unit (9) Paper misfeed in tray 1 to tray 4 (in the tray) Open the Paper reversing section cover and remove Before pulling the tray out, the misfed paper. open the right cover and check if there is a paper misfeed.
- Page 8 (11) Paper misfeed in the saddle stitch finisher (top) Open the top cover and remove the misfed paper. (14) Paper misfeed in the saddle stitch finisher (bottom) (12) Paper misfeed in the paper pass unit While pulling the lever, slide the saddle stitch finisher to Pull out the paper pass unit the left until it stops.
-
Page 9: Table Of Contents
COPYING This chapter provides solutions to possible copying problems. See the following table of contents to locate the appropriate page for your question or problem. Problems Related to Copying Operation • Copying does not take place............7 •... -
Page 10: Image Rotation Does Not Take Place
Problem Point to check Solution Image rotation does Did you select the paper size or copy Copy using automatic paper selection and automatic not take place. ratio manually? ratio selection. Are you copying using settings that do Rotate copying can generally be combined with other not allow rotate copying? special modes, however, some combinations are not possible. -
Page 11: Problems Related To Copy Results
Problems Related to Copy Results Problem Point to check Solution The image is too light Is the image too light or too dark? Select an appropriate exposure mode for the original or too dark. being copied and adjust the exposure level manually. Has an appropriate exposure mode for A satisfactory copy result can be obtained by selecting a the original type been selected? -
Page 12: Printing Does Not Take Place
PRINTING This chapter provides solutions to possible printing problems. See the following table of contents to locate the appropriate page for your question or problem. Problems Related to Printing Operation • Printing does not take place............10 •... - Page 13 Problem Point to check Solution Printing does not take Is the IP address selected correctly? If the machine does not have a permanent IP address place. (Windows) (the machine receives an IP address from a DHCP server), printing will not be possible if the IP address changes.
-
Page 14: Color Printing Does Not Take Place
Problem Point to check Solution Printing does not take Was a Notice Page printed? A Notice Page will be printed to indicate the cause of the place. problem if a print job cannot be performed as specified and the cause is not shown in the display. Read the printed page and take appropriate action. -
Page 15: A Tray, Finisher, Or Other Peripheral Device Installed On The Machine Cannot Be Used
Problem Point to check Solution A tray, finisher, or Have the peripheral devices that are Open the printer properties and click the [Auto other peripheral installed on the machine been Configuration] button on the [Configuration] tab. device installed on the configured in the printer driver? (Windows) machine cannot be... -
Page 16: Part Of The Image Is Cut Off
Problem Point to check Solution Part of the image is Does the paper size specified by the job Make sure that the paper size setting matches the size cut off. match the size of paper loaded in the of paper loaded in the tray. tray? The paper size setting is selected as follows: Windows:... -
Page 17: Many Nonsense Characters Are Printed
Problem Point to check Solution Many nonsense Is your computer or the machine in an If little free space remains in the memory or hard drive of characters are printed. unstable state? your computer, or many jobs have been spooled on the machine and it has little free memory remaining, printed text may turn into nonsense characters. -
Page 18: Transmission Does Not Take Place
SCANNING This chapter provides solutions to possible scanning problems. See the following table of contents to locate the appropriate page for your question or problem. Problems Related to Scanning Operation • Transmission does not take place........... . . 16 •... -
Page 19: An Address Cannot Be Specified
Problem Point to check Solution Transmission does Does the image file exceed the e-mail If your administrator has set a limit on the size of not take place. attachment limit set in the system transmitted files, a file that exceeds the limit cannot be settings (administrator)? transmitted. -
Page 20: The Received Image File Cannot Be Opened
Problem Point to check Solution The received image Does the viewer program used by the The recipient may be able to open the file if you change file cannot be opened. recipient support the format of the the file type and compression mode selected at the time received image data? of transmission. -
Page 21: Problems Related To Scan Results
Problems Related to Scan Results Problem Point to check Solution The scanned image is Is the original scan size setting smaller Set the scan size to the actual original size. clipped. than the actual original size? If you have intentionally set a smaller size than the actual original size, note carefully the placement position of the selected scan size when placing the original. -
Page 22: Jpeg Was Selected For The File Type But The File Was Created As A Tiff File
Problem Point to check Solution JPEG was selected for Did you press the [BLACK & WHITE When [JPEG] is selected for the file type and the image the file type but the file START] key ( ) to begin scanning? is scanned in Mono 2, the file will be created as a TIFF was created as a TIFF file. -
Page 23: Problems Related To One-Touch Individual Keys / Group Keys
Problems Related to One-Touch Individual Keys / Group Keys Problem Point to check Solution A one-touch individual If the key is an individual key, is the key Remove the key from the group and then edit or delete key or group key included in a group? the key. -
Page 24: Document Filing
DOCUMENT FILING This chapter provides solutions to possible document filing problems. See the following table of contents to locate the appropriate page for your question or problem. • Document filing does not take place........... 22 •... - Page 25 Problem Point to check Solution A stored file has Did you touch the [Print and Delete the A file that is printed using the [Print and Delete the Data] disappeared. Data] key to print a stored file? key is automatically deleted after being printed. To print a file without deleting it, use the [Print and Save the Data] key.
- Page 26 INSTALLATION This chapter provides solutions to possible installation problems. See the following table of contents to locate the appropriate page for your question or problem. • The software cannot be installed............24 •...
- Page 27 Problem Point to check Solution The plug and play Is the machine power on? When a USB cable is connected, make sure the power screen does not of the machine is "ON" and then connect a USB cable to appear (USB the machine.
-
Page 28: Removing The Software
The printer driver cannot be installed (Windows 2000/XP/Server 2003) If the printer driver cannot be installed on Windows 2000/XP/Server 2003, follow the steps below to check your computer settings. Click the [start] button and then click Check the settings in "What action do [Control Panel]. - Page 29 OTHER PROBLEMS This chapter explains how to resolve problems related to the general operation of the machine. Locate your question or problem in the table of contents below and refer to the appropriate page. Problems Related to Machine Operation • Specified machine functions cannot be used..........28 •...
-
Page 30: Problems Related To Machine Operation
Problems Related to Machine Operation Problem Point to check Solution Specified machine Have functions been disabled by the Some functions may have been disabled in the system functions cannot be administrator? settings (administrator). Check with your administrator. used. When user authentication is enabled, the functions that you can use and page counts may be restricted in your user settings. -
Page 31: Printing Is Not Possible Or Stops During A Job
Problem Point to check Solution The operation panel Does the message "Call for service. Make sure that the LINE indicator is not lit and that the cannot be used. Code:xx-xx*." appear in the display? DATA indicator is not blinking or lit and then switch off *Letters and numbers appear in xx-xx. -
Page 32: The Displayed Bypass Tray Paper Size Is Not Correct
Problem Point to check Solution The displayed bypass Is the bypass tray extension pulled out? When loading paper in the bypass tray, be sure to pull tray paper size is not out the extension to enable the paper size to be correct. -
Page 33: Paper Does Not Feed From The Paper Tray
Problem Point to check Solution The paper misfeeds. Is 5-1/2" x 8-1/2" (A5) size paper Load 5-1/2" x 8-1/2" (A5) size paper in tray 1 (the first loaded? tray), in tray 2 (the second tray), or in the bypass tray. * When loading 5-1/2"... -
Page 34: Toner Does Not Adhere Well Or Creases Appear In The Paper
Problem Point to check Solution Smudges appear on Are you printing on pre-punched paper? If the printed image overlaps the punch holes, smudges printed output. may appear on the reverse side of the paper following one-sided printing, or on both sides following two-sided printing. -
Page 35: Problems Related To Peripheral Devices
Problems Related to Peripheral Devices Problem Point to check Solution The connected USB Is the USB device compatible with the A non-compatible device cannot be used. Make sure device cannot be machine? that the device is compatible with the machine. used. -
Page 36: Punching Does Not Take Place
Problem Point to check Solution Stapling does not take Is the paper type setting of the selected Pamphlet stapling is not possible on heavy paper. place (including paper tray set to heavy paper? (However, when cover insertion is selected, pamphlet pamphlet stapling). -
Page 37: Other Problems
Other Problems Problem Point to check Solution The touch panel Is the display contrast properly Adjust the contrast using "Display Contrast" in the screen is difficult to adjusted? system settings. ➞ System Settings > "Default Settings" > "Display view. Contrast" You were logged out Did Auto Clear activate? When user authentication is used, the currently logged... -
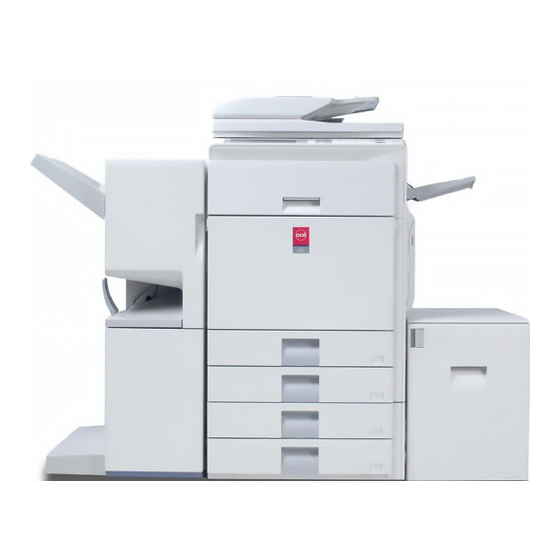
Page 38: Illustration Of The Machine
Illustration of the machine Front LINE indicator / DATA indicator Main power indicator [POWER] key (A) Operation panel PRINT DOCUMENT READY FILING DATA LINE IMAGE SEND DATA [POWER SAVE] COPY SYSTEM JOB STATUS SETTINGS LOGOUT (C) Exit tray unit (right tray) (B) Output tray (center tray) "On"... - Page 39 Back (I) Original placement position on the document glass Mark Mark 5-1/2" x 8-1/2" or A5 8-1/2" x 11"R or A4R 8-1/2" x 14" or B4 8-1/2" x 11" or A4 11" x 17" or A3 (J) Power plug (K) USB connector (A type) (L) USB connector (B type) (M) LAN connector The part indicated in the illustration is only...
- Page 44 The information contained in this manual is subject to change without notice to incorporate improvements made to the prod- ucts listed in this manual. This manual has been printed using a vegetable-based soy oil ink to help protect the environment. Printed on 100% post-consumer recycled paper 100 Oakview Drive, Trumbull, CT 06611...
Need help?
Do you have a question about the cm4010 and is the answer not in the manual?
Questions and answers