Table of Contents
Advertisement
Quick Links
Advertisement
Table of Contents

Related Manuals for Extron electronics SW USB Pro Series


Summary of Contents for Extron electronics SW USB Pro Series
- Page 1 SW USB Pro USB Switchers User Guide Switchers 68-3537-01, Rev. D 07 24...
- Page 2 Safety Instructions Safety Instructions • English Istruzioni di sicurezza • Italiano AVVERTENZA: Il simbolo, , se usato sul prodotto, serve ad avvertire WARNING: This symbol, , when used on the product, is intended to l’utente della presenza di tensione non isolata pericolosa all’interno del alert the user of the presence of uninsulated dangerous voltage within the contenitore del prodotto che può...
- Page 3 安全記事 • 繁體中文 안전 지침 • 한국어 警告: 경고: 이 이이 이 이이이 이이이 이이, 이이이 이이이이 이이 이이 이이이이 若產品上使用此符號, 是為了提醒使用者, 產品機殼內存在未隔離的危險 이이 이이이 이이이 이이 이이이이 이이이 이이이 이이이 이이이이이. 電壓, 可能會導致觸電之風險。 注意 若產品上使用此符號, 是為了提醒使用者, 設備隨附的用戶手冊中有重要 주의: 이 이이 이...
- Page 4 FCC Class A Notice This equipment has been tested and found to comply with the limits for a Class A digital device, pursuant to part 15 of the FCC rules. The Class A limits provide reasonable protection against harmful interference when the equipment is operated in a commercial environment.
- Page 5 Conventions Used in this Guide Notifications The following notifications are used in this guide: CAUTION: Risk of minor personal injury. ATTENTION : Risque de blessure mineure. ATTENTION: • Risk of property damage. • Risque de dommages matériels. NOTE: A note draws attention to important information. Software Commands Commands are written in the fonts shown here: ^AR Merge Scene, 0p1 scene 1,1 ^B 51 ^W^C.0...
-
Page 7: Table Of Contents
Contents ..............................1 Introduction About this Guide ..............................1 The SW USB Pro Series Switchers ........................1 Features ................................1 USB System Architecture .............................2 Application Diagrams ............................3 ..............................4 Installation Installation Overview ............................4 Rear Panel Features ............................5 Wiring for RS-232 Communication ........................7 Wiring the Power Connector ..........................7 Connecting Multiple SW USB Pro Switchers in a System ..................9... - Page 8 Device Status Panel .............................29 Roles and Permissions Panel ........................31 Network Settings Panel ..........................32 ..........................33 Reference Information Mounting the SW USB Pro Series Switcher .......................33 Tabletop Use ..............................33 UL Rack Mounting Guidelines ........................33 Furniture Mounting ............................34 Downloading Updated Firmware ........................34 SW USB Pro Series •...
-
Page 9: Introduction
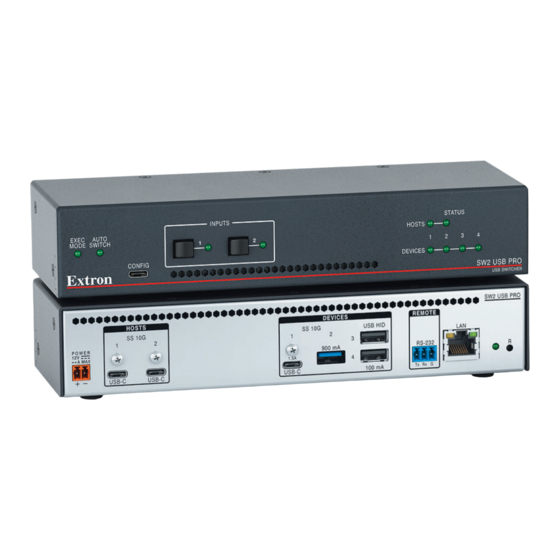
The SW USB Pro Series Switchers The SW USB Pro Series are two- and four-input USB switchers that allow for two or four host computers to switch among up to four peripheral USB devices (such as mass storage devices, keyboards, mice, and other human interface devices [HIDs]) with data rates up to 10 Gbps. -
Page 10: Usb System Architecture
NOTE: If the host device runs Windows® or macOS™ operating systems, use the following programs to view the hierarchical relationships between USB devices: • Windows: Device Manager • macOS: System Profiler or System Information SW USB Pro Series • Introduction... -
Page 11: Application Diagrams
Application Diagrams The following diagrams show examples of how an SW USB Pro Series switcher can be connected. Extron HDMI Cable Cubby 100 Cable Access Enclosure MODEL 80 Laptop Camera USB Mic POWER STANDBY FLAT PANEL Display Extron SW2 USB PRO... -
Page 12: Installation
Installation This section gives an overview of the steps to installing the SW USB Pro Series switchers. It also provides a description of the rear panel connectors and instructions for cabling. The following topics are discussed: • Installation Overview •... -
Page 13: Rear Panel Features
If your SW USB Pro system contains multiple computers, drivers for all connected peripheral devices should be loaded on all computers. • The outputs act as a USB hub. Hosts cannot be routed to specific USB Device connectors. All devices are simultaneously connected to the selected host. SW USB Pro Series • Installation... - Page 14 14 for details). While the Reset button is being pressed and held, the green LED to the left of the button blinks a varying number of times to indicate the current reset level. SW USB Pro Series • Installation...
-
Page 15: Wiring For Rs-232 Communication
5. Use the supplied tie wrap to strap the power cord to the extended tail of the connector. POWER 12 V 1.6 A MAX Smooth Ridges SECTION A–A 3/16" (5 mm) Max. Figure 8. Wiring the Power Connector SW USB Pro Series • Installation... - Page 16 Unless otherwise stated, the AC/DC adapters are not suitable for use in air handling spaces or in wall cavities. • Sauf mention contraire, les adaptateurs AC/DC ne sont pas appropriés pour une utilisation dans les espaces d’aération ou dans les cavités murales. SW USB Pro Series • Installation...
-
Page 17: Connecting Multiple Sw Usb Pro Switchers In A System
INPUTS STATUS EXEC AUTO HOSTS MODE SWITCH DEVICES CONFIG SW4 USB PRO USB SWITCHER Camera USB Flash Drive Figure 9. Example of a Host with Five SW USB Pro Switchers Cascaded in a Series SW USB Pro Series • Installation... -
Page 18: Operation
19) or PCS (see the SW USB Pro Help File). Auto Switch LED — This LED lights when auto-switching is enabled (see Auto Switching on page 12 to set up automatic input selection). SW USB Pro Series • Operation... -
Page 19: Powering On The System
You can also select a host (input) via an RS-232, Ethernet, or Ethernet over USB connection using SIS commands (see Input Selection on page 19 for a list of available input selection SIS commands and their explanations). SW USB Pro Series • Operation... -
Page 20: Selecting A Host Using The Keyboard (Hot Key Switching)
With PCS, only lowest to highest input number (1 to n) or highest to lowest (n to 1) priority order can be selected. You can connect host PCs to the inputs in any order, but the switcher switches to the valid input as defined by the assigned priority. SW USB Pro Series • Operation... -
Page 21: Locking And Unlocking The Front Panel (Executive Mode)
If emulation is enabled and a peripheral that is not a mouse or keyboard is connected to port 3 or 4, the switcher detects it and passes the signals to the respective connected peripheral host controller on the input. SW USB Pro Series • Operation... -
Page 22: Resetting
LED blink two times while retaining the IP (approximately 3 seconds) to settings. confirm the reset. Then, press the The SIS command Reset button again momentarily equivalent is E ZXXX } . (less than 1 second). SW USB Pro Series • Operation... -
Page 23: Troubleshooting
34). After installing the new firmware on your computer, Upload it to the switcher using PCS (see the SW USB Pro Help File), Toolbelt (see the Toolbelt Help File), or the internal web page (see Firmware Panel on page 28). SW USB Pro Series • Operation... -
Page 24: Remote Configuration And Control
The switcher sends the following copyright message when it first powers on. © Copyright 20nn, Extron Electronics, SWn USB Pro, Vn.nn, 60-183n-01 where SWn is the switcher model number as well as the number of inputs, and Vn.nn is the firmware version number. -
Page 25: Error Codes
The ASCII to Hex Conversion Table below is for use with the Command and Response Table. ASCII to Hex Conversion Table Space • SW USB Pro Series • Remote Configuration and Control... -
Page 26: Symbol Definitions
Verbose mode is on (enabled) and tagged responses are enabled and sent for queries If tagged responses are enabled, all read or view commands return the constant string plus the data. For example: Command: E CN } Response: Ipn • X^] SW USB Pro Series • Remote Configuration and Control... -
Page 27: Command And Response Table For Sis Commands
If an active input is removed, the switcher switches to the most recently prioritized input. = On or off status 0 = Off or disabled (default), 1 = On or enabled SW USB Pro Series • Remote Configuration and Control... - Page 28 Consists of up to 24 alphanumeric characters, including the hyphen ( ), with no blank spaces. The first character must be a letter, and the last character cannot be a hyphen. SW USB Pro Series • Remote Configuration and Control...
- Page 29 0Q1.00-1.00.0000-b115(2.07LX-SW USB PRO -Fri, 16 Jul 2021 15.42 UTC)-1.00.0000-b004*(2.07LX-SW USB PRO -Tue, 03 Aug 2021 17:56 UTC)] Factory base firmware version Updated firmware version Boot loader version KEY: n.nn = Firmware version {version} - {description} - {upload date and time} = Verbose firmware version SW USB Pro Series • Remote Configuration and Control...
- Page 30 = Media access code (MAC) 00-05-A6- = IP address Format nnn.nnn.nnn.nnn (Default is 192.168.254.254) = Subnet mask Format nnn.nnn.nnn.nnn (Default is 255.255.255.0) = Gateway IP address Format nnn.nnn.nnn.nnn (Default is 0.0.0.0) SW USB Pro Series • Remote Configuration and Control...
-
Page 31: Accessing The Product Configuration Software
), then click the Software button ( Alternatively, hover the mouse pointer over the Download tab, then move the pointer to the Software link in the Downloads column and click it. SW USB Pro Series • Remote Configuration and Control... - Page 32 6. Open the executable (.exe) file from the save location. 7. Follow the instructions that appear on the screen to install the program. By default, the installation creates a directory at C:\Program Files (x86)\Extron\Extron PCS. SW USB Pro Series • Remote Configuration and Control...
- Page 33 7. Follow the instructions that appear on the screen. By default, the configuration program file is stored on your computer in the Downloads folder at . From there, you can move it to a desired storage \Desktop\This PC location on your C: drive. SW USB Pro Series • Remote Configuration and Control...
- Page 34 2. Select a device (one of the SW USB Pro switchers) on the network or the USB port (see figure 15, 3. Click Connect ( The Product Configuration Software opens to the Host/Device Configuration window (see figure 16). Figure 16. PCS Host/Device Configuration Window SW USB Pro Series • Remote Configuration and Control...
-
Page 35: Internal Web Page
NOTE: The factory configured passwords for all accounts on this device have been set to the device serial number. In the event of a complete system reset, the passwords convert to the default, which is extron. 3. Click the OK button. SW USB Pro Series • Remote Configuration and Control... -
Page 36: Web Page Overview
(by default the file is stored at Open after being downloaded from the Extron website). C:\Program Files (x86)\Extron\Firmware NOTE: Firmware files for this product have a .eff extension. Do not attempt to load any other file types. SW USB Pro Series • Internal Web Page... -
Page 37: Device Status Panel
Click Sync to PC at the bottom of the panel. When the sync is completed, the message shown in Device Status figure 20 appears in the upper-right corner of the screen. Figure 20. Sync to PC Success Message SW USB Pro Series • Internal Web Page... - Page 38 Time Zone — In the Timezone field, select the desired time zone from the drop-down menu ( 3. When finished entering settings, click Save ( ) to confirm them, or Cancel to close the dialog box without implementing the settings. SW USB Pro Series • Internal Web Page...
-
Page 39: Roles And Permissions Panel
3. Click Save. The user password is removed. NOTE: An administrator password cannot be removed. If you enter a single space in the Admin Password field, it is replaced with extron as the unit password. SW USB Pro Series • Internal Web Page... -
Page 40: Network Settings Panel
NOTE: If DHCP is being enabled, the web page attempts to redirect and connect to the unit via the unit name (TCP/IP hostname). If a static IP address is being set, the web page attempts to connect to the new IP address. SW USB Pro Series • Internal Web Page... -
Page 41: Reference Information
• Downloading Updated Firmware Mounting the SW USB Pro Series Switcher The SW USB Pro Series switcher can be set on a table, mounted on a rack shelf, or mounted under a desk, podium, or table. Tabletop Use Four adhesive rubber feet are included with the SW USB Pro switcher. For tabletop use, attach one foot at each corner on the bottom of the unit, and place the switcher in the desired location. -
Page 42: Furniture Mounting
(see the mounting instructions provided with the kit). Downloading Updated Firmware Figure 25. Downloading Firmware from the Extron Website 1. On the Extron web page, click the Download tab (see figure 25, SW USB Pro Series • Reference Information... - Page 43 7. Follow the instructions on the subsequent screens to complete the software program installation. By default, the configuration program file is stored on your computer in the Downloads folder at . From \Desktop\This PC there, you can move it to a desired storage location on your C: drive. SW USB Pro Series • Reference Information...
- Page 44 Extron Electronics makes no further warranties either expressed or implied with respect to the product and its quality, performance, merchantability, or fitness for any particular use. In no event will Extron Electronics be liable for direct, indirect, or consequential damages resulting from any defect in this product even if Extron Electronics has been advised of such damage.
Need help?
Do you have a question about the SW USB Pro Series and is the answer not in the manual?
Questions and answers