US Robotics USR8700 User Manual
Serial ata 4-drive nas
Hide thumbs
Also See for USR8700:
- Declaration of conformity (1 page) ,
- Quick installation manual (36 pages) ,
- User manual (156 pages)
Table of Contents
Advertisement
Quick Links
Download this manual
See also:
User Manual
Advertisement
Table of Contents
Troubleshooting

Related Manuals for US Robotics USR8700


Summary of Contents for US Robotics USR8700
- Page 1 Serial ATA 4-Drive NAS User Guide R46.1221.00 rev 0.3 06/06...
- Page 2 U.S. Robotics Corporation 935 National Parkway Schaumburg, Illinois 60173-5157 No part of this documentation may be reproduced in any form or by any means or used to make any derivative work (such as a translation, transformation, or adaptation) without written permission from U.S. Robotics Corporation. U.S. Robotics Corporation reserves the right to revise this documentation and to make changes in the products and/or content of this document from time to time without obligation to provide notification of such revision or change.
-
Page 3: Table Of Contents
Contents Introducing Your Storage System Package Contents ............7 Physical Features . - Page 4 Logging Out of the Web User Interface ........72 Shutting Down the Storage System.
- Page 5 Support Information Regulatory Information Manufacturer’s Declaration of Conformity........127 Radio and Television Interference: .
- Page 6 Serial ATA 4-Drive NAS User Guide...
-
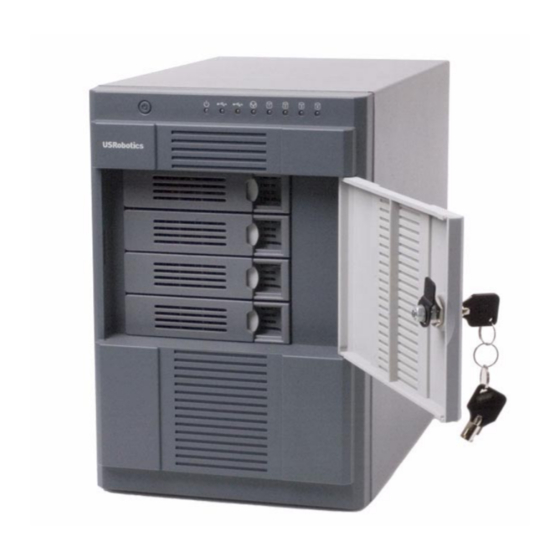
Page 7: Introducing Your Storage System
With DiskSafe Express, you can recover your local disks or partitions without having to reinstall or reconfigure the operating system or applications, dramatically shortening recovery time. Package Contents • USR8700 Serial ATA 4-Drive • Power Cord • Ethernet Cable... -
Page 8: Back
Symbol Name State Disk (1–4) Flashing Back USB Ports Ethernet Port Power Connector Power Switch System Requirements • Microsoft Windows XP; Microsoft Windows Server 2003; or Microsoft Windows 2000 Professional, Server, or Advanced Server with Service Pack 4 • An HTML 4.01-compliant Web Browser (such as Internet Explorer 5.5 or later or Netscape 8.0 or later) with JavaScript enabled Key Features and Benefits •... -
Page 9: Hardware Specification
• Simple administration—You can run the browser-based management interface from any computer in your network, and its informative wizards and configuration pages will help you accomplish your tasks quickly and easily. • Status at a glance—The home page of the management interface lets you quickly determine how much space is being used and who’s currently connected. -
Page 10: Software Specification
Note: If the temperature of the entire unit reaches or exceeds 85º C (185º F) or if the temperature if any of the disks reaches or exceeds 55º C (131º F), the storage system shuts down automatically. If the temperature of any of the disks reaches or exceeds 42º C (107.6º F), the fan will run at full speed. If the temperature of any of the disks reaches or falls below 37º... -
Page 11: Getting Started
Getting Started Getting started with your storage system involves the following general steps: 1. Install your storage system. This process involves installing both the hardware and software components of your storage system and specifying the initial configuration. For step-by-step instructions for this process, see 2. -
Page 12: Step One: Determine Your Configuration
considerations, see “Step One: Determine Your Configuration” 2. Set up your storage system. This involves installing the hard disks, attaching any optional USB devices, attaching the storage sys- tem to your network, and powering up the system. For information about this step, see 3. -
Page 13: Step Two: Set Up Your Storage System
Number of Disks Configuration Methods Used Linear Independent disks RAID 0 Striping RAID 1 Mirroring Linear Independent disks RAID 0 Striping RAID 5 Striping with parity Linear Independent disks RAID 0 Striping RAID 5 Striping with parity RAID 5 Striping with parity; spare drive with Spare automatically rebuilds a failed drive... - Page 14 To install the hard disks, you need a Phillips head screwdriver. 1. Remove the top hard disk tray from the storage system: 2. Near the front of the tray is a spacer containing four screws. Squeeze the tabs together to remove the spacer from the tray.
- Page 15 the screws on the sides of the tray: 6. Slide the hard disk and tray back into the storage system until it snaps into place. If you have fewer than four disks, load the bottom trays first and leave the top tray or trays empty. If you have four disks that are not the same size and you intend to use RAID 10, USRobotics recom- mends that you load the disks in ascending order of disk capacity, starting with the smallest disk in the bottom slot (slot 1),...
-
Page 16: Step Three: Install The Storage System Console
Serial ATA 4-Drive NAS User Guide Powering Up the Storage System To power up the storage system, insert the power cable into the power connector on the back of the storage system and plug the other end into a power outlet. Note: USRobotics recommends that you plug the storage system into a surge protector or uninterruptible power supply to prevent damage to the system from power surges. -
Page 17: Step Four: Initialize The Hard Disks
The installation wizard appears. 4. Follow the on-screen prompts to install the Storage System Console. When installation is complete, the following window appears: 5. Click Finish. Step Four: Initialize the Hard Disks To initialize the hard disks, follow these steps: 1. - Page 18 Serial ATA 4-Drive NAS User Guide The Storage System Console appears: 2. In the left pane, click the name of the storage system. Then click Log On Storage System Manager. If you see the Login page, your storage system was initialized and configured before you bought it. You are finished with the installation procedure and can begin using your Serial ATA 4-Drive NAS system, or you can reconfig- ure your disks if you choose to do so.
- Page 19 If the System Initialization page appears, you need to initialize your disks: If not all the hard disks have been detected, or if you want to add, remove, or reorder the disks at this time, insert or remove the disks one at a time and click Scan after each action. If you’re adding disks, be sure to wait until the Disk LED is blue before you click Scan.
-
Page 20: Step Five: Configure Your Storage System
2. If you agree to the terms, select I accept the license agreement and click Next. The Host Name page appears. 3. Click Next to accept the default storage system name (USR8700) Enter the name that you prefer and then click Next. - Page 21 Specify the time using the 24-hour format. For example, enter 2:00 P.M. as 14:00:00. When you click Next, the Network Settings page appears: 4. By default, if your network has a DHCP server, the storage system obtains an IP address automatically from that server.
- Page 22 5. Select the configuration that you chose from the table on page 12 and click Next. By default, the storage system selects the configuration that provides the best level of data protection available: for a single disk, a linear configuration; for two disks, RAID 1; and for three or four disks, RAID 5.
- Page 23 Serial ATA 4-Drive NAS User Guide Capacity of drives: 7. In each text box, enter the size of each disk that you plan to back up (specify the size in gigabytes). To determine the size of a computer’s disk, open My Computer or Windows Explorer on that compu- ter, right-click the disk, and then click Properties.
-
Page 24: Accessing The Web User Interface
8. To accept the suggested percentages for file sharing and backup, click Finish. To change these proportions, enter a new percentage in either text box. (When you click anywhere on the page, the other text box updates automatically so that both percentages add up to 100%.) Then click Finish. -
Page 25: Accessing The Web User Interface Using A Web Browser
to use a specific IP address, you might need to specify the IP address of the gateway in your network before you can successfully access the Web User Interface using a Web browser. First access the Web User Interface using the Storage System Console and then specify the gateway address (as described in “Changing the Network Settings”... -
Page 26: Logging In To The Web User Interface
1. Click Start > Programs > Storage System Console. As soon as you start the Storage System Console, it automatically scans the network for storage sys- tems. This might take a few minutes. As soon as the scan is complete, the left pane displays a tree view of all the storage systems it found: Note: If you connect a storage system to the network after the Storage System Console has already scanned it, or if you change the IP address of the storage system, you must click... - Page 27 Serial ATA 4-Drive NAS User Guide login page appears. This ensures that only authorized individuals can change the storage system settings. To log in, enter the administrator user name and password, and then click Log In. The default administrator user name is admin, and the default password is storage. (These are case- sensitive.) However, you can change the name and password at any time.
-
Page 28: Navigating The Web User Interface
Navigating the Web User Interface Once you log in to the Web User Interface, the Home page appears: The top of the Home page (and every page in the Web User Interface) displays a navigation bar that lets you access all the features of the storage system: •... - Page 29 age system. Note: The total storage capacity will be less than the total size of all your hard disks because some of the disk space is needed for the operating system and management software. In addition, the amount of used backup capacity will be greater than the total size of all the disks listed on the Backups page because additional storage space is needed for the data that has changed between backups.
-
Page 30: Adding Users
remotely. For more information, see Chapter , "Managing Your Storage System," • Contact Us—Provides information about USRobotics and the other products and services it offers. • Log Out—Logs you out of the Web User Interface. Adding Users By default, the storage system includes a user named guest that has a password of guest. However, you might want to add other users as well. - Page 31 The Users & Computers page appears: 2. Click Add. 3. Select the type of user that you want to add, and then click Next. The operating system used by the user determines which option you should choose—Windows/Mac OS X user (CIFS) or Linux/Other Mac user (NFS). Note: Linux users and Mac users who are not using OS X access shared folders using the Network File System (NFS).
- Page 32 • Windows/Mac OS X user (CIFS) • Linux/Other Mac user (NFS) User Guide Getting Started - 32...
-
Page 33: Creating Shared Folders
4. Enter the requested user information and click Done: For this type of user Do this Windows/Mac OS X Enter the user name and password for accessing the shared folders. (You must enter user (CIFS) the password a second time to confirm it.) The user name can be up to 20 characters long and can include letters and numbers. - Page 34 1. In the navigation bar, click Shared Folders. The Shared Folders page appears: Note: The Shared folders list includes usbdisk1 and usbdisk2, whether or not any USB disks have been connected to the storage system. In addition, shared folders created as the result of adding a Windows/Mac OS X user do not appear in the Shared folders list.
- Page 35 • Windows/Mac OS X user (CIFS) • Linux/Other Mac user (NFS) 4. In the Shared folder name text box, enter a unique name for the shared folder, and then click Next. This name can be up to 256 characters long and can contain letters, numbers, hyphens, underlines, and spaces.
- Page 36 • Windows/Mac OS X user (CIFS) • Linux/Other Mac user (NFS) 5. In the Unauthorized users list, select the name of the user(s) who should be able to access this shared folder. To select multiple, contiguous users, hold down the Shift key and select the first user, then select the last user.
-
Page 37: Accessing Shared Folders
uous users, hold down the Ctrl key as you select each user. Then specify what access rights the selected user(s) should have: To allow the user(s) to do this Only read the files in the shared folder and its subfolders Read, add, modify, and delete the folders and files in the shared folder The selected user(s) move from the Unauthorized users list to the Authorized users list. -
Page 38: Windows Users
Windows Users If you’re using Windows, you have two options for accessing shared folders: you can use My Computer or Windows Explorer to map a drive letter to the shared folder, or you can install the Storage System Console and use that utility to map a drive letter to the shared folder. With the Storage System Console, you don’t have to worry about remembering the name of the storage server or the shared folders;... - Page 39 work. 5. To automatically connect to this shared folder each time you log on to Windows, select Reconnect at logon. If you clear this option, you must repeat this procedure each time you want to access the shared folder. 6. Click Finish. 7.
- Page 40 Note: If you connect a storage system to the network after the Storage System Console has already scanned it, or if you change the IP address of the storage system, you must click Discover Storage Systems to scan the network again and update the tree in the left pane. 2.
-
Page 41: Linux Users
4. In the Drive list, select the drive letter that you want to assign to the shared folder. 5. To automatically connect to this shared folder each time you log on to Windows, select Reconnect at logon. If you clear this option, you must repeat this procedure each time you want to access the shared folder. 6. -
Page 42: Mac Users
If you included a full path when creating the directory, be sure to include the full path with this com- mand (for example, mount storage_system:/nas /NASDisk-00002/folder /mnt/my_directory). 4. Repeat steps 1 through 3 for each shared folder that you want to access. Mac Users The procedure for accessing a shared folder on a Mac varies, depending on whether the Mac is running OS X or an older operating system. -
Page 43: Managing Your Storage System
Managing Your Storage System The Web User Interface lets you perform a number of tasks to help you get the most from your storage system: • Managing Users—Add, modify, or remove users, or put users into groups. • Managing Shared Folders—Create shared folders, rename existing shared folders, change which users can access existing shared folders or their access rights, and delete shared folders that you no longer want to keep. -
Page 44: Adding Users
list of all currently configured Windows and Mac OS X users, as well as all Linux and other Mac computers. Only the individuals or computers that appear on this page can access the shared folders or back up their local hard disks on the storage system. (In this guide, the term user refers to both individuals and computers.) You can add, modify, or remove users at any time. - Page 45 1. In the navigation bar, click Users. 2. Select the radio button next to the user that you want to modify. 3. Click Edit. The page that appears next varies, depending on the type of user you selected: • Windows/Mac OS X user (CIFS) •...
-
Page 46: Removing Users
For this type of user Do this Linux/Other Mac user Enter the computer’s IP address or the actual computer name in the computer's system (NFS) configuration. A single user can actually represent multiple computers. In the IP address or compu- ter name text box, you can use the wildcard characters * and ? to indicate a range of names. - Page 47 Serial ATA 4-Drive NAS User Guide appear in the adjacent Members list. You can add a group, modify the group membership, or remove groups at any time. Adding a Group When you create a group, you typically specify which users should be members of that group, although you can create an empty group and add users later.
- Page 48 3. Click Add. 4. In the Group name text box, enter a unique name for the group. This name can be up to 20 characters long and can include letters, numbers, hyphens, and underlines. 5. Specify which users should belong to this group, and then click OK: To do this Do this Add all users to the group...
- Page 49 Marketing group might have read-only access to the Budget shared folder, while the Executives group might have read/write access. As a member of the Executives group, Alice would have read/write access to that shared folder. If Alice is currently connected to that shared folder and you subsequently remove her from the Executives group, she will continue to have read/write access to that folder until she disconnects or shuts down her computer.
-
Page 50: Managing Shared Folders
The selected users move from one list to the other. On the Groups page, when you select this group in the Groups list, the adjacent Members list imme- diately reflects the changes you just made. Removing a Group Removing a group does not remove the users that are members of that group; it simply means that the group will no longer appear in the Groups list on the Groups page. -
Page 51: Adding Shared Resources
Serial ATA 4-Drive NAS User Guide name is preceded by an @ symbol.) By default, the storage system includes a shared folder named public, and all Windows and Mac OS X users can access it and create, modify, or delete files there (unless you change the list of authorized users or their access rights as described in “Changing User Access to Shared Folders”... - Page 52 she was removed from the list of authorized users), or she will be able to only view the files there (if her access level was changed). To change user access to shared folders and USB disks: 1. In the navigation bar, click Shared Folders. 2.
- Page 53 • Linux/Other Mac user (NFS) 5. Specify which users should be able to access this shared folder or USB disk, and then click OK: To do this Allow selected users to access to the shared folder or USB disk Prevent selected users from accessing the shared folder or USB disk a To select multiple, contiguous users, hold down the Shift key and select the first user, then select...
-
Page 54: Deleting A Shared Folder
The selected users move from one list to the other. Notes: • To change the access level for a user, select the user in the Authorized users list and click Remove. Then select that user in the Unauthorized users list and click either Add (Read- Only) or Add (Read/Write), depending on the access level you now want the user to have. -
Page 55: Managing Backups
3. Click Delete. 4. When prompted to confirm the deletion, click Yes. The shared folder no longer appears in the Shared folders list, and all associated subfolders and files are deleted. Managing Backups Once the users have used DiskSafe Express to back up their computer hard disks to the storage system (as described in "Protecting Local Disks,"... -
Page 56: Changing The Recovery Cd Password
Changing the Recovery CD Password To change the recovery CD password: 1. In the navigation bar, click Backups. 2. In the Computer name list, select the name of the computer whose recovery CD password you want to change. 3. In the Recovery CD password text box, type the password to use. This password must be 12–16 characters long. -
Page 57: Deleting A Client
Deleting a Client If you remove DiskSafe Express from a particular computer, or if you change the computer name, the original computer name remains on the storage system and counts toward the total number of computers that are allowed to back up to the storage system. To both delete all backups of all disks for a particular computer and the computer name, you must delete the client. - Page 58 performing a backup: To take advantage of this feature, you must have access to an SMTP e-mail server, either within your own network or through an Internet service provider. Note: The e-mail might not be sent immediately when the problem occurs, but will be sent within an hour of the event.
-
Page 59: Upgrading The Firmware
3. In the SMTP server name or IP address text box, enter the fully qualified domain name or IP address of your e-mail server. 4. Specify whether or not your e-mail server requires authentication by selecting or clearing SMTP server authentication. If you select this option, you must enter a user name and password for logging into that server in the User name and Password text boxes. -
Page 60: Disconnecting Usb Devices
also allows you to upgrade it if newer firmware becomes available. For additional security, you must enter your administrator password in order to upgrade the firmware. Caution: When you upgrade the firmware, the storage system restarts, and access to the Web User Interface is temporarily interrupted. -
Page 61: Changing The System Settings
names cannot be changed.) When you plug a USB device into the storage system, the storage system automatically detects it and adds that device to the USB page. (You might need to click Scan to update the display.) However, when you want to unplug a USB device from the storage system, you must first use the Web User Interface to disconnect it. - Page 62 such as the storage system name, and the current date and time. You can change these settings at any time. Note: If you change the name of the storage system, be sure to also change that name in any local hosts files or on the DNS server in your network.
- Page 63 3. Make the desired changes: To change this The storage system name The system date, time, or time zone NTP server name or IP address The administrator name or password In the Administrator name text box, enter the user name to use for log- 4.
-
Page 64: Changing The Network Settings
Serial ATA 4-Drive NAS User Guide Changing the Network Settings The Network page displays the network settings that were set when you initially configured the storage system. Managing Your Storage System - 64... - Page 65 You can change these settings at any time. Note: Changing the IP address or subnet mask can have several effects: • If you access the Web User Interface using the Storage System Console or using the storage sys- tem’s IP address, access to the Web User Interface will be disrupted and you will have to access it again using the new IP address.
-
Page 66: Reconfiguring Your Storage System Disks
To change this The DNS server to use The DHCP settings The FTP settings 4. Click Apply. 5. When the confirmation message appears, click OK. Note: If you changed the IP address of the storage system, you must now access the Web User Interface using the new IP address. - Page 67 system: This page includes the following details: • The disk configuration (that is, whether the disks use a linear or RAID configuration, and the RAID level) • The overall status of the disks: • Normal—All the disks are working properly. •...
- Page 68 • N/A—The disk is detected but not available for use (for example, when it has failed) • The hotplug indicator: Caution: If the hotplug indicator for a disk is red or yellow, removing the disk will result in a loss of data.
- Page 69 Serial ATA 4-Drive NAS User Guide number of hard disks that are currently installed in the system.) 6. If you want to add or remove hard disks, do so one at a time and click Scan after each action. If you’re adding disks, wait until the disk LED is blue before you click Scan.
- Page 70 The Disks to Back Up page appears: 7. In the Number of disks to back up list, select the total number of disks that you plan to back up to this storage system. If some computers have multiple disks, be sure to select the total number of disks that you plan to back up.
- Page 71 The Disk Space Distribution page appears: 9. To change the percentage of space allocated for shared folders and backups, enter the desired per- centage for each usage type. (The percentages must add up to 100%.) Then click Reconfigure Disks. 10. When the confirmation message appears, click OK. The screen displays the progress of the process: When this process is complete, the storage system restarts.
-
Page 72: Logging Out Of The Web User Interface
page 33). Logging Out of the Web User Interface When you have finished using the Web User Interface, it is recommended that you log out to ensure that unauthorized individuals do not make changes to the storage system. To log out: 1. - Page 73 to do this. Caution: If you shut down the storage system, users will no longer be able to access the shared folders on the storage system. If users have shared files open, data might be lost. Be sure to have all users save their changes and close any open files before you shut down the storage system.
- Page 74 Serial ATA 4-Drive NAS User Guide Managing Your Storage System - 74...
-
Page 75: Accessing The Storage System Through Ftp And Telnet
Accessing the Storage System through FTP and Telnet If you enabled the storage system to act as an FTP server, all Windows or Mac OS X users can use a Web browser to access the public folder and their personal folders. For information about enabling the storage system to act as an FTP server, see Note: Even if you changed the access rights to the public folder (for example, to prevent a particular user from accessing it altogether or to limit a user to read-only access), all existing users have... - Page 76 Serial ATA 4-Drive NAS User Guide Accessing the Storage System through FTP and Telnet - 76...
-
Page 77: Protecting Local Disks
Protecting Local Disks Even if most of your data is stored and protected on your storage system, your operating system files, applications, and many other files still reside on each individual computer in your network. If one of those local disks fails, it can take many hours to re-install and reconfigure the operating system and applications on a new or repaired hard disk, and some files might be completely lost. -
Page 78: Getting Started
Getting Started System Requirements Each computer where DiskSafe Express is installed must have the following: • One of the following operating systems: • Microsoft Windows XP Home Edition or Professional with Service Pack 2 or newer • Microsoft Windows Server 2003 •... -
Page 79: Installing Disksafe Express
The installation wizard starts. 5. On the first page of the installation wizard, click Next. 6. On the page with installation options, click Next. (Initiator Service and Software Initiator are selected by default.) 7. If a message box appears telling you to configure the settings in the Control Panel, click OK. Note: You do not have to configure the Microsoft iSCSI Initiator. - Page 80 If this component is not currently installed, the following prompt appears: Click OK to go to the Microsoft website, click iSCSI Software Initiator v2.0, and follow the instructions “Installing the Microsoft iSCSI Initiator” You must install the Microsoft iSCSI Initiator 2.0 before you can install DiskSafe Express. When you have finished installing the iSCSI initiator, re-start the installation of DiskSafe Express.
- Page 81 It might take some time to copy and configure the associated files. Note: The remaining time might be reported as 0 and it might appear that no progress is occurring. However, configuration is occurring in the background. 6. When a message appears, indicating that the installation of Microsoft .NET Framework 1.1 is com- plete, click OK.
- Page 82 9. Click Next to install DiskSafe Express in the displayed location. Alternatively, you can click Browse, select or enter a different location, click OK, and then click Next. Note: You must install DiskSafe Express on the drive that you boot from (that is, where Windows is installed, typically C:).
-
Page 83: Starting Disksafe Express
After you restart the computer, the Add License dialog box appears: 11. Type the key code for licensing the product and click OK. The license key is on the back of the recovery CD envelope. Note: If you previously used this key code on a different computer, an error message appears, and you must re-activate your license. -
Page 84: Activating Your License
If you already protected a disk, the application window appears: The Status page displays the name of the disk that you protected and related information, such as the size of the disk, the name of the storage system where the backup resides, the number used to identify the backup disk on the storage system (Backup disk ID), the current status, information about any ongoing activity, and the date and time of the last backup and next scheduled backup (if any). - Page 85 the next section). Note: Activation is tied to your computer’s hardware. Once you have activated a particular license, if your computer hardware changes, or if you subsequently install DiskSafe Express on a different computer using the same key code, an error message appears. You must export your current license data (Action >...
-
Page 86: Protecting Your Disks
11. On the confirmation message, click OK. The license is now activated and you can continue to backup up and recover your data. 12. To close the dialog box, click Exit. Replacing Your Existing License To replace your existing license: 1. - Page 87 2. In the Available disks list, select the disk or partition that you want to protect. Even if your computer has only one hard disk, two items appear in this list. The first item represents the entire hard disk, and the second item represents the partition on that disk. (If there’s only one parti- tion on the disk, the partition is the same as the entire disk.) If your hard disk is divided into multiple partitions, this list displays one item for the entire hard disk, and one item for each partition.
- Page 88 What to do next: In this case You never previously completed the Protect a Disk wizard You previously completed the Protect a Disk wizard and connected to a storage system 4 You previously protected this disk and removed protection (as described in Protection”...
- Page 89 Serial ATA 4-Drive NAS User Guide (The first backup location in the list is selected by default.) If you want to scan the network for new storage systems, or add a new one manually, click Add and repeat step 3. If you want to remove a storage system that’s not valid or that you no longer want to use, select the storage system from the Backup locations list, click Remove, and then click Yes to confirm the removal.
- Page 90 to the next step. If you select Create a new backup and click Next, you must select the desired backup location as described in step 4. 6. Specify when you want backups to occur. For example, if you want backups to occur every day, select Daily from the Recurrence list. If you want backups to occur once a week, select the day of the week from the Recurrence list.
- Page 91 If you clear this option, the disk will be backed up at the next scheduled time or the next time you per- form a manual backup. 8. If you ever need to recover your disk using the recovery CD, you’ll be prompted for a password. In the Recovery password text box, enter the password that you’d like to use, enter it again in the Retype your password text box, and then click Next.
-
Page 92: Manually Backing Up Your Disk
9. Review all your selections and click Finish. If you selected the Back up now check box, the backup process begins as soon as you click Finish, and you can review its progress on the Status page in DiskSafe Express. 10. -
Page 93: Stopping A Backup Or Recovery In Progress
1. Click Status. 2. In the Protected disk list, select the disk that you want to back up. 3. Click Back Up Now. The Current activity area displays information about what’s happening, the percentage of the backup that has completed, and the speed at which the data is being sent over the network. The Progress bar graphically indicates how much of the backup is complete. -
Page 94: Changing The Backup Schedule
1. Click Status. 2. In the Protected disk list, select the disk whose backup or recovery you want to stop. 3. Click Stop Current Activity. If you’re stopping a backup, the backup stops immediately. If you’re stopping a recovery, a confirmation message appears. Click OK to stop the recovery now, or click Cancel to proceed with it. -
Page 95: Changing The Recovery Cd Password
1. Click Schedule. 2. In the Protected disk list, select the disk whose backup schedule you want to change. 3. Specify when you want backups to occur. For example, if you want backups to occur every day, select Daily from the Recurrence list. If you want backups to occur once a week, select the day of the week from the Recurrence list. - Page 96 1. Click Restore. 2. In the Protected disk list, select a disk whose backup resides on the storage system whose recovery CD password you want to change. To double-check your selection, click Status. The name of the storage system appears in the Backup location area.
-
Page 97: Recovering Data
Recovering Data With DiskSafe Express, there are several ways to recover data from your backups. The best method to use depends on what you want to do: • Recover selected folders, files, or sections of files—If you accidentally permanently deleted a folder or file that you want to recover, or if you just want to retrieve some information from a file that you changed, you can access the backup that contains the desired data and copy it to your local disk. - Page 98 1. Click Restore. 2. In the Protected disk list, select the disk that contains the folders or files that you want to recover. 3. In the Backups list, select the backup from the desired date and time. You can select only a backup for which No appears in the Backup View Open column. 4.
-
Page 99: Recovering A Non-System Disk Or Partition
Notes: • If the first drive letter after your local disks is mapped to a shared network folder, you must use Disk Management to change the drive letter assigned to the backup view so that you can access it. For example, if your system disk is mapped to C:, your CD-ROM drive is mapped to D:, and a shared network folder is mapped to E:, and you view a backup, you will continue to see the shared network folder when you explore E:, and you will not see a new drive letter for the backup view. - Page 100 those other partitions temporarily stops until the selected partition is recovered. Caution: When you recover a disk or partition, you will lose any data that was written to the disk after the time of the selected backup, as well as any backups that were performed after the backup you’re recovering.
-
Page 101: Recovering A System Disk Or Partition
is complete. Note: You can cancel this operation at any time by clicking Stop Current Activity. However, this will leave the local disk or partition in an incomplete state, and you will have to recover it again before you can use it. 7. - Page 102 5. In the Client Name field, enter the full computer name of this computer. This name is always in upper case. If you don’t remember the full computer name, access the Web User Interface (as described in “Accessing the Web User Interface” tected disks list, the Computer Name column lists the computer name of each computer that has backed up disks to the storage system.
- Page 103 ing Rollback the remote disk. Caution: This action is not reversible. If you select this option, you will not be able to subsequently recover from another later backup. 13. Specify whether or not to scan the differences between the backup and the disk to which you are recovering data by selecting or clearing Enable micro-scan.
-
Page 104: Removing Protection
To do this Recover another disk or partition Restart the computer 20. When the computer restarts, use the appropriate procedure for your system to configure the computer to boot from the local hard disk once more. 21. Start DiskSafe Express and remove protection from the recovered disk or partition (as described in “Removing Protection”... - Page 105 Serial ATA 4-Drive NAS User Guide 2. From the Action menu, click Remove Protection. The disk disappears from the Protected disk list. If another disk is protected, that disk appears in the Protected disk list, and information about that disk now appears in the application window. If no other disk is protected, the Protected disk list and application window are blank.
- Page 106 Serial ATA 4-Drive NAS User Guide Protecting Local Disks - 106...
-
Page 107: Disk Configurations
Disk Configurations Your storage system supports the following types of disk configurations: • Linear—A linear configuration is similar to using multiple hard disks in a regular computer. Each disk is an independent entity, and the data on it is self-contained. You can add or remove the disks without affecting the other disks. -
Page 108: Adding Hard Disks
• RAID 10—RAID 10 is similar to RAID 1, but rather than having one disk mirror to one other disk, two disks mirror to the two other disks. You can use RAID 10 only if your storage system has four disks. The disks in the first two slots consti- tute the first pair, and the disks in the second two slots constitute the second pair. - Page 109 Serial ATA 4-Drive NAS User Guide The Disk Change Notification page appears: 3. To add the disk to the storage system, click Add New Disk. If the information on this page is not correct, click Scan to scan the storage system again and update the page.
-
Page 110: Adding Hard Disks To A Degraded Raid Configuration
4. Take the desired action: To do this Add the disk to a linear configuration or use it as a spare for a normal three-disk RAID 5 configuration Add the disk to the storage system but not add it to the RAID at this time Return to the previous page (for example, to re-scan the storage system) Adding Hard Disks to a Degraded RAID Configuration... -
Page 111: Removing Hard Disks Or Responding To Disk Failure
3. Click Ignore to continue rebuilding the disk and return to the Web User Interface. The Disks page shows the progress of the rebuilding progress. Alternatively, if the information on this page is not correct, click Scan to scan the storage system again and update the page. -
Page 112: Responding To Raid Degradation
your disks (as described in “Reconfiguring Your Storage System Disks” Caution: Reconfiguring your disks will delete all the data on your storage system. Responding to RAID Degradation When disk removal/failure causes RAID degradation, the Disk Change Notification page appears when you access the Web User Interface or refresh the browser window: Take the appropriate action: To do this... -
Page 113: Responding To Raid Failure
Responding to RAID Failure When disk removal/failure causes the entire RAID to fail, the Disk Change Notification page appears when you access the Web User Interface or refresh the browser window: Take the appropriate action: To do this Scan the storage system again and update the information on the page Re-install the same disk Reconfigure the storage system... -
Page 114: Transferring Hard Disks To A New Storage System
or not the storage system is running. However, if you do this when the storage system is running, you can swap only two disks, and you must restart the system after you swap the disks. If you swap the disks when the storage system is not running, you can swap all four disks, and the system will function as it previously did when you restart it. - Page 115 Serial ATA 4-Drive NAS User Guide click Shut Down to shut down the system. Note: If the firmware on your new unit is newer than that on your hard disks, you can obtain the latest firmware from www.USR.com. To apply it, see “Upgrading the Firmware”...
- Page 116 Serial ATA 4-Drive NAS User Guide Disk Configurations - 116...
-
Page 117: Troubleshooting
Troubleshooting Resetting the Web User Interface Password To reset the password to its factory default: 1. If the storage system is running, shut it down by pressing the power button unit for approximately 5 seconds. 2. After the storage unit has shut down, press and hold the power button until the power LED comes on, and then release the button. -
Page 118: Disconnecting From Shared Folders
2. In the left pane, click System Log. The System Log page displays the date and time of the event, the type of event (I for informational, E for error, W for warning, and C for critical), and a brief description of the event. 3. -
Page 119: Linux Users
Linux Users To disconnect from a shared folder using LInux: • Unmount the desired shared folder by entering the following command: umount /my_directory where my_directory is the name of the local directory. For example, if you mounted the shared folder using the following command: mount 192.168.0.101:/nas/NASDisk-00002/public /my_directory you would unmount it using the following command: umount /my_directory... - Page 120 I can’t access the Web User Interface. If you’re using the Storage System Console, make sure the computer where the Storage System Console is installed is in the same subnet as the storage system. If you’re using a Web browser, make sure the name or IP address of the storage system is correct. You can use the storage system name only if that name is registered with a DNS server in your network.
-
Page 121: Troubleshooting Disksafe Express
The storage system is not distributing IP addresses. Make sure that Enable DHCP server is selected on the Network page (as described in Network Settings” on page 64), and that the starting and ending IP addresses are valid. The first three digit groups of both the starting IP address and ending IP address must be the same. - Page 122 • If the storage system already exists, select it in the list of backup locations and then click Remove. Then click Add to add it again. This resets the settings in the iSCSI initiator which might be causing the authentication problem. Note: When authentication errors occur, invalid backups might be created on the storage system.
-
Page 123: Creating A Diagnostic File
• If the IP address of the storage system changed (for example, if the storage system obtains its IP address from a DHCP server and acquired a new one after you added the storage system to the list of backup locations), you must start DiskSafe Express so that it can retrieve the new IP address. You must do this each time the IP address on the storage system changes. -
Page 124: Using The Recovery Cd
Using the Recovery CD To create a diagnostic file using the recovery CD: 1. Insert the recovery CD into the computer’s CD-ROM drive and press Alt+F2. 2. At the command line, enter the following command and then press Enter: xray 3. -
Page 125: Support Information
FAQ and Troubleshooting Web pages for your product. The product number of the USR8700 Network Attached Storage is 8700. You may need to know this to obtain information on the USRobotics Web site. - Page 126 Serial ATA 4-Drive NAS User Guide Support Information - 126...
-
Page 127: Regulatory Information
Regulatory Information Manufacturer’s Declaration of Conformity U.S. Robotics Corporation 935 National Parkway Schaumburg, IL 60173 U.S.A. declares that this product conforms to the FCC’s specifications: Part 15, Class B Operation of this device is subject to the following conditions: 1. this device may not cause harmful electromagnetic interference, and 2. -
Page 128: Ul Listing/Cul Listing
Serial ATA 4-Drive NAS User Guide UL Listing/CUL Listing: This information technology equipment is UL Listed and C-UL Listed for both the US and Canadian mar- kets respectively for the uses described in the User Guide. Use this product only with UL Listed Information Technology Equipment (ITE). -
Page 129: Robotics Corporation Two (2) Year Limited Warranty
Serial ATA 4-Drive NAS User Guide U.S. Robotics Corporation Two (2) Year Limited Warranty 1.0 GENERAL TERMS: 1.1 This Limited Warranty is extended only to the original end-user purchaser (CUSTOMER) and is not transferable. 1.2 No agent, reseller, or business partner of U.S. Robotics Corporation (U.S. ROBOTICS) is authorised to modify the terms of this Limited Warranty on behalf of U.S. -
Page 130: 3.0 Obtaining Warranty Service
2.2 CUSTOMER is specifically advised to make a backup copy of all software provided with this product. 2.3 CUSTOMER assumes full responsibility to properly install and configure this product and to ensure proper installation, configuration, operation and compatibility with the operating environment in which this product is to function. -
Page 131: 5.0 Limitations
Serial ATA 4-Drive NAS User Guide 4.2 Any product or part returned to U.S. ROBOTICS without an RMA issued by U.S. ROBOTICS or its authorised U.S. ROBOTICS Service Centre will be returned. 4.3 CUSTOMER agrees to pay shipping charges to return the product or part to the authorised U.S. ROBOTICS Return Centre;... -
Page 132: 6.0 Disclaimer
Serial ATA 4-Drive NAS User Guide 5.3 TO THE FULL EXTENT ALLOWED BY LAW, THE FOREGOING WARRANTIES AND REMEDIES ARE EXCLUSIVE AND ARE IN LIEU OF ALL OTHER WARRANTIES, TERMS, OR CONDITIONS, EXPRESS OR IMPLIED, EITHER IN FACT OR BY OPERATION OF LAW, STATUTORY OR OTHER- WISE, INCLUDING WARRANTIES, TERMS, OR CONDITIONS OF MERCHANTABILITY, FITNESS FOR A PARTICULAR PURPOSE, SATISFACTORY QUALITY, CORRESPONDENCE WITH DESCRIPTION, AND NON-INFRINGEMENT, ALL OF WHICH ARE EXPRESSLY DISCLAIMED.
Need help?
Do you have a question about the USR8700 and is the answer not in the manual?
Questions and answers