Interacoustics OtoRead Instructions For Use Manual
Hide thumbs
Also See for OtoRead:
- Instructions for use manual (172 pages) ,
- Operation manual (58 pages) ,
- Instructions for use manual (17 pages)
Table of Contents
Advertisement
Quick Links
Advertisement
Table of Contents

Related Manuals for Interacoustics OtoRead


Summary of Contents for Interacoustics OtoRead
- Page 1 Science made smarter Instructions for Use - US OtoRead™...
-
Page 3: Table Of Contents
2.3.6 Environmental factors ....................9 2.3.7 NOTICE ........................10 2.4.1 The OtoRead test instrument ................11 2.4.2 Connecting the Micro-Probe to the OtoRead ............12 2.4.3 Micro-Probe calibration ................... 12 2.4.4 Connecting the hook to the OtoRead ..............12 2.4.5 Connecting the neckstrap to the OtoRead ............ - Page 4 3.12.8 Viewing results ......................33 3.12.9 Viewing DPOAE results with normative data............34 3.13.1 Saving results on the device ................... 34 3.13.2 Deleting results from the OtoRead ..............35 3.15.1 Understanding the DPOAE printout ................ 36 3.15.2 Understanding the TEOAE printout ................ 37 3.15.3 Rounding results .....................
- Page 5 6 GENERAL TECHNICAL SPECIFICATIONS ................57 7 APPENDICES ..........................67...
-
Page 7: Introduction
Introduction About this manual This manual is valid for the OtoRead™ (valid from UI V3.41.0 FW version 113). This product is manufactured Interacoustics A/S Audiometer Allé 1 5500 Middlefart Denmark Tel.: +45 6371 3555 Fax: +45 6371 3522 E-mail: info@interacoustics.com Web: www.interacoustics.com... -
Page 8: Tm Device Measure Teoaes
The level of these emissions can be compared with the level of the noise. The SPL and frequencies of the test tones and the averaging time used to process the signals can be determined by the tester through adjustable settings maintained in static memory within the OtoRead instrument. - Page 9 Federal law restricts this device to sale by or on the order of a licensed medical practitioner Data protection The General Data Protection Regulation (GDPR) came into force on May 25, 2018 and stipulates how patient data is handled and stored. The OtoRead instrument together with the OtoRead Module and Auto Print software is used to test patients, store and view measurement data.
- Page 10 It is also the customer’s responsibility to clean up any computer where the OtoRead Module is installed or any OtoRead device where patient data is present prior to disposal, in accordance with the GDPR guidelines. D-0116684-B – 2020/03 Page 4...
-
Page 11: Unpacking And Installation
Storage If you need to store the OtoRead™ for a period, please ensure it is stored under the conditions specified in the section for technical specifications. D-0116684-B – 2020/03 Page 5 OtoRead™... - Page 12 Failing to do so may endanger the environment. The CE-mark indicates that Interacoustics A/S meets the requirements of Annex II of the Medical Device Directive 93/42/EEC. TÜV Product Service, Identification No. 0123, has approved the quality system.
-
Page 13: 2.3.1 Electrical System Safety
Device is required when a network connection is made. The requirement for the Separation Device is defined in IEC 60601-1 clause 2.3.2 Electrical safety Do not modify this equipment without authorization of Interacoustics Do WARNING not disassemble or modify the product as this may impact on the safety and/or performance of the device. -
Page 14: 2.3.3 Explosion Hazards
EMC. Use of accessories, transducers and cables other than specified, with the exception of transducers and cables sold by Interacoustics or representatives, may result in increased emission or decreased immunity of the equipment. For a list of accessories, transducers and cables that fulfil the requirements please also refer to the appendix regarding EMC. -
Page 15: 2.3.6 Environmental Factors
Connect only accessories purchased from Interacoustics to the instrument. Only accessories which have been stated by Interacoustics to be compatible are allowed to be connected to the device. Never insert, or in any way use, the insert headset without a new clean and non-defective ear-tip. -
Page 16: 2.3.7 Notice
Outside the European Union, local regulations should be followed when disposing of the product after end of life. D-0116684-B – 2020/03 Page 10 OtoRead™ - Instructions for Use - US... -
Page 17: The Otoread Tm Test Instrument
Interface of the instrument to the ear canal is accomplished through disposable ear tips which fit onto the probe tube. The disposable ear tips are color coded to facilitate easy selection by size. D-0116684-B – 2020/03 OtoRead™ - Instructions for Use - US Page 11... -
Page 18: Connecting The Micro-Probe To The Otoread
OtoRead . The plug will only fit in one orientation. The Interacoustics logo on the probe plug will align with the instrument control panel. Misalignment of the plug and socket can cause damage. The plug and socket should be visually inspected prior to each installation of the remote probe. -
Page 19: Connecting The Neckstrap To The Otoread
1. Insert the loop of the neckstrap into the hole on the back of the OtoRead and push the loop through until it comes out the hole on the top of the OtoRead 2. Thread the necktrap through the loop. 3. Pull the neckstrap to secure it in place. - Page 20 To remove the OtoRead from the cradle, grasp the upper portion of the OtoRead above the cradle placement guides and lift it out. D-0116684-B – 2020/03 OtoRead™ - Instructions for Use - US Page 14...
-
Page 21: The Battery
During instrument operation, the user is warned of a low • battery condition by two fast blinks followed by a pause which is repeated until the battery is charged. D-0116684-B – 2020/03 OtoRead™ - Instructions for Use - US Page 15... -
Page 22: Battery Lifetime And Charging Time
Do not expose the battery to water • Do not short circuit the battery or reverse the polarity • The battery automatically starts charging when the OtoRead is placed properly into the AC- • powered cradle or when connected via USB to the PC Use only the charger provided with the OtoRead •... -
Page 23: Pairing The Wireless Printer To Otoread
OtoRead Module & Auto Print software The OtoRead can be used in conjunction with the OtoRead Module & Auto Print software for storing, viewing, printing and managing patient information. For further information about the software, refer to the OtoRead Module &... - Page 24 D-0116684-B – 2020/03 OtoRead™ - Instructions for Use - US Page 18...
-
Page 25: Operating Instructions
If the device is used adjacent to other equipment, caution must be taken to observe that no mutual disturbance appears. D-0116684-B – 2020/03 OtoRead™ - Instructions for Use - US Page 19... - Page 26 Standard Diagnostic with TE or DP Combined Diagnostic with TE and DP If the battery is sufficiently charged, the OtoRead will automatically remember the last time and date setting. If there are no date/time errors detected, the Main Menu will appear on the display.
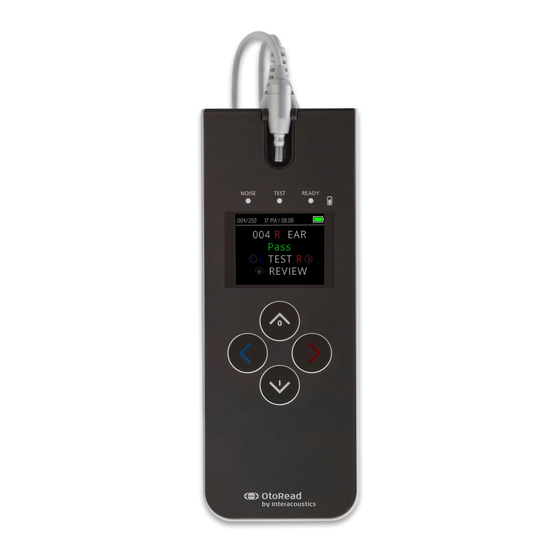
- Page 27 25 – 12 % < 12% LED Indicators (lights) The OtoRead has 3 LED test status indicators located above the OLED display. The table below describes the meaning of the indictor lights. Table 2: Explanation of LED indicators The indicator labeled ‘NOISE’ provides a visual indication (RED) that the noise level measured during the test exceeds a nominal threshold.
-
Page 28: Probe Integrity Test
Calibration reminder The OtoRead comes with a calibration reminder to remind you that the yearly calibration of the device will be required soon. The calibration reminder will be prompted when the OtoRead is switched on. Daily system check for OAE devices It is recommended to perform a daily check of your OAE equipment to ensure that it is in good working order, before testing on patients. - Page 29 NOTE: It is possible for system distortion to appear at levels below -10dB SPL. Ensure that the MIN OAE LEVEL is set to -10 dBSPL on the device for the protocols in use before conducting the probe integrity test. D-0116684-B – 2020/03 OtoRead™ - Instructions for Use - US Page 23...
-
Page 30: Real-Ear Check
For TEOAE protocols, the test will pause when noise levels exceed the noise rejection limit. Pause is indicated when the Noise, Test and Ready lights turn on simultaneously. Testing will automatically resume when noise levels decrease. Total pause time will not exceed 30 seconds. D-0116684-B – 2020/03 OtoRead™ - Instructions for Use - US Page 24... -
Page 31: General
NOTICE Do not attempt to clean the probe tube. This may cause damage to the probe! D-0116684-B – 2020/03 OtoRead™ - Instructions for Use - US Page 25... -
Page 32: Probe Tube Removal
A properly inserted probe tube will snap securely into place when it is inserted correctly. The probe tube can also be inserted using the probe tube removal tool. D-0116684-B – 2020/03 OtoRead™ - Instructions for Use - US Page 26... -
Page 33: Using The Probe Tube Removal Tool For Insertion
3. Push the probe onto the probe tube until the probe contacts the face of the probe tube tool and a snapping sound is heard. 4. Slide the tool off leaving the tube in place in the probe. D-0116684-B – 2020/03 OtoRead™ - Instructions for Use - US Page 27... -
Page 34: Menus
DPOAE Menu (DP) DP Level • Averaging time (test time per DP frequency) • • Pass SNR # frequencies for a pass • • Reset protocol Save protocol • D-0116684-B – 2020/03 OtoRead™ - Instructions for Use - US Page 28... -
Page 35: Main Menu
Main Menu. The following can be viewed or initiated from this screen: Date and Time Battery Status Number of stored measurements Selected Protocol Start Left Ear Test Start Right Ear Test Change Protocol & Settings D-0116684-B – 2020/03 OtoRead™ - Instructions for Use - US Page 29... -
Page 36: Selecting The Test Protocol
It should fit snugly and comfortably. The best test results are obtained when an ear tip is inserted deeply into the ear canal instead of flush with the ear canal. D-0116684-B – 2020/03 OtoRead™ - Instructions for Use - US Page 30... -
Page 37: Probe Check
3.12.5 In-ear stimulus calibration after probe check Immediately after the probe check, the OtoRead will automatically perform an in-ear stimulus calibration prior to the start of each test. During calibration a series of tones will be presented to the ear canal to calibrate the stimulus levels of the frequencies to be tested. -
Page 38: Test Phase
Refer to section Managing results for more information on how the OtoRead saves results. Refer to section Instrument Settings – Save Mode for more information on the OtoRead save mode options. -
Page 39: Viewing Results
UP key to return to the Main Menu. Once the review screen is exited, results are no longer viewable on the device. Print or transfer the results to the PC for further review. D-0116684-B – 2020/03 OtoRead™ - Instructions for Use - US Page 33... -
Page 40: Viewing Dpoae Results With Normative Data
Saving results on the device The OtoRead automatically saves the results of completed tests in the non-volatile memory. Tests are saved even if the battery is temporarily discharged. However, the OtoRead is not intended for long- term storage of test results. -
Page 41: Deleting Results From The Otoread
OtoRead list for instances when a patient is being tested, but the patient name was not transferred to the OtoRead When transferring names to the device, only 15 characters are retained for first name, last name, patient ID and other supported identifiers. -
Page 42: Understanding The Dpoae Printout
A “P” to the right of the SNR if pass criteria were met for that frequency • The Value or SNR graph as selected on the device • • “MIN*” if the Minimum Amplitude setting was enabled D-0116684-B – 2020/03 OtoRead™ - Instructions for Use - US Page 36... -
Page 43: Understanding The Teoae Printout
USB connection from device Plug the USB-A connector into an available USB port on the computer and the Micro-USB connector into the port found on the base of the OtoRead D-0116684-B – 2020/03 OtoRead™ - Instructions for Use - US... -
Page 44: Usb Connection From Cradle
3.16.3 Wireless connection For a wireless connection to the computer, ensure that the OtoRead has been correctly paired. From the Main Menu screen press the UP key to enter the device connection screen. Press the LEFT or RIGHT key to connect. -
Page 45: Accessing The Menus
To access the TE or DP menus, you must have selected the relevant protocol. E.g., to access the DP menu, a DP protocol must have been selected and appear on the Main Menu screen. DP and TE menus are not accessible in the OtoRead Screening and Screener Plus Version. -
Page 46: Date And Time Settings (Menu M1)
NEXT key to advance to the next display. When the correct minute is set, pressing the DONE key will return to the Main Menu. The time and date changes are automatically saved. D-0116684-B – 2020/03 OtoRead™ - Instructions for Use - US Page 40... -
Page 47: Device Settings (Menu M2)
OtoRead has been wirelessly connected to other devices. To establish wireless pairing, turn on the device that will be paired with the OtoRead (e.g., DISCOVER thermal printer). - Page 48 When using the ‘500 test’ mode, it is important to keep a record of the test number for each patient. When 495 tests have been saved, the user will be warned that the memory is almost full. When the OtoRead unit reaches 500 saved tests, it will not allow any further testing.
-
Page 49: Clock Mode
DP test frequency or TE test band. The Value graph view shows the absolute OAE and noise levels for each DP test frequency or TE test band. D-0116684-B – 2020/03 OtoRead™ - Instructions for Use - US Page 43... -
Page 50: Languages
To exit M2 without resetting to default, press the NEXT key to return to the Main Menu. Resetting to default will un-pair the wireless device, clear the test results, and reset all system and protocol settings. D-0116684-B – 2020/03 OtoRead™ - Instructions for Use - US Page 44... -
Page 51: Protocol Settings For Dpoae (Dp Menu)
3.18.9.1 The DP protocol settings menu is reserved for those devices purchased as either a Standard or Clinical version. Screener and Screener Plus versions of the OtoRead device do not have access to this menu as the default screening protocol’s parameters cannot be changed. - Page 52 (discussed below) to determine an overall PASS/REFER for each test. After setting the desired PASS SNR, press the NEXT key to go to the next test parameter. D-0116684-B – 2020/03 OtoRead™ - Instructions for Use - US Page 46...
- Page 53 After pressing one of the RESET keys, a confirmation that the DONE key to protocol was reset will be displayed. Press the return to the Main menu. D-0116684-B – 2020/03 OtoRead™ - Instructions for Use - US Page 47...
-
Page 54: Advanced Options For Teoae Testing (Te Menu)
3.18.10.1 The TE protocol settings menu is reserved for those devices purchased as either a Standard or Clinical version. Screener and Screener Plus versions of the OtoRead device do not have access to this menu as the default screening protocol’s parameters cannot be changed. - Page 55 3 frequencies where the emission is at least 4 dB above the noise at a minimum level of -10 dB to indicate a PASS. D-0116684-B – 2020/03 OtoRead™ - Instructions for Use - US Page 49...
- Page 56 Main menu. When one of the SAVE keys have been pressed, CUSTOM PROTOCOL SAVED will be displayed as confirmation. Press the DONE key to return to the Main menu. D-0116684-B – 2020/03 OtoRead™ - Instructions for Use - US Page 50...
-
Page 57: Care And Maintenance
Ensure isopropyl alcohol does not come into contact with any screens on the instruments Ensure that isopropyl alcohol does not come into contact with any silicone tubes or rubber parts D-0116684-B – 2020/03 OtoRead™ - Instructions for Use - US Page 51... - Page 58 It is important that the customer (distributor) fills out the RETURN REPORT every time a problem arises. This should also be done every time an instrument is returned to Interacoustics. (This of course also applies in the unthinkable worst case of death or serious deterioration to patient or user).
- Page 59 This shall apply solely to the original purchaser. This warranty shall not apply to any subsequent owner or holder of the product. Furthermore, this warranty shall not apply to, and Interacoustics shall not be responsible for, any loss arising in connection with the purchase or use of any Interacoustics product that has been: repaired by anyone other than an authorized Interacoustics service representative;...
- Page 60 D-0116684-B – 2020/03 OtoRead™ - Instructions for Use - US Page 54...
-
Page 61: Troubleshooting
For a DP test, the desired stimulus level (L1 or L2) cannot be obtained within Cannot Obtain P allowable limits. User should refit the probe in the paitnet’s ear and retry the test Replace the probe tube D-0116684-B – 2020/03 OtoRead™ - Instructions for Use - US Page 55... - Page 62 A daily reminder will appear during device startup. Arrange calibration of the instrument Contact Interacoustics or your local distributor for service if any of the above problems persist. D-0116684-B – 2020/03 OtoRead™ - Instructions for Use - US...
- Page 63 General technical specifications OtoRead hardware – Technical specifications Medical The CE-mark indicates that Interacoustics A/S meets the requirements of CE-mark Annex II of the Medical Device Directive 93/42/EEC. Approval of the quality system is made by TÜV – identification no0123...
- Page 64 < ± 3 dB Measurement: Display SNR and Value Graph, Norm data Probe OtoRead probe: DPOAE and TEOAE capable specifications Replaceable probe tube Other Test Pressure Ambient pressure D-0116684-B – 2020/03 OtoRead™ - Instructions for Use - US Page 58...
- Page 65 Table 3: Probe Nominal Sound Channel Magnitudes in dB SPL Frequency IEC 60711, RA- [Hz] 0045 732.4 88.0 1037.6 90.0 1464.8 93.5 2075.2 97.8 2929.7 97.8 4150.4 90.6 5859.4 81.9 D-0116684-B – 2020/03 OtoRead™ - Instructions for Use - US Page 59...
- Page 66 Unused Rcvr Shield Unused Rcvr - Unused Reserved Reserved Shield Comm Power Reserved Comm Data Mic Power + Ground Mic Shield +3.3V Mic Out Ground Mic Power - D-0116684-B – 2020/03 OtoRead™ - Instructions for Use - US Page 60...
- Page 67 NOTICE: There are no deviations from the collateral standard and allowances uses NOTICE: All necessary instruction for maintaining compliance with regard to EMC can be found in the general maintenance section in this instruction. No further steps required. D-0116684-B – 2020/03 OtoRead™ - Instructions for Use - US Page 61...
- Page 68 The use of accessories, transducers and cables other than those specified, with the exception of servicing parts sold by Interacoustics as replacement parts for internal components, may result in increased EMISSIONS or decreased IMMUNITY of the device.
- Page 69 IEC 61000-4-8 location in a typical commercial or residential environment. Note: UT is the A.C. mains voltage prior to application of the test level. D-0116684-B – 2020/03 OtoRead™ - Instructions for Use - US Page 63...
- Page 70 Field strengths from fixed transmitters, such as base stations for radio (cellular/cordless) telephones and land mobile radios, amateur radio, AM and FM radio broadcast and TV broadcast cannot be D-0116684-B – 2020/03 OtoRead™ - Instructions for Use - US Page 64...
- Page 71 Conformance to the EMC requirements as specified in IEC 60601-1-2 is ensured if the cable types and cable lengths are as specified below: Description Length Screened OAE cable 2.0 m Screened USB Cable 2.0 m Screened D-0116684-B – 2020/03 OtoRead™ - Instructions for Use - US Page 65...
- Page 72 D-0116684-B – 2020/03 OtoRead™ - Instructions for Use - US Page 66...
- Page 73 Main Menu screen. Selecting the SETUP key takes you to the change protocol and settings menus. D-0116684-B – 2020/03 OtoRead™ - Instructions for Use - US Page 67...
- Page 74 As the noise level of the test increases, the user will notice that more “false” emissions will appear, which is to be expected. D-0116684-B – 2020/03 OtoRead™ - Instructions for Use - US Page 68...
- Page 75 Please note: The SNR limits for transients are lower than the corresponding limits for distortion products primarily because the traditional noise calculation used in TEOAE measurements (and in the OtoRead instrument) gives a 3 dB lower SNR than the calculation used for DPOAEs. Without that difference, the numerical SNR value for a PASS with the two methods would be quite similar.
- Page 76 (patent pending) that permits accurate DPOAE and TEOAE measurements in background noise and babble as high as 55 dB SPL to 65 dB SPL (A- weighted). Briefly explained, use of available memory in the OtoRead processor permits a post-hoc statistical analysis that identifies those samples whose retention would improve the overall accuracy.
- Page 77 Grey fields are customizable fields: Average time : 4, 16, 32 or 64 sec. Pass SNR : 3 to 10 dB Passing Freq. for Test Pass : 1 to 6 D-0116684-B – 2020/03 OtoRead™ - Instructions for Use - US Page 71...
- Page 79 Other : Date : Person : Please provide e-mail address or fax No. to whom Interacoustics may confirm reception of the returned goods: The above mentioned item is reported to be dangerous to patient or user In order to ensure instant and effective treatment of returned goods, it is important that this form is filled in and placed together with the item.
Need help?
Do you have a question about the OtoRead and is the answer not in the manual?
Questions and answers