EMS FirePoint 5000 Operating Manual
Hide thumbs
Also See for FirePoint 5000:
- Step-by-step manual (34 pages) ,
- User manual (28 pages) ,
- Installation manual (26 pages)
Table of Contents
Advertisement
Quick Links
Advertisement
Table of Contents

Related Manuals for EMS FirePoint 5000


Summary of Contents for EMS FirePoint 5000
- Page 1 5000 ENGINEERS OPERATING GUIDE...
-
Page 3: Table Of Contents
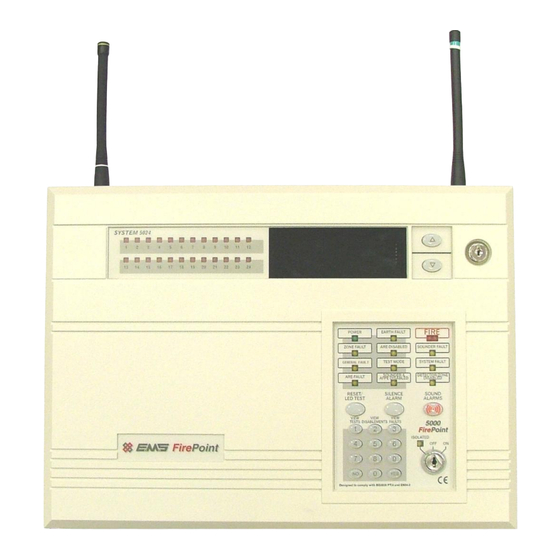
EMS 5000 FIREPOINT Table of Contents Section Page No 1. HOW TO RESET FIRE & FAULT EVENTS................6 2. HOW TO ENTER THE SYSTEM EVENT LOG ................. 7 3. HOW TO ENTER THE SYSTEM EVENT LOG WITH FAULTS DISPLAYED........8 4. - Page 4 EMS 5000 FIREPOINT SYSTEM 5000 Display Helical Helical Aerial Aerial (R/X) (T/X) Yellow Green ∆” ∇” “ & “ Zoned LED for Arrows For Fire Indication scrolling up and down the menus Thermal Printer Keypad & Panels Control Key switch CONTROL PANELS ARE SUPPLIED WITH ALL DETECTOR ZONES IN TEST.
- Page 5 Pins & Access EMS 5000 FIREPOINT User Log On View Users Change PIN Options Menu Structure Add 6 Digit User Add 4 Digit User Edit User Delete User Access And Buzzer User Options Order Key in “OFF” position Front Screen Text...
-
Page 6: How To Reset Fire & Fault Events
EMS 5000 FIREPOINT 1. How To Reset Fire & Fault Events. To reset fires/faults on the 5000 FirePoint, insert the Key into the Panel’s Control Key switch, located at the right of the Panel. Turn the Key to the “ON” Position. -
Page 7: How To Enter The System Event Log
EMS 5000 FIREPOINT 2. How To Enter The System Event Log To enter the Systems Event Log on the 5000 FirePoint, insert the key into the Panels Control Key switch, located at the right of the panel. Turn the key to the”ON” position. -
Page 8: How To Enter The System Event Log With Faults Displayed
EMS 5000 FIREPOINT 3. How To Enter The System Event Log With Faults Displayed To enter the system event log on the 5000 FirePoint with faults displayed there are two ways. The first way is to disable the devices that are in fault then enter the logging in the first menu. -
Page 9: How To Disable Devices
EMS 5000 FIREPOINT Enter the date to View: Press the “YES” key and the screen will now display: Yes = Finish - - - - - - - - - - - - - - - - Enter the required date to view in dd/mm/yy On 28/05/03 At 00:00 format, (e.g.28/05/03) then press the “YES”... - Page 10 EMS 5000 FIREPOINT |Number is: 125 > Status is: ACTIVE< Press the “∇” key until the screen displays: | Zone is : 01 Yes= Select Time |Number is: 125 >Status is :DISABLE< Press the “YES” key and the screen will now...
-
Page 11: How To Re-Instate Devices From Disablement
EMS 5000 FIREPOINT 5. How To Re-instate Devices From Disablement To reactivate a device on the 5000 FirePoint, insert the key into the Panels Control Key switch, located at the right of the panel. Turn the key to the “ON” position. -
Page 12: How To Disable A Device Across A Network System
EMS 5000 FIREPOINT 6. How To Disable A Device Across A Network System To disable a device across the network on the 5000 FirePoint, insert the key into the Panels Control Key switch, located at the right of the panel. - Page 13 EMS 5000 FIREPOINT Enter Device (Number 1-256) Press “0” screen will Number > _ now display: Yes = Finish Time | Panel : 04 Enter the device number that you want to >Device : 125 < Disable (e.g. 125) then press the “YES” key and...
-
Page 14: How To Re-Instate A Disabled Device Across A Network
EMS 5000 FIREPOINT 7. How To Re-instate a Disabled Device Across a Network To re-instate a Disabled a device across the network on the 5000 FirePoint, insert the key into the Panels Control Key switch, located at the right of the panel. - Page 15 EMS 5000 FIREPOINT Enter Device (Number 1-256) Press the “0” key and the screen will now Number > _ display: Yes = Finish Time Time | Panel : 04 Enter the device number that you want to re- > Device : 125 <...
-
Page 16: How To Log On A Device
EMS 5000 FIREPOINT 8. How To Log On A Device To log on a device onto the 5000 FirePoint, take the device in front of the panel. Insert the key into the Panels Control Key switch, located at the right of the Panel. - Page 17 EMS 5000 FIREPOINT | **Logon Options** | Enter the slot number that you want to add a > Logon Slot :125 < device to (e.g. 125) then press the “YES” key | Slot is :FREE | and the Screen will now display:...
-
Page 18: How To Remove A Device
EMS 5000 FIREPOINT | Slot is :IN USE | >Logon is DISABLED< Press the “YES” key twice and the screen will | /\/\/\/\/\/\/\/\/\/\ | now display: 01 FAULT TOT 02 Press the “NO” key three times and the screen Default Device 125... - Page 19 EMS 5000 FIREPOINT |** Eng.; Config ** Press 221100 then press the “YES” >Device Database < key and the screen will display: | Sounder Options Yes= Select Time | Site Survey > Remove Devices < Press the “∇” key until the screen displays:...
-
Page 20: How To Replace Devices
EMS 5000 FIREPOINT 10. How To Replace Devices To replace a device onto the 5000 FirePoint, take the new device in front of the panel. Insert the key into the Panels Control Key switch, located at the right of the panel. - Page 21 EMS 5000 FIREPOINT Enter Device (Numbers 1-256) Press the “0” key and the screen will now Number> display: Yes= Finish Time |**Logon Options** | Enter the slot number that you want to add a >Logon Slot :125 < device to (e.g. 125) then press “YES” key and...
- Page 22 EMS 5000 FIREPOINT | Slot is :IN USE | >Logon is DISABLED< Press the “YES” key once and the screen will | /\/\/\/\/\/\/\/\/\/\ | now display: 01 FAULT TOT 02 Press the “NO” key three times and the screen Default Device 125...
-
Page 23: How To Put Detector Zones Into Test (Testing Devices)
EMS 5000 FIREPOINT 11. How To Put Detector Zones Into Test (Testing Devices) To put zones into test for the 5000 FirePoint, insert the key into the Panels Control Key switch, located at the right of the panel. Turn the key to the “ON” position. - Page 24 EMS 5000 FIREPOINT Press the “∇” key and the screen will now | Zone is : 01 > Status : ACTIVE < display: (Make note of the status the zones is in |^^^^^^^^^^^^^^^^ | e.g. ACTIVE, the status will need to be changed...
-
Page 25: How To Take Detector Zones Out Of Test
EMS 5000 FIREPOINT 12. How To Take Detector Zones Out Of Test To take zones out of test and back into original state i.e. all on the 5000 FirePoint, insert the key into the Panels Control Key switch, located at the right of the Panel. Turn the key to the “ON”... -
Page 26: How To Put All The Zones Into Test Across A Network
EMS 5000 FIREPOINT | Zone is : 02 > Status : Test < Press the “∇” key once and the screen will now |^^^^^^^^^^^^^^^^ | display: Yes= Select Time | Zone is : 02 Press the “YES” key twice and the screen will >... - Page 27 EMS 5000 FIREPOINT | Reset System Press Number 8 on the keypad and the screen >Lan Options < will now display: (number is a quick move key |^^^^^^^^^^^^^^ | that take you to the bottom of the menu) Yes= Select...
-
Page 28: How To Take All The Zones Out Of Test Across A Network
EMS 5000 FIREPOINT 14. How To Take All The Zones Out Of Test Across A Network How to take all the zones out of test across a network (depending on which version of software) on the 5000 FirePoint, insert the key into the Panels Control Key switch, located at the right of the panel. - Page 29 EMS 5000 FIREPOINT |** Lan Fire DB ** | >H/W Local Panels < Press the “YES” key and the screen will now | Mimic display: Yes= Select Time | Mimic >Advanced < Press the “∇” key until the screen displays:...
-
Page 30: How To Test Individual Sounders
EMS 5000 FIREPOINT 15. How To Test Individual Sounders To test individual sounders on the 5000 FirePoint, Insert the key into the Panels Control Key switch, Located at the right of the panel. Step Action Screen Display Panel in Access ith the key in the “ON”... - Page 31 EMS 5000 FIREPOINT |** Configure ** Press the “YES” key to toggle though the >Sounder : 025 < device numbers until |Action : EVAC sounder that requires testing. (e.g. 025) Yes= Select Time | Sounder : 025 Press the “∇” key once and the screen will >Action...
-
Page 32: How To Change The Device Address Text Description
EMS 5000 FIREPOINT This timer will count down to 0, when the timer reaches 0 the retry should change to 6 and a message is sent to the sounder. If not, that means the panel is still busy and the timer will start again, when the retry number decreases listen for the selected sounder to activate. - Page 33 EMS 5000 FIREPOINT |** Fire system ** >Dev. Disable/Test < Press the “YES” key and the screen will now | Net. Disable/Test | Yes= Select Time display: | System Mode >Engineers Config < Press the “∇” key until the screen displays:...
-
Page 34: Recommended Additional Sounder Monitoring
EMS 5000 FIREPOINT FUNCTION Enters a blank space into the new device name being entered. Moves the alphabet wheel of characters to the Left, by one character space at a time. Enters the character in the centre directly above the character selector |. -
Page 35: Fault List
EMS 5000 FIREPOINT 18. Fault List Panel Faults Description In Log Symptom Mains Input Failed. Check 230 volt supply and the fuse. Battery Charging Fail. Check the battery connection and the fuse. Main Receiver, Aerial Occurs when one of the aerials have been removed. -
Page 36: Do's And Don'ts
EMS 5000 FIREPOINT 19. Do’s and Don’ts Don’t place any aerials near metal work and keep aerials 2 meters away from all electrical equipment, all tips of aerials must stay away from any obstruction. Always pinch and twist on helical aerials to ensure good connection. - Page 37 EMS 5000 FIREPOINT ENGINEERS OPERATING GUIDE, ISSUE 3.0 – 16/08/10...
- Page 38 EMS 5000 FIREPOINT ENGINEERS OPERATING GUIDE, ISSUE 3.0 – 16/08/10...
- Page 40 Sea Street Herne Bay, The information contained within this literature is Kent CT6 8JZ correct at time of publishing. The EMS Group reserves England the right to change any information regarding Tel: +44 (0) 8712 710804 products as part of its continual development enhancing new technology and reliability.
Need help?
Do you have a question about the FirePoint 5000 and is the answer not in the manual?
Questions and answers