Chapters
Table of Contents
Troubleshooting

Related Manuals for Aficio 1015


Summary of Contents for Aficio 1015
- Page 1 Operating Instructions Copy Reference ZENH010E.eps Read this manual carefully before you use this product and keep it handy for future reference. For safety, please follow the instructions in this manual.
- Page 2 Type for Aficio 1015/1018/2515/2518/1502/1802 Printed in China UE USA B039-7207...
- Page 3 Introduction This manual contains detailed instructions on the operation and maintenance of this machine. To get maximum versatility from this machine all operators should carefully read and follow the instructions in this manual. Please keep this manual in a handy place near the machine. Please read the Safety Information in the Copy Reference before using this machine.
- Page 4 In accordance with IEC 60417, this machine uses the following symbols for the main power switch: a means POWER ON. c means STAND BY.
- Page 5 Safety Information When using your equipment, the following safety precautions should always be followed. Safety During Operation In this manual, the following important symbols are used: R WARNING: Indicates a potentially hazardous situation which, if instructions are not followed, could result in death or serious injury. R CAUTION: Indicates a potentially hazardous situation which, if instructions are not followed, may result in minor or moderate injury or damage to property.
- Page 6 R CAUTION: • Protect the equipment from dampness or wet weather, such as rain, snow, and so on. • Unplug the power cord from the wall outlet before you move the equipment. While moving the equipment, you should take care that the power cord will not be damaged under the equipment.
- Page 7 How to Read this Manual Symbols In this manual, the following symbols are used: R WARNING: This symbol indicates a potentially hazardous situation that might result in death or serious injury when you misuse the machine without following the in- structions under this symbol.
- Page 8 Machine Types This machine comes in two models which vary in copy speed. Type 1 Type 2 Copy speed 15 copies/minute (A4K, 8 " 18 copies/minute (A4K, 8 " × 11"K) × 11"K) Fax unit Option Option Printer unit Option Option...
- Page 10 What You Can Do with This Machine...
-
Page 12: Table Of Contents
TABLE OF CONTENTS Guide to Components ................1 Options ....................... 3 Operation Panel ..................4 Panel Display ..................... 6 Displays and Key Operations................ 6 1. Basics Turning on the Power................7 Turning on the Main Power ................7 Starting the Machine ..................8 Changing Modes.................. - Page 13 Preset Reduce/Enlarge ................36 Zoom......................37 Combine ....................38 Series Copies................... 40 Book→1 Sided .................... 40 Combination Chart .................. 41 3. Troubleshooting If Your Machine does not Operate as You Want........43 Message...................... 43 Display ......................44 If You Cannot Make Clear Copies ............45 If You Cannot Make Copies as You Want..........
- Page 14 5. Remarks Do's and Don'ts ..................67 Where to Put Your Machine..............68 Machine Environment ................. 68 Power Connection..................69 Access to Machine ..................70 Maintaining Your Machine ..............71 Cleaning the Exposure Glass..............71 Cleaning the Platen Cover ................71 Cleaning the Document Feeder ..............
-
Page 15: Guide To Components
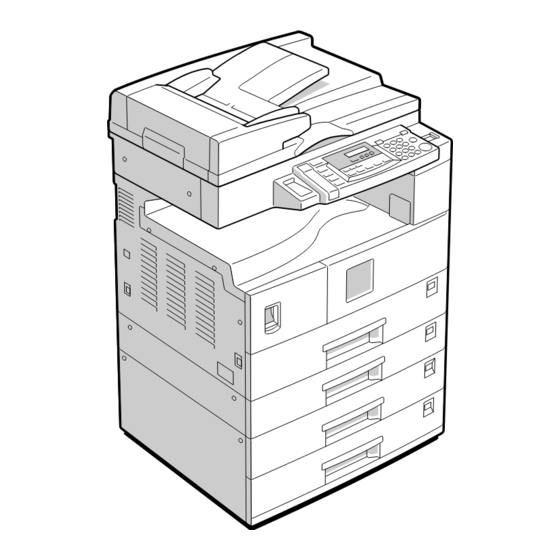
Guide to Components Platen cover or document feeder Main power switch (ADF) (option) If the machine does not operate after turning on the operation switch, check if Lower the platen cover over originals the main power switch is turned on. If it placed on the exposure glass for copying. - Page 16 Operation switch Paper tray Set paper here. See P.47 “ B Loading Pa- Press this switch to turn the power on (the On indicator lights up). To turn the per”. power off, press this switch again (the On Paper tray unit (option) indicator goes off).
-
Page 17: Options
Options Platen cover Paper tray unit (1-tray type) Lower this cover over originals for copy- Holds 500 sheets of paper. ing. Paper tray unit (2-tray type) Document feeder (ADF) Holds up to 1,000 sheets of paper. Each Insert a stack of originals here. paper tray holds 500 sheets of paper. -
Page 18: Operation Panel
Operation Panel ❖ ❖ ❖ ❖ Copier only ❖ ❖ ❖ ❖ Fax or printer installed Indicators for fax mode (for ma- Indicators chines with the optional fax func- These indicators show errors or the status tion) of the machine. See P.43 “Troubleshoot- ing”. - Page 19 { { { { Clear/Stop} } } } key { { { { Reduce} } } } key While entering numbers, press to cancel a Press to make reduced copies. See P.36 number you have entered. While copy- “Preset Reduce/Enlarge”. ing, press to stop copying.
-
Page 20: Panel Display
Panel Display The panel display shows the status of the machine, error messages, and function menus. Important ❒ Do not apply a strong shock or force of about 30N (about 3kgf) or more to the panel display. Otherwise, the display might be damaged. Note ❒... -
Page 21: Basics
1. Basics Turning on the Power To turn the machine on, press the operation switch. Note ❒ This machine automatically enters Energy Saver mode or turns itself off if you do not use the machine for a while. See “6.Auto Off Timer” in the System Set- tings manual. -
Page 22: Starting The Machine
Basics Starting the Machine Press the operation switch to make the On indicator go on. The display panel will come on. Note ❒ If the power is not turned on when the operation switch is pressed, check if the main power switch is on. If off, turn it on. ❒... -
Page 23: Changing Modes
Changing Modes Changing Modes You can use this machine not only as a copier, but optionally as a fax machine or a printer as well. Press the {Copy} key to use copy functions, or press the {Fac- simile} key to use facsimile functions. If the display shows a mode other than copy mode, press the {Copy} key to switch to copy mode. -
Page 24: Originals
Basics Originals Sizes and Weights of Recommended Originals ❖ ❖ ❖ ❖ Metric version Where original is set Original Size Original Weight Exposure glass Up to A3 Document feeder 1-sided originals: 40 – 128g/m A3L – A5KL ❖ ❖ ❖ ❖ Inch version Where original is set Original Size Original Weight... -
Page 25: Sizes Difficult To Detect
Originals Sizes Difficult to Detect It is difficult for the machine to detect the sizes of the following originals, so se- lect the paper size manually. • Originals with indexes, tags, or other projecting parts • Transparent originals such as OHP transparencies or translucent paper •... -
Page 26: Original Sizes And Scanning Area/Missing Image Area
Basics Original Sizes and Scanning Area/Missing Image Area ❖ ❖ ❖ ❖ Exposure glass Reference position Horizontal size Maximum Scanning area (297x420mm) 11"x17" (279x432mm) CP01AEE ❖ ❖ ❖ ❖ Document feeder Limitation ❒ Even if you correctly set originals in the document feeder or on the exposure glass, 4mm, 0.2"... -
Page 27: Copy Paper
Copy Paper Copy Paper Recommended Paper Sizes and Types The following limitations apply to each tray: Metric version Inch version Paper weight Paper capacity Paper Tray 1, 2 A3L, B4JISL, A4KL, B5JISKL, 60 – 90g/m 250 sheets A5K, 11" × 17"L, 8 "... - Page 28 Basics Metric version Inch version Paper weight Paper capacity Bypass Standard A3L , B4JISL 52 – 162g/m 10 sheets tray Sizes 14 – 43 lb A4KL, A4KL, 100 sheets B5JISKL, B5JISKL, A5KL, B6JISL A5KL, B6JISL 11" × 17"L 11" × 17"L "...
-
Page 29: Non-Recommended Paper
Copy Paper Note ❒ When you use the bypass tray, it is recommended to set the copy paper direc- tion to L. ❒ Postcards should be fed from the bypass tray. ❒ If you load paper of the same size and in the same direction in two or more trays, the machine automatically shifts to another tray when the tray in use runs out of paper. -
Page 30: Paper Storage
Basics Paper Storage Note ❒ When storing paper, the following precautions should always be followed: • Do not store paper where it will be exposed to direct sunlight. • Avoid storing paper in humid areas (humidity: 70% or less). • Store on a flat surface. ❒... -
Page 31: Toner
Toner Toner Handling Toner R WARNING: • Do not incinerate used toner or toner containers. Toner dust might ig- nite when exposed to an open flame. Dispose of used toner containers in accordance with local regulations for plastics. R CAUTION: •... - Page 32 Basics...
-
Page 33: Copying
2. Copying Basic Procedure Make sure that the machine is in Enter the number of copies re- Copy mode. quired with the number keys. Note ❒ If not, press the {Copy} key. When the machine is set for user codes, enter the user code with the number keys and then press the { { { { #} } } } or { { { { OK} } } } key. - Page 34 Copying - System Reset The machine returns to its prioritized mode automatically after your job is finished, after a certain period of time. This function is called “System Reset”. Note ❒ You can change the System Reset time. See “3.System Reset” in the System Settings manual.
-
Page 35: Setting Originals
Setting Originals Setting Originals Limitation Placing Originals on the ❒ Set originals after correction fluid Exposure Glass and ink has completely dried. Not taking this precaution could mark the exposure glass and cause Lift the platen cover or the docu- marks to be copied. -
Page 36: Loading Originals In The Document Feeder
Copying Setting a stack of originals in the Loading Originals in the document feeder Document Feeder Adjust the guide to the original Note size. ❒ The original might become dirty if it is written with a pencil or similar Set the aligned originals face up tools. -
Page 37: Setting Custom Original Size In The Document Feeder
Setting Originals When SADF mode is selected Setting Custom Original Size in the Document Feeder Set one original face up into the document feeder. Then press the Limitation { { { { Start} } } } key. ❒ Enter the size of your original if it When the machine instructs you is not one of the following: A3L , B4JISL, A4KL, B5JIS KL,... - Page 38 Copying D Enter the vertical size of the Selecting paper from a paper tray original with the number keys, then press the { { { { OK} } } } or { { { { #} } } } key. A Press the { { { { #} } } } key.
-
Page 39: Basic Functions
Basic Functions Basic Functions The following basic functions are ex- Adjusting Copy Image Density plained in this section. ❖ ❖ ❖ ❖ Adjusting Copy Image Density You can adjust the copy image densi- ty to match your originals. ❖ ❖ ❖ ❖ Selecting an Original Type If you require darker or lighter cop- Text and Photo ies, adjust the image density yourself. -
Page 40: Selecting Copy Paper
Copying ❖ ❖ ❖ ❖ Manual Paper Select Press the { { { { Original Type} } } } key and You can select the desired copy pa- select the original type. per size manually. You can also se- lect the bypass tray. Reference See P.31 “Copying from the By- pass Tray”. - Page 41 Basic Functions Original Paper Rotates the Select the copy paper. orientation orientation image and copies it Auto Paper Select A Make sure that “Auto Paper” (Auto Paper Select) is selected. GCROTA0E Limitation ❒ You cannot use the Rotated Copy Manual Paper Select function when enlarging onto B4JIS or A3 size paper.
-
Page 42: Auto Reduce/Enlarge
Copying ❒ You can change the reproduction Auto Reduce/Enlarge ratio from 50 – 200 %. ❒ For some originals, the original The machine can choose an appropri- size might not be detected correct- ate reproduction ratio based on the ly. See P.11 “Sizes Difficult to De- paper and original sizes you select. -
Page 43: Sort
Sort Sort Type 1 requires the optional 16MB copier memory unit. The machine can scan your originals Sort into memory and automatically sort the copies. Copies can be assembled as sets in se- • Sort quential order. • Rotate Sort ❖... - Page 44 Copying ❒ To use the Rotate Sort function, When setting an original on the two paper trays identical in size exposure glass or in the and different in direction (K L) document feeder are required. Press the { { { { Sort} } } } key. Reference See P.23 “When SADF mode is se- lected”...
-
Page 45: Copying From The Bypass Tray
Copying from the Bypass Tray Copying from the Bypass Tray Use the bypass tray to copy onto OHP Open the bypass tray. transparencies, adhesive labels, trans- lucent paper, post cards, and copy pa- per that cannot be set in the paper tray. - Page 46 Copying Horizontal size Push down the paper guide re- Vertical size lease lever. “ Bypass” is selected automati- Extender cally. Paper guides Important ❒ If the guides are not flush with the copy paper, a skew image or paper misfeeds might occur. Note ❒...
- Page 47 Copying from the Bypass Tray E Enter the vertical size of the pa- When copying onto custom size per with the number keys, then copy paper press the { { { { OK} } } } key. Important ❒ You should specify the size of copy paper to avoid paper mis- feeds.
- Page 48 Copying D Press the 0 0 0 0 or 1 1 1 1 key until the desired size is displayed, then press the { { { { OK} } } } key. When copying onto envelopes Note ❒ Use envelopes approximately 100mm, 4”...
-
Page 49: Other Functions
Other Functions Other Functions Press the 0 0 0 0 or 1 1 1 1 key until User Codes “12Key Op. Tools” is displayed, then press the { { { { OK} } } } key. When user codes are turned on, oper- ators must input their user codes be- fore the machine can be operated. -
Page 50: Preset Reduce/Enlarge
Copying Preset Reduce/Enlarge ❖ ❖ ❖ ❖ Inch version You can select a preset ratio for copying. Original → → → → Copy paper size Ratio (%) " × 8 " × 14" 155 (enlarge "→8 area by 2) " × 11"→11" × 17" "... -
Page 51: Zoom
Zoom Zoom You can change the reproduction ra- Enter the ratio. tio in 1% steps. When using the 0 or 1 key A Enter the desired reproduction ratios with the 0 0 0 0 or 1 1 1 1 key. When using the number keys A Enter the desired ratio with the Note... -
Page 52: Combine
Copying Combine The optional 16MB copier memory unit is required for Type 1 to use this function . Use this feature to combine several • Originals reading from top to bot- original images onto one or more pages. ❖ ❖ ❖ ❖ 1sided 2 pages→ → → → Combine 1 Side Limitation ❒... - Page 53 Combine ❒ When the number of originals Make sure that “Combine”is se- placed is less than the number lected, then press the { { { { OK} } } } key. specified for combining, the last page(s) will be copied blank as shown in the illustration.
-
Page 54: Series Copies
Copying Series Copies The optional 16MB copier memory unit is required for Type 1 to use this function . ❖ ❖ ❖ ❖ Inch version You can make one-sided copies from two facing pages of bound (book) Original Copy paper originals. -
Page 55: Combination Chart
Combination Chart Combination Chart The combination chart given below shows which modes can be used together. When you read the chart, please refer to the following table. ✩ means that these modes can be used together. → means that these modes cannot be used together. The mode after you select will be the mode you're working in. - Page 56 Copying...
-
Page 57: Troubleshooting
3. Troubleshooting If Your Machine does not Operate as You Want Message Machine's Condition Problem/Cause Action The machine instructs you to The machine is warming up. Wait for the machine to warm- wait. Reference You can use Auto Start mode during the warm-up period. -
Page 58: Display
Troubleshooting Display Problem Cause Action The panel display is off. The machine is in Energy Sav- Turn on the operation switch. er mode. The operation switch is turned off. The main power switch is Turn on the main power turned off. switch. -
Page 59: If You Cannot Make Clear Copies
If You Cannot Make Clear Copies If You Cannot Make Clear Copies Problem Cause Action Copies appear dirty. The image density is too dark. Adjust the image density. See P.25 “Adjusting Copy Image Density”. The reverse side of an original The image density is too dark. -
Page 60: If You Cannot Make Copies As You Want
Troubleshooting If You Cannot Make Copies as You Want Problem Cause Action Misfeeds occur frequently. Copy paper size setting is not Set the proper paper size. See correct. P.54 “Changing the Paper Size”. You cannot combine several Selected functions cannot be Refer to the combination functions. -
Page 61: B Loading Paper
B Loading Paper B Loading Paper ❒ If paper is left in the paper tray Note and then you add paper, a mis- ❒ If you want to change the paper feed might occur. size, see P.54 “Changing the Paper Size”. - Page 62 Troubleshooting Important ❒ If paper is left in the paper tray and then you add paper, a mis- feed might occur. Note ❒ Shuffle the paper before setting it in the tray. ❒ If the paper is curled, set the pa- per up side down.
-
Page 63: D Changing The Toner Cartridge
D Changing the Toner Cartridge D Changing the Toner Cartridge When D is displayed, it is time to supply toner. R WARNING: • Do not incinerate used toner or toner containers. Toner dust might ig- nite when exposed to an open flame. Dispose of used toner containers in accordance with local regulations for plastics. - Page 64 Troubleshooting • Press the Toner Cartridge backward to raise its head, then gently pull out the bot- tle. • Hold the new bottle horizontally and shake it 5 or 6 times. Note ❒ Do not remove the black cap when shaking.
-
Page 65: Clearing Misfeeds
x Clearing Misfeeds x Clearing Misfeeds R CAUTION: • The fusing section of this equipment might be very hot. You should be very careful that you don't touch this section when removing the misfed paper. Important ❒ When clearing misfeeds, do not turn off the power switch. If you do, your copy settings are cleared. - Page 66 Troubleshooting...
- Page 67 x Clearing Misfeeds...
-
Page 68: Changing The Paper Size
Troubleshooting Changing the Paper Size Important When using 11”× 17”size paper ❒ Select the paper size with the user A Pull the back fence off from tools or the paper size selector. Otherwise, misfeeds might occur. the tray. Reference For paper sizes, weight, and capac- ity that can be set in each tray, see P.13 “Copy Paper”. - Page 69 Changing the Paper Size While pressing the release lever, While pressing the release lever, adjust the side fences. adjust the side and back fences to the new paper size. ZENY390E ZENY320E Push the metal plate down. Important ❒ When setting small quantities of copy paper, be careful not to squeeze in the side fence too much or paper will not be fed...
-
Page 70: Changing The Paper Size In The Optional Paper Tray Unit
Troubleshooting Push the paper tray in until it While pressing the release lever, stops. adjust the side fences. Changing the Paper Size in the Optional Paper tray unit Make sure that the paper tray is not being used. Pull out the paper tray until it stops. - Page 71 Changing the Paper Size Important ❒ When setting small quantities of copy paper, be careful not to squeeze in the side fence too much or paper will not be fed properly. Press down the lock button. Adjust the tray size with the pa- per size selector to the new paper size.
- Page 72 Troubleshooting...
-
Page 73: User Tools (Copier Features)
4. User Tools (Copier Features) Accessing the User Tools (Copier Features) This section is for the key operators in Press the 0 0 0 0 or 1 1 1 1 key until de- change of this machine. The user tools sired User Tools menu is dis- allow you to change or set the ma- played, then press the { { { { OK} } } } key. -
Page 74: Exiting The User Tools
User Tools (Copier Features) Exiting the User Tools Press the { { { { User Tools/Counter} } } } key. Note ❒ You can exit the User Tools mode by pressing the {Cancel} key. ❒ If you want to return to the pre- vious mode (copy, facsimile or printer), press the {User Tools/ Counter} key. -
Page 75: User Tools Menu (Copier Features)
User Tools Menu (Copier Features) User Tools Menu (Copier Features) Displays when using Type 2, or when using Type 1 with the optional 16MB copier memory unit. -
Page 76: Settings You Can Change With The User Tools
User Tools (Copier Features) Settings You Can Change with the User Tools Reference For how to access the user tools, see P.59 “Accessing the User Tools (Copier Fea- tures)”. Copier Features Menu Description 1. Auto Paper Select, Auto You can select Auto Paper Select (APS Priority) or Auto Reduce/ Reduce/Enlarge (APS. - Page 77 Settings You Can Change with the User Tools Menu Description 3. Adjust original mode • Special Mode 1 (3.Adjust Orig. Mode) For originals trough which the rear side is extremely visible (or have a colored background) with light text. Also for originals with very grainy backgrounds (some newspapers) and light text •...
- Page 78 User Tools (Copier Features) Menu Description 6.SADF Auto Reset When you set one original at a time in the optional document feed- er, the message is displayed. It shows the document feeder is ready for another original. You can adjust this time from 3 seconds to 99 seconds in 1 second steps.
- Page 79 Settings You Can Change with the User Tools Menu Description 1.User Code Access Specify whether to employ user codes to restrict copier users and manage the number of copies made. Note ❒ Default: Off 2.Check Copy Counter You can check the number of copies made under each user code. 3.Print Counter List You can print counter lists.
- Page 80 User Tools (Copier Features)
-
Page 81: Remarks
5. Remarks Do's and Don'ts R CAUTION: • Unplug the power cord from the wall outlet before you move the equipment. While moving the equipment, you should take care that the power cord will not be damaged under the equipment. Important ❒... -
Page 82: Where To Put Your Machine
Remarks Where to Put Your Machine Machine Environment Your machine's location should be carefully chosen because environmental con- ditions greatly affect its performance. Optimum environmental conditions R CAUTION: • Keep the equipment away from humidity and dust. Otherwise a fire or an electric shock might occur. -
Page 83: Power Connection
Where to Put Your Machine • Places where the machine might be subjected to frequent strong vibration. • Dusty areas. • Areas with corrosive gases. Power Connection R WARNING: • Only connect the machine to the power source described on the inside front cover of this manual. -
Page 84: Access To Machine
Remarks Access to Machine Place the machine near the power source, providing clearance as shown. Rear: more than 1cm (0.4") Front: more than 75cm (29.6") Right: more than 1cm (0.4") Left: more than 1cm (0.4") Note ❒ For the required space when options are installed, please contact your service representative. -
Page 85: Maintaining Your Machine
Maintaining Your Machine Maintaining Your Machine If the exposure glass, platen cover or Cleaning the Platen Cover document feeder white sheet is dirty, you might not be able to make copies as you want. Clean them if you find them dirty. ❖... - Page 86 Remarks...
-
Page 87: Specification
6. Specification Mainframe ❖ ❖ ❖ ❖ Configuration: Desktop ❖ ❖ ❖ ❖ Photosensitivity type: OPC drum (Φ30) ❖ ❖ ❖ ❖ Original scanning: One-dimensional solid scanning system through CCD ❖ ❖ ❖ ❖ Copy process: Dry electrostatic transfer system ❖... - Page 88 Specification ❖ ❖ ❖ ❖ Copy paper weight: • Paper trays (Standard size): 60 – 90g/m , 16 – 24 lb • Bypass tray: 52 – 162g/m , 14 – 43 lb • Paper tray unit: 60 – 105g/m , 16 – 28 lb ❖...
- Page 89 Mainframe ❖ ❖ ❖ ❖ Reproduction ratio: Preset reproduction ratios: Metric version Inch version Enlargement 200% 155% 141% 129% 122% 121% Full Size 100% 100% Reduction Zoom: From 50% to 200 % in 1% steps. ❖ ❖ ❖ ❖ Continuous copying count: 1 –...
- Page 90 Specification ❖ ❖ ❖ ❖ Noise Emission • Sound power level Mainframe only Complete System Stand-by 39.6dB (A) 39.6dB (A) During printing 60.1dB (A) 62.9dB (A) • Sound pressure level Mainframe only Complete System Stand-by 28.2dB (A) 28.2dB (A) During printing 51.0dB (A) 53.6dB (A) The above measurements made in accordance with ISO 7779 are actual value.
-
Page 91: Document Feeder (Adf) (Option)
Document Feeder (ADF) (Option) Document Feeder (ADF) (Option) ❖ ❖ ❖ ❖ Mode: • ADF mode, SADF mode ❖ ❖ ❖ ❖ Original size: • A3L - A5KL • 11" × 17"L - 5 " × 8 "KL ❖ ❖ ❖ ❖ Original weight: •... -
Page 92: Paper Tray Unit (1-Tray Type) (Option)
Specification Paper Tray Unit (1-tray type) (Option) ❖ ❖ ❖ ❖ Copy paper weight: 60 – 105g/m (16 – 28 lb) ❖ ❖ ❖ ❖ Available paper size: A3L, B4JISL, A4KL, B5JISKL, A5KL, 11" × 17"L, 8 " × 14"L, 8 "... -
Page 93: Paper Tray Unit (2-Tray Type) (Option)
Paper Tray Unit (2-tray type) (Option) Paper Tray Unit (2-tray type) (Option) ❖ ❖ ❖ ❖ Copy paper weight: 60 – 105g/m (16 – 28 lb) ❖ ❖ ❖ ❖ Available paper size: A3L, B4JISL, A4KL, B5JISKL, A5KL, 11" × 17"L, 8 "... -
Page 94: 16Mb Copier Memory Unit (Option)
Specification 16MB Copier Memory Unit (Option) ❖ ❖ ❖ ❖ Memory capacity: 16MB (For Type 1 only) ❖ ❖ ❖ ❖ Additional functions: Increases copier features, allowing you to use the optional document feeder (ADF), Sort, Combine or Printing counter features. ❖... -
Page 95: 32Mb Dimm (Option)
32MB DIMM (Option) 32MB DIMM (Option) ❖ ❖ ❖ ❖ Memory capacity: 32MB DIMM (For Type 1, it is available only when the optional 16MB copier memory unit is installed.) ❖ ❖ ❖ ❖ Additional functions: Increased memory capacity ❖ ❖ ❖ ❖ Number of originals that can be stored: about 99 pages ITU-T No.4 chart... -
Page 96: Index
INDEX 16 MB Copier Memory Unit , 3 , 80 Internal tray , 1 32MB DIMM , 3 , 81 Loading Paper , 47 Access to Machine , 70 Lower right cover , 2 Adjusting Copy Image Density , 25 Auto Off , 20 Auto Paper Select , 27 Machine Environment , 68... - Page 97 Safety Information , i Selecting an Original Type , 25 Selecting Copy Paper , 26 Series Copies , 40 Sort , 29 Sort key , 5 Specification , 73 System Reset , 20 Toner , 17 User Codes , 35 User Tools , 59 Ventilation hole , 1 Zoom , 37...
- Page 98 MEMO...
- Page 99 MEMO...
- Page 100 MEMO USA B039...
- Page 101 Operating Instructions System Settings Read this manual carefully before you use this product and keep it handy for future reference. For safety, please follow the instructions in this manual.
- Page 102 Type for Aficio 1015/1018/2515/2518/1502/1802 Printed in China UE USA B039-8607...
- Page 103 Introduction This manual contains detailed instructions on the operation and maintenance of this machine. To get maximum versatility from this machine all operators should carefully read and follow the instructions in this manual. Please keep this manual in a handy place near the machine. Please read the Safety Information in the Copy Reference before using this machine.
- Page 104 Note to users in the United States of America Notice: This equipment has been tested and found to comply with the limits for a Class B digital device, pursu- ant to Part 15 of the FCC Rules. These limits are designed to provide reasonable protection against harmful interference in a residential installation.
- Page 105 ENERGY STAR Program As an ENERGY STAR Partner, we have determined that this machine model meets the ENERGY STAR Guidelines for energy efficiency. The ENERGY STAR Guidelines intend to establish an international energy-saving system for developing and introducing energy-efficient office equipment to deal with environmental is- sues, such as global warming.
- Page 106 Specification Copier only Fax or printer installed Low Power Power con- 70 Wh 80 Wh mode sumption Default inter- 15 minute 15 minute Recovery time Less than 20 seconds Less than 20 seconds Sleep mode Power con- 70 Wh sumption Default inter- 30 minutes Recovery time -...
- Page 107 How to Read this Manual Symbols In this manual, the following symbols are used: R WARNING: This symbol indicates a potentially hazardous situation that might result in death or serious injury when you misuse the machine without following the in- structions under this symbol.
- Page 108 TABLE OF CONTENTS Manuals for This Machine................. 1 Machine Types................... 2 Additional Functions Provided by Internal Options....... 3 Copy Mode....................3 Facsimile Mode (Option) ................3 Printer Mode (Option)..................3 1. Modes Changing Modes..................5 Multi-access ....................6 Copy Mode ....................8 Changing to Copy Mode ................
-
Page 109: Manuals For This Machine
Manuals for This Machine This is a multi-functional machine combining copier, printer and fax functions. A separate manual is provided for each function. Please consult the manual that suits your needs. ❖ ❖ ❖ ❖ System Settings Provides an overview of the machine. This manual introduces the functions of the machine. -
Page 110: Machine Types
Machine Types This machine comes in two models which vary in copy speed. Type 1 Type 2 Copy speed 15 copies/minute (A4K, 8 " 18 copies/minute (A4K, 8 " × 11"K) × 11"K) Fax unit Option Option Printer unit Option Option... -
Page 111: Additional Functions Provided By Internal Options
Additional Functions Provided by Internal Options You can expand the capabilities of this machine to include fax functions and printer functions. When you want to add a function, contact your sales or service representative. Copy Mode In copy mode you can make basic copies and also copy using more sophisticated techniques, such as reduction/enlargement or combining several originals onto one copy. -
Page 113: Modes
1. Modes Changing Modes Press the {Copy}, {Facsimile} or {Printer} key to switch to copy, fax or printer mode respectively. Limitation ❒ You cannot switch modes in any of the following cases: • When scanning in a fax message for transmission. •... -
Page 114: Multi-Access
Modes Multi-access You can carry out another job using a different function while the current job is being performed. This allows you to handle your jobs efficiently regardless of how the machine is being used. For example: • While making copies, the machine can send a fax message that has been stored in memory. - Page 115 Multi-access Mode after you select Copy Facsimile Printer Transmission Reception Print Mode before you select ❍ ❍ ❍ ❍ ✩ ❍ ✩ ✩ ✩ ✩ ✩ Copying ❍ ✩ ✩ ✩ ✩ ✩ ✩ ❍ ❍ ❍ ❍ Sort ❍ ❍...
-
Page 116: Copy Mode
Modes Copy Mode Changing to Copy Mode You can always make a copy when the machine is not printing or scan- ning a fax data. Press the { { { { Copy} } } } key. The copy display appears on the panel display. -
Page 117: Facsimile Mode
Facsimile Mode Facsimile Mode Complete the usual operations Changing to Facsimile Mode for sending a fax, then press the { { { { Start} } } } key. You can always use the machine for faxing when you are not using a scan- After the transmission has fin- ner. -
Page 118: Printer Mode
Modes Printer Mode Changing to Printer Mode Whenever you print from applica- tions, you do not have to switch to printer mode. Reference For details, see the Printer Refer- ence manual. Printing The machine can receive a print data while any feature go on. -
Page 119: User Tools (System Settings)
2. User Tools (System Settings) Keys for User Tools (System Settings) ❖ ❖ ❖ ❖ When the machine has the copier feature only ❖ ❖ ❖ ❖ When the machine has the printer or fax feature { { { { Cancel} } } } key { { { { Clear/Stop} } } } key Press to return to the previous menu. - Page 120 User Tools (System Settings) Operation switch Press this switch to turn the power on or return from the low power mode or the sleep mode. To turn the power off, press this switch again.
-
Page 121: Accessing The User Tools (System Settings)
Accessing the User Tools (System Settings) Accessing the User Tools (System Settings) This section is for the key operators in Press the 0 0 0 0 or 1 1 1 1 key until your charge of this machine. You can change desired menu is displayed, and or set the machine's default settings. -
Page 122: Exiting From The User Tools
User Tools (System Settings) Exiting from the User Tools After changing the user tools set- tings, press the { { { { User Tools/Coun- Note ter} } } } key. ❒ 1: Press to go to the next menu. ❒ 0: Press to go back to the previ- ous menu. -
Page 123: User Tools Menu (System Settings)
User Tools Menu (System Settings) User Tools Menu (System Settings) -
Page 124: Settings You Can Change With The User Tools
User Tools (System Settings) Settings You Can Change with the User Tools Reference For how to access the user tools, see P.15 “User Tools Menu (System Settings)”. System Settings Menu Description 1.Function Priority You can specify the mode (Copier, Fax or Printer) to be displayed immediately after the operation switch is turned on or System Re- set mode is turned on. - Page 125 Settings You Can Change with the User Tools Menu Description 5.Energy Saver Level You can select the Energy Saver level. ❖ ❖ ❖ ❖ Level 1 • Power Consumption: Reduced by about 30% compared standby mode. • Warm-Up Time: about 10 seconds ❖...
- Page 126 User Tools (System Settings) Menu Description 9.Pap.Tray Priority (for You can select the paper tray which will be selected as a default in Copy mode only) the following conditions: • When the operation switch is turned on. • When the {Clear Modes} key is pressed. •...
- Page 127 Settings You Can Change with the User Tools Menu Description 10Auto Tray Switch (for If you load paper of the same size in two or more trays, the ma- Copy mode only) chine automatically shifts another tray when the tray in use runs out of paper.
- Page 128 User Tools (System Settings) Menu Description 3 Key Operator Access Turn the key operator access code “On” or “Off”. If you select (3.Key Op. Access) “On”, the registered access code is required for using all applica- tions. Note ❒ Default: Off Reference See “4.Prog.
-
Page 129: Index
INDEX Auto Off Timer , 17 Number keys , 11 Auto Tray Switch , 19 OK key , 11 Clear Modes key , 11 Operation switch , 12 Clear/Stop key , 11 Contrast , 19 Copy Count Display , 16 Panel display , 11 Copy Mode , 3 , 8 Paper Tray Priority , 18... - Page 130 MEMO...
- Page 131 MEMO...
- Page 132 MEMO USA B039...
- Page 133 FAX Option Type 1018 Operating Instructions Facsimile Reference (option) <Basic Features> > <Advanced Features> ZEQH010N.eps Read this manual carefully before you use this product and keep it handy for future reference. For safety, please follow the instructions in this manual.
- Page 135 ❖ ❖ ❖ ❖ FCC Requirements 1. This equipment complies with Part 68 of the FCC rules. On the cover of this equipment is a label that contains, among other information, the FCC registration number and ringer equivalence number (REN) for this equipment. If requested, this information must be provided to the tele- phone company.
- Page 136 Available Options • Handset (Handset Type 1018) Supplies • Marker Ink (Marker Type 30 is recommended for the best performance)
- Page 137 NOTICE R CAUTION: Use of controls, adjustments or performance of procedures other than those specified herein may result in hazardous radiation exposure. Shielded interconnect cables must be employed with this equipment to ensure compliance with the pertinent RF emission limits governing this device. Direct (or indirect reflected) eye contact with the laser beam may cause serious eye damage.
- Page 138 Note to users in the United States of America - Notice: This equipment has been tested and found to comply with the limits for a Class B digital device, pursuant to Part 15 of the FCC Rules. These limits are designed to provide reasonable protection against harmful interference in a residential in- stallation.
- Page 139 Important Safety Instructions Caution When using your telephone equipment, basic safety precautions should always be followed to reduce the risk of fire, electric shock and injury to persons, includ- ing the following: • Do not use this product near water, for example, near a bath tub, wash bowl, kitchen sink or laundry tub, in a wet basement or near a swimming pool.
- Page 140 How to Read this Manual Symbols In this manual, the following symbols are used: R WARNING: This symbol indicates a potentially hazardous situation that might result in death or serious injury when you misuse the machine without following the in- structions under this symbol.
- Page 141 TABLE OF CONTENTS Manuals for This Machine................. 1 Basic Features (this manual) ................ 1 Advanced Features ..................1 1. Getting Started Guide to Components ................3 Front View ..................... 3 Rear View...................... 5 Operation Panel ..................6 Starting the Machine ................. 8 Turning On the Power ...................
- Page 142 Dialing....................... 30 Number Keys ....................30 Quick Dials ....................32 Speed Dials....................33 Groups ......................34 Reception ....................36 Selecting the Reception Mode ..............36 3. Setup Own Name/Fax Header/Own Fax Number ..........37 Registering Own Name/Fax Header/Own Fax Number ......38 Quick Dial ....................
-
Page 143: Manuals For This Machine
Manuals for This Machine Two Facsimile Reference manuals are provided, the Basic Features manual and the Advanced Features manual. Please refer to the manual that suits your needs. Basic Features (this manual) The Basic Features manual explains the most frequently used fax functions and operations. -
Page 145: Getting Started
1. Getting Started Guide to Components Front View Document Feeder (ADF)/Platen Exposure Glass Cover (Option) Place the original face down on the upper left corner of the exposure glass, aligning Holds a document stack of up to 30 the upper left corner with the reference sheets which are fed automatically one at mark. - Page 146 Getting Started Handset (Option) This permits voice communication. Main Power Switch If the machine dose not operate after turning on the operation switch, check if the main power switch is turned on. If it is off, turn it on. However, if the machine is installed with the fax option, do not turn the main power switch off.
-
Page 147: Rear View
Guide to Components Rear View Bypass Tray G3 Line Connector Select this tray for non-standard size pa- Optional Handset/External Tele- per. phone Connector See Chapter 2 “Copying from the Bypass Tray” in the Copy Reference. -
Page 148: Operation Panel
Getting Started Operation Panel 0 0 0 0 1 1 1 1 keys Receive File Indicator Lights to tell you a message has been re- Press to move the cursor or select func- ceived into memory. tions. { { { { OK} } } } key Communicating Indicator Lights during transmission or reception. - Page 149 Operation Panel User Function keys Operation switch Each of these can be programmed for Press this switch to turn the power on rapid access to frequently used features. (the On indicator goes on). To turn the power off, press this switch again (the On ❖...
-
Page 150: Starting The Machine
Getting Started Starting the Machine To start the machine, turn on the op- Turning On the Power eration switch. Note Confirm that the power cord is ❒ This machine automatically enters plugged into the wall outlet firm- Energy Saver mode or turns itself ly and the Main Power switch is off if you do not use the machine for a while. -
Page 151: Turning Off The Power
Starting the Machine Turning Off the Power Turn off the operation switch. The On indicator will go out. Important ❒ Before you unplug the power cord, confirm that the display in Facsimile mode indicates that the remaining memory space is 100%. -
Page 152: Switching Between Copy Mode And Facsimile Mode
Getting Started Switching Between Copy Mode and Facsimile Mode This machine is both a fax and a copier. When you turn on the power switch, the copier screen is shown and the machine is ready to make copies. When you wish to use fax functions, press the {Facsimile} key. -
Page 153: Reading The Display
Reading the Display Reading the Display The display tells you the machine status and guides you through operations. Note ❒ All procedures in this manual assume you are in Facsimile mode. By default, when you turn the machine on it is in Copy mode. Press the {Facsimile} key to change to Facsimile mode. -
Page 154: Standby Display
Getting Started Standby Display Display Prompts While the machine is in standby mode Depending on the situation, the ma- (immediately after it is turned on or af- chine will show various prompts on ter the {Cancel} key is pressed), the fol- the display. -
Page 155: Faxing
2. Faxing Overview Changing Memory Transmission and Immediate Transmission The basic procedure to send a fax message is: Make sure the Facsimile indicator is lit Set your original Dial the number Press the {Start} key The rest of this section describes these steps and the various features that are available in more detail. -
Page 156: Setting Originals
Faxing Setting Originals ❒ You can scan non-standard size In this manual an original can mean a single or multiple page document. documents as standard size docu- You can set your originals either in ments with the Irregular Scan Area the Document Feeder or on the expo- feature. -
Page 157: Placing A Single Original On The Exposure Glass
Setting Originals Placing a Single Original on - How to set A4, B4, A3, 8 "× × × × 11", the Exposure Glass "× × × × 14" and 11"× × × × 17" size originals Set originals that cannot be placed in the Document Feeder, such as a book, on the exposure glass one page at a time. -
Page 158: Loading Originals In The Document Feeder
Faxing ❒ Set thin originals on the exposure Loading Originals in the glass. Document Feeder Reference For information about the sizes Use the Document Feeder to scan in a and number of originals that can stack of originals in one operation. be placed in the Document Feeder, see Chapter 9 “Acceptable Types Limitation... -
Page 159: If The Machine Cannot Detect The Size Of Your Original
Setting Originals • Sticky originals, such as translucent paper • Thin and soft originals • Originals of inappropriate weight • Originals in bound form, such as books • Transparent originals, such as OHP transparencies or translucent paper If the Machine Cannot Detect the Size of Your Original If the machine cannot detect the original size, the following display is shown: If this happens, carry out the following steps. -
Page 160: Original Sizes Difficult To Detect
Faxing Original Sizes Difficult to Detect The following paper sizes are automatically detected in Facsimile mode. ❖ ❖ ❖ ❖ Metric Version 11"× × × × 17"L "× × × × 14"L "× × × × 11" "× × × × 8 "×... -
Page 161: Memory Transmission
Memory Transmission Memory Transmission In Memory Transmission mode, after Note you press the {Start} key, the machine ❒ Maximum number of Memory does not dial the destination until all Transmission files: 200 pages of your fax message have ❒ Maximum number of destinations scanned into memory (in contrast per Memory Transmission: 100 with Immediate Transmission, where... - Page 162 Faxing Set the original. Dial. If you wish to send the same message to more than one desti- Limitation nation, press the { { { { OK} } } } key and ❒ You can send the first pages dial another destination. Repeat from the exposure glass then this step for all destinations.
- Page 163 Memory Transmission D Place the next original on the Press the { { { { Start} } } } key. exposure glass within 60 sec- onds after the machine has fin- i s h e d s c a n n i n g t h e f i r s t original.
-
Page 164: Canceling A Memory Transmission
Faxing Canceling a Memory Transmission Canceling the Transmission Canceling a Transmission Before the Original is Scanned While the Original is Being Scanned Press the { { { { Clear Modes} } } } key. Press the { { { { Clear/Stop} } } } key. Note ❒... -
Page 165: Canceling A Transmission While The Message Is Being Sent
Canceling a Memory Transmission Press the { { { { OK } } } } key. Canceling a Transmission Press the 0 0 0 0 or 1 1 1 1 key until the file While the Message is Being you wish to delete is shown and Sent press the { { { { OK} } } } key. -
Page 166: Immediate Transmission
Faxing Immediate Transmission With Immediate Transmission, when Check that the Immediate Trans- you press the {Start} key, the fax mission indicator is lit. number is dialed immediately. The message is scanned and transmitted page by page without being stored in memory. - Page 167 Immediate Transmission C Press the { { { { Start} } } } key. Reference The machine starts scanning the P.30 “Dialing” original. See Chapter 3 “Chain Dial” in D Place the next original on the the Advanced Features manual. exposure glass within 10 sec- Press the { { { { Start} } } } key.
-
Page 168: Canceling An Immediate Transmission
Faxing Canceling an Immediate Transmission Canceling a Transmission Canceling a Transmission Before You Have Pressed the After You Have Pressed the Start Key Start Key Use this procedure to cancel a trans- Press the { { { { Clear/Stop} } } } key, and mission before you have pressed the then remove the original. -
Page 169: Scan Settings
Scan Settings Scan Settings ❖ ❖ ❖ ❖ Fine (8× × × × 15.4lines/mm, 200× × × × 400dpi) You may wish to send many different types of fax messages. Some of these Select for originals with very fine may be difficult to reproduce at the details or when you require the other end. -
Page 170: Original Type
Faxing Press the { { { { Resolution} } } } key to Note ❒ If you select Photo, the transmis- switch between resolutions. The indicators above the key shows sion will take longer than when the current selection. Text is selected. ❒... -
Page 171: Image Density (Contrast)
Scan Settings Image Density (Contrast) The text and diagrams in your origi- nal should stand out clearly from the paper they are written on. If your original has a darker background than normal (for example, a newspa- per clipping), or if the writing is faint, adjust the image density. -
Page 172: Dialing
Faxing Dialing There are three main ways to dial a Number Keys number: ❖ ❖ ❖ ❖ Number keys: Enter numbers directly using the Enter numbers directly using the number keys on the right side of the number keys on the right side of operation panel. - Page 173 Dialing ❒ The display shows the percentage of free memory space for storing - Restrictions When Dialing with originals. Since fax numbers are the Number Keys stored in separate memory, dialing fax numbers with the number keys F a x n u m b e r s e n t e r e d w i t h t h e does not change the percentage on number keys are stored in internal the display.
-
Page 174: Quick Dials
Faxing Tone Quick Dials This feature allows a machine con- When you have stored a destination's nected to a pulse dialing line to send number in a Quick Dial key, you can tonal signals (for example if you want dial the number by just pressing that to use a special service on a tone dial- key. -
Page 175: Speed Dials
Dialing Press the Quick Dial key in which Speed Dials the destination's number is pro- grammed. If you store a number in a Speed Dial, when you want to dial it, just press the {Speed Dial} key followed by a 2 digit code. -
Page 176: Groups
Faxing Press the { { { { Speed Dial} } } } key. Groups If you frequently send the same mes- sage to more than one place, program these numbers into a Group. Then you can send the messages to all the destinations in that Group with just a few keystrokes. - Page 177 Dialing Press the Quick Dial in which the Group is programmed. Note ❒ If you make a mistake, press the {Clear/Stop} key and try again. ❒ If you wish to dial another des- tination, press the {OK} key and dial another fax number. Press the { { { { Start} } } } key.
-
Page 178: Reception
Faxing Reception Selecting the Reception Mode - Receiving a Fax in Telephone Mode There are two ways you can set up your machine to handle incoming This feature needs a User Function calls: key programmed as Manual Recep- tion. By default, the {F1} key is al- •... -
Page 179: Setup
3. Setup Own Name/Fax Header/Own Fax Number ❖ ❖ ❖ ❖ Own Fax Number (Required by inter- Make sure that all necessary settings are made before connecting your ma- national law) chine to the telephone line. This is your fax machine's phone number, which must include coun- ❖... -
Page 180: Registering Own Name/Fax Header/Own Fax Number
Setup Press 0 0 0 0 or 1 1 1 1 until "4. Fax Infor- Registering Own Name/Fax mation" is displayed. Header/Own Fax Number The following procedure describes how to make initial settings. Press the { { { { OK} } } } key. Press the { { { { User Tools} } } } key. - Page 181 Own Name/Fax Header/Own Fax Number Press the { { { { OK} } } } key. Enter your Own Fax Number. The programmed Own Name is displayed. Note ❒ The format of the number is normally as follows: Interna- Enter your Fax Header. tional Dial Prefix, Your Country If your Fax Header is the same as Code, Your Area Code (do not...
-
Page 182: Quick Dial
Setup Quick Dial Press the { { { { User Tools} } } } key. Registering Quick Dials To save time, you can program a fax number that you use often into a Quick Dial key. Then, whenever you are sending a message to that loca- tion, just press that Quick Dial key to dial. - Page 183 Quick Dial Press the { { { { OK} } } } key. Display the number of the Quick Dial key you want to register. The fax number is programmed. Press a Quick Dial key, or search using 0 or 1. Enter the destination name.
-
Page 184: Quick Dial Key And Function Key Label (Dial Label)
Setup Press the { { { { OK} } } } key. Quick Dial Key and Function Key Label (Dial label) You can print a template that can be used to make labels for Quick Dial If you want to store another Quick Dial, go to step D. - Page 185 Quick Dial Non-transparent label paper Quick Dial key number Group name (G) Destination name Programmed contents of User Function keys...
- Page 186 Setup Transparent label paper Quick Dial key number Group name (G) Destination name Programmed contents of User Function keys...
-
Page 187: Deleting Quick Dials
Quick Dial Press 0 0 0 0 or 1 1 1 1 until "2. Del. Quick Deleting Quick Dials Dial" is displayed. This procedure describes how to find a programmed Quick Dial and delete Press the { { { { OK} } } } key. Limitation ❒... -
Page 188: Speed Dial
Setup Speed Dial Press the { { { { User Tools} } } } key. Registering Speed Dial If you register a destination in a Speed Dial, you can dial that number by just pressing the {Speed Dial} key followed by a two digit code. Use these steps to program a new Speed Dial or overwrite an existing one. - Page 189 Speed Dial Display the number of the Speed Enter the Destination name. Dial you want to register (00 to 99). Enter the Speed Dial number with the number keys, or search using 0 or 1. Note ❒ If a destination name is already registered in the Speed Dial, the name is shown on the display.
-
Page 190: Deleting Speed Dial
Setup Press the { { { { OK} } } } key. Press 0 0 0 0 or 1 1 1 1 until "4. Fax Fea- tures" is displayed. If you want to store another Speed Dial number, go to step E. Press the { { { { OK} } } } key. - Page 191 Speed Dial Press the { { { { OK} } } } key. T h e p r o g r a m m e d d a t a ( f a x number and name) is deleted. If you want to delete another name, go to step E.
-
Page 192: Groups
Setup Groups ❒ When a registered group is being Registering Groups used for a standby Memory Trans- mission, the message " This Dial If you send the same message to sev- " is is in Use. Cannot Change. eral destinations at the same time on a shown and you cannot change des- regular basis, program these destina- tinations for this Group. - Page 193 Groups Press 0 0 0 0 or 1 1 1 1 until "5. Prog. Specify the destination using one Group Dial" is displayed. of the following three methods: Enter the fax number with the number keys. Press the { { { { OK} } } } key. Press a Quick Dial key.
-
Page 194: Deleting Groups
Setup Press the { { { { OK} } } } key to register the Deleting Groups Group. This function deletes all destinations registered in a Group. Limitation ❒ When a registered Group is being Press the { { { { OK} } } } key. used for a Memory Transmission If you selected "No", go to step R. - Page 195 Groups Press 0 0 0 0 or 1 1 1 1 until "6. Del. Group Dial" is displayed. Press the { { { { OK} } } } key. Display the number of the group you want to delete (1 to 9). Enter the group number with the number keys, or search using 0 or Press the { { { { OK} } } } key.
-
Page 196: Entering Text
Setup Entering Text ❖ ❖ ❖ ❖ 0 0 0 0 or 1 1 1 1 This section describes how to enter characters. When you enter a charac- Use to move the cursor left or ter, it is shown at the position of the right. -
Page 197: How To Enter Text
Entering Text ❖ ❖ ❖ ❖ Using a wild card Entering letters Destination to be reg- Number of regis- istered (Own name) tered identifications Press the { { { { shift} } } } key to switch be- BRANCH tween Uppercase and Lowercase. Limitation ❒... - Page 198 Setup Select the desired symbol by Entering numbers pressing 0 0 0 0 and 1 1 1 1 . Press a number key. The numeral is entered and the cursor moves. Note ❒ If you wish to insert a character, press the 0 or 1 key to move the cursor to a character you want to enter.
-
Page 199: Troubleshooting
4. Troubleshooting Adjusting Volume You can change the volume of the fol- Press the { { { { User Tools} } } } key. lowing sounds the machine makes. ❖ ❖ ❖ ❖ On Hook Sounds when you press the {On Hook Dial} key. - Page 200 Troubleshooting Press the { { { { OK} } } } key. Confirm that "1. Monitor Volume" is displayed. Press the { { { { OK} } } } key. Press 0 0 0 0 or 1 1 1 1 to select the item you want to adjust, and then press the { { { { OK} } } } key.
-
Page 201: Error Messages And Their Meanings
Error Messages and Their Meanings Error Messages and Their Meanings If there is an error, one of the following messages may appear on the display. It might just flash up briefly, so if you are watching for errors, stay by the machine and check the display. -
Page 202: When The {Facsimile} Key Is Lit In Red
Troubleshooting When the {Facsimile} key is Lit in Red If this key is lit, refer to the table below and take the appropriate action. Problem Solution Paper has run out. Add paper. See Chapter 3 “Loading Paper” in the Copy Reference. -
Page 203: When The Receive File Indicator Is Lit
When the Receive File Indicator is Lit When the Receive File Indicator is Lit If the Receive File indicator is lit, a message has been received but could not be printed for some reasons. The message was stored in memory (Substitute Recep- tion). -
Page 204: Solving Problems
Troubleshooting Solving Problems This table lists some common problems and their solutions. Problem Solution Refer to Image background appears Adjust the scan density. P.29 “Image Density (Contrast)” dirty when a fax is received at the other end. Printed or sent image contains The Document Feeder or ex- spots. -
Page 205: Index
INDEX Adjusting Volume , 57 G3 Line Connector , 5 Advanced Features , 1 Getting Started , 3 Auto Reception Mode , 36 Group Dial list , 52 Groups , 34 , 50 Basic Features (this manual) , 1 Broadcasting , 19 Handset (Option) , 4 , 5 Bypass Tray , 5 How to Read this Manual , iv... - Page 206 Pause , 31 User Function Keys , 7 Pause/Redial key , 7 User Tools key , 6 Photo , 28 Wild Cards , 54 Quick Dial , 30 , 32 , 40 Quick Dial Flip Plate , 6 Quick Dial keys , 6 Quick Dial List , 42 Rear View , 5 Receive File Indicator , 6 , 61...
- Page 207 FUNCTION MAP...
- Page 209 How to Read this Manual Symbols In this manual, the following symbols are used: R WARNING: This symbol indicates a potentially hazardous situation that might result in death or serious injury when you misuse the machine without following the in- structions under this symbol.
- Page 210 TABLE OF CONTENTS Manuals for This Machine................. 1 Advanced Features (this manual) ..............1 Basic Features ....................1 1. Transmission Options Overview..................... 3 Sending at a Specific Time (Send Later) ..........4 Personal Code Transmission ..............6 Choosing the Area to be Scanned Yourself (Irregular Scan Area) ..7 Fax Header Print ..................
- Page 211 3. Transmission Features Handy Dialing Functions ................ 23 Chain Dial....................23 Telephone Directory..................23 Redial ......................24 On Hook Dial .................... 25 Manual Dial....................26 Transmission Features ................27 Stamp......................27 SEP Code ....................28 SUB Code ....................29 More Transmission Functions ............... 31 Auto Fax Reception Power-up ..............
- Page 212 5. Facsimile User Tools Accessing the User Tools............... 45 Exiting User Tool mode................46 Assigning User Function Keys .............. 47 Storing/Editing the Contents of a User Function Key........47 Utilizing a User Function Key ..............48 Functions You Can Store in User Function Keys........48 Printing Reports/Lists ................
- Page 213 9. Appendix Connecting the Machine to a Telephone Line and Telephone.... 93 Connecting the Telephone Line ..............93 Connecting The Optional External Telephone ..........94 Selecting the Line Type................95 Specifications ..................96 Acceptable Types of Originals ..............97 Function List .................... 99 Advanced Transmission Features...............
- Page 214 viii...
-
Page 215: Manuals For This Machine
Manuals for This Machine Two Facsimile Reference manuals are provided, the Basic Features manual and the Advanced Features manual. Please refer to the manual that suits your needs. Advanced Features (this manual) The Advanced Features manual describes more advanced functions, and also explains settings for key operators. -
Page 217: Transmission Options
1. Transmission Options Overview This feature describes various options that you can choose when sending a fax message. The selections you make will only apply to the current fax message. Note ❒ If you frequently use a certain configuration of options, you can change their default settings (on or off) with the User Parameters. -
Page 218: Sending At A Specific Time (Send Later)
Transmission Options Sending at a Specific Time (Send Later) Using this feature, you can instruct Press the { { { { Transmission Option} } } } key. the machine to delay transmission of your fax message until a later time which you specify. - Page 219 Sending at a Specific Time (Send Later) Enter the time that you want to send the fax message. Note ❒ When entering numbers small- er than 10, add a leading zero. ❒ If you make a mistake, press the {Clear/Stop} key and try again. ❒...
-
Page 220: Personal Code Transmission
Transmission Options Personal Code Transmission Personal Codes allow you to keep Press 0 0 0 0 or 1 1 1 1 until "2. Personal track of machine usage (for example, Code" is displayed. for billing purposes). If everybody uses a Personal Code when they use the fax machine, the codes or the names programmed for the codes will be printed in the Journal and other re-... -
Page 221: Choosing The Area To Be Scanned Yourself (Irregular Scan Area)
Choosing the Area to be Scanned Yourself (Irregular Scan Area) Choosing the Area to be Scanned Yourself (Irregular Scan Area) Usually the machine automatically Press the { { { { Transmission Option} } } } key. detects the size of an original when it is scanned. - Page 222 Transmission Options Press 0 0 0 0 or 1 1 1 1 to select the paper size. Note ❒ To see which paper sizes have already been programmed, press 0 or 1. Press the { { { { OK} } } } key. Specify the destination.
-
Page 223: Fax Header Print
Fax Header Print Fax Header Print By default, the machine adds your Press 0 0 0 0 or 1 1 1 1 until "5. FaxHeader Fax Header to each message you send Print" is displayed and press the so it appears on the printed fax at the { { { { OK} } } } key. -
Page 224: Label Insertion
Transmission Options Label Insertion With this feature you can have the re- Press 0 0 0 0 or 1 1 1 1 until "6. Label In- ceiver's name printed on the message sertion" is displayed and press when it is received at the other end. the { { { { OK} } } } key. -
Page 225: Auto Reduction
Auto Reduction Auto Reduction By default, if the receiver's paper is Press the { { { { Transmission Option} } } } key. smaller than the paper you are send- ing on, the message is automatically reduced to fit onto the paper available at the other end. -
Page 226: Polling Reception
Transmission Options Polling Reception Use this function if you want to poll a Press 0 0 0 0 or 1 1 1 1 until "8. Polling RX" message from another terminal. You is displayed. can also poll documents from many terminals with only one operation (use Groups to fully exploit this fea- ture). -
Page 227: Transfer Request
Transfer Request Transfer Request ❖ ❖ ❖ ❖ Transfer Station Transfer Request allows fax machines that have this feature to automatically The machine that forwards the in- distribute incoming messages onto coming message to another desti- multiple fax destinations. This feature nation, that is, the machine that helps you save costs when you send receives the Transfer Request. -
Page 228: Specifying An End Receiver
Transmission Options Press 0 0 0 0 or 1 1 1 1 until "10. Transfer Press the { { { { OK} } } } key. Report" is displayed. If you selected "Yes", go back to step I. Press the { { { { Start} } } } key. Press the { { { { OK} } } } key. -
Page 229: Job Information
2. Job Information Canceling Transmission or Reception Transmission files are originals that Press the { { { { Job Information} } } } key. have been stored in memory and are awaiting transmission. The features that produce transmission files are Memory Transmission, Transfer Re- quest, Polling Reception. - Page 230 Job Information Press the { { { { OK} } } } key. Confirm that you have selected the correct file, and press the { { { { OK} } } } key. "Trans. Cancelled File Deleted" is displayed, and the machine re- turns to standby display.
-
Page 231: Checking The Transmission Result (Tx File Status)
Checking the Transmission Result (TX File Status) Checking the Transmission Result (TX File Status) This function let you check up on the Press 0 0 0 0 or 1 1 1 1 until "2. TX Status" last 50 completed transmissions with- is displayed and press the { { { { OK} } } } out having to print the Journal. -
Page 232: Checking The Reception Result (Rx File Status)
Job Information Checking the Reception Result (RX File Status) This function let you check up on the Press 0 0 0 0 or 1 1 1 1 to scroll through the last 50 messages received without messages. having to print the Journal. You can browse through the received messag- es on the display. -
Page 233: Printing A List Of Files In Memory (Print Tx File List)
Printing a List of Files in Memory (Print TX File List) Printing a List of Files in Memory (Print TX File List) Print this list if you wish to find out which files are stored in memory and what their file numbers are. Knowing the file number can be useful (for ex- ample when erasing files). -
Page 234: Printing A Stored Message
Job Information Printing a Stored Message If you wish to check the contents of a Press the { { { { OK} } } } key. fax that is stored in memory and has not been sent yet, use this procedure Press the { { { { Start} } } } key. -
Page 235: Printing The Journal
Printing the Journal Printing the Journal The Journal contains information Press 0 0 0 0 or 1 1 1 1 until "6. Print Jour- about the last 100 communications nal" is displayed. made by your machine. When auto- matic communication report printing is turned on, the Journal is printed au- tomatically after every 50 communi- cations (receptions + transmissions). -
Page 236: Displaying The Memory Status
Job Information Displaying the Memory Status Use this function to display a summa- Press the { { { { OK} } } } key. ry of current memory usage. Items shown are the percentage of free memory space, the number of files to be sent, and the number of received messages to be printed. -
Page 237: Transmission Features
3. Transmission Features Handy Dialing Functions Chain Dial Telephone Directory This allows you to compose a tele- This feature lets you find a stored phone number from various parts, Speed Dial quickly by just entering a some of which may be stored in single letter, for example, the first let- Quick Dials or Speed Dials and some t er o f t h e n am e s t o r e d fo r t h at... -
Page 238: Redial
Transmission Features Enter the search letter by pressing Redial one of the Quick Dial keys (A to The machine memorizes the last 10 destinations that have been dialed. If you wish to send a message to a des- tination which you faxed to recently, the Redial feature saves you finding and entering the number again. -
Page 239: On Hook Dial
On Hook Dial On Hook Dial This is just like using the external tel- Dial. ephone, except you do not have to pick up the external telephone before dialing. Just press the {On Hook Dial} key and dial the number. If you hear a voice, you can pick up the external The machine immediately dials the telephone and speak with the other... -
Page 240: Manual Dial
Transmission Features Manual Dial The external telephone is required. Pick up the handset of the external Replace the handset of the exter- telephone and dial. When the line is nal telephone. connected and you hear a high- After transmission the machine pitched tone, press the {Start} key to will return to standby mode. -
Page 241: Transmission Features
Transmission Features Transmission Features Note Stamp ❒ When the stamp starts getting lighter, replace the cartridge. See The optional Document Feeder is re- P.91 “Replacing the Stamp Car- quired. tridge”. ❒ If a page was not stamped even When sending a fax message using the Document Feeder (ADF), the ma- though the Stamp feature is turned chine can stamp a circle mark at the... -
Page 242: Sep Code
Transmission Features Press the { { { { User Function} } } } key as- SEP Code signed with the Dial Option fea- ture. Normally you can only use Polling Reception to receive faxes from ma- chines that have the Polling Recep- t i o n fe a t u r e o f t h e sa m e m ak e . -
Page 243: Sub Code
Transmission Features Press the { { { { Transmission Option} } } } key. SUB Code Transfer Request is only possible with machines of the same make that have the Transfer Request feature. However, if you use the SUB/SID function, you can send and receive fax messages to and from other mak- ers' machines that have the SUB/SID feature. - Page 244 Transmission Features Press the { { { { User Function} } } } key as- Press the { { { { Start} } } } key. signed with the Dial Option fea- ture. Note ❒ If you use Immediate Transmis- sion and the destination fax ma- chine does not support the Dial Option feature, a message will...
-
Page 245: More Transmission Functions
More Transmission Functions More Transmission Functions Auto Fax Reception Power-up Transmission with Image Rotation This machine can be set to shut down automatically if nobody has used it For most purposes, set A4/LT origi- for a while. In these situations, even nals in the landscape direction (L). -
Page 246: Sending A Fax Message Immediately
Transmission Features Sending a Fax Message If Memory Runs Out While Immediately Storing an Original To send a fax message immediately, If you run out of memory while stor- use Immediate Transmission. If you ing an original (free space reaches have just set up an original for broad- 0%), "Memory is Full. -
Page 247: Ecm (Error Correction Mode)
More Transmission Functions • When two or more destinations are ECM (Error Correction Mode) specified • When the original is set on the ex- This feature automatically sends data posure glass that was not transmitted successfully using a system that complies with in- Note ternational standards. -
Page 248: Printed Report
Transmission Features Printed Report ❒ You can choose whether to include File Reserve Report part of the original image on the re- port (by default, part of the image This report is printed after an original is printed). See P.72 “User Parame- is stored in memory. -
Page 249: Transmission Result Report (Immediate Transmission)
Printed Report Transmission Result Report (Immediate Transmission) If you turn this report on, a report will be printed after every Immediate Transmission so you have a record of whether the transmission was suc- cessful or not. If the machine is set up not to print this report and the fax message could not be successfully transmitted, the Error report is print-... - Page 250 Transmission Features...
-
Page 251: Reception Features
4. Reception Features Reception Immediate Reception Memory Reception Each page of a received fax message is The machine waits until all pages of printed as soon as it is received. This the message have been received into method is used for standard fax mes- memory before printing the message. -
Page 252: Substitute Reception
Reception Features Substitute Reception Screening Out Messages from Anonymous Senders If any of the conditions listed below are met, the machine automatically To help you screen out unwanted switches to Memory Reception mode messages that may fill up machine and stores messages in memory in- memory, the machine can be pro- stead of printing them. - Page 253 Reception - When Own Name or Own Fax Number is Received The machine switches to Substitute Reception only when the sender has programmed their Own Name or Own Fax Number. If the power is switched off for more than an hour, all the messages received into memo- ry are deleted.
-
Page 254: Printing Functions
Reception Features Printing Functions Print Completion Beep Center Mark By default, the machine beeps to let By default, marks are printed halfway you know when a received message down the left side and at the top cent- has been printed. er of each page received. -
Page 255: Reception Time
Printing Functions Reception Time Page Separation and Length Reduction (Not Available in You can have the date and time when Some Countries) a message was received printed at the bottom of the received image. This When the size of a received message feature is turned off by default—turn is longer than the paper loaded in the it on with the Initial Setup RX set-... -
Page 256: Page Reduction
Reception Features Page Reduction TSI Print If you turn this feature on and you re- Usually the sender's Fax Header is ceive a message that is longer than the printed on received messages. If the paper in the cassette, usually the ma- sender has not programmed their Fax chine prints it on two pages. - Page 257 Printing Functions ❖ ❖ ❖ ❖ Priority Table Page Reduction Disabled Reduction in Sub-scan Direction Enabled Page Separation Threshold 0.79" (20mm) Width or Length Priority Width • KK and LL indicate that the message is split over two pages of paper with the orientation and size shown.
- Page 258 Reception Features Limitation ❒ The paper size used to print a received message may be different from the size of the sent original. Note ❒ Widths that this machine can receive are A4, B4, LT, LG, and A3. Any mes- sages narrower than A4 or LT are sent as A4 or LT width with the length un- changed.
-
Page 259: Facsimile User Tools
5. Facsimile User Tools Accessing the User Tools The User Tools allow you to program Press the { { { { User Tools} } } } key. the machine with your identification, store frequently used numbers and settings, and customize the default settings to match your needs. -
Page 260: Exiting User Tool Mode
Facsimile User Tools Follow the instructions appearing on the display. For more details on each User Tool, see the relevant pages of this manual. When you have made your chang- es, press the { { { { OK} } } } key. The machine automatically returns to the User Tools main menu. -
Page 261: Assigning User Function Keys
Assigning User Function Keys Assigning User Function Keys You can program each of the User Press 0 0 0 0 or 1 1 1 1 until "4. Fax Fea- Function keys ( {F1} - {F3} ) with a tures" is displayed. function that you use frequently. -
Page 262: Utilizing A User Function Key
Facsimile User Tools Press 0 0 0 0 or 1 1 1 1 until the function Utilizing a User Function Key you want to register into the User Function key and press the { { { { OK} } } } Pres s the User Function Key key. -
Page 263: Printing Reports/Lists
Printing Reports/Lists Printing Reports/Lists This function allows you to print the Press 0 0 0 0 or 1 1 1 1 until "2. Reports / following reports and lists manually. Lists" is displayed and press the Select a report or list as needed. { { { { OK} } } } key. - Page 264 Facsimile User Tools Printing the Quick Dial List Printing the Group Dial List A Press 0 0 0 0 or 1 1 1 1 until "3. Dial A Press 0 0 0 0 or 1 1 1 1 until "3. Dial List"...
-
Page 265: Setting The Date And Time
Setting the Date and Time Setting the Date and Time Use this function to set your ma- Press the { { { { OK} } } } key. chine's internal clock to the current time and date. Press a number key to enter the year for the digit, or it the year is If the current date and time are correct press the { { { { OK} } } } key. - Page 266 Facsimile User Tools Press the { { { { OK} } } } key. After "Function Accepted" flashes briefly in the display, the next set- ting is displayed. Press the { { { { User Tools} } } } key to re- turn to standby display.
-
Page 267: Summer Time / Daylight Saving Time
Summer Time / Daylight Saving Time Summer Time / Daylight Saving Time Whenever local custom requires ad- Press 0 0 0 0 or 1 1 1 1 until "3. Summer vancing the clock or setting the clock Time /DST" is displayed. back, use this feature. -
Page 268: Changing The Initial Setup Transmission
Facsimile User Tools Changing the Initial Setup Transmission When you turn on the machine or re- Press 0 0 0 0 or 1 1 1 1 until "4. Fax Fea- turn to Copy mode, the machine re- tures" is displayed. turns to the home settings. - Page 269 Changing the Initial Setup Transmission ❖ ❖ ❖ ❖ Resolution ❖ ❖ ❖ ❖ On Hook Timeout You can select the setting that meets your needs based upon this trade off between speed and image clarity. This machine automatically cancel ❖...
-
Page 270: Changing The Initial Setup Reception
Facsimile User Tools Changing the Initial Setup Reception The Initial Setup Reception function Press 0 0 0 0 or 1 1 1 1 until "5. Initial Set- allows you to change settings for the up RX" is displayed and press the following reception functions. - Page 271 Changing the Initial Setup Reception ❖ ❖ ❖ ❖ Print RX Time ❖ ❖ ❖ ❖ Forwarding Note ❒ If you wish to change other functions, repeat steps E and F. ❒ Select on or off for Checkered Mark, Center Mark, Print RX Time and Forwarding.
- Page 272 Facsimile User Tools...
-
Page 273: Key Operator Settings
6. Key Operator Settings Changing Key Operator Settings This chapter explains about functions Counters the key operator handles. ❖ ❖ ❖ ❖ Key Operator Code This function allows you to check the When the Key Operator Code is total number of pages transmitted registered and turned on, user and received on the display. -
Page 274: Authorized Reception
Key Operator Settings Press the { { { { OK} } } } key. Authorized Reception Note This feature helps you to reject junk ❒ If the key operator code is regis- mail. It lets you specify which termi- tered and turned on, enter the nals you wish to receive fax messages key operator code and press the from;... - Page 275 Changing Key Operator Settings Press 0 0 0 0 or 1 1 1 1 until "2. Authorized Switching Authorized Reception On/Off RX" is displayed. Press the { { { { User Tools} } } } key. Press the { { { { OK} } } } key. Confirm that "1.
- Page 276 Key Operator Settings Press the { { { { OK} } } } key. Programming specified senders Press 0 0 0 0 or 1 1 1 1 until "2. Program Press the { { { { User Tools} } } } key. Sender"...
- Page 277 Changing Key Operator Settings Press the { { { { OK} } } } key. Deleting a Specified Sender (Authorized Reception) Press 0 0 0 0 or 1 1 1 1 until "3. Delete Sender" is displayed. Press the { { { { User Tools} } } } key. Press the { { { { OK} } } } key.
- Page 278 Key Operator Settings Press 0 0 0 0 or 1 1 1 1 until "2. Authorized Sender (Authorized Reception) List RX" is displayed. Print this list to find out which Speci- f ied S en de rs are c urren tly p ro- grammed.
-
Page 279: Forwarding
Changing Key Operator Settings Note Forwarding ❒ Before using the Forwarding func- tion, register Forwarding Stations Using this feature, you can select and turn Forwarding function on. messages from Specified Senders to See P.56 “Changing the Initial Setup be printed on your machine and then Reception”. - Page 280 Key Operator Settings Press 0 0 0 0 or 1 1 1 1 until "6. Key Op. Press the { { { { OK} } } } key. Tools" is displayed. The Forwarding Station's fax number is registered. Press the { { { { OK} } } } key. Note When specifying senders ❒...
- Page 281 Changing Key Operator Settings Press the { { { { Cancel} } } } key on each Press 0 0 0 0 or 1 1 1 1 until "3. Forward- display until you reach the stand- ing" is displayed. by display. Editing a Forwarding Station Press the { { { { OK} } } } key.
- Page 282 Key Operator Settings Press the { { { { OK} } } } key. Deleting a Forwarding Station Press 0 0 0 0 or 1 1 1 1 until "2. Delete Sta- Press the { { { { User Tools} } } } key. tion"...
- Page 283 Changing Key Operator Settings Press the { { { { OK} } } } key. Deleting a Specified Sender (Forwarding) Press 0 0 0 0 or 1 1 1 1 until "1. Prog. Sta- Press the { { { { User Tools} } } } key. tion"...
- Page 284 Key Operator Settings Press 0 0 0 0 or 1 1 1 1 until "3. Forward- Specified Sender/Forwarding Station list ing" is displayed. Print this list to find out which Speci- fied Senders are assigned to which Forwarding Stations. Press the { { { { User Tools} } } } key. Press the { { { { OK} } } } key.
- Page 285 Changing Key Operator Settings Press 0 0 0 0 or 1 1 1 1 until "3. Forward- Sender Setting ing" is displayed. For Forwarding, select the messages to forward either from all senders, from specified senders. Press the { { { { User Tools} } } } key. Press the { { { { OK} } } } key.
-
Page 286: User Parameters
Key Operator Settings User Parameters The User Parameters allow you to customize various settings to match your needs. To change the function settings, set the user parameter switches. Preparation Access to some User Parameter Settings requires installation of optional equipment or that other settings be made beforehand. - Switches and Bits User Parameters are divided into Switches and each switch is divided into eight bits. - Page 287 Changing Key Operator Settings Switch Item 0 Forwarding Mark 3 TSI Print 0 Automatic printing of the Communication Result Re- port (Memory TX) 2 Automatic printing of the File Reserve Report (Mem- ory TX) 3 Automatic printing of the File Reserve Report (Poll- ing RX) 4 Automatic printing of the Communication Result Re-...
- Page 288 Key Operator Settings Switch Item 2 Authorized Reception type Receive all mes- Only receive sages except from specified those from speci- senders fied senders 3 Page Reduction when printing 6 Local Print when Forward- 0 Print documents received When turning on Immediate with Auto Power-On Re- the Operation...
- Page 289 Changing Key Operator Settings Press 0 0 0 0 or 1 1 1 1 until "4. User Pa- Changing the User Parameters rameters" is displayed. • We recommend that you print the User Parameter list and keep it when you register or change a user parameter.
- Page 290 Key Operator Settings Press 0 0 0 0 or 1 1 1 1 until "4. User Pa- Printing the User Parameter List rameters" is displayed. Print this list to see the current User Parameter settings. Press the { { { { User Tools} } } } key. Press the { { { { OK} } } } key.
-
Page 291: Personal Codes
Changing Key Operator Settings Press 0 0 0 0 or 1 1 1 1 until "6. Key Op. Personal Codes Tools" is displayed. This function allows you to keep track of machine usage. When Per- sonal Codes are programmed, users have to enter their Personal Code be- Press the { { { { OK} } } } key. - Page 292 Key Operator Settings Press the { { { { OK} } } } key. Editing a Personal Code Confirm that "1. Prog. Pers. Code" Press the { { { { User Tools} } } } key. is displayed and press the { { { { OK} } } } key.
- Page 293 Changing Key Operator Settings Press the { { { { OK} } } } key. Deleting a Personal Code Press 0 0 0 0 or 1 1 1 1 until "2. Delete" is Press the { { { { User Tools} } } } key. displayed.
- Page 294 Key Operator Settings Press 0 0 0 0 or 1 1 1 1 until "4. Fax Fea- Restricted Access tures" is displayed. Use this feature to restrict access to the machine or monitor machine us- age by user or department. When turned on, users must enter a previ- ously assigned code before they can Press the { { { { OK} } } } key.
-
Page 295: Polling Id
Changing Key Operator Settings Press 0 0 0 0 or 1 1 1 1 until "4. Fax Fea- Note ❒ When tures" is displayed. Restricted Access turned on and you enter a per- sonal code to use the machine, Personal Code Transmission is selected by default. -
Page 296: Line Type
Key Operator Settings Press 0 0 0 0 or 1 1 1 1 until "4. Fax Fea- Line Type tures" is displayed. You must register the Line Type before you connect the machine to the line. Note ❒ By default, Line Type is set to Press the { { { { OK} } } } key. -
Page 297: Select Line
Changing Key Operator Settings Press the { { { { OK} } } } key. Select Line Note When your machine is connected ❒ If the key operator code is regis- through a PABX, change the Select tered and turned on, enter the Line setting to Extension. -
Page 298: Pstn Access Number
Key Operator Settings Press 0 0 0 0 or 1 1 1 1 until "4. Fax Fea- PSTN Access Number tures" is displayed. Use this setting to save having to en- ter a pause after the outside line ac- cess number when dialing. When you program an access number, a pause is Press the { { { { OK} } } } key. -
Page 299: Transfer Report
Changing Key Operator Settings Press the { { { { OK} } } } key. Transfer Report Note For the requesting party to be able to ❒ If the key operator code is regis- receive Transfer Result Reports from tered and turned on, enter the the Transfer Station, the requesting key operator code and press the party must store the number of the... -
Page 300: Rds (Remote Diagnostic System)
Key Operator Settings Press the { { { { OK} } } } key. RDS (Remote Diagnostic System) Note ❒ If the key operator code is regis- If your machine has a problem, a tered and turned on, enter the service representative can perform key operator code and press the {OK} key. -
Page 301: Troubleshooting
7. Troubleshooting When Toner Runs Out When the machine has run out of ton- er the symbol appears on the display. Note that even if there is no toner left you can still send fax messages. How- ever, it is advisable to replace the ton- e r early to avoid po or p rinting quality. -
Page 302: When An Error Report Is Printed
Troubleshooting When an Error Report is Printed An error report is printed when a message could not be successfully sent or re- ceived. Possible causes include a problem with your machine or the receiver's noise on the telephone line etc. If an error occurs during transmission, re-send the origi- nal. -
Page 303: When Power Is Turned Off Or Fails
When Power is Turned off or Fails When Power is Turned off or Fails Even if the Main Power switch is turned off, the contents of the machine's mem- ory (programmed numbers etc.) will not be lost. However, if power is lost for about 1 hour through the Main Power switch being turned off, a power cut or the power cable being removed, contents of the Fax memory will be lost. - Page 304 Troubleshooting...
-
Page 305: Maintaining Your Machine
8. Maintaining Your Machine Replacing the Stamp Cartridge The optional Document Feeder is required. When the stamp is getting to become Set a new cartridge. lighter, replace the cartridge. Note ❒ Use the cartridge specified for this machine. Lift the Document Feeder and open the stamp cover. - Page 306 Maintaining Your Machine...
-
Page 307: Appendix
9. Appendix Connecting the Machine to a Telephone Line and Telephone Connecting the Telephone Line To connect the machine to a telephone line, use a snap-in modular type connec- tor. Important ❒ Make sure the connector is the correct type before you start. ❖... -
Page 308: Connecting The Optional External Telephone
Appendix Connecting The Optional External Telephone You can connect the handset and an external telephone to the machine. You can use them for telephone calls. Note ❒ Some telephone may not be connected or may suffer reduced functionality. Limitation ❒ When you use the handset or an optional external telephone with the {On Hook Dial} key for telephone calls, you can not talk with the other party with- out pressing the {On Hook Dial} or {Clear/Stop} key after taking off the receiver. -
Page 309: Selecting The Line Type
Connecting the Machine to a Telephone Line and Telephone Selecting the Line Type Select the line type to which the machine is connected. There are two types: tone and pulse dial. Select the Line Type using "Line Type" in "Key Operator Settings". The default settings is "Tone". -
Page 310: Specifications
Appendix Specifications Standard Resolution 8×3.85/mm•200×100dpi (Standard), 8×7.7/ mm•200×200dpi (Detail), 8×15.4/ mm•200×400dpi (Fine) Transmission Time 3 seconds at 28,800bps, Standard resolution Data Compression Method MH, MR, MMR Maximum Original Size 297×1200mm / 11"×47" 297×432mm / 11" × 17" Maximum Scanning Size Print Process Printing on standard paper using the laser Transmission Speed... -
Page 311: Acceptable Types Of Originals
Specifications Acceptable Types of Originals Make sure your originals are completely dry before setting them in the machine. Originals containing wet ink or correcting fluid will mark the exposure glass and resulting image will be affected. Acceptable Original Sizes Where Original is Set Acceptable Original Size Maximum Paper Thickness Number of... - Page 312 Appendix Limitation ❒ There may be a difference in the size of the image when it is printed at the des- tination. ❒ If you set an original larger than DLT/A3 on the exposure glass, only an area of DLT/A3 is scanned. Note ❒...
-
Page 313: Function List
Function List Function List Advanced Transmission Features Feature name Description Reference Send Later Sets the machine to automati- P.4 “Sending at a Specific Time cally start transmission or (Send Later)” polling reception at an ap- pointed time. Personal Code TX This will help you to check up P.6 “Personal Code Transmis- on who has been using the... -
Page 314: Communication Information
Appendix Communication Information Feature name Description Reference Canceling Transmission or This feature cancels a file (res- P.15 “Canceling Transmission Reception ervation) for Memory Trans- or Reception” mission, Transfer Request, Polling Reception. Displaying the Transmission Part of the Journal can be P.17 “Checking the Transmis- Result shown on the display. -
Page 315: User Tools
Function List User Tools Feature name Description Reference Register/Delete Quick Dial When you register a destina- Chapter3 “Quick Dial” in the tion in a Quick Dial, you can Basic Features manual. specify the destination only by pressing the Quick Dial key. - Page 316 Appendix Feature name Description Reference Initial Setup TX Allows you to change follow- P.54 “Changing the Initial Set- ing transmission function set- up Transmission” tings: • Transmission • Resolution • Photo Original • Fax Reset Timer • On Hook Timeout Initial Set Up RX Allows you to change follow- P.56 “Changing the Initial Set-...
- Page 317 Function List Feature name Description Reference Select Line Allows you to select an inter- P.83 “Select Line” nal G3 communication line or external telephone line for your fax machine. PSTN Access Number Allows you to specify the code P.84 “PSTN Access Number” used to access an outside line when you dialing.
-
Page 318: Index
INDEX Acceptable Types of Originals , 97 Fax Header Print , 9 , 99 Adjusting Volume , 101 Fax Information , 101 Authorized Reception , 60 , 102 File Reserve Report , 12 , 34 Authorized Reception list , 64 Forwarding , 65 , 102 Auto Fax RX Power-up , 31 Forwarding Station , 65... - Page 319 On Hook Dial , 25 Selecting the Line Type , 95 Outside Line Access Number , 84 Select Line , 103 Sender Reception list , 64 Sender Setting , 71 Sending at a Specific Time (Send Later) , 4 Page Reduction , 42 Send Later , 99 Page Separation and Length Reduction , 41 SEP , 28...
- Page 320 MEMO...
- Page 321 MEMO...
- Page 322 MEMO B404...
- Page 324 Printed in China UE USA B404-8607...
- Page 325 B120 OPERATING INSTRUCTION MANUAL ***RLA ONLY***...
- Page 327 RICOH COMPANY, LTD. 15-5, Minami Aoyama 1-chome, Minato-ku, Tokyo 107-8544, Japan Phone: +81-(0)3-3479-3111 1113 Manual de usuario Overseas Affiliates U.S.A. Spain RICOH CORPORATION RICOH ESPAÑA S.A. 5 Dedrick Place Avda. Litoral Mar, 12-14, West Caldwell, New Jersey 07006 Blue Building, Marina Village, Phone: +1-973-882-2000 08005 Barcelona Phone: +34-(0)93-295-7600...
- Page 328 Introducción Este manual contiene instrucciones detalladas sobre el funcionamiento e información acerca del uso de esta máquina. Para aprovechar al máximo la versatilidad de la máquina, todos los usuarios deberán leer detenidamente este manual y seguir sus instrucciones. Conserve este manual al alcance de la ma- Declaración de conformidad no, cerca de la máquina.
- Page 329 Introducción Este manual contiene instrucciones detalladas sobre el funcionamiento e información acerca del uso de esta máquina. Para aprovechar al máximo la versatilidad de la máquina, todos los usuarios deberán leer detenidamente este manual y seguir sus instrucciones. Conserve este manual al alcance de la ma- no, cerca de la máquina.
- Page 330 Introducción Este manual contiene instrucciones detalladas sobre el funcionamiento e información acerca del uso de esta máquina. Para aprovechar al máximo la versatilidad de la máquina, todos los usuarios deberán leer detenidamente este manual y seguir sus instrucciones. Conserve este manual al alcance de la ma- no, cerca de la máquina.
- Page 331 Introducción Este manual contiene instrucciones detalladas sobre el funcionamiento e información acerca del uso de esta máquina. Para aprovechar al máximo la versatilidad de la máquina, todos los usuarios deberán leer detenidamente este manual y seguir sus instrucciones. Conserve este manual al alcance de la ma- no, cerca de la máquina.
- Page 332 Declaración de conformidad “El producto cumple los requisitos de la EMC, Directiva 89/336/EEC y sus modificaciones y de la Di- rectiva de bajo voltaje 73/23/EEC y sus modificaciones.” De acuerdo con IEC 60417, esta máquina utiliza los siguientes símbolos para el interruptor principal: a significa ENCENDIDA.
- Page 333 Introducción Este manual contiene instrucciones detalladas sobre el funcionamiento e información acerca del uso de esta máquina. Para aprovechar al máximo la versatilidad de la máquina, todos los usuarios deberán leer detenidamente este manual y seguir sus instrucciones. Conserve este manual al alcance de la ma- no, cerca de la máquina.
- Page 334 Declaración de conformidad “El producto cumple los requisitos de la EMC, Directiva 89/336/EEC y sus modificaciones y de la Di- rectiva de bajo voltaje 73/23/EEC y sus modificaciones.” De acuerdo con IEC 60417, esta máquina utiliza los siguientes símbolos para el interruptor principal: a significa ENCENDIDA.
- Page 335 Qué se puede hacer con esta máquina...
- Page 336 CONTENIDO Qué se puede hacer con esta máquina ..............i ¿Cómo se lee este manual?..................1 Información de seguridad ..................2 Seguridad durante la utilización .................2 Posición de las etiquetas y distintivos de R R ADVERTENCIA y R R PRECAUCIÓN Programa ENERGY STAR ..................5 1.
- Page 337 3. Detección de fallos Si la máquina no funciona correctamente............39 Si las copias no son claras .................40 B Carga de papel ....................41 D Añadir tóner ....................42 x Eliminación de atascos ..................44 Cambio del tamaño del papel ................46 Cambio del tamaño del papel de la bandeja............46 4.
-
Page 339: Cómo Se Lee Este Manual
¿Cómo se lee este manual? Símbolos Este manual utiliza los siguientes símbolos: R ADVERTENCIA: Este símbolo alerta sobre una situación potencialmente peligrosa que puede pro- ducir lesiones graves o incluso la muerte si no se siguen adecuadamente las ins- trucciones indicadas. Asegúrese de leer todas las instrucciones descritas en la sección "Información de seguridad". -
Page 340: Información De Seguridad
Información de seguridad Respete siempre las siguientes recomendaciones de seguridad cuando utilice el aparato. Seguridad durante la utilización En este manual se utilizan los siguientes símbolos de advertencia: R ADVERTENCIA: Indica una situación potencialmente peligrosa que, de no seguir- se las instrucciones, podría provocar lesiones graves e incluso la muerte. - Page 341 R PRECAUCIÓN: • Proteja su máquina de la humedad, de la lluvia o nieve. • Desenchufe el cable de alimentación de la pared antes de mover o despla- zar la máquina. Cuando mueva la máquina, tenga cuidado de que el cable de alimentación no se dañe bajo la misma.
-
Page 342: Posición De Las Etiquetas Y Distintivos De R
Posición de las etiquetas y distintivos de R ADVERTENCIA y R R PRECAUCIÓN Esta máquina contiene etiquetas de RADVERTENCIA y RPRECAUCIÓN en las posiciones que se muestran a continuación. Por motivos de seguridad, siga las instrucciones y manipule la máquina de la forma indicada. ZKBS030E... -
Page 343: Programa Energy Star
Programa ENERGY STAR Como socio de ENERGY STAR, hemos determinado que este modelo cumple con las directrices de ENER- GY STAR de aprovechamiento de energía. Las directrices de ENERGY STAR pretenden establecer un sistema internacional de ahorro de energía para desarrollar e introducir equipos de oficina que hagan uso eficiente de ésta y tenga en cuenta los problemas medioambientales, como el calentamiento global. - Page 344 Papel reciclado De acuerdo con el programa ENERGY STAR, le recomendamos la utilización de papel reciclado para contribuir a la protección del medio ambiente. Póngase en contacto con su representante de ventas para obtener el papel recomendado.
-
Page 345: Introducción
1. Introducción Guía de componentes Tapa del cristal de exposición (op- Bandeja interna cional) o alimentador automático de El papel copiado será depositado aquí documentos (ADF) (opcional) mirando hacia abajo. Baje la tapa del cristal de exposición so- Orificio de ventilación bre los originales colocados en el cristal Evita el sobrecalentamiento. - Page 346 Introducción Interruptor de alimentación prin- Interruptor de funcionamiento cipal Pulse para encender la máquina (el indi- cador de Encendido se ilumina). Para Si la máquina no funciona después de en- apagar el equipo, vuelva a pulsarlo (el in- cender el interruptor principal de alimen- dicador de encendido (On) se apaga).
-
Page 347: Accesorios Opcionales
Accesorios opcionales Accesorios opcionales Tapa del cristal de exposición Alimentador automático de docu- mentos (ADF) Bájela sobre los originales para copiar. Coloque aquí la pila de originales. Serán alimentados automáticamente. Otras opciones: • Unidad de memoria de la copiadora de 16 MB Aumenta las funciones de la copiadora y le permite utilizar la función de cla- sificado. -
Page 348: Panel De Mandos
Introducción Panel de mandos Tecla { { { { Contador/ Herramientas de Indicadores usuario} } } } Muestran los errores y el estado de la má- quina. Pulse aquí para cambiar los valores y • M: Indicador de tapa abierta condiciones predeterminados y adaptar- los a sus necesidades. - Page 349 Panel de mandos Tecla { { { { Reducir} } } } Tecla { { { { Tipo de original} } } } Pulse para hacer copias reducidas. Con- Pulse para seleccionar el tipo de original sulte Pág.35 “Reducción/Ampliación que desee. predeterminadas”.
-
Page 350: Pantalla
Introducción Pantalla La pantalla muestra el estado de funcionamiento de la máquina, los mensajes de error y los menús de funciones. Importante ❒ Una fuerza o impacto de más de 30 N (unos 3 kgf) dañará la pantalla. Pantallas y teclas ❖... -
Page 351: Encendido De La Alimentación
Encendido de la alimentación Encendido de la alimentación Pulse el interruptor de funcionamiento para encender la máquina. Nota ❒ Esta máquina entra automáticamente en modo de bajo consumo o se apaga si no se utiliza durante un período de tiempo determinado. Consulte “4. Temp.Auto Apagado”... -
Page 352: Encendido De La Máquina
Introducción Encendido de la máquina A A A A Pulse el interruptor de funcionamiento para encender el indicador de En- cendido. Se encenderá la pantalla. ZENH080E Nota ❒ Si no se activa la alimentación al pulsar el interruptor de encendido, com- pruebe que el interruptor principal de alimentación está... -
Page 353: Originales
Originales Originales Tamaños y gramaje recomendados de los originales ❖ ❖ ❖ ❖ Versión métrica Lugar de colocación del original Tamaño del original Gramaje del original Cristal de exposición Hasta A3 Originales de 1 cara: 40 – 128 g/m A3L – A5KL ❖... -
Page 354: Tamaños De Los Originales Y Área De Escaneo
Introducción Tamaños cuyos márgenes son ajustados automáticamente por el alimentador automático de documentos ❖ ❖ ❖ ❖ Versión métrica Tamaño A3 11" 11" " " " " × × × × × × × × × × × × × × × × ×... - Page 355 Originales ❖ ❖ ❖ ❖ ADF Limitación ❒ Aun colocando correctamente los originales en el ADF o en el cristal de expo- sición, es posible que se pierdan unos 4 mm, 0,2" de margen en las cuatro ca- ras.
-
Page 356: Papel De Copia
Introducción Papel de copia Tamaño y tipo de papel recomendados A cada una de las bandejas se le aplican las siguientes limitaciones: Versión métrica Versión en Gramaje Capacidad pulgadas de papel Bandeja de papel A3L, B4 JISL, A4KL, B5 JISKL, 60 –... - Page 357 Papel de copia Versión métrica Versión en Gramaje Capacidad pulgadas de papel Bandeja Tamaños Papel translúcido (A3L, B4 JISL), trans- 10 hojas bypass parencias OHP especiales Papel translúcido (A4KL, B5 JISKL), 40 hojas tarjetas postales Etiquetas adhesivas (B4 JISL, A4L) 1 hoja Tamaño de papel: 80 g/m , 20 lb...
-
Page 358: Papel No Utilizable
Introducción Papel no utilizable R PRECAUCIÓN: • Para evitar que el aparato se estropee o se incendie, no utilice papel de alu- minio, papel carbón ni ningún tipo de papel conductor. Importante ❒ No utilice ninguno de los siguientes tipos de papel, para evitar averías: •... -
Page 359: Copia
2. Copia Procedimiento básico A A A A Compruebe si aparece “ ” en Nota Lista ❒ la pantalla. El número máximo de copias puede fijarse entre 1 y 99 (valor predeterminado: 99). Consulte “1. Cant.Máxima Copia” en la página Pág.57 “Funciones de B B B B copiadora”. -
Page 360: Colocación De Los Originales
Copia Colocación de los originales Nota Colocación de los originales ❒ Procure no colocar nunca origina- en el cristal de exposición les hasta que se haya secado la tin- ta de la impresora o, en su caso, el A A A A líquido de corrección. -
Page 361: Colocación De Originales En El Alimentador Automático De Documentos
Colocación de los originales Colocación de una pila de originales Colocación de originales en el en el ADF. alimentador automático de A A A A documentos Ajuste la guía del documento al tamaño del original. Nota B B B B Coloque los originales alineados ❒... -
Page 362: Colocación De Originales De Tamaño Especial
Copia B B B B B B B B Pulse la tecla { { { { Seleccionar bandeja Cuando la máquina le pida el si- de papel} } } } para seleccionar la ban- guiente original, coloque la pági- na siguiente. deja de papel o la bandeja bypass. - Page 363 Colocación de los originales C Introduzca el tamaño horizon- Selección del papel de la bandeja tal del original con las teclas de papel numéricas y a continuación pulse la tecla { { { { OK} } } } . A Pulse la tecla { { { { R/#} } } } . D Introduzca el tamaño vertical B Introduzca el tamaño horizon- del original con las teclas nu-...
-
Page 364: Funciones Básicas
Copia Funciones básicas En esta sección se explican las si- Selección del tipo de original guientes funciones básicas: ❖ ❖ ❖ ❖ Ajuste de la densidad de imagen de la Para ajustar la copia al tipo del origi- copia nal, existen dos formas: ❖... -
Page 365: Selección Del Papel De Copia
Funciones básicas Nota ❒ Pulse la tecla { { { { Tipo de original} } } } para pasar de un tipo a otro de entre los siguientes: Indicador superior encendido Texto Indicador inferior encendido Foto Selección del papel de copia ❖... -
Page 366: Clasificación
Copia Clasificación Para esta función se requiere la unidad de memoria de 16 MB. A A A A La máquina puede escanear origina- Pulse la tecla { { { { Clasificación} } } } . les, almacenarlos en la memoria y cla- sificar las copias automáticamente. - Page 367 Clasificación Colocación de un original en el cristal de exposición o en el alimentador automático de documentos Referencia Pág.23 “Con el modo SADF se- leccionado” A Coloque el original y pulse la tecla { { { { Inicio} } } } . B Coloque el siguiente original y pulse la tecla { { { { Inicio} } } } .
-
Page 368: Copia Desde La Bandeja Bypass
Copia Copia desde la bandeja bypass B B B B Utilice la bandeja bypass para realizar Coloque hacia arriba la palanca copias en transparencias OHP, etique- de liberación de la guía del papel. tas adhesivas, papel translúcido, pos- tales y otras copias con papel que no puede cargarse en la bandeja de papel. - Page 369 Copia desde la bandeja bypass Importante Nota ❒ ❒ Si las guías no están alineadas Si coloca papel de tamaño A4, × con el papel de copia, puede " 11" o mayor, sujete el que la imagen salga torcida o borde del papel y baje la palan- que se produzca atasco de pa- ca de liberación de la guía de...
- Page 370 Copia D Introduzca el tamaño horizontal B Compruebe si aparece “1.Ta- del papel con las teclas numéricas y maño Papel” en pantalla y pul- a continuación pulse la tecla { { { { OK} } } } . se la tecla { { { { OK} } } } . C Pulse 0 0 0 0 o 1 1 1 1 hasta que aparez- Nota ca “Tamaño estándar”en pan-...
- Page 371 Copia desde la bandeja bypass B Pulse la tecla 1 1 1 1 para seleccio- nar “2. Tipo de papel”, y a con- tinuación pulse { { { { OK} } } } . C Pulse 0 0 0 0 o 1 1 1 1 hasta que aparez- ca “Especial”en pantalla, y des- pués pulse la tecla { { { { OK} } } } .
-
Page 372: Otras Funciones
Copia Otras funciones C C C C Pulse 0 0 0 0 o 1 1 1 1 hasta que aparezca Códigos de usuario “6.Tecla herram.usu.” y después pulse { { { { OK} } } } . Si está activada la función de código de usuario, el usuario deberá... -
Page 373: Reducción/Ampliación Predeterminadas
Reducción/Ampliación predeterminadas Reducción/Ampliación predeterminadas ❖ ❖ ❖ ❖ Versión métrica La escala de copia predeterminada puede especificarse de antemano. Tamaño original → → → → Escala (%) Tamaño copia A5 → A3 200 (área am- pliada por 4) A4 → A3, A5 → A4 141 (área am- pliada por 2) 8”... - Page 374 Copia A A A A Pulse las teclas { { { { Reducir} } } } o { { { { Ampliar} } } } . Tecla { { { { Reducir} } } } Tecla { { { { Ampliar} } } } B B B B Pulse 0 0 0 0 o 1 1 1 1 hasta que vea en pantalla el tamaño deseado.
-
Page 375: Zoom
Zoom Zoom B B B B La escala de reproducción se cambia Especifique la escala. en incrementos del 1%. Con las teclas 0 o 1 A Especifique las escalas de re- producción deseadas utilizan- do las teclas 0 0 0 0 o 1 1 1 1 . Con las teclas numéricas Nota A Especifique la escala deseada... - Page 376 Copia...
-
Page 377: Detección De Fallos
3. Detección de fallos Si la máquina no funciona correctamente Problema Causas Soluciones La máquina le indica que es- La máquina se está calentan- Espere a que la máquina se ca- pere. liente. Referencia Puede utilizar el modo de Inicio automático mientras se calienta la máquina. -
Page 378: Si Las Copias No Son Claras
Detección de fallos Si las copias no son claras Problema Causas Soluciones Las copias salen sucias. La densidad de imagen es Ajuste la densidad de imagen. demasiado oscura. Consulte Pág.26 “Ajuste de la densidad de imagen de la copia” Se copia el lado del reverso del La densidad de imagen es Ajuste la densidad de imagen. -
Page 379: B B Carga De Papel
B Carga de papel B Carga de papel Nota Importante ❒ ❒ Si desea cambiar el tamaño del pa- No apile el papel por encima de pel, consulte Pág.46 “Cambio del la marca de límite. tamaño del papel”. Referencia Para obtener información detalla- da sobre los tipos y tamaños que pueden utilizarse, consulte Pág.18 “Papel de copia”. -
Page 380: D Añadir Tóner
Detección de fallos D Añadir tóner Cuando aparece el mensaje D es que debe añadir tóner. R ADVERTENCIA: • No incinere nunca el tóner usado ni los contenedores. El polvo de tóner puede arder si se expone directamente a las llamas. Deseche los cartu- chos de tóner usado de acuerdo con la normativa local. - Page 381 D Añadir tóner • Empuje hacia atrás la botella de tóner para levantar su parte superior y luego tire sua- vemente de ella. • Mantenga la nueva botella en posición ho- rizontal y agítela bien cinco o seis veces. Nota ❒...
-
Page 382: Eliminación De Atascos
Detección de fallos x Eliminación de atascos R PRECAUCIÓN: • La zona de fusión de esta máquina podría estar muy caliente. Al retirar pa- peles atascados, tenga mucho cuidado de no tocar la zona de fusión. Importante ❒ Para solucionar los atascos no apague el interruptor de alimentación. Si lo ha- ce, perderá... - Page 383 x Eliminación de atascos...
-
Page 384: Cambio Del Tamaño Del Papel
Detección de fallos Cambio del tamaño del papel Importante Con papel de tamaño 11” × 17” ❒ Seleccione el tamaño del papel con A Saque el tope trasero de la ban- las Herramientas de usuario y el selector de tamaño de papel. Si no deja deslizándolo. - Page 385 Cambio del tamaño del papel E E E E Mientras pulsa la palanca lateral, Nota ❒ ajuste los topes de los lados. Abanique el papel antes de car- garlo en la bandeja. ❒ Asegúrese de que no hay ningu- na hoja doblada o arrugada an- tes de colocarlas en la bandeja.
- Page 386 Detección de fallos Nota ❒ Asegúrese de seleccionar el ta- maño correcto. Si el tamaño no es el adecuado, se pueden pro- ducir atascos. ❒ Si no encuentra el tamaño de papel que desea, seleccione “p” y después cargue el tama- ño de papel de copia con la con- figuración “6.Tamaño papel esp.”.
-
Page 387: Herramientas Del Usuario
4. Herramientas del usuario Acceso a herramientas de usuario Esta sección está destinada a los ad- Referencia ministradores de la máquina. Los va- Para obtener más información l ores conf igurados se pueden sobre el menú Herramientas de modificar o configurar. usuario, consulte Pág.52 “Ajus- tes sistema”... -
Page 388: Abandonar El Menú De Herramientas De Usuario
Herramientas del usuario D D D D Busque el elemento de configura- Abandonar el menú de ción deseado con las teclas 0 0 0 0 o 1 1 1 1 . Herramientas de usuario Nota A A A A ❒ Tecla 1: va al siguiente menú. -
Page 389: Cambio Del Idioma
Acceso a herramientas de usuario B B B B Compruebe si aparece “1.Conta- dor” en pantalla y pulse la tecla { { { { OK} } } } para ver el número total de impresiones. C C C C Pulse la tecla { { { { Inicio} } } } . Cambio del idioma Puede cambiar el idioma utilizado en la pantalla. -
Page 390: Menú Herramientas De Usuario
Herramientas del usuario Menú Herramientas de usuario Ajustes sistema... -
Page 391: Funciones De Copiadora
Menú Herramientas de usuario Funciones de copiadora... -
Page 392: Ajustes Que Se Pueden Cambiar Con Las Herramientas Del Usuario
Herramientas del usuario Ajustes que se pueden cambiar con las herramientas del usuario Referencia Para saber cómo acceder a las herramientas del usuario, consulte Pág.49 “Ac- ceso a herramientas de usuario”. Ajustes sistema Menú Descripción 1.Pant.Conta. Copias El contador de copias se puede configurar para que muestre el nú- mero de copias realizadas (cuenta hacia delante) o el número de copias que quedan por hacer (cuenta hacia atrás). - Page 393 Ajustes que se pueden cambiar con las herramientas del usuario Menú Descripción 4.Temp.Auto Apagado La máquina se apaga automáticamente para ahorrar energía una vez transcurrido un tiempo especificado a partir de la finalización de un trabajo. Esta función se llama “Auto Apagado”. Este tiempo puede establecerse entre 1 y 240 minutos.
- Page 394 Herramientas del usuario Menú Descripción 8.Herramientas de admi- Se utilizan para ver o imprimir los contadores y establecer códigos nistrador (8.Tecla he- de usuario. Si se ha registrado el código de acceso y establecido rram.usu.) “3.Tecla acceso usu.” en “Encendido”, tendrá que introducir el có- digo correcto para poder utilizar esta función.
-
Page 395: Funciones De Copiadora
Ajustes que se pueden cambiar con las herramientas del usuario Funciones de copiadora Menú Descripción 1.Cantidad máxima de co- El número máximo de copias puede fijarse entre 1 y 99 pias (1.Cant.Máxima Co- Nota pia) ❒ Valor predeterminado: 99 2.Ajuste del modo del ori- El nivel de calidad de las copias puede ajustarse en función del ginal (2.Ajuste modo tipo de original empleado. - Page 396 Herramientas del usuario Menú Descripción 3.Ajustar escala Selecciona la escala (reducción, ampliación o entrada de datos) que aparece en pantalla con prioridad si se pulsan las teclas { { { { Re- ducir } } } } o { { { { Ampliar} } } } . Nota ❒...
- Page 397 Ajustes que se pueden cambiar con las herramientas del usuario Menú Descripción 6. Herramientas de admi- Si la máquina está configurada con la función de código de usua- nistrador rio, será necesario introducir este para poder utilizar la máquina. (6.Tecla herram.usu.) La máquina puede guardar el recuento del número de copias efec- tuadas bajo cada código de usuario.
- Page 398 Herramientas del usuario...
-
Page 399: Observaciones
5. Observaciones Lo que se debe y lo que no se debe hacer R PRECAUCIÓN: • Desenchufe el cable de alimentación de la pared antes de mover o despla- zar la máquina. Cuando mueva la máquina, tenga cuidado de que el cable de alimentación no se dañe bajo la misma. -
Page 400: Tóner
Observaciones Tóner Manipulación del tóner R ADVERTENCIA: • No incinere nunca el tóner usado ni los contenedores. El polvo de tó- ner puede arder si se expone directamente a las llamas. Deshágase de los cartuchos de tóner usado de acuerdo con la normativa local. R PRECAUCIÓN: •... -
Page 401: Dónde Instalar La Máquina
Dónde instalar la máquina Dónde instalar la máquina Entorno de la máquina Seleccione cuidadosamente el lugar de ubicación de la máquina, ya que las con- diciones ambientales pueden afectar de forma significativa al rendimiento. Condiciones ambientales óptimas R PRECAUCIÓN: • Evite exponer el aparato a la humedad y al polvo. De lo contrario podría pro- ducirse un incendio o una descarga eléctrica. -
Page 402: Traslado
Observaciones Ambientes que se deben evitar • Lugares expuestos a la luz directa del sol o a otras fuentes de luz intensa (más de 1.500 lux). • Lugares directamente expuestos al aire frío de un aparato de aire acondicio- nado o al aire caliente de un calefactor (los cambios bruscos de temperatura pueden causar condensación en el interior de la máquina). -
Page 403: Conexión De Alimentación
Dónde instalar la máquina Conexión de alimentación R ADVERTENCIA: • Conecte el aparato únicamente a la fuente de alimentación indicada en la parte interior de la portada de este manual. Enchufe el cable de alimen- tación directamente a la toma de corriente, no utilice nunca alargadores. •... -
Page 404: Mantenimiento De La Máquina
Observaciones Mantenimiento de la máquina Si el cristal de exposición, la tapa del Limpieza de la tapa del cristal mismo o el ADF están sucios, las co- pias no saldrán nítidas. Límpielos si de exposición están sucios. ❖ ❖ ❖ ❖ Limpieza de la máquina Limpie la máquina con un trapo húmedo y suave. -
Page 405: Especificaciones
6. Especificaciones Unidad principal ❖ ❖ ❖ ❖ Configuración: Sobremesa (desktop) ❖ ❖ ❖ ❖ Tipo de fotosensibilidad: Φ Tambor OPC (30 ❖ ❖ ❖ ❖ Escaneo de originales: Sistema de escaneo sólido de una dimensión mediante CCD ❖ ❖ ❖ ❖ Proceso de copia: Sistema de transferencia electrostática en seco ❖... - Page 406 Especificaciones ❖ ❖ ❖ ❖ Gramaje del papel de copia: • Bandeja de papel (tamaño estándar): 60 – 90 g/m , 16 – 24 lb • Bandeja bypass: 52 – 162 g/m , 14 – 43 lb ❖ ❖ ❖ ❖ Área no reproducida: ±...
- Page 407 Unidad principal ❖ ❖ ❖ ❖ Consumo: Sólo unidad principal Sistema completo Calentamiento 780 W aprox. 790 W aprox. Modo de espera 120 Wh aprox. 130 Wh aprox. Durante la copia 480 Wh aprox. 480 Wh aprox. Máximo Menos de 1.000 W Menos de 1.000 W Unidad principal con el ADF opcional y la unidad de memoria de 16 MB o DIMM de 32 MB.
-
Page 408: Opciones
Especificaciones Opciones Tapa del cristal de exposición Bájela sobre los originales para copiar. Alimentador automático de documentos ❖ ❖ ❖ ❖ Modo: • Modo ADF, modo SADF ❖ ❖ ❖ ❖ Tamaño del original: • A3L – A5KL × × •... -
Page 409: Unidad De Memoria De 16 Mb
Opciones Unidad de memoria de 16 MB ❖ ❖ ❖ ❖ Capacidad de memoria: 16 MB ❖ ❖ ❖ ❖ Funciones adicionales: Aumenta las funciones de la copiadora y le permite utilizar el ADF opcional y las funciones de clasificado y contador de impresiones. ❖... -
Page 410: Índice
ÍNDICE Acceso a herramientas de usuario Imprimir el valor del contador Acceso a la máquina Indicador de alimentación principal Accesorios opcionales Indicador de encendido Ajuste de la densidad de imagen de la Información de seguridad copia Inicio automático Alimentador automático de documentos Interruptor de alimentación principal Alimentador automático de documentos Interruptor de funcionamiento... - Page 411 Tamaño papel esp. Tapa delantera Tapa del cristal de exposición Tapa derecha Tecla Clasificación Temp.Ahorro energ Temp.Auto Apagado Tipo de original Tóner Unidad de memoria de 16 MB Unidad de memoria de la copiadora de 16 Unidad principal Visualización de recuento de copias Zoom...
- Page 412 B120-6604...
Need help?
Do you have a question about the 1015 and is the answer not in the manual?
Questions and answers