
Related Manuals for Toshiba B-FP2D Series


Summary of Contents for Toshiba B-FP2D Series
- Page 1 TOSHIBA Portable Printer B-FP2D Series Key Operation Specification 1st Edition: December 16, 2019...
- Page 2 Modification History KEY OPERATION SPECIFICATION Modified Pages Date Description – 16DEC2019 Newly published.
-
Page 3: Table Of Contents
TABLE OF CONTENTS Page SCOPE ······································································································································································································· 1 OUTLINE ··································································································································································································· 1 OPERATION PANEL ··········································································································································································· 1 GENERAL VIEW OF KEY OPERATION ···································································································································· 2 ONLINE MODE ······················································································································································································ 3 GENERAL VIEW OF KEY OPERATION ··························································································································· 3 KEY FUNCTIONS ········································································································································································ 4 LED FUNCTIONS ········································································································································································ 5 LCD FUNCTIONS ·······································································································································································... - Page 4 7.4.1 LCD Contrast Setting (LCD Contrast) ·····················································································································64 7.4.2 Code Page Setting (Code Page) ·································································································································64 7.4.3 Zero Font ················································································································································································65 7.4.4 LCD Language Setting (LCD Language) ··················································································································66 7.4.5 Control Code Setting (Control Code) ·······················································································································67 7.4.6 EURO Font Code Setting (EURO Code) ·················································································································68 7.4.7 MaxiCode Specification Setting (Maxicode Spec) ·······························································································68 7.4.8...
- Page 5 7.7.6 Backlash Step Count Adjustment 1 (Backlash1) ································································································97 7.7.7 Backlash Step Count Adjustment 2 / Backlash2 ······························································································97 RAM Clear ···················································································································································································98 7.8.1 No RAM Clear ·······································································································································································98 7.8.2 Parameter Clear (Parameter) ·········································································································································99 7.8.3 Maintenance Counter Clear (MAINTE Count) ···································································································· 102 Interface Setting (I/F Setting) ········································································································································ 105 7.9.1 USB Serial Number Setting (USB) ·······················································································································...
- Page 6 Shifting To Power Save Mode ······································································································································· 120 11.2 When A Wireless LAN Module Is Connected ········································································································· 120 11.3 Precausions··············································································································································································· 120 POWER OFF OPERATION ····················································································································································· 121 12.1 TIME REQUIRED FOR POWER OFF ··························································································································· 121 12.2 PRECAUTIONS ······································································································································································· 121 COPYRIGHT©2019 TOSHIBA TEC CORPORATION ALL RIGHTS RESERVED...
-
Page 7: Scope
1 SCOPE This specification describes key operations of the B-FP2D series portable printers using their keys and the LCD display. 2 OUTLINE The key operations are performed roughly in two modes: online mode and system mode. In online mode, where the printer is connected to a host device such as a personal computer, the key operations are performed mainly to pause or restart the printer and to display printer status messages and error messages on the LCD. -
Page 8: General View Of Key Operation
4 GENERAL VIEW OF KEY OPERATION [Power OFF] Press and hold down the [POWER] key until the message, “Initiallizing…” appears, then 3 sec. or IP address print (B-FP2D-GH50) more elapses. BD address print (B-FP2D-GH30/50) Online mode Press the [POWER] key Data registration, label print, etc. -
Page 9: Online Mode
5 ONLINE MODE 5.1 GENERAL VIEW OF KEY OPERATION Online Mode Hold down [FEED]+ Printer state [PAUSE]+ [POWER] Forced (10 sec. or more) power OFF Printer function Hold down [POWER] Power OFF (1 sec. or more) [FEED] (*1) Paper feed, Reprint [PAUSE] [PAUSE]... -
Page 10: Key Functions
5.2 KEY FUNCTIONS [POWER] key (1) Turns the printer power on from a power off state and initializes the printer. (2) Performs various parameter settings. [FEED] key: (1) Feeds or ejects 1 label. This key is also used to adjust a label to a proper position. When the label is not properly positioned, feed 1 or 2 blank labels using this key before printing so that the printer can start printing at the proper position. -
Page 11: Led Functions
5.3 LED FUNCTIONS [STATUS] LED: Indicates the following statuses: (red/purple/blue) Printer power, ON or OFF Communication status of printer Printer error Battery level Strip wait state LED lighting patterns Power OFF: ..............OFF Charging in power OFF state........OFF ... -
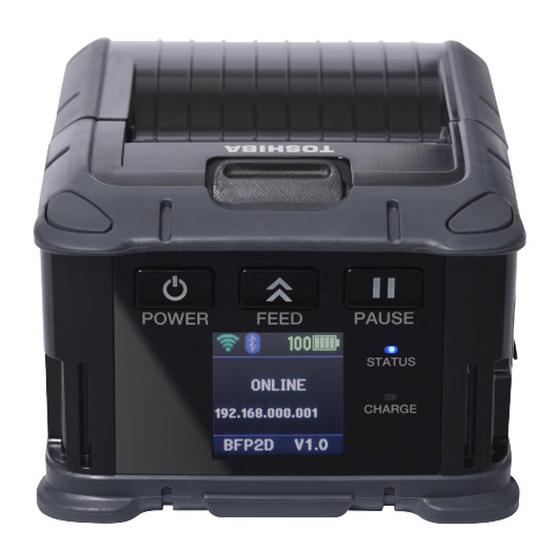
Page 12: Lcd Functions
5.4 LCD FUNCTIONS The LCD displays printer status messages. Type Graphics LCD Size 128 dots (W) X 128 dots (H) Display structure 12 digits x 7 lines *1 *1 Maximam digit change because of using proposional font. 5.5 ONLINE MODE LCD DISPLAY 5.5.1 Online Mode LCD Display Example Printer... - Page 13 Cover open ←M (ON LINE) essage ← Message Setting ← Icon mode ← Message (*3) ← Model name, Firmware version (*1) *About image in User System Mode, Refer to [6 DISPLAY PATTERN AND KEY OPERATION FOR SYS TEM MODE AND USER MODE] *About icon, Refer to [5.5.2 Icon] (*1)The model name description BFP 2 D...
-
Page 14: Icon
5.5.2 Icon Five kinds of icon are displayed in the top line of the online mode display. These icons are displayed in the online mode/error display. Each mark are updated every 5 seconds. Icon Explanation Wireless LAN icon Displayed and used when the wireless LAN module is mounted. The graph shows the strength of radio wave. - Page 15 Thermal Head Near Alert Battery check result Displays battery life warning status Icon No battery life problem (*2) Battery replacement required Temperature error occurred during battery check Timeout error occurred during battery check (*1) Battery icon list 100% Corresponding table about Batery Level and Battery Voltage * Depending on temperature, threthold of Battery Level is changed.
-
Page 16: Online Mode Lcd Display
5.5.3 ONLINE MODE LCD DISPLAY Idling or normal issuing When [PAUSE] key is pressed, the printer When [PAUSE] key is resumes printing if there is remaining data pressed while printing: Printing is stopped If printer cover is After error recovery(close the printer opened while printing: cover), press [PAUSE] key... -
Page 17: Parameter Print
5.6 Parameter print 5.6.1 Outline of Parameter Print The B-FP with the Bluetooth module or the wireless LAN module performs a parameter print when the [POWER] key is pressed for 3 seconds or more after the printer power is turned on and a “Initiallizing…” message is displayed on the LCD. - Page 18 (2) With Wireless LAN module (B-FP2D-GH50) RF-LAN PARAMS TYPE[JPN] IP [000.000.000.000] LPD [OFF] GW [000.000.000.000] DHCP[ON ] SUB[255.255.000.000] CON [INF] TCP SOCK[ON ][09100] HOST [ ESSID[ MAC:00-23-a7-fd-d5-54 WLAN Ver3.1.1 Print contents: IP address (IP) Default Gateway (GW) Subnet Mask (SUB) Socket connection, Port number (TCP SOCK) Country Code (TYPE) LPR server (LPD)
-
Page 19: Setting Value Display
5.7 SETTING VALUE DISPLAY Display information about mounted I/F (1) With Bluetooth module(B-FP2D-GH30/GH50) From Online state Press [PAUSE] key at online state. -> PAUSE state Press [POWER] key [Case] Bluetooth setting is enable, and module is a vailable [Display information] - QR code: Data is BD address Press [POWER] key... - Page 20 (2) With Wireless LAN module(B-FP2D-GH50) From Online state Press [PAUSE] key at online state. -> PAUSE state Press [POWER] key [Case] Bluetooth setting is enable, and module is a vailable [Display information] - QR code: Data is BD address Press [POWER] key [Case] Wireless LAN setting is enable, and module is available...
-
Page 21: Threshold Setting
5.8 THRESHOLD SETTING 5.8.1 Outline of Threshold Setting When a label is printed, the printer detects the gap between the labels using the transmissive sensor, and corrects the print position automatically to obtain a constant print position. However, when a preprinted label is used, some inks may prevent proper positioning correction. In this case, determine the transmissive sensor threshold manually by key operation and store the value in the non-volatile memory. - Page 22 <Supplementary Explanations> (1) To program the threshold, 1.5 labels or more should be fed. (If the label is not fed by the above amount, the threshold may not be properly programmed. In this case, reprogramming is required.) (2) While the printer is feeding a label to program the threshold, an error detection including the paper end or cutter error is not performed.
-
Page 23: Lcd Messages And Led Indications
5.9 LCD MESSAGES AND LED indications Acceptan LEDIndic ce of ation Recovera Status ble by the Request [PAUSE] LCD Message Printer Status Reset (English) STATUS Comman Yes/No Yes/No ○ ONLINE Online mode ○ The cover was opened in online state. COVER OPEN ●... - Page 24 Acceptan LEDIndic ce of ation Recovera Status ble by the Request [PAUSE] LCD Message Printer Status Reset (English) STATUS Comman Yes/No Yes/No SYNTAX ERROR A command error has occurred while △ (Command error)(*3) analyzing the command. Wait for Peel-off label ...
- Page 25 (*3) If there is a command error in the sent command, the command with the error is displayed on the 3rd to 4th lines of the LCD. At this time, the maximum number of bytes varies depending on the character. (However, [LF] and [NUL] are not displayed.) When a command error is displayed, it is displayed as “?”...
-
Page 26: Lcd Message
5.10 LCD Message English German French ON LINE ONLINE EN LIGNE COVER OPEN DECKEL OFFEN CAPOTOUVERT PAUSE PAUSE PAUSE PAPER JAM BOURRAGE PAPIERSTAU PAPIER NO PAPER KEIN PAPIER PAS DE PAPIER HEAD ERROR ERREUR TÊTE KOPF DEFEKT D'IMPRESSION EXCESS HEAD DRUCKKOPF SURCHAUFFE TEMPERATURE... - Page 27 REFLECTIVE REFLECTIVE REFLECTIVE TRANSMISSIVE TRANSMISSIVE TRANSMISSIVE PAIRING… PAIRING*** COUPLAGE REJECTING… ABGELEHNT REJETÉ PIN : PIN: PIN: NEIN -21-...
- Page 28 Dutch Spanish Italian IN LIJN PREPARADA PRONTA KOP OPEN TAPA ABIERTA TESTATA APERTA PAUZE PAUSA PAUSA PAPIER VAST ATASCO DE CARTA PAPEL INCEPPATA PAPIER OP SIN PAPEL FINE CARTA PRINTKOP ERROR DE ERRORE FOUT CABEZAL TESTINA PRINTKOP EXCESO TEMP. TEMP. TESTA OVERVERHIT DEL CABEZAL TROPPO ALTA...
- Page 29 TRANSMISSIVE 32 TRANSMISSIVE TRANSMISSIVE PAIRING 33 EMPAREJANDO PAIRING VERWORP 34 RECHAZANDO RIFIUTATO PIN: 35 PIN: 36 SI 37 NO -23-...
- Page 30 Portuguese Polish Chinese PREPARADA ONLINE ONLINE 盖板打开 TAMPA ABERTA POKRYWA OTW PAUSA PAUZA 暂停 ZACIĘCIE PAP. 卡纸 PAPEL ENCRAVADO 缺纸 SEM PAPEL BRAK PAPIERU BŁĄD GŁOWICY 打印头错误 ERRO DE CABECA 打印头温度 EXCES.TEMP. PRZEKR TEMP GŁOWICY NA CABECA 过高 保存中 SALVAR ZAPIS #### &&&&...
- Page 31 反射式 REFLECTIVO 31 ODBLASKOWY 传送式 TRANSMISIVO 32 PRZEPUSZCZ 配对中 A EMPARELHAR 33 PAROWANIE 断开中 RECUZAR 34 ODRZUCANIE PIN: 35 PIN : PIN: 是 36 TAK 否 37 NIE -25-...
- Page 32 Korean JAPANESE 온라인 オンライン 커버 열기 カバーオープン 멈춤 ポーズ 페이퍼 잼 紙送りエラー 용지 부족 紙が ありません 헤드 에러 ヘッドエラー 헤드 온도 ヘッド 과열 異常加熱 登録中 절약 #### &&&& #### &&&& 포맷 에러 初期化エラー 플래쉬 메모리 書込みエラー 쓰기 에러 メモリーフル 플래쉬 메모리...
- Page 33 반사 反射センサー 전송 透過センサー 연결… ペアリング 거부… リジェクト 핀 はい いいえ -27-...
-
Page 34: Charge Error Number List
5.11 CHARGE ERROR NUMBER LIST Details of Error Cause Battery ID error Battery is not loaded or an unspecified battery is detected. Abnormal battery voltage 8.7V or more Less than 4.6V Abnormal charge current (in tricle charge) 0.5A or more Trickle charge timeout After a 90-min. -
Page 35: Display Pattern And Key Operation For System Mode
6 DISPLAY PATTERN AND KEY OPERATION FOR SYSTEM MODE AND USER MODE 6.1 LIST BOX WITH SCROLLBAR The list box is used for displaying the menus or items to be selected. It is comprised of the following parts. Display example (English) Title Knob Sub title... -
Page 36: Movement Of The Cursor When Scrolled
6.2 Movement of the cursor when scrolled The cursor moves in the following way with a depression of the [FEED] or [PAUSE] key. The following table shows the example of depression of the [PAUSE] key. The [FEED] key functions in the same way. Key Operation Press [PAUSE] key The position of the displayed... -
Page 37: Value Setting Display
6.3 VALUE SETTING DISPLAY The value setting display is used for setting a value by increasing or decreasing it. It is comprised of the following parts. Display example (English) Sub title Title Setting value Setting range The currently programmable item is reverseed. The display of the symbols like “+” and “-“, and the unit of measure like “mm”... - Page 38 [PAUSE] Decreases the setting value by specified step. When the setting value reaches the minimum, it goes to maximum -32-...
-
Page 39: Information Display
6.4 INFORMATION DISPLAY The information display is used when no input or setting is performed. It is consists of the following parts. Display example (English) タイトル Title Information Running Scroll Key function (Running) Function Displays the top menu. [FEED] + [PAUSE] [PAUSE] Displays the upper hierarchy. -
Page 40: System Mode For Service Persons And System Administrators
7 SYSTEM MODE FOR SERVICE PERSONS AND SYSTEM ADMINISTRATOR S (ALL MENU ITEMS ARE AVAILABLE.) 7.1 OUTLINE OF SYSTEM MODE The printer enters the system mode when the following operation is performed when the printer power is off. ・ Turn on the printer while holding down the [FEED] and [POWER] keys at the same time. The system mode is intended for performing self-test, parameter setting, and other settings. -
Page 41: Diagnostic
Diagnostic Contents of Diagnostic menu MENU ITEM SYSTEM MODE 2.Diagnostic MAINTE CNT Diagnostic Head Check LED Check LCD Check Beep Check 7.2.1 MAINTE CNT This section describes how to print out the maintenance counter data. The following table shows the menu structure from the top menu of the system mode to MAINTE CNT. MENU ITEM SYSTEM MODE 2.Diagnostic... -
Page 42: Counter Parameter Print Contents
+0.0mm SERIAL NUMBER [DISABLE] TONE +0step PEEL +0.0mm << BLUETOOTH >> X ADJ. +3.0mm DEVICE NICKNAME THRESHOLD(R) 1.0V [TOSHIBA TEC BT ] THRESHOLD(T) 1.4V CMD SETTING [TPCL] ADDRESS [A8:B2:DA:7C:57:A6] PRINTER ID [00001] MODE [ON] PRINT TYPE [AUTO] TEST MODE [OFF]... - Page 43 +0.0mm SERIAL NUMBER [DISABLE] TONE +0step PEEL +0.0mm << BLUETOOTH >> X ADJ. +3.0mm DEVICE NICKNAME THRESHOLD(R) 1.0V [TOSHIBA TEC BT ] THRESHOLD(T) 1.4V CMD SETTING [TPCL] ADDRESS [A8:B2:DA:7C:57:A6] PRINTER ID [00001] MODE [ON] PRINT TYPE [AUTO] TEST MODE [OFF]...
- Page 44 << WIRELESS LAN >> WLAN [ON] BAND SELECTION [DUAL BAND] COUNTRY CODE [JPN] CHANNEL [001] IP MODE [DYNAMIC] PRTR IP [192.168.254.254] GATE IP [000.000.000.000] SUBNET [255.255.000.000] [00-23-a7-fd-d5-54] SOCKET PORT [ON][09100] HOST NAME [ USER CLASS[ ESS ID [TOSHIBA_TEC LPR SERVER [OFF] SNMP AGENT [ON]...
- Page 45 Maintenance Counter Count Conditions Total label distance covered Counts whenever the paper feed motor is driven, for Label distance covered example, to feed, print, or exit a label. (Also counts during a reverse feed operation.) When the label distance covered reaches the maximum value, the maintenance counter must be cleared.
- Page 46 (2) Various parameter values Item Description Value << PARTS ALERT >> PLATEN ROLLER NEAR ALERT Platen roller near alert setting 0.0m to 320000.0m ALERT Platen roller alert setting 0.0m to 320000.0m THERMAL HEAD NEAR ALERT Thermal head near alert setting 0.0m to 320000.0m ALERT Thermal head alert setting...
- Page 47 Code Page PC-850 :PC-850 PC-852 :PC-852 PC-857 :PC-857 PC-8 :PC-8 PC-851 :PC-851 PC-855 :PC-855 PC-1250 :PC-1250 PC-1251 :PC-1251 PC-1252 :PC-1252 PC-1253 :PC-1253 PC-1254 :PC-1254 PC-1257 :PC-1257 LATIN9 :LATIN9 Arabic :Arabic PC-866 :PC-866 UTF-8 :UTF-8 LCD language LCD LANGUAGE ENGLISH :English GERMAN :German FRENCH...
- Page 48 BEEP OFF: Beep is disabled. Beep ON: Beep is enabled. B-EP MODE OFF: B-EP compatible mode OFF. B-EP compatible mode ON: B-EP compatible mode ON LINERLESS OFF: Linerless setting is disabled. Linerless ON: Linerless setting is enabled. STOP POSITION CUT: Stop at the cut position Post-print stop position setting HEAD: Stop at the head position ON: Back feed restricted...
- Page 49 ≪BLUETOOTH≫ * When the Bluetooth module is installed. Bluetooth device nickname DEVICE NICKNAME Fixed module address ADDRESS Bluetooth device address MODE Bluetooth mode AUTO mode for process inspection TEST MODE Bluetooth Inquiry scan time SEARCH SETTING EVERY 60sec Security level SECURITY LEVEL LINK authentication type...
- Page 50 ≪WIRELESS LAN≫ * When the wireless LAN module is installed. Wireless LAN enable/disable OFF: Disable WLAN ON: Enable CONFIG: Config Mode Band Selection 2.4GHz: Using only 2.4GHz BAND SELECTION 5GHz: Using only 5GHz DUAL BAND: Using dual band “---” :INIT Selected country code COUNTRY CODE Other :Please refer to country code...
-
Page 51: Diagnostic
7.2.2 Diagnostic The procedure for printing the self-diagnosis result is the same as that for the maintenance counter data. The following table shows the menu structure from top menu of the system mode to Diagnostic. MENU ITEM SYSTEM MODE 2.Diagnostic Diagnostic CHECKING &... -
Page 52: Auto Self-Diagnosis Printout
AUTO SELF-DIAGNOSIS PRINTOUT 7.2.2.1 (1) B-FP2D-GH30 B-FP2D-GH MAIN 09JUN2016 V1.0 :5800 BOOT 09JUN2016 V1.0 :1700 SBCS1 09JUN2016 V1.0 :8100 SBCS2 09JUN2016 V1.0 :5300 SBCS3 09JUN2016 V1.0 :0E00 SBCS4 09JUN2016 V1.0 :5800 SBCS5 09JUN2016 V1.0 :5800 DBCS1 09JUN2016 V1.0 :4A00 DBCS2 09JUN2016 V1.0 :D000 DBCS3 NONE... - Page 53 (2) B-FP2D-GH50 B-FP2D-GH MAIN 09JUN2016 V1.0 :5800 BOOT 09JUN2016 V1.0 :1700 SBCS1 09JUN2016 V1.0 :8100 SBCS2 09JUN2016 V1.0 :5300 SBCS3 09JUN2016 V1.0 :0E00 SBCS4 09JUN2016 V1.0 :5800 SBCS5 09JUN2016 V1.0 :5800 DBCS1 09JUN2016 V1.0 :4A00 DBCS2 09JUN2016 V1.0 :D000 DBCS3 NONE DBCS4 09JUN2016 V1.0 :D000...
- Page 54 (3) Automatic self-test (when there is an invalid setting) B-FP2D-GH MAIN XXXXX2018 V1.3 :XXXX BOOT 25JAN2018 V1.2 :2000 SBCS1 09JUN2016 V1.0 :8100 SBCS2 09JUN2016 V1.0 :5300 SBCS3 09JUN2016 V1.0 :0E00 SBCS4 09JUN2016 V1.0 :5800 SBCS5 09JUN2016 V1.0 :5800 DBCS1 09JUN2016 V1.0 :4A00 DBCS2 09JUN2016 V1.0 :D000 DBCS3...
- Page 55 (4) Details of self-test print B-FP2D-G H Peel-off model “H” Model name 2: 2inch G: 203dpi MAIN 01JAN2016 V1.0:1200 Checksum Version Creation date (Day-Month-Year) Name MAIN: Program area BOOT 01JAN2016 V1.0 :3400 Checksum Version Creation date (Day-Month-Year) Name BOOT: BOOT area SBCS 01JAN2016 V1.0 :5600 Checksum Version...
- Page 56 CONST 01JAN2016 V1.0 :3400 Checksum Version Creation date (Day-Month-Year) Name CONST: CONST area WLAN 01JAN2016 V1.0:1A00 Checksum Version Creation date (Day-Month-Year) Name WLAN: WLAN program area SDRAM 32MB Capacity of SDRAM Peel-off model “32MB” ” Memory for the system and drawing <Supplemental Explanation>...
- Page 57 (6) Sensor check SENSOR1 0 0 0 0 0 0 0 0 , 0 0 0 0 0 0 1 0 Blank (Fixed to 0) Cover open sensor 1: The cover is closed. (Printing is not performed when the cover is open.) Blank (Fixed to 0) Blank (Fixed to 0) SENSOR2 [H]+20 ゚...
- Page 58 BATTERY 8.0V [5] Battery Level *1 Battery voltage *1 It changes by ambient temperature (refer to 5.5.2 Icon) (7) Installed interface I/F USB/BT/WLAN USB/BT USB/BT/WLAN Installed interface (8) Loopback test result LOOPBACK BLUETOOTH OK sppi_v2.12 Bluetooth module firmware version Bluetooth check : Normal : Abnormal : Not installed...
-
Page 59: Head Check
7.2.3 Head Check The print head check procedure is the same as that for the maintenance counter data. 8.2.1 MAINTE CNT.. The following table shows the menu structure from the top menu of the system mode to Head Check. MENU ITEM SYSTEM MODE 2.Diagnostic Head Check... -
Page 60: Led Check
7.2.4 LED Check The following table shows the menu structure from the top menu of the system mode to LED Check. MENU ITEM SYSTEM MODE 2.Diagnostic LED Check LED lighting pattern STATUS LED: Turns on for 3 sec. (blue) ↓ STATUS LED: Turns off ↓... -
Page 61: Lcd Check
7.2.5 LCD Check The following table shows the menu structure from the top menu of the system mode to LED Check. MENU ITEM SYSTEM MODE 2.Diagnostic LCD Check LCD pattern Red -> Green -> Blue *When the [PAUSE] key is pressed with all LCD dots turned on, the printer stops under such condition. Pressing the [PAUSE] key again continues test. -
Page 62: Beep Check
7.2.6 Beep Check The following table shows the menu structure from the top menu of the system mode to Beep Check. MENU ITEM SYSTEM MODE 2.Diagnostic Beep Check Push [Beep Check」 Beep Check start Sounds BEEP for 3seconds Beep Check end -56-... -
Page 63: Mode Setting
7.3 Mode Setting Set the parameters for each printer movement. Contents of Diagnostic menu MENU ITEM SYSTEM MODE 3.Mode Setting CMD Setting Head DIV Head DIV CMD B-EP Mode Linerless Print Type Stop Position Backfeed Limit Peel Backfeed <Supplemental Explanations> When the [FEED] key is pressed, the menu moves in the opposite direction from when the [PAUSE] key is pressed. -
Page 64: Cmd Setting
7.3.1 CMD Setting This setting selects print mode. B-EP Mode OFF: TPCL TPCL1 C Mode ESC/POS Z Mode S Mode B-EP Mode ON: TPCL TPCL1 LABEL REPEIPT REPEIPT1 ESC/POS Default value: TPCL *Support mode (o:valid、x:invalid)... -
Page 65: Head Output Division Command Parameter Setting (Head Div Cmd)
7.3.3 Head Output Division Command Parameter Setting (Head DIV CMD) This setting enables or disables the head output division parameter of AY command. Head output division parameter of AY command is disabled. Head output division parameter of AY command is enabled. Default value: ON (Head output division parameter of AY command is enabled). -
Page 66: Print Type Setting (Print Type)
7.3.6 Print Type Setting (Print Type) ・ AUTO Print depending on the sensor used (Automatic selection from Batch or STRIP) ・ BATCH Fixed to batch issue ・ STRIP Fixed to strip issue Default value: AUTO (automatic selection from BATCH or STRIP) *Support mode (o:valid、x:invalid)... -
Page 67: Back Feed Restriction Setting (Backfeed Limit)
7.3.8 Back Feed Restriction Setting (Backfeed Limit) ・ Back feed not restricted (Performs a back feed.) ・ Back feed restricted (Performs no back feed.) Default value: ON (Back feed restricted) <Commentary> During label issue with sensor type specified (transmissive/reflective sensor) under the following conditions, this setting determines whether or not to perform a back feed. -
Page 68: Strip Issue Back Feed Setting (Peel Backfeed)
7.3.9 Strip Issue Back Feed Setting (Peel Backfeed) When strip position fine adjustment is set to – (negative) by using a command or in system mode, the strip position is finely adjusted and the printing is misaligned simultaneously. This setting is used to perform a back feed and thus correct the print position for the purpose of printing on the normal position. -
Page 69: Set Param
7.4 Set PARAM Contents of Set PARAM menu MENU ITEM SYSTEM MODE 4. Set PARAM LCD Contrast Code Page Zero Font LCD Language Control Code EURO Code Maxicode Spec Auto Off Error Power Off Sleep LCD Off Charge Mode Battery CHK Auto Head CHK Head Error CHK Head Error PRT... -
Page 70: Lcd Contrast Setting (Lcd Contrast)
7.4.1 LCD Contrast Setting (LCD Contrast) This setting is to adjust the LCD display contrast. NORMAL Default value: NORMAL *Support mode (o:valid、x:invalid) TPCL, TPCL1, C Mode ESC/POS Z Mode S Mode LABEL RECEIPT,RECEIP 7.4.2 Code Page Setting (Code Page) ... -
Page 71: Zero Font
7.4.3 Zero Font This setting determines how zero should be displayed/printed, “Ø” (with slash) or “0” (without slash). ・ 0 without slash ・ 0 with slash Ø: Default value: 0 (Without slash) *Support mode (o:valid、x:invalid) TPCL, TPCL1, C Mode ESC/POS Z Mode S Mode LABEL... -
Page 72: Lcd Language Setting (Lcd Language)
7.4.4 LCD Language Setting (LCD Language) This setting selects a language to be used for displaying messages on the LCD. ENGLISH GERMAN FRENCH DUTCH SPANISH ITALIAN PORTUGUESE SIMP. CHINESE KOREAN POLISH ... -
Page 73: Control Code Setting (Control Code)
7.4.5 Control Code Setting (Control Code) This setting selects a control code to be used in TPCL mode. ・ AUTO Automatic selection between {.|.} method and ESC.LF.NUL method ・ {,|,} / {,|,} {.|.} method ・ ESC,LF,NUL / ESC,LF,NUL ESC.LF.NUL method Default value: AUTO (Automatic selection) (1) AUTO As an interface command control code, [ESC](1BH),[LF](0AH),[NUL](00H) or {(7BH),|(7CH),}(7DH) is... -
Page 74: Euro Font Code Setting (Euro Code)
(2) Manual Selection ({.|.}) The control code of the command is {(7BH),|(7CH),}(7DH), and the control code selection is not performed. Data of 00H to 1FH is ignored and discarded of in this mode. However, data of 00H to 1FH becomes valid while processing the Graphic command or Writable Character command in hexadecimal mode. - Page 75 Support mode (o:valid、x:invalid) TPCL, TPCL1, C Mode ESC/POS Z Mode S Mode LABEL RECEIPT,RECEIP -69-...
-
Page 76: Auto Power-Off Timing Setting (Auto Off)
7.4.8 Auto Power-off Timing Setting (Auto Off) This setting selects a time for the printer power to turn off automatically. The power is not automatically turned off. It turns off the power following setting time. Max. Min. value Step Display Sign... -
Page 77: Power Save Mode Timing Setting (Sleep)
7.4.10 Power Save Mode Timing Setting (Sleep) This setting selects a time for the printer to enter power save mode. The printer does not enter the power save mode. It enters power save mode after following setting time Max. -
Page 78: Battery Charge Mode Setting (Charge Mode)
7.4.12 Battery Charge Mode Setting (Charge Mode) This setting enables selecting the battery charge mode. NORMAL Normal mode Battery protection mode (Low charge voltage) LOW2 NRcan Support Default value: NORMAL (JA Type, CN Type) LOW2 (QM Type, QQ Type) Support mode (o:valid、x:invalid)... -
Page 79: Automatic Print Head Check For Broken Dots At Power On Setting
7.4.14 Automatic Print Head Check for Broken Dots At Power On Setting (Auto Head CHK) This setting selects whether or not an automatic print head check for broken dots is to be automatically performed when the power is turned on. ... -
Page 80: Resume Printing After Broken Dots Error Setting (Head Error Prt)
7.4.16 Resume Printing After Broken Dots Error Setting (Head Error PRT) This setting selects whether or not the printer resumes printing after a broken dots error occurs. The printer does not resume printing after a broken dots error occurs. ... -
Page 81: Beep Check (Beep)
7.4.18 Beep check (Beep) This setting selects BEEP sounds or not at turn ON, turn OFF, and error ocuured. Beep is disabled. Beep is disabled. Default value: ON <Supplemental Explanations> · When [FEED] and [PAUSE] key are input at the same time, it returns to the system mode men u display. -
Page 82: Parts Alert (Parts Alert)
7.4.20 Parts Alert (Parts Alert) MENU ITEM SYSTEM MODE 4. Set PARAM Parts Alert Platen Roller Near Alert Alert Thermal Head Near Alert Alert Platen Roller 7.4.20.1 Set the value of the life of the platen roller parts. When the specified distance is reached, an icon is displayed. If the value is set to 0, the component life is not checked. -
Page 83: System Mode Password Setting (Password)
7.4.21 System Mode Password Setting (Password) This setting selects whether or not a new password, which is required to enter system mode for service persons and system administrators, is to be programmed. Password is not set. Password is set. Default value: OFF Password: 0000 -77-... -
Page 84: System Mode Start Screen When Password Is Enabled
System mode start screen when password is enabled 7.4.21.1 When the password is enabled, the password input screen is displayed at the time the system mode is started. Password input for system mode Procedure Turn on the printer while holding down the [FEED] and [POWER] keys at the same time. -
Page 85: Adjust Set
7.5 Adjust Set Contents of Adjust Set menu MENU ITEM SYSTEM MODE 5. Adjust Set Feed Adjust X Adjust Tone Adjust REFL Sensor TRANS Sensor Peel Adjust ESC/POS Width <Supplemental Explanations> When the [FEED] key is pressed, the menu moves in the opposite direction from when the [PAUSE] key is pressed. -
Page 86: Feed Amount Fine Adjustment (Feed Adj.)
7.5.1 Feed Amount Fine Adjustment (FEED ADJ.) This setting sets a feed amount so that the label is shifted forward or backward from the print start position which has been automatically determined. Max. Min. Step Display Sign Integer Decimal 0-padding Unit of value value... -
Page 87: X-Coordinate Fine Adjustment (X Adjust)
7.5.2 X-coordinate Fine Adjustment (X Adjust) This setting sets an amount by which the X-coordinate is shifted to the left or right. Max. Min. value Step Display Sign Integer Decimal 0-padding Unit of value digit place measure +99.9 -99.9 Decimal Exist None Default value: 0.0mm... -
Page 88: Print Tone Fine Adjustment (Tone Adjust)
7.5.3 Print Tone Fine Adjustment (Tone Adjust) This setting finely adjusts the print tone against the value automatically set. Max. Min. value Step Display Sign Integer Decimal 0-padding Unit of value digit place measure Decimal Exist None step Default value: 0step <Supplemental Explanations>... -
Page 89: Transmissive Sensor Manual Threshold Fine Adjustment (Trans Sensor)
7.5.5 Transmissive Sensor Manual Threshold Fine Adjustment (TRANS Sensor) Max. Min. value Step Display Sign Integer Decimal 0-padding Unit of value digit place measure Decimal None None Default value: 1.4V <Supplemental Explanations> ・ This setting is effective only in the TPCL and TPCL1 modes. -83-... -
Page 90: Strip Position Fine Adjustmentpeel Adjust
7.5.6 Strip Position Fine AdjustmentPeel Adjust Max. Min. value Step Display Sign Integer Decimal 0-padding Unit of value digit place measure +3.0 -2.0 Decimal Exist None Default value: 0.0mm +0.0 mm Strip stop position (top edge of strip shaft) +3.0 mm Strip stop position (top edge of strip shaft) -2.0 mm Strip stop position (top edge of strip shaft) -
Page 91: Paper Size For Esc/Pos Setting
7.5.7 Paper Size for ESC/POS Setting (ESC/POS Width) Max. Min. value Step Display Sign Integer Decimal 0-padding Unit of value digit place measure Decimal None None Default value: 80mm <Supplemental Explanations> This setting is effective only in the ESC/POS mode. There is no command to set paper width in the ESC/POS mode. -
Page 92: Test Print
7.6 Test Print Contents of TEST PRINT menu MENU ITEM 6.Test Print Print Condition Slant Line 1dot Slant Line 3dot Characters Barcode Non Printing Factory Test Auto Print(T) Auto Print(R) Process Print <Supplemental Explanations> When the [FEED] key is pressed, the menu moves in the opposite direction from when the [PAUSE] key is pressed. -
Page 93: Print Condition
7.6.1 Print Condition This menu enables setting print conditions for test print. Contents of TEST PRINT menu MENU ITEM 6.Test Print Print Condition Issue Count Sensor Print Type Label Length Paper Feed <Supplemental Explanations> ・ Default value at power on is: Issue count Sensor NONE... -
Page 94: Issue Count Setting (Issue Count)
Issue Count Setting (Issue Count) 7.6.1.1 This setting sets the number of labels to be printed for test print. 1 3 5 10 50 100 500 1000 5000 Default value: 1 Sensor Setting (Sensor) 7.6.1.2 ... -
Page 95: Label Length Setting (Label Length)
Label Length Setting (Label Length) 7.6.1.4 This setting selects a label length for test print. Max. Min. value Step Display Sign Integer Decimal 0-padding Unit of value digit place measure Decimal None None Default value: 63mm <Supplemental Explanations> The label length, which is larger than the image buffer length, cannot be specified. If specified, the printer prints the data of image buffer length, then stops. -
Page 96: Slant Line 1Dot
7.6.3 Slant Line 1dot 1-dot slant line Enlarged view of slant lines 1-dot slant line print (Print ratio: 16.7%) -90-... -
Page 97: Slant Line 3Dot
7.6.4 Slant Line 3dot 3-dot slant line Enlarged view of slant lines 3-dot slant line print (Print ratio: 16.7%) -91-... -
Page 98: Characters
7.6.5 Characters 7.6.6 Barcode 7.6.7 Non Printing The printer feeds blank label. -92-... -
Page 99: Factory Test
7.6.8 Factory Test 7.6.9 Auto Print(T) The factory test print is performed on the following conditions. The parameter settings and the print density fine adjustment value are ignored. After each test pattern is printed, the factory test print is performed when the [POWER] key is pressed. ... -
Page 100: Auto Print
7.6.10 Auto Print(R) The factory test print is performed on the following conditions. The parameter settings and the print density fine adjustment value are ignored. After each test pattern is printed, the factory test print is performed when the [POWER] key is pressed. ... -
Page 101: Sensor Display/Adjustment (Sensor Adj)
7.7 Sensor Display/Adjustment (Sensor ADJ) Contents of SENSOR ADJUST menu MENU ITEM 7.Sensor ADJ Temperature Reflective Transmissive Paper End Battery VOLT Backlash1 Backlash2 <Supplemental Explanations> When the [FEED] key is pressed, the menu moves in the opposite direction from when the [PAUSE] key is pressed. -
Page 102: Reflective
7.7.2 Reflective Head (printer) side Tag paper Reflects Cover side The sensor level of the reflective sensor is registered. Place the tag paper to be used on the reflective sensor so that the sensor can detect a print area. The display of the currently detected value is updated every 200 msec. Hold down the [FEED] key for 3 seconds or more. -
Page 103: Paper End
7.7.4 Paper End Paper end level of the transmissive sensor and the reflective sensor is registered. Remove any media from the media sensor. The display of the currently detected value is updated every 200 msec. Hold down the [FEED] key for 3 seconds or more. When the registration of the “paper end level”... -
Page 104: Ram Clear
RAM Clear Contents of RAM CLEAR menu MENU ITEM 8. RAM Clear No RAM Clear Parameter MAINTE Count <Supplemental Explanations> When the [FEED] key is pressed, the menu moves in the opposite direction from when the [PAUSE] key is pressed. -
Page 105: Parameter Clear (Parameter)
7.8.2 Parameter Clear (Parameter) The parameters settings are cleared. Destination is selectable for parameter clear. The destination code printed on the top right corner of the maintenance counter printout shows which destination was selected for the parameter clear. QM TYPE RAM clear for Global model ... - Page 106 Values after parameter clear Parameter Value +0.0 ㎜ Feed amount fine adjustment (PC) Print tone fine adjustment (PC) +0step +0.0 ㎜ Strip position fine adjustment (PC) +0.0 ㎜ Feed amount fine adjustment (Key) Print tone fine adjustment (Key) +0step +0.0 ㎜ Strip position fine adjustment (Key) +0.0 ㎜...
- Page 107 60.0 ㎜ Effective print length 54.0 ㎜ Effective print width Sensor Transmissive sensor PC-save automatic call Bluetooth Bluetooth device nickname TOSHIBA TEC BT MODE TEST MODE Bluetooth device address Fixed module address Inquiry scan time EVERY Security level Auto Connection...
-
Page 108: Maintenance Counter Clear (Mainte Count)
7.8.3 Maintenance Counter Clear (MAINTE Count) The maintenance counter, including label distance covered, is cleared. FEED PRINT <Supplemental Explanations> Item of counter clear and default value after clear. Clear item default value Item of counter clear All counte FEED Print after clear... - Page 109 Maintenance counter value and various parameter value print Whenever FEED is performed: TOTAL FEED 0.0m [QM] TOTAL PRINT 0.0 m FEED value FEED 0.0 m FEED1 0.0 m FEED1 FEED2 0.0 m FEED1 value FEED3 0.0 m FEED4 0.0 m ...
- Page 110 <Supplemental Explanations> 1. LCD image at counter clear Clearing After clear 2. Turn off the printer when “COMPLETED. Turn off the printer” is displayed after the RAM clear is completed. -104-...
-
Page 111: Interface Setting (I/F Setting)
Interface Setting (I/F Setting) Contents of INTERFACE menu MENU ITEM 9. I/F Setting WLAN Bluetooth <Supplemental Explanations> When the [FEED] key is pressed, the menu moves in the opposite direction from when the [PAUSE] key is pressed. When the [FEED] and [PAUSE] keys are simultaneously pressed, the display returns to the system mode menu. ... -
Page 112: Wlan Mode (Mode)
WLAN Mode (MODE) 7.9.2.1 ・ OFF ・ ON ・ CONFIG MODE Default value: CONFIG MODE *About mode setting and authentication , refer to Network specification Band Select (BAND SELECT) 7.9.2.2 ・ DUAL BAND ・ 2.4GHz ・ 5GHz Default value: DUAL BAND -106-... -
Page 113: Tcp/Ip / Tcp/Ip
TCP/IP / TCP/IP 7.9.2.3 Contents of WLAN menu MENU ITEM TCP/IP IP Mode Printer IP ADD Gateway ADD Subnet Mask 7.9.2.3.1 IP Mode STATIC DHCP disable DYNAMIC DHCP enable Default value: DYNAMIC <Supplemental Explanations> If it sets DYNAMIC, printer can get IPaddress from DHCP server automatically. 7.9.2.3.2 Printer IP Address Setting (Printer IP ADD) IP address is displayed and set. -
Page 114: Protocols
Protocols 7.9.2.4 Contents of Protocols menu About setting detail information, refer to Network specification MENU ITEM Protocols Socket Port Port Number LPR Server SNMP Agent 7.9.2.4.1 Socket Communication Setting (Socket Port) OFF ON Default value: ON 7.9.2.4.2 Port Number Socket port number is displayed and set. -
Page 115: Bluetooth
Device nickname for assembly process test is used. Default value: OFF <Supplemental Explanations> When set to “ON”, the device nickname is “FACTORY TEST”. When set to “OFF”, the device nickname is “TOSHIBA TEC BT”. Search Setting 7.9.3.3 Inquiry is disabled. -
Page 116: Ssp Auth Type
7.9.3.4.1 SSP AUTH type ・ JUST WORKS ・ NUMERIC CMP Default value: NUMERIC CMP 7.9.3.4.1.1 NUMERIC CMP ・ NO IN/OUT No authentication key displayed ・ DISPLAY ONLY Display authentication key only Display authentication key and select “Yes” or “No” ・ DISPLAY Y/N Default value: DISPLAY Y/N Auto Connect 7.9.3.5... -
Page 117: Basic Setup
7.10 BASIC Setup Contents of ASIC Setup menu ITEM NAME 10. BASIC Setup BASIC File MAINTE Trace Expand Mode 7.10.1 BASIC Interpreter Setting (BASIC) This setting selects whether the BASIC interpreter setting is enabled or disabled. OFF Disabled ... - Page 118 NOTE: The BASIC expansion mode ends when the BASIC expansion program is exited. When the [POWER] key is pressed without the BASIC expansion mode program loaded, the display does not change from “10.BASIC Setup” which indicates the BASIC expansion mode menu. * For details of the BASIC expansion mode, refer to the section, “Startup of System Mode Program”...
-
Page 119: System Mode For Users (Available Menu Items Are Limited.)
8 SYSTEM MODE FOR USERS (AVAILABLE MENU ITEMS ARE LIMITED.) 8.1 OUTLINE OF SYSTEM MODE FOR USERS The printer enters the system mode for users when the following operation is performed when the printer power is off. ・ Turn on the printer while holding down the [PAUSE] and [POWER] keys at the same time. The system mode is intended for performing self-test, parameter setting, and other settings. -
Page 120: Shutdown
8.2 Shutdown The printer is reset. 8.3 Diagnostic Same as 7.2 Diagnostic of the system mode. 8.4 Mode Setting Same as 7.3 Mode Setting of the system mode. 8.5 Adjust Set Same as 7.5 Adjust Set of the system mode. 8.6 Test Print Same as 7.6 Test Print of the system mode. -
Page 121: User System Mode
9 USER SYSTEM MODE OUTLINE OF SYSTEM MODE FOR USERS When the printer status is paused, the user's system mode is entered when the following operations are executed. ・ Hold down the [PAUSE] key for 3 seconds or longer. The system mode is intended for performing parameter setting, and other settings. When a language other than Japanese is selected in the language setting (7.4.4 LCD language setting), the language displayed on the panel is English. -
Page 122: Reset
Reset The printer is reset. Mode Setting Same as 7.3 Mode Setting of the system mode. Set PARAM Same as 7.4 Set PARAM of the system mode. Adjust Set Same as 7.5 Adjust Set of the system mode. Dump Mode Print the data sent from the host. -
Page 123: Expand Mode
Data pointed by the receive buffer write pointer is printed in bold type. NOTE: If an error occurs when printing the receive buffer dump, the printer displays an error message, and stops. The error is cleared by pressing the [PAUSE] key, and the display is returned to the PRINT menu. After the error is cleared, data is not automatically reprinted Expand Mode Same as 7.10.4 Expand Mode of the system mode. -
Page 124: Operation During Battery Charge By Ac/Usb Power Supply
Operation during battery charge by AC/USB power supply This chapter describes the printer operations when the battery is charged through the AC adapter or USB cable. 10.1 In Printer Power Off State When the AC adapter or USB cable is being connected with the battery installed: No display (Same as power off) [STATUS] LED (blue) ........ -
Page 125: In Printer Power On State
10.2 In Printer Power On State (1) When the AC adapter is being connected: The battery level mark (Charging) turns on. When the battery is fully charged, it displays battery level mark. Charging Chanrge finished or non- charging state [STATUS] LED (blue) In normal state .... -
Page 126: Power Save Mode
POWER SAVE MODE This section describes printer operations in power save mode. 11.1 Shifting To Power Save Mode When communication, key operations and cover open/close operations are not performed in a certain period of time to shift to power save mode, the printer enters power save mode. 11.2 When A Wireless LAN Module Is Connected When a wireless LAN module is connected, “Power Save Mode Setting”... -
Page 127: Power Off Operation
POWER OFF OPERATION This section describes printer operations when the power is turned off. 12.1 TIME REQUIRED FOR POWER OFF When the printer is in online mode, holding down the [POWER] key for 1 second or more causes the printer to turn off.
Need help?
Do you have a question about the B-FP2D Series and is the answer not in the manual?
Questions and answers