Table of Contents
Advertisement
Endoscopes
OPERATION MANUAL
Lower Gastrointestinal Endoscopes
EC-760Z-V/M
EC-760Z-V/L
This Operation Manual provides details on how to
prepare and operate the endoscope and describes
cautions to be observed. Please read this manual
thoroughly before operating the endoscope.
After reading this manual, store it nearby the
endoscope so that you can review it whenever
necessary.
897N201625
English
Introduction
1
Precautions
2
Product Overview
3
Workflow
4
Preparation and Inspection
5
How to Use
6
Troubleshooting
7
Service
Appendix
Advertisement
Table of Contents
Troubleshooting

Related Manuals for FujiFilm 700 Series


Summary of Contents for FujiFilm 700 Series
- Page 1 English Endoscopes Introduction Precautions OPERATION MANUAL Product Overview Workflow Preparation and Inspection How to Use Lower Gastrointestinal Endoscopes Troubleshooting EC-760Z-V/M Service EC-760Z-V/L Appendix This Operation Manual provides details on how to prepare and operate the endoscope and describes cautions to be observed. Please read this manual thoroughly before operating the endoscope.
- Page 2 897N201625...
- Page 3 Contents at a Glance Introduction This chapter explains about this manual. Precautions Chapter Before using this product, read this chapter carefully so that you can operate it correctly. This chapter describes the warnings and cautions for safe operation of the endoscope. Product Overview Chapter This chapter describes details on the accessories supplied with this product, the...
-
Page 4: Table Of Contents
Contents Contents Contents at a Glance......................iii Introduction About This Manual........................1 Endoscope Operation Manuals..............2 How to Read This Manual ...................... 3 Terms ......................3 Conventions Used in This Manual ..............3 Chapter 1 Precautions Intended Use ......................1-1 Applicability of Endoscopy and Endoscopic Treatment.......... - Page 5 Control Portion (G7 control portion) ............2-6 Boot......................2-7 Insertion Portion (Applied Part) ..............2-8 Nomenclature and Functions of Distal End of Endoscope ......... 2-9 Flexibility Adjustment Mechanism ................2-10 Optical Zoom Function ..................... 2-11 2.5.1 Operating Optical Zoom Function ..............2-11 2.5.2 Focus Indicator.....................
- Page 6 Contents 4.5.2 Preparing System..................4-20 Connecting Endoscope to Light Source and Related Equipment ......4-22 4.6.1 Connecting to Light Source................4-22 4.6.2 Attaching Water Tank................... 4-23 4.6.3 Attaching Suction Unit.................. 4-24 4.6.4 Attaching J Tube ..................4-25 4.6.5 Attaching Water Pump ................. 4-26 Inspecting Functions Used in Combination with Related Equipment .......
- Page 7 6.1.7 Problem with Flexibility Adjustment Mechanism ..........6-6 6.1.8 Problem with Optical Zoom Function ............. 6-6 6.1.9 Problem with Related Equipment..............6-7 Problem with Endotherapy Devices ............6-7 Problem with Image Recorder ..............6-7 Withdrawal of Endoscope with Abnormality ............... 6-8 6.2.1 When Endoscopic Images Appear on the Monitor.........
- Page 8 Contents Service Centers viii 897N201625...
-
Page 9: Introduction
The company names and product names described in this manual are trademarks or registered trademarks of FUJIFILM Corporation or its subsidiaries. Other holders’ trademarks All other company names and product names described in this manual are trademarks or registered trademarks of their respective owners. Copyright © 2019 FUJIFILM Corporation. All rights reserved. 897N201625... -
Page 10: Endoscope Operation Manuals
Introduction Endoscope Operation Manuals Manage and store “Operation Manual” and “Reprocessing Manual” together as a set. Endoscope Operation Manual Model: EC-760Z-V/M, EC-760Z-V/L This manual provides necessary information for using the endoscope such as the equipment overview, operation procedures and precautions to observe. Endoscope Reprocessing Manual Model: EC-760Z-V/M, EC-760Z-V/L ... -
Page 11: Terms
How to Read This Manual Terms Term Description Reprocessing It refers to disinfection or sterilization performed after the manual cleaning of the endoscope and its accessories according to the Reprocessing Manual supplied with this product. This product It refers to the endoscope with or without attached accessories. Standard accessory It refers to the parts and devices included in the package or supplied with this product. - Page 12 Introduction 897N201625...
-
Page 13: Chapter 1 Precautions
Intended Use FUJIFILM Endoscope Models EC-760Z-V/M and EC-760Z-V/L are intended for the observation, diagnosis and endoscopic treatment of the lower digestive tract, specifically the rectum, sigmoid colon, large intestine and ileocecal region, at medical facilities under the management of physicians. -
Page 14: User Qualifications
Do not modify this product or its components, and do not disassemble, repair or in any other way reverse-engineer these products. Even if you find a defect, do not attempt to repair these products yourself. FUJIFILM Corporation shall not be liable for any defects, adverse events or device failures caused by such modifications, disassembly, repairs or reverse-engineering. -
Page 15: Reprocessing Before The First Use/Reprocessing And Storage After Use
Reprocessing Before the First Use/Reprocessing and Storage After Use 1.5.1 Reprocessing Before the First Use/Reprocessing After Use This product has not been reprocessed. The endoscope and its accessories must be reprocessed prior to first use as per instructions provided in the Reprocessing Manual. After using the endoscope and its accessories, reprocess and store them according to the instructions provided in the Reprocessing Manual. -
Page 16: Disposal
The more the product is used, the greater the probability of failure of the endoscope and its accessories. Do not use the endoscope that shows any sign of abnormality or irregularity. Take appropriate measures by following “Chapter 6 Troubleshooting.” If the irregularity is still observed after inspection, contact your local FUJIFILM dealer. 897N201625... -
Page 17: Symbols
Symbols This section explains the safety signs used in this product. Symbol Description Do not re-use / Single patient use only Lot number Serial number Year of manufacture Manufacturer Authorised representative in the European Community Refer to instructions for use (Blue) Temperature limitation Keep dry... -
Page 18: Precautions For Transportation
Contact your local FUJIFILM dealer when this product is returned for repair. Be sure to reprocess this product before returning for repair. If a product which is not reprocessed is returned, it can create a risk of infection to users, service personnel or other persons in contact with it. -
Page 19: Electromagnetic Compatibility (Emc)
Take mitigation measures such as shielding the installation location of any affected device. If the problem cannot be solved with the above measures, stop using this product and consult the manufacturer or your local FUJIFILM dealer for help. Do not use this product near devices, such as MRI systems, that generate strong electromagnetic waves. - Page 20 Chapter 1 Precautions (If this product is used in combination with an electrosurgical unit, follow the instructions provided in the operation manuals of the electrosurgical unit and high-frequency endotherapy device.) 897N201625...
-
Page 21: General Warnings And Cautions
1.12 General Warnings and Cautions Observe the following cautions when handling this product. Also, there are same cautions in each chapter. 1.12.1 Precautions for Inspection Before Use WARNING Make sure to inspect the endoscope and accessories before use according to the procedures provided in this manual. -
Page 22: Handling Precautions
If abnormalities and/or material changes including but not limited to cracking, flaking, pitting, corrosion, etc. which can create rough surfaces or sharp edges, holes/depressions, compromise sealed surfaces and/or negatively affect device functionality are found, contact your local FUJIFILM dealer. 1.12.2 Handling Precautions WARNING ... - Page 23 WARNING Never use endotherapy devices, operate, insert or withdraw the endoscope, or operate the related equipment without viewing or while freezing the endoscopic image on the monitor. Otherwise, injury to tissues in the body cavity, bleeding and/or perforation may result. ...
- Page 24 If the bending section does not return to its neutral position during a procedure, do not withdraw the endoscope forcibly. Consult your local FUJIFILM dealer. If the endoscope is withdrawn forcibly, injury to tissues in the body cavity, bleeding and/or perforation may result.
- Page 25 CAUTION Do not apply unnatural force or impact on the insertion portion, bending section, control portion, LG flexible portion or scope connector. Doing so may cause malfunction of the endoscope. When holding the endoscope, hold it by the control portion. Handling it up by the insertion portion or LG flexible portion is difficult to hold and may exert an unnatural force, resulting in instrument failure.
-
Page 26: Abnormalities During Use Of This Product
Note If any abnormality occurs with this product, refer to “Chapter 6 Troubleshooting.” Should any safety concerns arise with this product, contact your local FUJIFILM dealer. 1-14 897N201625... -
Page 27: Precautions For Flexibility Adjustment Mechanism
1.12.4 Precautions for Flexibility Adjustment Mechanism WARNING Do not rotate the flexibility adjustment ring quickly and forcibly. If the patient reports pain while rotating the flexibility adjustment ring, stop rotating the flexibility adjustment ring and secure patient safety. Otherwise, patient pain, injury to tissues in the body cavity, bleeding and/or perforation may result. -
Page 28: Precautions For Water Jet Function
Not doing so may cause damage to the mucous membrane. Regardless of irrigation or water source, the FUJIFILM J tube (JT-500) must be used with the water jet channel. If the specified J tube is not used, body fluids may leak, posing infection risks to patients and/or end-users. - Page 29 CAUTION When using the water jet function, be sure to use the FUJIFILM J tube model JT-500 regardless of irrigation or water source. If the specified J tube is not used, water may leak from the water jet channel and it may come into contact with related equipment, causing a failure of related equipment.
-
Page 30: Precautions For Optical Zoom Function
Chapter 1 Precautions 1.12.6 Precautions for Optical Zoom Function WARNING Use only the “Normal” position to insert or withdraw the endoscope or an endotherapy device, angulate the bending section or carry out observations and/or treatments in intermediate and distant views. The field of view is small and the focusing for intermediate and distant views is blurred in zoom-up mode. -
Page 31: Precautions For Equipment Used In Combination
1.13 Precautions for Equipment Used in Combination Use this product in combination with related equipment described in this manual. “Appendix - Related Equipment Used in Combination” Using related equipment not described in this manual can result in not only abnormal operations but also equipment damage and/or patient or end-user injury. - Page 32 Chapter 1 Precautions CAUTION Turn off the light of the light source except during an inspection, procedure, etc., when necessary. If the light of the light source is left on, the distal end of the endoscope and its surroundings may become hot, causing burn injury to the patient or end-user. ...
-
Page 33: Precautions For High-Frequency Treatment
1.13.1 Precautions for High-Frequency Treatment WARNING Set the minimum required output power of the electrosurgical unit and high-frequency endotherapy device within the specified output range as per instructions provided in the operation manual of the electrosurgical unit and high-frequency endotherapy device. If the output power is inappropriate, it may cause injury to tissues in the body cavity, thermal injury, bleeding or perforation. -
Page 34: Precautions For Endotherapy Device And Syringe
Chapter 1 Precautions CAUTION Operate the electrosurgical unit within specified output range as per instructions provided in the operation manual of the electrosurgical unit. Leakage current may cause thermal injury. Do not energize the electrosurgical unit when the high-frequency endotherapy device or electrically active portion is in contact with the distal end of endoscope. -
Page 35: Chapter 2 Product Overview
Check the endoscope and other components in the package against the items shown in the figures below. Inspect the endoscope and each component for damage. If the endoscope or a component is damaged, or if a component is missing, contact your local FUJIFILM dealer. 2.1.1... -
Page 36: Accessories
Chapter 2 Product Overview 2.1.2 Accessories Note Figures in parentheses indicate the number of articles. Air/Water Channel Cleaning Suction Valve Air/Water Valve Forceps Valve Adapter SB-605 (1) AW-603 (1) FOV-DV7 (11) CA-611 (1) Injection Tube Cylinder Adapter Syringe WA-007 WA-010 Ventilation Adapter Cylinder/Inlet Brush... - Page 37 897N201625...
-
Page 38: Nomenclature And Functions Of Endoscope
Chapter 2 Product Overview Nomenclature and Functions of Endoscope This product consists of the following parts. LG Flexible Portion Scope Connector (One Step Connector) 11. Water Jet Inlet Cap 12. Water Jet Inlet 1. Suction Connector 2. Connector Mount 10. Ventilation Connector 3. - Page 39 13. Up/Down Angulation Lock 23. Scope Switches “1” to “3” 14. Up/Down Angulation Knob 22. Suction Valve Cylinder Control Portion (G7 control portion) 21. Suction Valve 20. Air/Water Valve 15. Left/Right Angulation Lock 19. Air/Water Valve Cylinder 16. Left/Right Angulation Knob 18.
-
Page 40: Scope Connector (One Step Connector)
Chapter 2 Product Overview Scope Connector (One Step Connector) The scope connector is connected to the light source. Name Function Suction Connector Accepts the tube from the suction unit. Secures the connection of the scope connector to the light Connector Mount source. -
Page 41: Boot
Name Function Maintains the right/left angle of the bending section. Moving this lock in the direction of F (Free) unlocks the left/ right movement of the bending section, allowing external Left/Right Angulation force to angulate the bending section freely. Lock Moving this lock in the direction opposite to F locks the right/ left movement and maintains the right/left angle of the bending section. -
Page 42: Insertion Portion (Applied Part)
Chapter 2 Product Overview Insertion Portion (Applied Part) The insertion portion contains various components of the angulation system, internal channels, optical and illumination systems. The endoscope can be inserted into the body cavity up to the boot. Name Function Connects the bending section and the control portion. -
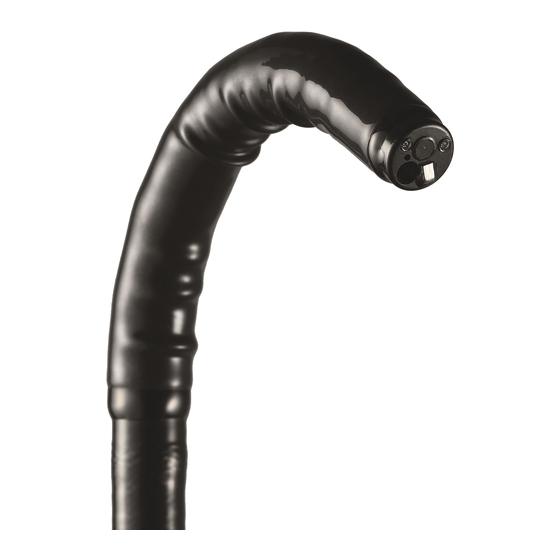
Page 43: Nomenclature And Functions Of Distal End Of Endoscope
Nomenclature and Functions of Distal End of Endoscope <Direction of Forceps> 1. Imaging Section 7. Light Guides 2. Distal Cap 6. Objective Lens 4. Water Jet Nozzle 5. Instrument Channel Outlet 3. Air/Water Nozzle Name Function This section receives an image focused on its surface by the distal objective lens. -
Page 44: Flexibility Adjustment Mechanism
Chapter 2 Product Overview Flexibility Adjustment Mechanism The flexibility adjustment mechanism adjusts the flexibility of the insertion tube of the endoscope. Index on Flexibility Adjustment Ring Index on Control Portion (“”, “1”, “2”, “3”) Rigid Flexible The flexibility can be adjusted in four steps (“”, “1”, “2” and “3”). Adjust the flexibility by aligning the index on the flexibility adjustment ring (“”, “1”, “2”... -
Page 45: Optical Zoom Function
Optical Zoom Function The optical zoom function optically magnifies the image and adjusts the focus simultaneously. The focus is adjusted and an enlarged image is obtained by moving the focusing position of the lens inside the endoscope from “Normal” to “Closest” by pressing the scope switch to which the “Zoom In”... -
Page 46: Focus Indicator
Chapter 2 Product Overview 2.5.2 Focus Indicator Focus Indicator Closest Normal (Close side) (Normal side) EM portion OM portion (Electronic magnification) (Optical zoom magnification) Example of Screen Display (Continuous Mode) Note The function assigned to each scope switch is set on the processor. ... - Page 47 Table 2.5.1 Focal points in multi zoom operating mode and magnification levels of the obtained image Focal point (Magnification level) Zoom operation mode Closest Very close Close Slightly close Normal (Maximum) (High) (Medium) (Low) (Normal) Continuous mode 5 steps Step Zoom 3 steps –...
-
Page 48: Resetting The Focal Point
Chapter 2 Product Overview 2.5.4 Resetting the Focal Point In the following cases, the focal point is automatically returns to the “Normal” position. When the processor is turned on When the EXAM. button on the processor is pressed ... -
Page 49: Location Of Each Label
Location of Each Label The positions where the labels are affixed on this product are shown below. 2.6.1 Location of Labels <Control Portion> Instrument Channel Diameter Label Model Label <Scope Connector> Label for the Year of Manufacture CDRH Certification and Identification Label Scope Connector Label 2-15 897N201625... -
Page 50: System Configuration
Chapter 2 Product Overview System Configuration This product is used in combination with related equipment. The recommended combination of related equipment that can be used with this product is listed below. Related equipment is optional. WARNING Use this product only in combination with related equipment described in this manual. Otherwise, it is unable to ensure its functionality, and may cause severe harm to patient or end-users. - Page 51 2-17 897N201625...
- Page 52 Chapter 2 Product Overview 2.7.1 System Configuration (Combination with VP-7000 and BL-7000) Water Pump JW-2 Cart Suction Unit Data Keyboard Foot Switch Processor VP-7000 Water Tank Water Tank WT-603 WT-604G *3 *4 Light Source BL-7000 Endoscopic CO Regulator Monitor GW-100 Printer Video Recorder *1 Use a suction unit which complies with EN 60601-1 (IEC 60601-1) and can set suction pressure to 40 to 53 kPa.
- Page 53 In addition, the related equipment described here may have already been discontinued or not marketed depending on the country or region. For details on the devices used in combination with this product, contact your local FUJIFILM dealer. Gas/Water Valve AW-604G...
-
Page 54: System Configuration (Combination With Ep-6000)
Chapter 2 Product Overview 2.7.2 System Configuration (Combination with EP-6000) Water Pump JW-2 Suction Unit Cart Data Keyboard Foot Switch Water Tank Water Tank WT-603 WT-604G Processor EP-6000 Endoscopic CO Regulator Monitor GW-100 Printer Video Recorder *1 Use a suction unit which complies with EN 60601-1 (IEC 60601-1) and can set suction pressure to 40 to 53 kPa. 2-20 897N201625... - Page 55 In addition, the related equipment described here may have already been discontinued or not marketed depending on the country or region. For details on the devices used in combination with this product, contact your local FUJIFILM dealer. Gas/Water Valve AW-604G...
- Page 56 Chapter 2 Product Overview 2-22 897N201625...
-
Page 57: Chapter 3 Workflow
Chapter Workflow This chapter describes the workflow of endoscopy. Have an understanding about the workflow and read the relevant sections thoroughly before use. 897N201625... -
Page 58: When Using Standard Functions
Chapter 3 Workflow When Using Standard Functions Inspecting Endoscope Inspecting and Connecting Related Inspecting Each Attaching Equipment Function Accessories 4.3.1 4.4.1 4.7.1 Inspecting Control Forceps Valve Preparing Related Inspecting Endoscopic Portion Equipment Images 4.3.2 4.4.2 4.6.1 4.7.2 Suction Valve Inspecting Scope Switch Inspecting Flexibility Connecting to Light Adjustment Mechanism... - Page 59 Note When the flexibility adjustment mechanism, the optical zoom function and the water jet function are used, be sure to read the sections with gray background ( Preparation Insertion and Treatment Withdrawal Before Use Observation 5.2.1 Preparation Using Flexibility Treatment Endoscope Withdrawal Adjustment Mechanism...
- Page 60 Chapter 3 Workflow 897N201625...
-
Page 61: Chapter 4 Preparation And Inspection
FUJIFILM dealer. Note The endoscope and accessories are not reprocessed before shipping from FUJIFILM. Reprocess them according to the instructions given in the Reprocessing Manual before using them in a procedure. -
Page 62: Preparation Of The Equipment
Chapter 4 Preparation and Inspection Preparation of the Equipment Prepare the endoscope, accessories, related equipment and personal protective equipment. Related equipment not supplied with this product is optional. Also refer to the operation manual of related equipment and personal protective equipment. ... -
Page 63: Related Equipment (Essential)
In addition, the devices described here may have already been discontinued or not marketed depending on the country or region. For details on the devices used in combination with this product, contact your local FUJIFILM dealer. Endoscopic CO... -
Page 64: Personal Protective Equipment
Chapter 4 Preparation and Inspection Personal Protective Equipment Goggles Facemask Protective Chemical-resistant and Clothing Waterproof Gloves *1 It is also recommended to use shoes that can be disinfected and/or a single-use shoe covers. *2 Chemical-resistant and waterproof gloves are recommended to be long enough to prevent your skin from being exposed. -
Page 65: Transporting Endoscope
Transporting Endoscope This section explains how to transport the reprocessed endoscope. When transporting the endoscope that has been pre-cleaned after use, refer to the Reprocessing Manual. “Reprocessing Manual” WARNING Carry a reprocessed endoscope in a clean manner. If personal protective equipment such as gloves is contaminated, the contaminants adhere to the endoscope and it can be a source of infection. -
Page 66: Inspecting Endoscope
Chapter 4 Preparation and Inspection Inspecting Endoscope Prior to inspection, make sure that dirt does not adhere to the endoscope. If dirt adheres to the endoscope, reprocess it according to the instructions given in the Reprocessing Manual. 4.3.1 Inspecting Control Portion (1) Visually and manually inspect the control portion for excessive scratches, deformation, cracks, residue, loose parts, or other irregularities. -
Page 67: Inspecting Insertion Portion
4.3 Inspecting Endoscope Control Portion Flexibility Adjustment Mechanism Insertion Portion Distal End Bending Section Scope Connector 4.3.3 Inspecting Insertion Portion CAUTION Do not forcibly twist or bend the insertion tube of the endoscope. It could damage the endoscope. (1) Visually inspect the boot and the insertion portion near the boot for bends, twists, swelling or other irregularities. -
Page 68: Inspecting Distal End
The distal adhesives are free from abnormalities such as loss, peeling or deterioration. All distal end surfaces are free from foreign residues, debris or sharp edges. Note If the distal adhesives are lost, peeled or deteriorated, or if the lens is damaged or disengaged, contact your local FUJIFILM dealer. 897N201625... -
Page 69: Inspecting Bending Section
4.3 Inspecting Endoscope Control Portion Flexibility Adjustment Mechanism Insertion Portion Distal End Bending Section Scope Connector 4.3.5 Inspecting Bending Section WARNING Turn the up/down and left/right angulation knobs slowly in each direction until they stop. Repeat this operation several times to confirm that the bending section angulates smoothly and correctly. -
Page 70: Inspecting Up/Down Angulation
Chapter 4 Preparation and Inspection <When the up/down and left/right angulation knobs are in the neutral positions> (4) When the up/down and left/right angulation knobs are turned to their respective neutral positions, visually check that the bending section returns smoothly to an approximately straight condition. -
Page 71: Inspecting Left/Right Angulation
4.3 Inspecting Endoscope Control Portion Flexibility Adjustment Mechanism Insertion Portion Distal End Bending Section Scope Connector Inspecting Left/Right Angulation (1) Move the left/right angulation lock all the way in the opposite direction of F (Free) to lock the left/ right angulation knob. -
Page 72: Inspecting Scope Connector
Chapter 4 Preparation and Inspection 4.3.6 Inspecting Scope Connector Water Jet Inlet Ventilation Connector Suction Connector Connector Mount Water Supply Connector Communication Light Guide Power-receiving Window Prong Section Air Guide Port Transmission Window Light Guide Cover Glass CAUTION Make sure that no moisture or foreign matter (such as dust, gauze fibers, metallic fragments) adheres to the scope connector before connecting it to the light source. -
Page 73: Inspecting And Attaching Accessories
<Preparation> The forceps valve is not reprocessed before shipping from FUJIFILM. Reprocess it according to the instructions given in the Reprocessing Manual before using it in a procedure. Reprocessing Manual <Inspection>... -
Page 74: Suction Valve
If the suction valve is attached forcibly, it may be damaged. <Preparation> The suction valve is not reprocessed before shipping from FUJIFILM. Reprocess it according to the instructions given in the Reprocessing Manual before using it in a procedure. Reprocessing Manual... - Page 75 4.4 Inspecting and Attaching Accessories Forceps Valve Suction Valve Air/Water Valve J Tube <Inspection> Visually check that the suction valve is free from abnormalities such as tears, distortions, cracks, indentations, etc. Note The suction valve is a consumable item. If any abnormality is found, use a new reprocessed valve.
-
Page 76: Air/Water Valve
<Preparation> The air/water valve is not reprocessed before shipping from FUJIFILM. Reprocess it according to the instructions given in the Reprocessing Manual before using it in a procedure. Reprocessing Manual <Inspection>... - Page 77 4.4 Inspecting and Attaching Accessories Forceps Valve Suction Valve Air/Water Valve J Tube <Attachment> CAUTION Slowly insert the air/water valve straight into the air/water valve cylinder of the endoscope. If the air/water valve is attached forcibly, it may be damaged. Note ...
-
Page 78: J Tube
J tube could be a source of infection. CAUTION When using the water jet function, be sure to use the FUJIFILM J tube model JT-500 regardless of irrigation or water source. If the specified J tube is not used, water may leak from the water jet channel and it may come into contact with related equipment, causing a failure of related equipment. - Page 79 Forceps Valve Suction Valve Air/Water Valve J Tube <Preparation> The J tube is not reprocessed before shipping from FUJIFILM. Reprocess it according to the instructions given in the Reprocessing Manual before using it in a procedure. Reprocessing Manual <Inspection>...
-
Page 80: Preparing Related Equipment
Inspect related equipment as per instructions provided in each operation manual. Note Some pieces of related equipment are not reprocessed before shipping from FUJIFILM or the manufacturer. Reprocess them for the first time prior to use as per instructions provided in respective operation manuals. - Page 81 The water in the water tank should be changed at least daily using sterile water. Use a reprocessed water tank. FUJIFILM water tanks must be reprocessed at least daily. These water containers are 24- hour multiple patient use devices which should not be used longer than 24 hours without additional reprocessing.
-
Page 82: Connecting Endoscope To Light Source And Related Equipment
Chapter 4 Preparation and Inspection Connecting Endoscope to Light Source and Related Equipment This section explains how to connect the endoscope to the light source and related equipment. 4.6.1 Connecting to Light Source WARNING Firmly connect the scope connector of the endoscope and the light source. If the scope connector is not connected properly, the endoscopic image may flicker or be lost, which may cause patient injury, bleeding and/or perforation. -
Page 83: Attaching Water Tank
4.6 Connecting Endoscope to Light Source and Related Equipment Light Source Water Tank Suction Unit J Tube Water Pump 4.6.2 Attaching Water Tank CAUTION Attach the water tank to the specified position of the cart or light source. Otherwise, fluid may leak from the connector of the water tank and it may come into contact with related equipment, causing equipment failure. -
Page 84: Attaching Suction Unit
Chapter 4 Preparation and Inspection 4.6.3 Attaching Suction Unit WARNING Firmly connect the suction tube from the suction unit to the suction connector on the scope connector. If the suction tube is not attached properly, body fluid may drip from the tube and can pose an infection control risk. -
Page 85: Attaching J Tube
Attaching J Tube WARNING Regardless of irrigation or water source, the FUJIFILM J tube (JT-500) must be used with the water jet channel. If the specified J tube is not used, body fluids may leak, posing infection risks to patients and/or end-users. -
Page 86: Attaching Water Pump
Confirm that all components of the water pump (irrigation source) have been reprocessed or are sterile, single patient use items. The components of the FUJIFILM water pump (irrigation source) have not been reprocessed. Before using irrigation components for a procedure for the first time, reprocess them as per the instructions described in the manual of the water pump. -
Page 87: Inspecting Functions Used In Combination With Related Equipment
4.7 Inspecting Functions Used in Combination with Related Equipment Endoscopic Images Scope Switch Air/Water Supply Function Suction Function Instrument Channel Water Jet Channel Inspecting Functions Used in Combination with Related Equipment 4.7.1 Inspecting Endoscopic Images Confirm that endoscopic images are normally displayed on the monitor and that the images are clear, sharp, of appropriate color and accuracy of observed target sites. -
Page 88: Inspecting Scope Switch
Chapter 4 Preparation and Inspection Up/Down Angulation Knob Left/Right Angulation Knob (4) Angulate the bending section by operating the up/down or left/right angulation knob of the endoscope and confirm that the endoscopic image is free from momentary disappearing or other irregularities. 4.7.2 Inspecting Scope Switch Scope Switch “3”... -
Page 89: Inspecting Air/Water Supply Function
4.7 Inspecting Functions Used in Combination with Related Equipment Endoscopic Images Scope Switch Air/Water Supply Function Suction Function Instrument Channel Water Jet Channel 4.7.3 Inspecting Air/Water Supply Function WARNING If water leaks from the air/water valve during the inspection of the air/water supply function, replace it with a new one already reprocessed. -
Page 90: Inspecting Suction Function
Chapter 4 Preparation and Inspection 4.7.4 Inspecting Suction Function WARNING If water leaks from the forceps valve or suction valve during the inspection of the suction function, replace it with a new one already reprocessed. A leaking forceps valve or suction valve may cause backflow of body fluid, posing an infection control risk. -
Page 91: Inspecting Instrument Channel
CAUTION When using the water jet function, be sure to use the FUJIFILM J tube model JT-500 regardless of irrigation or water source. If the specified J tube is not used, water may leak from the water jet channel and it may come into contact with related equipment, causing a failure of related equipment. - Page 92 Chapter 4 Preparation and Inspection Water Pump Side Connector (1) If a water (irrigation) pump is not connected, attach a sterile syringe filled with sterile water to the J tube. (2) Feed sterile water from the water pump or sterile syringe and check that sterile water comes out from the water jet nozzle.
-
Page 93: Chapter 5 How To Use
Chapter How to Use This chapter describes the basic operation procedures of this product and precautions to observe. This product is intended for use by medical professionals who have received proper training in endoscopic procedures at medical facilities under the management of physicians. This manual does not provide information about procedures or any aspects of endoscopic techniques. -
Page 94: Preparation
Chapter 5 How to Use Preparation 5.1.1 Preparing Related Equipment Prepare related equipment to be used, including back-up or spare endoscope, scope components (valves, etc.) and accessories (ex. water tank, endotherapy devices, irrigation tubing, etc.). 5.1.2 Pretreatment of Patient Prepare the patient in the normal endoscopy regimen. 897N201625... -
Page 95: Insertion And Observation
Insertion and Observation 5.2.1 Using Flexibility Adjustment Mechanism WARNING Use the flexibility adjustment mechanism while observing a clear view of the endoscopic image to secure patient safety. If the endoscopic image moves suddenly or is lost while rotating the flexibility adjustment ring, stop rotating the flexibility adjustment ring and restore the optimum field of view. -
Page 96: Insertion
Chapter 5 How to Use Index on Flexibility Adjustment Ring Index on Control Portion (“”, “1”, “2”, “3”) Rigid Flexible (1) When adjusting the rigidity of the insertion tube, confirm that there are no loops in the insertion tube. (2) Confirm that the indexes (“”, “1”, “2”, “3”) on the flexibility adjustment ring and the index “” on the control portion are clearly visible. - Page 97 (1) Patients should lie on examining table in an appropriate position as required for the specific type of endoscopy procedure to be performed. (2) Unlock the bending section by turning the up/down and left/right angulation locks in the direction of F (Free) until they stop. Note ...
-
Page 98: Observing Endoscopic Image
Chapter 5 How to Use 5.2.3 Observing Endoscopic Image Refer to the operation manual of the light source and processor for instructions on how to adjust the brightness, color, etc. WARNING When using special light observation mode, use it after sufficiently understanding the difference between the color tone and brightness of normal light observation mode and those of special light observation mode. -
Page 99: Operating Scope Switch
If the bending section does not return to its neutral position during a procedure, do not withdraw the endoscope forcibly. Consult your local FUJIFILM dealer. If the endoscope is withdrawn forcibly, injury to tissues in the body cavity, bleeding and/or perforation may result. - Page 100 Chapter 5 How to Use Operation of Left/Right Angulation Knob Operation of Up/Down Angulation Knob (1) Steer the distal end of the endoscope to the region of interest by turning the up/down and left/ right angulation knobs. Note To retain the bending angle securely, hold the up/down and left/right angulation knobs by hand.
-
Page 101: Operating Air/Water Valve
5.2.6 Operating Air/Water Valve Operate the air/water valve to supply air or water from the air/water nozzle in the distal end during a procedure. Note Do not operate the air/water valve under the following conditions while the endoscope is inserted in the body cavity. -
Page 102: Operating Suction Valve
Chapter 5 How to Use 5.2.7 Operating Suction Valve WARNING Set the suction pressure between 40 and 53 kPa. If the suction pressure is too high, patient debris or fluids may leak or splash from the forceps valve, posing infection control risks to patient or operator. -
Page 103: Using Water Jet Function
When using the water jet function, be sure to use the FUJIFILM J tube model JT-500 regardless of irrigation or water source. If the specified J tube is not used, water may leak from the water jet channel and it may come into contact with related equipment, causing a failure of related equipment. - Page 104 Chapter 5 How to Use (2) Using a sterile syringe or an irrigation/water pump system, inject sterile water through the water jet inlet to spray an area of interest. Note If you use the water pump for water feeding, refer to the manual of the water pump. ...
-
Page 105: Using Optical Zoom Function
Using Optical Zoom Function WARNING Use only the “Normal” position to insert or withdraw the endoscope or an endotherapy device, angulate the bending section or carry out observations and/or treatments in intermediate and distant views. The field of view is small and the focusing for intermediate and distant views is blurred in zoom-up mode. -
Page 106: Injecting Fluids From Instrument Channel Inlet
Chapter 5 How to Use Injecting Fluids from Instrument Channel Inlet WARNING When injecting fluids by attaching a syringe to the forceps valve, open the lid of the forceps valve and insert the syringe straight into the forceps valve. Otherwise, the forceps valve may be damaged or the syringe may be accidentally detached during fluid injection and body fluids may leak or splash from the forceps valve, posing an infection control risk to the patient or end-user. -
Page 107: Treatment
Treatment Prior to performing endoscopic electrosurgery, one should have a thorough understanding of the manufacturers' instructions for all equipment involved and one should be familiar with the specific safety and usage aspects of each endotherapy device. 5.6.1 Using Endotherapy Devices WARNING ... - Page 108 Chapter 5 How to Use CAUTION If resistance is encountered while advancing an endotherapy device within the instrument channel, do not forcibly advance the endotherapy device. Otherwise, it may cause malfunction of the endoscope. When inserting an endotherapy device, close the lid of the forceps valve. If the lid is open, it can reduce the efficacy of the endoscope’s suction system, making it impossible to perform aspiration.
-
Page 109: Use Of Non-Flammable Gases
5.6.2 Use of Non-Flammable Gases If the intestines contain a flammable gas, replace it with air or a non-flammable gas such as air or CO before performing high-frequency treatment. WARNING If the intestines contain a flammable gas, replace it with air or a non-flammable gas such as air or CO before performing high-frequency treatment. - Page 110 Chapter 5 How to Use WARNING Prior to performing endoscopic electrosurgery, one should have a thorough understanding of the manufacturers' instructions for all equipment involved and one should be familiar with the specific safety and usage aspects of each endotherapy device. CAUTION ...
-
Page 111: Endoscope Withdrawal
Endoscope Withdrawal (4) (5) WARNING Unless the endoscope’s bending section is in a neutral position (essentially “straight”), do not withdraw the endoscope whenever the endoscopic image is compromised, unclear, blurry, etc. due to any reason or condition including loss of image, power interruption, water droplets or dirt/debris adhering to the objective lens, etc. -
Page 112: Reprocessing Endoscope
Chapter 5 How to Use Reprocessing Endoscope After withdrawing the endoscope and discarding single-use components/accessories consistent with manufacturers’ recommendations, reprocess the endoscope and its accessories as per instructions provided in the Reprocessing Manual. Reprocessing Manual WARNING Immediately upon completion of the procedure, it is imperative that pre-cleaning is performed as per instructions provided in the Reprocessing Manual. -
Page 113: Chapter 6 Troubleshooting
“6.1 Troubleshooting.” If the problem persists even after following troubleshooting chart in “6.1 Troubleshooting”, consult your local FUJIFILM dealer and return the product for evaluation and/or repair according to “6.4 Returning Endoscope for Repair.” If any abnormality occurs during a procedure, immediately stop using the product and withdraw the endoscope from the patient according to “6.2 Withdrawal of Endoscope with Abnormality.”... -
Page 114: Troubleshooting
Chapter 6 Troubleshooting Troubleshooting 6.1.1 Problem with Displayed Images Problem Cause Remedy No images The cart, monitor, processor or Plug the cart, monitor, processor or light source into light source is unplugged from the the main outlet. outlet. The cart, monitor, processor or Power ON the cart, monitor, processor or light light source is OFF. -
Page 115: Problem With Scope Switch
Problem Cause Remedy Distorted image High-frequency interference. Stop power supply to the high-frequency endotherapy device to restore image output. The endoscope is working properly. The endoscope is not connected Connect the endoscope properly to the light source. correctly to the light source. ... -
Page 116: Problem With Air/Water Supply
Chapter 6 Troubleshooting 6.1.4 Problem with Air/Water Supply Problem Cause Remedy No air/water The operation of the air pump in Select the operation of the air pump from among “H” supply the light source is set to off. (high), “M” (middle) and “L” (low) by following the instructions described in the operation manual of the light source. -
Page 117: Problem With Suction
Suction valve is damaged. Replace with a new suction valve. Suction valve The suction valve or the control Contact your local FUJIFILM dealer. cannot be portion of the endoscope has been detached. damaged. Fluid leaks from The forceps valve is not attached Attach the forceps valve properly and close the lid. -
Page 118: Problem With Flexibility Adjustment Mechanism
Chapter 6 Troubleshooting 6.1.7 Problem with Flexibility Adjustment Mechanism Problem Cause Remedy Too difficult to The insertion tube is looped. Straighten the insertion tube. turn the flexibility adjustment ring 6.1.8 Problem with Optical Zoom Function Problem Cause Remedy The optical zoom The “Zoom In”... -
Page 119: Problem With Related Equipment
6.1.9 Problem with Related Equipment Problem with Endotherapy Devices Problem Cause Remedy Endotherapy The endotherapy device (such as Close the endotherapy device for insertion. device cannot be biopsy forceps) is left open. inserted. The handle of endotherapy device Loosen the grip to insert the endotherapy device. (such as biopsy forceps) is held firmly. -
Page 120: Withdrawal Of Endoscope With Abnormality
Image Cannot be Restored.” If abnormalities of the withdrawn endoscope are not described in “6.3 Handling of Endoscope with Abnormality”, contact your local FUJIFILM dealer and return the endoscope for repair as described in “6.4 Returning Endoscope for Repair.” In addition, if the endoscope cannot be withdrawn smoothly, do not withdraw the endoscope forcibly and consult your local FUJIFILM dealer. -
Page 121: When Either Normal Observation Mode Or Special Light Observation Mode Is Not Available
(8) Operate the up/down and left/right angulation knobs to straighten the bending section before withdrawing the endoscope. (9) Slowly withdraw the endoscope. 6.2.2 When Either Normal Observation Mode or Special Light Observation Mode is Not Available (1) Turn off all related equipment except the processor, light source, monitor, and suction pump. (2) Operate the processor to switch to available observation mode. -
Page 122: Handling Of Endoscope With Abnormality
Chapter 6 Troubleshooting Handling of Endoscope with Abnormality If the problem persists even after following “6.3.1 When Suction Valve Does Not Return to Its Original Position”, contact your local FUJIFILM dealer. 6.3.1 When Suction Valve Does Not Return to Its Original Position WARNING ... - Page 123 (18) Aspirate air with the syringe. While pressing the suction valve, inject air into instrument/suction channel until the sterile water inside the channel is discharged completely. (19) Detach the sterile syringe from the suction channel side of the injection tube. (20) Detach the tube for instrument/suction channel of the injection tube from the suction connector on the scope connector.
-
Page 124: Returning Endoscope For Repair
“Chapter 7 Service” WARNING Contact your local FUJIFILM dealer when this product is returned for repair. Be sure to reprocess this product before returning for repair. If a product which is not reprocessed is returned, it can create a risk of infection to users, service personnel or other persons in contact with it. -
Page 125: Chapter 7 Service
Problem caused by careless handling or misuse including use of non-compatible reprocessing systems or agents. Malfunctions or damages due to products of other manufacturers not supplied by FUJIFILM. Remodeling, maintenance, and repair using repair parts other than those specified by FUJIFILM. - Page 126 Chapter 7 Service 897N201625...
-
Page 127: Appendix
Appendix This chapter describes main specifications, related equipment used in combination with this product, electromagnetic compatibility (EMC), etc. Main Specification Classification of Medical Electrical Equipment 1. Type of protection against electric shock: Class I equipment (power supply: protected ground fault receptacle) 2. -
Page 128: Specifications
Appendix Specifications EC-760Z-V/M EC-760Z-V/L Optical system: Viewing direction 0° (Forward) Focus adjustment Available mechanism Field of view Normal 140° Closest 56° Observation range (mm) 1.5 to 100 Normal (mm) 3 to 100 Closest (mm) 1.5 to 2.5 Method of illumination Light guide method Image size Super image... - Page 129 EC-760Z-V/M EC-760Z-V/L LED class *3 *5 Class 1 LED product *1 Channel size should not be used as the sole consideration for compatibility of an accessory. *2 For EC-760Z-V/M, use an endotherapy device with working length of 1800 mm or longer. For EC-760Z-V/L, use an endotherapy device with working length of 2000 mm or longer.
-
Page 130: Operating Environment, Transport Environment And Storage Environment
Appendix Operating Environment, Transport Environment and Storage Environment Operating Environment Temperature +10 to +40°C Humidity 30 to 85%RH (no dew condensation) Pressure 70 to 106 kPa (within range of atmospheric pressure) Transport Environment Temperature -20 to +60°C Humidity 10 to 85%RH (no dew condensation) Pressure 70 to 106 kPa (within range of atmospheric pressure) -
Page 131: Accessories
Accessories Accessories in the following tables are items whose life expectancy is limited and will require replacement once they show signs of wear or irregularity. Such accessories cannot be repaired or refurbished and should be replaced after any irregularity is observed. Name Model Forceps valve... -
Page 132: Related Equipment Used In Combination
Note that the devices described here may have already been discontinued. For details on the devices used in combination with this product, contact your local FUJIFILM dealer. Compatible Processor and Light Source Name... -
Page 133: Water Pump
Water Pump Name Model Water Pump JW-2 Electrosurgical Unit Use an electrosurgical unit which complies with EN 60601-2-2 (IEC 60601-2-2). Note For details on the electrosurgical unit that can be used in combination with this product, refer to the operation manual of the diathermic slitter. ... -
Page 134: Compatible Endotherapy Devices
Endotherapy devices cannot be repaired or refurbished. Thus, if any abnormality is found, replace with a new one. Note For details on endotherapy devices used in combination with this product, consult your local FUJIFILM dealer. EC-760Z-V/M EC-760Z-V/L Disposable diathermic slitter... -
Page 135: Electromagnetic Compatibility (Emc) Information
Electromagnetic Compatibility (EMC) Information Medical electronic equipment requires special care with regards to EMC. This product must be installed and used according to the EMC information provided in Table 1 through Table 4 if both this product and the processor and light source , which are used in combination, comply with the requirements of EN 60601-1-2:2015 or that provided in Table 5 through Table 8 if the processor and light source... - Page 136 Appendix <Electromagnetic Immunity Compliance Information and Guidance> Table 2 Guidance and Manufacturer Declaration - Electromagnetic Immunity - This device is intended for use in the following prescribed electromagnetic environments. Customers and users of this product are advised to check that it is being used in such environments. IEC 60601 Immunity test Compliance level...
- Page 137 <Portable and Mobile RF Communications Equipment Compliance Information and Guidance> Table 3 Guidance and Manufacturer Declaration - Electromagnetic Immunity - This device is intended for use in the following prescribed electromagnetic environments. Customers and users of this product are advised to check that it is being used in such environments. IEC 60601 Immunity test Compliance level...
- Page 138 Appendix IEC 60601 Immunity test Compliance level Guidance Test level Immunity to 380 - 390 MHz, 27 V/m 380 - 390 MHz, 27 V/m Degradation of the performance proximity fields 430 - 470 MHz, 28 V/m 430 - 470 MHz, 28 V/m of this product could result if from RF wireless 704 - 787 MHz, 9 V/m...
- Page 139 <Recommended Separation Distance Between Portable and Mobile RF Communications Equipment and this Product> Table 4 Recommended separation distance between portable and mobile RF communications equipment and this product. This product is intended for use in an electromagnetic environment in which radiated RF disturbances are controlled.
- Page 140 Appendix <Electromagnetic emission compliance information and guidance> Table 5 Guidance and Manufacturer Declaration - Electromagnetic Emission - This device is intended for use in the following prescribed electromagnetic environments. Customers and users of this product are advised to check that it is being used in such environments.
- Page 141 <Electromagnetic Immunity Compliance Information and Guidance> Table 6 Guidance and Manufacturer Declaration - Electromagnetic Immunity - This device is intended for use in the following prescribed electromagnetic environments. Customers and users of this product are advised to check that it is being used in such environments. IEC 60601 Immunity test Compliance level...
- Page 142 Appendix <Portable and Mobile RF Communications Equipment Compliance Information and Guidance> Table 7 Guidance and Manufacturer Declaration - Electromagnetic Immunity - This device is intended for use in the following prescribed electromagnetic environments. Customers and users of this product are advised to check that it is being used in such environments. IEC 60601 Immunity test Compliance level...
- Page 143 a. Field strengths from fixed transmitters, such as base stations for radio (cellular/cordless) telephones and land mobile radios, amateur radio, AM and FM radio broadcast and TV broadcast cannot be predicted theoretically with accuracy. To assess the electromagnetic environment due to fixed RF transmitters, an electromagnetic site survey should be considered.
- Page 144 Appendix <Recommended Separation Distance Between Portable and Mobile RF Communications Equipment and this Product> Table 8 Recommended separation distance between portable and mobile RF communications equipment and this product. This product is intended for use in an electromagnetic environment in which radiated RF disturbances are controlled.
-
Page 145: Disposal Of Electric And Electronic Equipment
The recycling of materials will help to conserve natural resources. For more detailed information about recycling of this product, contact your local FUJIFILM dealer. In Countries outside the EU: If you wish to discard this product, contact your local authorities and ask for the correct way of disposal. - Page 146 Index 897N201625897N201625 Index Air Guide Port ..........2-4 Power-receiving Section ......... 2-4 Air/Water Nozzle ..........2-9 Air/Water Valve ..........2-5 Scope Connector ..........2-4 Air/Water Valve Cylinder......... 2-5 Scope Switches..........2-5 Suction Connector........... 2-4 Bending Section..........2-5 Suction Valve ..........2-5 Boot..............
- Page 147 Contact our regional representative below or the distributor from which you purchased the product. <Europe> FUJIFILM Europe GmbH http://www.fujifilm.eu/eu/ See our website to locate our representative in your country. <USA> Fujifilm Medical Systems U.S.A., Inc http://www.fujifilmendoscopy.com/ (800) 385-4666 <Australia> FUJIFILM Australia Pty Ltd http://www.fujifilm.com.au/ 1800 060 209 <Asia>...
- Page 148 FUJIFILM Europe GmbH Heesenstrasse 31, 40549 Duesseldorf, Germany EU Importer: FUJIFILM Europe B.V. Oudenstaart 1, 5047 TK Tilburg, The Netherlands Imported to Australia by: FUJIFILM Australia Pty Ltd 114 Old Pittwater Road, Brookvale, NSW. 2100, Australia 897N201625 190218-1.0-DT-E2 FC746A Printed in Japan...
Need help?
Do you have a question about the 700 Series and is the answer not in the manual?
Questions and answers