FujiFilm SonoSite iViz User Manual
Ultrasound
system
Hide thumbs
Also See for SonoSite iViz:
- User manual supplement (74 pages) ,
- User manual (40 pages) ,
- Manual (2 pages)
Table of Contents
Troubleshooting

Related Manuals for FujiFilm SonoSite iViz


Summary of Contents for FujiFilm SonoSite iViz
- Page 1 USER GUIDE...
- Page 2 Federal (United States) law restricts this device to sale by or on the order of a physician. iViz, Sonosite, and the Sonosite logo are trademarks and registered trademarks of FUJIFILM Sonosite, Inc. in various jurisdictions. FUJIFILM is a trademark and registered trademark of FUJIFILM Corporation in various jurisdictions.
-
Page 3: Table Of Contents
Chapter 1: Introduction About the SonoSite iViz User Guide ......................1 Document conventions .......................... 1 Getting help ..............................2 Chapter 2: Getting Started About SonoSite iViz ............................3 Intended use ................................ 3 Diagnostic ultrasound ..........................3 Contraindications ............................4 Accessories and peripherals ........................... 4 Hardware features .............................. - Page 4 Adjusting the screen brightness .......................20 Configuring sleep mode ........................20 Adding a wireless printer ........................21 Configuring SonoSite iViz settings ......................21 Opening the SonoSite iViz Settings screen ...................22 Configuring preferences ........................22 Configuring OB measurements and calculations ................24 Configuring labels ..........................24 Setting up a DICOM profile ........................25 Configuring patient search settings ....................27...
- Page 5 Switching between CVD and CPD ....................47 Controlling color gain ..........................47 Adjusting scale ............................48 Inverting the blood flow colors ......................49 Filtering ...............................49 Controlling flow ............................50 Scanning in M Mode ............................50 Moving the M Line ..........................51 Updating in M Mode ............................51 Changing the sweep speed .........................51 Setting the image orientation ........................52 Optimizing the image ............................53 Adjusting depth and gain ..........................54...
- Page 6 Common problems ..........................93 Understanding error messages......................93 Troubleshooting connectivity problems ..................96 DICOM common problems ........................96 Maintenance ..............................98 Upgrading SonoSite iViz software and firmware ................98 iViz performance testing ..........................99 Overview ..............................99 Recommended test equipment ......................99 Functional acceptance ..........................99 2D performance tests ......................... 100 Additional performance tests ......................
- Page 7 Chapter 11: Safety Ergonomic safety ............................123 Minimize eye and neck strain ......................124 Support your back during an exam ....................124 Minimize reaching and twisting ..................... 124 Promote comfortable shoulder and arm postures ..............124 Employ comfortable postures ......................124 Use comfortable wrist and finger postures with transducers ..........
- Page 8 Chapter 12: Acoustic Output ALARA principle ............................. 151 Applying the ALARA principle ......................151 Direct, indirect, and receiver controls ................... 152 Acoustic artifacts ............................152 Guidelines for reducing MI and TI ......................153 Output display ..............................154 MI and TI output display accuracy ....................154 Factors that contribute to display uncertainty ................
-
Page 9: About The Sonosite Iviz User Guide
Other accessories and third-party equipment are subject to their own instructions and restrictions. The SonoSite iViz User Guide is intended for a user familiar with ultrasound. It does not provide training in sonography, ultrasound, or clinical practices. Before using SonoSite iViz, you must complete such training. -
Page 10: Getting Help
English support: +44 14 6234 1151 French support: +33 1 8288 0702 German support: +49 69 8088 4030 Italian support: +39 02 9475 3655 Spanish support: +34 91 123 8451 Asia Service Center +65 6380-5581 About the SonoSite iViz User Guide... -
Page 11: Chapter 2: Getting Started
Chapter 2: Getting Started Use this section to help familiarize yourself with the SonoSite iViz system and its uses. About SonoSite iViz SonoSite iViz is a portable, hand-held device that acquires and displays high-resolution, real-time ultrasound images. Features available on the system include: 2D scanning mode with color Doppler... -
Page 12: Contraindications
Contraindications SonoSite iViz is not intended for opthalmic use or any application that causes the acoustic beam to pass through the eye. Accessories and peripherals... -
Page 13: Hardware Features
To order accessories, or to find out if a specific piece of equipment is compatible with the SonoSite iViz ultrasound system, contact FUJIFILM SonoSite or your FUJIFILM SonoSite representative. See “Getting help” on page 2. Hardware features The front of the system is shown in Figure 2-1. - Page 14 The back of the system is shown in Figure 2-2. Figure 2-2 Back of the SonoSite iViz ultrasound system Battery bay Speaker Camera and flash Hardware features...
-
Page 15: General Interaction
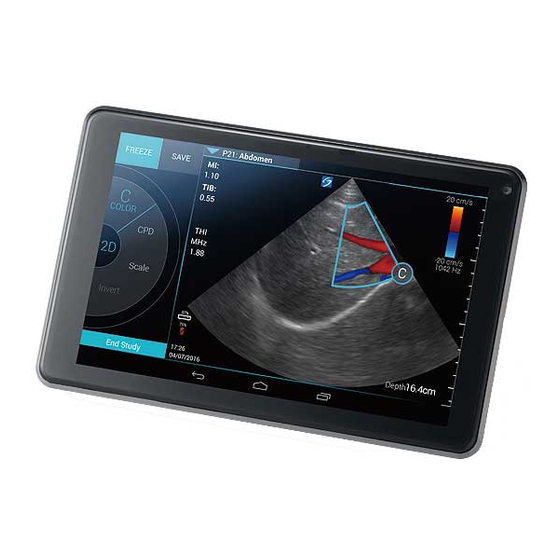
Learn - This module contains general ultrasound training videos and SonoSite iViz on-board help videos. Using the touchscreen When scanning, the SonoSite iViz touchscreen is divided into two main areas: the left side contains your controls, and the right side is the scan area, as shown in Figure 2-4. - Page 16 ID: 1234567890 P21v: Abdomen Patient: John Smith FREEZE SAVE COLOR Orient 0.00 Dynamic Range Depth: 16.4cm 09:15 End Study 01/01/2015 Figure 2-4 Touchscreen while in scan mode 1 Scan mode selector Power management indicator: flashing white - Slow frame rate mode. Solid blue - Freeze mode.
-
Page 17: Using Gestures
Using gestures You interact with the touchscreen the same as with many other touchscreen devices: Swipe - Move your finger quickly across the screen. Drag - Move one or two fingers across the screen, usually to move an object from one location to another. Tap - Quickly touch the screen once. -
Page 18: Opening Menus And Tool Drawers
Opening menus and tool drawers You can access additional controls by opening menus and tool drawers. This symbol indicates a drop-down menu. Tap or swipe down on this symbol to open the menu. For instance, the Exam Type menu allows you to choose between several preset exam types. This symbol indicates a drawer that you can open. -
Page 19: Entering Text
Entering text When filling out forms in SonoSite iViz, such as when you are updating patient records or configuring settings, you can enter text by tapping the text field you want to edit. An on-screen keyboard appears, as shown in Figure 2-5. -
Page 20: Plugging In A Transducer
1 On the back of the SonoSite iViz system, position the battery in the battery slot so that the beveled edge of the battery is nearest the side of the SonoSite iViz system. -
Page 21: Charging The Battery
To avoid risk from loss of power, plug the system into an appropriate power source or change batteries when the battery is low. There are two ways to charge the SonoSite iViz batteries; you can use the included battery charger or plug in the USB charger while a battery is installed in system. - Page 22 2 Connect the AC power adapter to the receptacle on the battery charger. 3 Remove the battery from the SonoSite iViz system, and insert it in a slot on the battery charger. You can charge up to two batteries at a time.
-
Page 23: Removing The Battery
1 Turn off the system. See “Turning off SonoSite iViz” on page 16. 2 On the back of the SonoSite iViz system, press the battery lock in to unlock the battery. 3 Pull up the battery to remove it. Turning SonoSite iViz on and off The system is battery powered. -
Page 24: Turning On Sonosite Iviz
Turning on SonoSite iViz To turn on SonoSite iViz 1 Check that a battery is installed in the SonoSite iViz system. For more information, see “Installing the battery” on page 12. 2 Press the Power button, and wait several seconds for the system to power on. -
Page 25: Chapter 3: Configuring Sonosite Iviz
Chapter 3: Configuring SonoSite iViz Configuring Android settings Google Android is the operating system (OS) that the SonoSite iViz software runs on. The Android OS manages and monitors things like wireless connectivity, date and time, and battery charge. Most Android settings will be pre-configured by FUJIFILM SonoSite, but there are several Android functions that you can configure yourself. -
Page 26: Connecting To A Virtual Private Network (Vpn)
Connecting to a virtual private network (VPN) Note For security reasons, your SonoSite iViz system must be secured with some form of password before you can connect to a VPN. For more information, see “Activating security settings” on page 17. -
Page 27: Setting The Date And Time
By default, the SonoSite iViz system date and time are set automatically when you connect to a wireless network. If you choose not to connect your SonoSite iViz system to a network, or if you want to use a different date and time, use the following manual procedure. -
Page 28: Adjusting The Screen Brightness
3 Tap the time period you want to change to. This is the period of inactivity before the system switches to sleep mode. Understanding sleep mode and screen lock settings If the system is unlocked and not in scanning mode, SonoSite iViz goes into sleep mode as described in the section “To change the Android sleep mode interval (non-scanning mode)”... -
Page 29: Adding A Wireless Printer
5 In the upper right corner of the screen, tap the three dots, and then tap Add a printer. 6 From the Nearby Printers menu, tap one of the options, such as Nearby Wi-Fi Printers. SonoSite iViz searches for a wireless printer. -
Page 30: Opening The Sonosite Iviz Settings Screen
1 From the SonoSite iViz Settings screen, tap Preferences. 2 From the Preferences screen, the following settings are available: Units - Select the units of measure used by SonoSite iViz. Generic Volume Calcs - Can be measured two different ways, depending on the type of structures you are measuring. - Page 31 To turn this feature off, select Never. Power off - Turns off the iViz system after a period of time in sleep mode, regardless of whether scanning or not. The system must be powered on manually. Configuring SonoSite iViz settings...
-
Page 32: Configuring Ob Measurements And Calculations
Configuring OB measurements and calculations 1 From the SonoSite iViz Settings screen. tap OB Calcs. 2 From the OB Calculations screen, set the author of preference for the following OB calculations and measurements: GS - Gestational Sac CRL - Crown Rump Length BPD - Biparietal Diameter... -
Page 33: Setting Up A Dicom Profile
. To retrieve the default list of labels, tap Restore. Setting up a DICOM profile You can create a Digital Imaging and Communications in Medicine (DICOM) profile tailored to each location or institution where SonoSite iViz is used. SonoSite iViz also includes a non-specific DICOM profile called Tricefy. Note For institutions that have a Tricefy Collaboration account, the Tricefy Collaboration profile has limited editability. - Page 34 Inactive. h Tap Ping to check whether the connection to the archive server is working. i Tap Verify to check whether the archive server is ready to receive uploads from your SonoSite iViz system. 5 From the Worklist tab: a In the AE Title field, type the application entity (AE) title.
-
Page 35: Configuring Patient Search Settings
To query the worklist server, select Active; you cannot query the worklist server if it is set to Inactive. i Tap Ping to check whether the connection to the worklist server is working. j Tap Verify to check whether the worklist server is ready to receive uploads from your SonoSite iViz system. -
Page 36: Configuring Emr Settings And Preferences
32. Configuring EMR settings and preferences Use this feature to enter FUJIFILM Synapse EMR Gateway information, such as host name, IP address, and port number for the FUJIFILM Synapse EMR Gateway that the SonoSite iViz system connects to. - Page 37 Caution: Using a display other than the one included on your SonoSite iViz system may result in image distortion and degradation. The touchscreen interface functions will not be available on the secondary display. Note You need to use the micro HDMI connector to route the video output signal of SonoSite iViz to an external display.
- Page 38 Connecting to a separate display...
-
Page 39: Chapter 4: Managing Patient Records
About SonoSite iViz studies Throughout this guide, you will see references to studies. Studies are used in SonoSite iViz as a way to organize and consolidate all of the data associated with an exam. The specific information contained in a study is based on the exam type. - Page 40 To search for studies associated with a specific patient or date 1 Open the Patient module. If you are in an open patient study, tap to open the main Patient module screen. 2 Tap Worklist 3 Use any or all of the following parameters in your search: ...
-
Page 41: Managing Studies
Using the integrated camera on your SonoSite iViz system, you can scan the patient's ID bar code in order to search for associated studies. For information on configuring this feature, see “To set up bar code scanning” on page 28... -
Page 42: Creating Or Updating A Patient Study
2 Tap Worklist. To sort the list In the list header, tap next to the item that you want to sort the list by. To view a study Tap the study that you want to open. To refresh the list ... -
Page 43: Ending A Study
Referring Doctor Tap the field and use the keyboard to enter the name of the referring doctor. Study Date This field cannot be changed. User Tap the field and use the keyboard to enter the name of the person using SonoSite iViz. 4 Tap Save. -
Page 44: Sharing A Study
Tricefy - This option sends the image or clip through the Tricefy collaborative medical image-sharing tool. You must set up an account with Tricefy to use this option. SonoSite iViz includes a free 30-day trial of Tricify. After your 30-day trial is over, you have up to one year to perform an additional 500 collaboration transactions. -
Page 45: Editing A Report
Editing a report Once you’ve ended a study, your editing options are limited. In some places, you can delete data but not add or change it. Note You cannot edit archived reports. To edit a report 1 Open the study that contains the report you want to edit. For more information about finding studies, see “Accessing patient information”... -
Page 46: Sharing A Report
3 Tap Print, and select your printer and document options. 4 Tap Print to print the report. Sharing a report You can share a report if SonoSite iViz is connected to an EMR server. To share a report Within an open report, tap Save and Send to EMR. -
Page 47: Chapter 5: Performing An Exam
Beginning an exam There are two ways to begin an exam: From the Home screen, tap Scan. You can return to the Home screen from anywhere in the SonoSite iViz system by tapping Understanding optimal thermal performance... -
Page 48: Understanding Imaging Modes
Understanding imaging modes In SonoSite iViz, the active imaging mode is always highlighted in blue so you can tell at a glance what imaging mode you are using. For instance, in Color mode, both the 2D and Color buttons are highlighted in blue:... -
Page 49: Exam Overview
Exam overview WARNING Do not allow patient contact with the system other than the transducer lens. Acoustic artifacts An acoustic artifact is information, present or absent in an image, that does not properly indicate the structure or flow being imaged. There are helpful artifacts that aid in diagnosis and those that hinder proper interpretation. -
Page 50: Choosing A Transducer And Exam Type
The SonoSite iViz system is capable of automating or assisting some measurements and calculations based on the exam type you choose. To ensure that the measurements and calculations you need are available, be sure to select an exam type from the menu. - Page 51 Gels Use acoustic coupling gel on the transducer during exams. Although most gels provide suitable acoustic coupling, some gels are incompatible with some transducer materials. FUJIFILM SonoSite recommends Aquasonic gel and provides a sample with the system. For general use, apply a liberal amount of gel between the transducer and the body.
-
Page 52: Reviewing Patient Information
Doppler. Selecting Color mode In the SonoSite iViz system, color is included as part of the 2D scanning mode. If you are in M Mode and want to switch to color, you must change to 2D scanning mode first. - Page 53 Because color images can lose some resolution and detail compared to other 2D images, the color box enables you to concentrate the scan on a particular region of interest. With SonoSite iViz, you can change the location, size, and shape of the color box to achieve the best possible image.
- Page 54 2 To change the size and shape of the box, tap Resize, and then drag your thumb in the trackpad. Moving to the right makes the box wider. Moving to the left makes the box narrower. Moving down makes the box taller. Moving up makes the box shorter. 3 To change the location of the box, tap Move, and drag your thumb in the trackpad.
-
Page 55: Switching Between Cvd And Cpd
CPD is not available for all exam types. To switch between CVD and CPD On the control wheel, tap CVD or CPD. Controlling color gain SonoSite iViz lets you adjust the gain within the color box to accommodate different anatomic and flow conditions. Scanning in 2D... -
Page 56: Adjusting Scale
To control the color gain 1 On the control wheel, tap Color Gain. The gain control appears. 2 Move the slider up or down to set the gain. Color Gain Adjusting scale You can change the scale of the color scan to better view high or low-flow blood vessels. The current blood flow scale appears in the upper left of the scanning window: The scale range varies according to exam type. -
Page 57: Inverting The Blood Flow Colors
To control the color scale 1 On the control wheel, tap Scale. The Scale control appears. Scale 2 Tap to change to a higher or lower blood flow scale (or tap one of the dots for specific blood flow scale index). Inverting the blood flow colors By default, blood flow toward the transducer is shown in red, while blood flow away from the transducer is displayed in blue. -
Page 58: Controlling Flow
To control wall filtering 1 On the control wheel, tap Wall Filter. The Wall Filter control appears. Wall Filter 2 Tap the desired level of filtering: H - High M - Medium L - Low Controlling flow To control flow 1 On the control wheel, tap Flow. -
Page 59: Moving The M Line
An M (representing M Mode) appears in the scan mode selector. Moving the M Line There are two ways to control the M Line. You can use your thumb in the control area or your index finger in the display area. To move the M Line using your thumb ... -
Page 60: Setting The Image Orientation
To change the sweep speed 1 On the control wheel, tap Update. 2 On the control wheel, tap Speed. Speed 3 Tap one of the following: S - Slow M - Medium F - Fast Setting the image orientation You can determine the orientation of the image at a glance by seeing which side of the image the SonoSite logo appears on. -
Page 61: Optimizing The Image
To change image orientation 1 On the control wheel, tap Orient. the orientation control appears. 2 Tap to move the orientation to up/left or up/right. Orient Optimizing the image The following image optimizations are available, depending on the transducer you have selected: Res - Provides the best possible resolution. -
Page 62: Adjusting Depth And Gain
To optimize the image 1 On the control wheel, tap Opt. The image optimization control appears. 2 Tap the image optimization option you want. Note THI optimization is not available for all transducers. Adjusting depth and gain Adjusting depth Depth refers to the depth of display. You can adjust the depth in all imaging modes. Scan depth is always displayed in the lower left of the scan window. -
Page 63: Adjusting Gain
2 Tap to increase or decrease the scan depth (or tap one of the dots for specific screen-depth index). Depth Adjusting gain Gain refers to amplifying the intensity of the returning sound waves on the screen display. Increasing the gain brightens the image. -
Page 64: Controlling The Dynamic Range
2 To set the gain, move the blue dot up and down the slider. Overall Gain Reset 3 If desired, tap Reset to return to the default settings. To set Near/Far Gain 1 On the control wheel, tap Near/Far Gain. The gain control appears. 2 Tap Near/Far Gain again to toggle between near gain and far gain. -
Page 65: Accessing Guided Protocols
Dynamic Range Accessing guided protocols SonoSite iViz offers protocols that guide you through all the necessary views for that protocol and supply a reference image for that view. Note Guided protocols are only available when using phased array transducers, such as the P21v. -
Page 66: Efast
IVC Aorta Liver Right Kidney Left Kidney Spleen Bladder Lung (Ph.) eFAST Extended focused assessment with sonography for trauma (eFAST) is a rapid bedside ultrasound examination. Assistance is available for the following types of exams: RUQ LUQ Pelvis Lung (Ph.) FATE Focus assessed transthoracic echo (FATE) interprets echocardiographic findings. -
Page 67: Rush
RUSH Rapid ultrasound for shock and hypotension (RUSH) exam is a quick way to examine the heart, intravascular compartments, and large arteries. Assistance is available for the following types of exams: PLAX PSAX Apical Subxiphoid IVC Aorta RUQ Spleen/LUQ Pelvis Lung (Ph.) Accessing guided protocols... - Page 68 Accessing guided protocols...
-
Page 69: Chapter 6: Managing Images And Clips
If you did not open an existing study before beginning your scan, a new blank study is created. Be sure to update the study with the necessary patient and exam information before ending it. For more information about patient studies and how they are used in the SonoSite iViz system, see Chapter 4, “Managing Patient Records.”... -
Page 70: Saving An Image Or A Clip
Drag the green slider up and down to scroll through the frames. Select the back arrow to return to the first frame or the forward arrow to go to the last frame Saving an image or a clip During an exam, you can save an image or clip to the current study. Caution To avoid mixing images saved from multiple patients, make sure that the correct patient ID is displayed before you save an image. -
Page 71: Reviewing An Image Or Clip
Zooming in and out of an image To zoom in and out of an image, make a pinching or expanding motion with your fingers on the display screen. For more information about using gestures in the SonoSite iViz system, see “Using gestures”... - Page 72 To add labels and arrows 1 On a frozen or saved image, open the bottom tool drawer by swiping upward on the tool drawer handle in the lower right of the screen. 2 Tap Text Labels. 3 To add an arrow: a Tap +Arrow.
-
Page 73: Deleting Images And Clips
To delete labels and arrows 1 Tap the arrow or label that you want to delete. 2 In the label menu, tap next to the arrow or label you want to delete. Deleting images and clips To delete an image or clip 1 From the Patient module, tap the iViz Studies tab. - Page 74 Tricefy - This option sends the image or clip through the Tricefy collaborative medical image-sharing tool. You must set up an account with Tricefy to use this option. SonoSite iViz includes a free 30-day trial of Tricify. After your 30-day trial is over, you have up to one year to perform an additional 500 collaboration transactions.
-
Page 75: Chapter 7: Measurements And Calculations
Chapter 7: Measurements and Calculations This chapter provides information about measurements, calculations, worksheets, and reports. Measurements are performed on frozen images. For references used, see “Measurement References” page 81 To avoid misdiagnosis or harming the patient outcome, do not use single WARNINGS calculations as sole diagnostic criteria. -
Page 76: Viewing And Deleting Measurement Results
Viewing and deleting measurement results The current measurement results appear on the upper left side of the scan area under the Measurements box. Tap the drop-down arrow to see the measurements you’ve taken. To delete a measurement Select the caliper you want to delete, and then tap the red Taking basic measurements Caution: Moving the baseline, scrolling, or inverting the trace while frozen causes the cardiac... - Page 77 2 Under the General measurements area, tap Ellipse. 3 Drag the caliper to the boundary of the feature you want to measure. When you lift your finger, a dashed circle appears, and the ellipse is anchored at that point. 4 Drag the second caliper along the horizontal axis to align it to the rest of the feature you are measuring. 5 Tap the height caliper to make it active.
- Page 78 6 Drag the height caliper to the height of the feature you want to measure. The diameter, area, and circumference measurements appear in the Measurements box. To measure the circumference or area by tracing 1 On a frozen scan, tap Measurements. 2 Under the General measurements area, tap Trace.
-
Page 79: About Calculations
Measurements box. About calculations In SonoSite iViz, you can perform calculations that you then save to a patient report. You can display, repeat, and delete measurements from a calculation. Some measurements can be deleted directly from a patient report. See “Ending a study”... -
Page 80: Calculating Volume
After each measurement is taken, the measurement name in the calculation menu changes color to show that it is complete. Calculating volume You can calculate the volume of a structure by taking up to three separate measurements: length, width, and height. - Page 81 c Drag the active caliper to the other side of the structure. When you lift your finger, the length value is set. 4 Measure the width of the structure. a If necessary, unfreeze the image, reposition the transducer to show the width of the feature, freeze the image, and then tap Measurements.
-
Page 82: Exam-Based Calculations
5 Measure the height of the feature. a If necessary, unfreeze the image, reposition the transducer to show the height of the structure, freeze the image, and then tap Measurements. b In the control area, tap Height. c Drag the active caliper to the top of the structure. When you lift your finger, a new, active caliper appears. d Drag the active caliper to the bottom of the structure. - Page 83 Table 7-1: Cardiac calculations and results Calculation list Measurement name (imaging mode) Results Area trace MVA (2D) MV Area AVA (2D) AV Area To measure LVd and LVs 1 From the Exam Type drop-down menu, tap Cardiac. 2 On a frozen 2D image, tap Measurements. 3 Switch to the Cardiac calculation list.
-
Page 84: Obstetrics Calculations
Obstetrical calculation table you intend to use. See “Obstetrical references” page 86. In SonoSite iViz, you can calculate gestational age and fetal heart rate. You can select authors for Obstetrical calculations. See “Configuring OB measurements and calculations” on page 24 and “Measurement... - Page 85 Table 7-2: Results from system-defined obstetrical measurements and table authors Gestational Calculation result Available authors OB measurements — Gestational Age Hansmann, Nyberg, Tokyo U. Hadlock, Hansmann, Osaka, Tokyo Chitty, Hadlock, Hansmann, Osaka, Tokyo U. Chitty, Hadlock, Hansmann Hadlock, Hansmann, Tokyo U. Chitty, Hadlock, Hansmann, Osaka, Tokyo U.
- Page 86 Table 7-2: Results from system-defined obstetrical measurements and table authors Gestational Calculation result Available authors OB measurements Amniotic Fluid Index Jeng Chitty, Hadlock, Jeanty Growth Analysis Tables Chitty, Hadlock, Jeanty Chitty, Hadlock, Jeanty Chitty, Hadlock, Jeanty Brenner, Hadlock, Jeanty HC/AC Campbell The Gestational Age is automatically calculated and displayed next to the Obstetrical measurement you selected.
-
Page 87: Abdomen, Breast, Lung, Msk, And Nerve Calculations
To measure Heart Rate (HR) in M Mode 1 From the Exam Type drop-down menu, tap OB. 2 On a frozen M-Mode trace, tap Measurements. 3 Switch to the OB calculation list. 4 Under HR, tap HR in the calculations list. 5 Position the caliper at the peak of a heartbeat, and lift your finger from the screen. - Page 88 Exam-based calculations...
-
Page 89: Chapter 8: Measurement References
Chapter 8: Measurement References This chapter provides information about measurement accuracy, publications, and terminology. Measurement accuracy The measurements from the system are of a physical property, such as distance for evaluation by the clinician. The accuracy values require that you can place the calipers over one pixel. The values do not include acoustic anomalies of the body. -
Page 90: Measurement Publications And Terminology
% tolerance = ( 2 (maximum of 2 errors) * 100) + 0.5%. Full scale for time implies the total time displayed on the scrolling graphic image. FUJIFILM SonoSite special test equipment was used. Measurement publications and terminology The following are the publications and terminology used for each calculation result. - Page 91 Terminology and measurements comply with American Institute of Ultrasound in Medicine (AIUM) published standards. Cardiac references Body Surface Area (BSA) in m Grossman, W. Cardiac Catheterization and Angiography. Philadelphia: Lea and Febiger, (1980), 90. 0.425 0.725 BSA = 0.007184 * Weight * Height Weight = kilograms Height = centimeters...
- Page 92 Heart Rate (HR) in bpm HR = 3 digit value input by user or measured on M Mode and Doppler image in one heart cycle Interventricular Septum (IVS) Fractional Thickening, percent Laurenceau, J. L., M.C. Malergue. The Essentials of Echocardiography. Le Hague: Martinus Nijhoff, (1981), 71. IVSFT = ((IVSS –...
- Page 93 -- - -- - where: V = Volume in ml a = Diameter b = Diameter n = Number of segments (n=20) L = Length i = Segment Left Ventricular Volume: Single Plane Method in ml Schiller, N.B., P.M.
- Page 94 SI = SV/BSA where: SV = Stroke Volume BSA = Body Surface Area Stroke Volume (SV) 2D and M Mode in ml Oh, J.K., J.B. Seward, A.J. Tajik. The Echo Manual. 2nd ed., Boston: Little, Brown and Company, (1994), 44. SV = (LVEDV –...
- Page 95 Journal of Medical Ultrasonics, 23:12 (1996), 885. WARNING The gestational age calculated by your FUJIFILM SonoSite system does not match the age in the aforementioned reference at the 20.0 cm and 30.0 cm abdominal circumference (AC) measurements. The implemented algorithm extrapolates the...
- Page 96 Biparietal Diameter (BPD) Chitty, L. S. and D.G. Altman. “New charts for ultrasound dating of pregnancy. ” Ultrasound in Obstetrics and Gynecology 10: (1997), 174-179, Table 3. Hadlock, F., et al. “Estimating Fetal Age: Computer-Assisted Analysis of Multiple Fetal Growth Parameters. ” Radiology, 152: (1984), 497-501.
- Page 97 Gestational Sac (GS) Hansmann, M., et al. Ultrasound Diagnosis in Obstetrics and Gynecology. New York: Springer-Verlag, (1986). Nyberg, D.A., et al. “Transvaginal Ultrasound. ” Mosby Yearbook, (1992), 76. Gestational sac measurements provide a fetal age based on the mean of one, two, or three distance measurements;...
- Page 98 Jeanty P., E. Cousaert, and F. Cantraine. “Normal Growth of the Abdominal Perimeter. ” American Journal of Perinatology, 1: (January 1984), 129-135. (Also published in Hansmann, Hackeloer, Staudach, Wittman. Ultrasound Diagnosis in Obstetrics and Gynecology. Springer-Verlag, New York, (1986), 179, Table 7.13.) Biparietal Diameter (BPD) Chitty, Lyn S.
- Page 99 Head Circumference (HC) Chitty, Lyn S., et al. “Charts of Fetal Size: 2. Head Measurements. ” British Journal of Obstetrics and Gynaecology 101: (January 1994), 43, Appendix: HC-Derived. Hadlock, F., et al. “Estimating Fetal Age: Computer-Assisted Analysis of Multiple Fetal Growth Parameters. ” Radiology, 152: (1984), 497-501.
- Page 100 HC/AC Ratio Campbell S., Thoms Alison. “Ultrasound Measurements of the Fetal Head to Abdomen Circumference Ratio in the Assessment of Growth Retardation, ” British Journal of Obstetrics and Gynaecology, 84: (March 1977), 165- 174. Measurement accuracy...
-
Page 101: Chapter 9: Troubleshooting And Maintenance
System goes into Freeze mode or sleep too quickly. To preserve battery life and limit heating, SonoSite iViz automatically switches itself into Slow frame rate mode, Freeze mode, and sleep mode after a period of transducer inactivity. If this interval is too short, you can increase it, or even turn off the auto- Freeze and Sleep features, by changing the Power Management settings in Preferences (see “Configuring... - Page 102 Steady green Indicates that the system is connected to the USB charger, and the battery is fully charged. System Error messages The error messages displayed on the SonoSite iViz screen can be classified as either hardware- or software- related. Troubleshooting...
- Page 103 Hardware-related errors are usually indicated by an error message. Use the following table to identify hardware-related errors and their remedies. Table 9-2: System error messages Error message Remedy The signal path has Reattach the transducer. stopped because the transducer is not Note that it is important to end an exam before disconnecting connected.
-
Page 104: Troubleshooting Connectivity Problems
How do I know if my report was successfully transferred to the EMR? When the transfer to the EMR is complete, the message Report sent to EMR appears. How many scheduled worklist procedures can I query and view at one time? SonoSite iViz can display up to 100 procedures. - Page 105 Does SonoSite iViz support DICOM Storage Commitment service? The DICOM Storage Commitment service is not supported at this time. Troubleshooting DICOM connectivity 1 To check if the system can communicate on the network with the target DICOM device, on the Archive tab, tap Ping.
-
Page 106: Maintenance
Upgrading SonoSite iViz software and firmware New versions of the SonoSite iViz software and transducer firmware may be released from time to time. SonoSite iViz is capable of upgrade using either your wireless network, or a USB device. Your FUJIFILM SonoSite representative can provide upgrade materials and instructions whenever a new software upgrade is available. -
Page 107: Iviz Performance Testing
Functional acceptance To perform a functional acceptance test 1 Insert a system battery pack, and turn on the system. (See “Turning on SonoSite iViz” on page 16.) 2 Verify that the system boots up to the normal display. 3 Verify that the system display shows the proper boot-up images and that the battery charge indicator displays the battery charge. -
Page 108: 2D Performance Tests
10 Verify that as the Gain controls are increased and decreased, and that there is a corresponding increase and decrease in echo intensity in the sector display. 11 Verify that the scan plane orientation mark in the image located near the skin line corresponds to element #1 on the transducer. - Page 109 8 Press Freeze again to return to live imaging. Axial measurement accuracy Note Measurements must be performed while the image is frozen. To perform an axial measurement accuracy test 1 Acquire the image. 2 Freeze the image. 3 Tap Measurements. 4 Tap General.
-
Page 110: Additional Performance Tests
8 Verify that the distance measured is within the tolerance listed in Table 9-3, “System measurement accuracy tolerance” on page 102 Table 9-3: System measurement accuracy tolerance Measurements Tolerance Axial Distance +/-2% Lateral Distance +/-2% 2D Penetration The penetration measurement is an integral part of the quality assurance program. Penetration is defined as the deepest depth at which an ultrasound system can provide adequate image quality of small anatomical structures. -
Page 111: M Mode Imaging
To perform a color test 1 Start in 2D imaging with the P21x/5-1 MHz transducer connected. 2 On the control wheel, tap Color. A Region of Interest (ROI) box is displayed on top of the gray scale image. 3 Touch and drag the Color ROI box to a new position. 4 Verify that the ROI box moves to the new position on the display. - Page 112 iViz performance testing...
-
Page 113: Chapter 10: Cleaning And Disinfecting
Chapter 10: Cleaning and Disinfecting The SonoSite iViz ultrasound system consists of the system (tablet), protective case, and transducer. System (tablet) Protective case Transducer This chapter contains instructions for cleaning and disinfecting the SonoSite iViz ultrasound system, transducer, and accessories. Be sure to follow FUJIFILM SonoSite recommendations when cleaning or disinfecting your ultrasound system, transducer, and accessories. - Page 114 Disinfectants and cleaning methods listed in this chapter are recommended by FUJIFILM SonoSite for efficacy and material compatibility with the products. Ensure that the disinfectant type and the solution strength and duration are appropriate for the equipment and application.
-
Page 115: Determining The Required Cleaning And Disinfection Level
Determining the required cleaning and disinfection level WARNING: The cleaning instructions contained in this chapter are based on requirements mandated by the American Food and Drug Administration (FDA). Failure to follow these instructions may result in cross contamination and patient infection. The level of cleaning and disinfecting required for the system is dictated by the type of tissue it contacts during use. - Page 116 Doing so can damage the transducer and void the warranty. Use only FUJIFILM SonoSite recommended cleaners and disinfectants. Using a non- recommended disinfecting solution or incorrect solution strength can damage the System and transducer and void the warranty.
- Page 117 3 Clean the TRANSDUCER CABLE AND BODY to remove any gel, debris, or bodily fluids. Use the following procedure: Note All SonoSite iViz transducers should be cleaned using the following method, regardless of transducer shape. Determining the required cleaning and disinfection level...
- Page 118 a Use either a pre-moistened wipe or a soft cloth dampened with cleaner or disinfectant. Choose a cleaner from Table 10-3. Table 10-3: Approved cleaners/disinfectants for the transducer L38v P21v Cleaner/Disinfectant SaniCloth AF3 (grey top) Sani-Cloth Plus (red top) For maximum effectiveness, the component being cleaned must remain wet with disinfectant for a minimum period of time.
- Page 119 Failure to remove all gel, debris, and bodily fluid could leave contaminants on the transducer. 4 Prepare the disinfectant for use. a Choose a high-level disinfectant from the list of approved disinfectants. See Table 10-4 Table 10-4: High-level disinfectants and soak times for SonoSite iViz transducers Temperature Duration Disinfectant Cidex 25°...
- Page 120 Caution: manufacturer. Do not immerse the transducer connector in any disinfectant solution. Use only FUJIFILM SonoSite recommended cleaners and disinfectants. Using a non- recommended disinfecting solution or incorrect solution strength can damage or discolor the transducer and void the warranty.
- Page 121 Dispose of the disinfectant according to the manufacturer’s guidelines. Examine the transducer and cable for damage, such as cracks or splitting where fluid can enter. If damage is evident, discontinue use of the transducer, and contact FUJIFILM SonoSite or your local representative.
-
Page 122: Clean And Disinfect System And Transducer To A Low Level (Non-Critical Uses)
Option Clean and disinfect system and transducer to a low level (non-critical uses) Use the following procedure to clean and disinfect the ultrasound system and transducer if it has NOT come into contact with blood, broken skin, mucosal membranes, or bodily fluids. WARNING: If the system or transducer has come into contact with any of the following, use the high-level cleaning and disinfection procedure. - Page 123 Doing so can damage the transducer and void the warranty. Use only FUJIFILM SonoSite recommended cleaners and disinfectants. Using a non- recommended disinfecting solution or incorrect solution strength can damage the System and transducer and void the warranty.
- Page 124 f Use either a premoistened wipe or a soft cloth dampened with cleaner or disinfectant. Choose a cleaner from Table 10-5. Table 10-5: Approved cleaners/disinfectants for the ultrasound system and accessories Protective System Carry case Cleaner/Disinfectant case SaniCloth AF3 (grey top) Sani-Cloth Plus (red top) For maximum effectiveness, the component being cleaned must remain wet with disinfectant for a minimum period of time.
- Page 125 a Use either a premoistened wipe or a soft cloth dampened with cleaner or disinfectant. Choose a cleaner from Table 10-6. Table 10-6: Approved cleaners/disinfectants for the transducer L38v P21v Cleaner/Disinfectant SaniCloth AF3 (grey top) Sani-Cloth Plus (red top) For maximum effectiveness, the component being cleaned must remain wet with disinfectant for a minimum period of time.
- Page 126 e Pull the cloth back and forth from one side of the slot to the other. f Pull the cloth up and down from the transducer connector to the transducer head. g Remove the cloth from the slot. h Verify that all gel and debris have been removed from the transducer cable and body. If necessary, repeat steps c through g with a new wipe.
- Page 127 5 Allow the transducer to air dry in a clean, well-ventilated space. 6 Examine the system, transducer and cable for damage, such as cracks or splitting where fluid can enter. If damage is evident, do not use the transducer. Instead, contact FUJIFILM SonoSite or your local representative.
-
Page 128: Cleaning The Iviz Carry Case
Cleaning the iViz carry case To clean the iViz carry case, use mild soap and water, and wash it by hand or machine. You can also use one of the cleaners listed in the table called “Approved cleaners/disinfectants for the ultrasound system and accessories”... - Page 129 Whenever possible, avoid shipping a contaminated transducer. Before shipping, ensure the transducer has been cleaned and disinfected using the steps detailed in this chapter or according to special instructions received from FUJIFILM SonoSite. If you are returning the transducer to FUJIFILM SonoSite, document the disinfection on a “Declaration of Cleanliness, ”...
-
Page 130: Disposing Of The System
After arrival, the transducer must be cleaned and disinfected before it can be used in an exam. Disposing of the system If the SonoSite iViz ultrasound system shows damage or deterioration, such as corrosion, discoloration, pitting, or cracking, do not dispose of it. Contact FUJIFILM SonoSite or your local representative. -
Page 131: Ergonomic Safety
Although the protective case is rubberized to prevent slipping, do not lean on it; the kickstand is not designed to support weight beyond the system itself. Be sure to place SonoSite iViz on a flat surface when using the kickstand. Ergonomic safety... -
Page 132: Minimize Eye And Neck Strain
Minimize eye and neck strain Adjust the system to minimize screen glare. Adjust the room lighting to reduce eye strain. Maintain the system at chest, chin, or eye level to minimize neck strain. Support your back during an exam Use a chair that supports your lower back, promotes a natural body posture, and provides quick height adjustments to your work surface. -
Page 133: Use Comfortable Wrist And Finger Postures With Transducers
Use comfortable wrist and finger postures with transducers Use different grips while holding the transducer to maintain a straight (neutral) wrist position. Avoid excessive gripping forces by holding the transducer lightly in your fingers. Minimize the use of a pinch grip when holding the transducer; use a whole-hand (palmar) grip when possible. -
Page 134: System And Transducer Temperatures
WARNINGS exceed IEC 60601-1 limits for patient contact. Make sure that only the operator handles the system. Avoid placing the SonoSite iViz base unit on the patient during use. The maximum temperature of the transducer scan head may be greater than 41 °C (105.8 °F), but is less than 43 °C (109.4 °F) when in contact with the patient. - Page 135 Do not use the system if an error message appears on the image display: note the Cautions error code; call FUJIFILM SonoSite or your local representative; turn off the system by pressing and holding the power button, and then tapping Power off.
-
Page 136: Electrical Safety Classification
Remove the battery from the system if the system is not likely to be used for an extended period of time. Do not spill liquid on the system. The SonoSite iViz system, including all internal adjustments and replacements (except battery replacement) can only be serviced by a qualified FUJIFILM SonoSite technician. Equipment safety... -
Page 137: Battery Safety
Periodically check to make sure that the battery charges fully. If the battery fails to WARNINGS charge fully, replace it. Do not ship a damaged battery without instructions from FUJIFILM SonoSite Technical Support. Do not short-circuit the battery by directly connecting the positive and negative terminals with metal objects. - Page 138 SonoSite or your local representative. Use only FUJIFILM SonoSite batteries. Do not use or charge the battery with non-FUJIFILM SonoSite equipment. Only charge the battery in the SonoSite iViz system or in the battery charger provided by FUJIFILM SonoSite. Battery safety...
-
Page 139: Clinical Safety
To avoid injury, inspect all fasteners and connections. WARNINGS Non-medical (commercial) grade peripheral display monitors have not been verified or validated by FUJIFILM SonoSite as being suitable for diagnosis. To avoid the risk of a burn hazard, do not use the transducer with high frequency surgical equipment. -
Page 140: Electromagnetic Compatibility
IEC 60601-1-2:2007 and IEC 60601-1-2:2014. These limits are designed to provide reasonable protection against harmful interference in a typical medical installation. The SonoSite iViz ultrasound system is suitable for the professional healthcare environment per 60601-1- 2:2014. It is suitable for use in physician offices, clinics, hospitals, and other professional healthcare environments except near HF surgical equipment and the RF shielded room of an ME system for magnetic resonance imaging or other environments where the intensity of electromagnetic disturbances is high. -
Page 141: Wireless Transmission
Wireless transmission SonoSite iViz is designed and tested in conformity with the essential requirements and other relevant requirements of the R&TTE Directive (1999/5/EC). This device complies with part 15 of the FCC Rules. Operation is subject to the following two conditions: (1) This device may not cause harmful interference, and (2) this device must accept any interference received, including interference that may cause undesired operation. -
Page 142: Electrostatic Discharge
The SonoSite iViz ultrasound system contains a IEEE 802.11 a/b/g/n wireless LAN plus Bluetooth 4.0 combination transmitter. The transmitter is capable of transmitting in the bands 2.412-2.484 GHz and 5.180- 5.925 GHz. In the 2.412-2.484 GHz band, the transmitter is capable of CCK, OFDM, MCS0, MCS3, MCS5, MCS7, MCS8, MCS11, MCS11, MCS13, and MCS15 at HT20 modulations. -
Page 143: Compatible Accessories And Peripherals
The SonoSite iViz ultrasound system is intended for use in an electromagnetic environment in which radiated radio frequency (RF) disturbances are controlled. The customer or the user of the SonoSite iViz ultrasound system can help prevent electromagnetic interference by maintaining a minimum distance between portable and mobile RF communications equipment (transmitters) and the SonoSite iViz ultrasound system as recommended below, according to the maximum output power of the communications equipment. -
Page 144: Guidance And Manufacturer's Declaration
Table 11-2: Accessories and peripherals compatible with SonoSite iViz ultrasound system Description Maximum Cable Length SonoSite iViz base unit No cable SonoSite iViz battery No cable SonoSite iViz USB charger 4.9 ft/1.5 m SonoSite iViz protective case No cable P21v transducer 4 ft/1.2 m... - Page 145 Table 11-3: Manufacturer’s Declaration - Electromagnetic Emissions (IEC60601-1-2:2007, IEC 60601-1-2:2014) Emissions Test Compliance Electromagnetic Environment Class B The SonoSite iViz ultrasound system (excluding the battery charger) (SonoSite iViz is suitable for use in all establishments, including domestic ultrasound establishments and those directly connected to the public low- system...
- Page 146 See footnote on power supply input lines IEC 61000-4-11 If image distortion occurs, it may be necessary to position the FUJIFILM SonoSite ultrasound system further from sources of power frequency Power Frequency magnetic fields or to install Magnetic Field...
- Page 147 The iViz system does not allow scanning when it is connected to AC power via a wall wart power supply. Since there is no essential performance provided while the SonoSite iViz system is AC powered, the criteria to assess degradation of essential performance is not applicable. Therefore, immunity testing on the SonoSite iViz system is not applicable for the following AC powered immunity tests (Electrical Fast Transients (EFT)/Burst, Surge, Voltage Dips, Short Interruptions, and Variations).
- Page 148 Table 11-5: Manufacturer's Declarations - Electromagnetic Immunity (IEC 60601-1-2:2014) IEC 60601-1-2 Test Immunity Test Compliance Level Electromagnetic Environment Level Electrical fast transient/burst IEC 61000-4-4 Surge IEC 61000-4-5 Voltage dips IEC 61000-4-11 Voltage Interruptions IEC 61000-4-11 If image distortion occurs, it may be necessary to position the SonoSite iViz ultrasound system further from Power frequency...
- Page 149 Compliance Level Electromagnetic Environment Level Portable and mobile RF communications equipment should be used no closer to any part of the SonoSite iViz ultrasound system 3Vrms including cables, than the 150 kHz to 80 MHz 3Vrms recommended separation distance Outside ISM bands...
- Page 150 The SonoSite iViz system only provides essential performance during diagnostic ultrasound imaging and, by design, this is only possible with battery power. The SonoSite iViz system does not allow scanning when it is connected to AC power via a wall wart power supply. Since there is no essential performance provided while the SonoSite iViz system is AC powered, the criteria to assess degradation of essential performance is not applicable.
-
Page 151: Labeling Symbols
Immunity testing requirements The SonoSite iViz ultrasound system complies with the essential performance requirements specified in IEC 60601-1-2 and IEC 60601-2-37. Results of immunity testing show that the SonoSite iViz ultrasound system meets these requirements and is free from the following: Noise on a waveform or artifacts or distortion in an image or error of a displayed numerical value that... - Page 152 Symbol Definition Device complies with relevant Australian regulations for electronic devices. Catalog number. Collect separately from other household waste (see European Commission Directive 93/86/EEC). Refer to local regulations for disposal. Corrugated recycle. Manufacturer. Do not get wet. Do not stack over 10 high. Device complies with relevant FCC regulations for electronic devices.
-
Page 153: Specifications
Symbol Definition Atmospheric pressure limitation. Humidity limitation. Contains mercury. LCMs contain a small amount of Liquid Crystal and Mercury. Please follow local ordinances or regulations for disposal. Follow instructions for use. A mandatory action that the user shall read the accompanying documentation for more information. -
Page 154: Environmental Limits
Display Length: 6.37 in. (161.87 mm) Width: 4.11 in. (104.52 mm) Diagonal: 7.0 in. (177.8 mm) Environmental limits Note The temperature, pressure, and humidity limits apply only to the ultrasound system, transducers, and battery. Operating (system, battery, and transducer) 10–40°C (50–104°F), 15–95% R.H. 700 to 1060hPa (0.7 to 1.05 ATM) Mode of Operation: Continuous... -
Page 155: Equipment Specifications
Run time varies, depending on imaging mode and display brightness. Equipment specifications IPX-7 (watertight equipment) Ultrasound transducers (except the connector) Non AP/APG Ultrasound system, including the power supply and peripherals are not suitable for use in the presence of flammable anesthetics. Standards Electrical safety standards ANSI/AAMI ES60601-1:2005/(R) 2012, and A1:2012 - Medical electrical equipment, Part 1: General... -
Page 156: Acoustic Standards
Acoustic standards NEMA UD 2-2004, Acoustic Output Measurement Standard for Diagnostic Ultrasound Equipment. IEC 60601-2-37: 2007, Medical electrical equipment – Part 2-37: Particular requirements for the safety of ultrasonic medical diagnostic and monitoring equipment. IEC 62359:2010 - Ultrasonics – Field characterization – Test methods for the determination of thermal and mechanical indices related to medical diagnostic ultrasonic fields. - Page 157 Europe EN 301 893 EN 300 328 EN 62311:2008 EN 62209-2 Australia/New Zealand AS/NZS 4268 - RCM Standards...
- Page 158 Standards...
-
Page 159: Alara Principle
Chapter 12: Acoustic Output This chapter contains information about the ALARA (as low as reasonably achievable) principle, the output display standard, and acoustic power and intensity tables. The information applies to the ultrasound system, transducer, accessories, and peripherals. ALARA principle ALARA is the guiding principle for the use of diagnostic ultrasound. -
Page 160: Direct, Indirect, And Receiver Controls
on page 155. In the event of a device malfunction, there are redundant controls that limit transducer power. This is accomplished by an electrical design that limits both power supply current and voltage to the transducer. The sonographer uses the system controls to adjust image quality and limit ultrasound output. The system controls are divided into three categories relative to output: controls that directly affect output, controls that indirectly affect output, and receiver controls. -
Page 161: Guidelines For Reducing Mi And Ti
Guidelines for reducing MI and TI The following are general guidelines for reducing MI or TI. If multiple parameters are given, the best results may be achieved by minimizing these parameters simultaneously. In some modes changing these parameters does not affect MI or TI. Changes to other parameters may also result in MI and TI reductions. Please note the MI and TI values on the right side of the screen. -
Page 162: Output Display
The TI consists of three user-selectable indices, and only one of these is displayed at any one time. In order to display TI properly and meet the ALARA principle, the user selects an appropriate TI based on the specific exam being performed. FUJIFILM SonoSite provides a copy of , which contains guidance on AIUM Medical Ultrasound Safety determining which TI is appropriate. -
Page 163: Related Guidance Documents
The displayed MI and TI values are based on calculations that use a set of acoustic output measurements that were made using a single reference ultrasound system with a single reference transducer that is representative of the population of transducers of that type. The reference system and transducer are chosen from a sample population of systems and transducers taken from early production units, and they are selected based on having an acoustic output that is representative of the nominal expected acoustic output for all transducer- system combinations that might occur. -
Page 164: Acoustic Output Measurement
Acoustic output measurement Since the initial use of diagnostic ultrasound, the possible human biological effects (bioeffects) from ultrasound exposure have been studied by various scientific and medical institutions. In October 1987, AIUM ratified a report from its Bioeffects Committee (Bioeffects Considerations for the Safety of Diagnostic Ultrasound, J Ultrasound Med., Sept. -
Page 165: Tissue Models And Equipment Survey
Since the ultrasonic path during the exam is likely to pass through varying lengths and types of tissue, it is difficult to estimate the true In Situ intensity. An attenuation factor of 0.3 is used for general reporting purposes; therefore, the In Situ value commonly reported uses the formula: -(0.069lf ) In Situ (derated) = Water [e Since this value is not the true In Situ intensity, the term “derated”... -
Page 166: Acoustic Output Tables
less than 1° and 4°C (1.8° and 7.2°F) for exposures of first-trimester fetal tissue and second-trimester fetal bone, respectively. The largest values obtained were approximately 1.5°C (2.7°F) for first-trimester fetal tissue and 7°C (12.6°F) for second-trimester fetal bone. Estimated maximum temperature elevations given here are for a “fixed path”... - Page 167 Table 12-5: Transducer Model: L38v, Operating Mode: Color/CPD Index Label M.I. Non-scan Non- Scan scan ≤1 >1 aprt aprt Global Maximum Index Value (MPa) 2.50 (mW) min of W )] (mW) TA.3 (cm) (cm) Associated Acoustic (cm) Parameter z@Pll (cm) .3max (cm) (MHz)
- Page 168 Table 12-6: Transducer Model: P21v, Operating Mode: 2D Index Label M.I. Non-scan Non- Scan scan ≤1 >1 aprt aprt Global Maximum Index Value (MPa) 1.83 (mW) min of W )] (mW) TA.3 (cm) (cm) Associated Acoustic (cm) Parameter z@Pll (cm) .3max (cm) (MHz)
- Page 169 Table 12-7: Transducer Model: P21v, Operating Mode: M Mode Index Label M.I. Non-scan Non- Scan scan ≤1 >1 aprt aprt Global Maximum Index Value (MPa) 1.83 (mW) min of W )] (mW) TA.3 (cm) (cm) Associated Acoustic (cm) Parameter z@Pll (cm) .3max (cm)
- Page 170 Table 12-8: Transducer Model: P21v, Operating Mode: Color/CPD Index Label M.I. Non-scan Non- Scan scan ≤1 >1 aprt aprt Global Maximum Index Value (MPa) 1.70 (mW) min of W )] (mW) TA.3 (cm) (cm) Associated Acoustic (cm) Parameter z@Pll (cm) .3max (cm) (MHz)
-
Page 171: Acoustic Measurement Precision And Uncertainty
Acoustic measurement precision and uncertainty All table entries have been obtained at the same operating conditions that give rise to the maximum index value in the first column of the table. Measurement precision and uncertainty for power, pressure, intensity, and other quantities that are used to derive the values in the acoustic output table are shown in the table below. - Page 172 Derated spatial-peak temporal-average intensity at axial distance z (milliwatts per SPTA.3 square centimeter). Mechanical index. Pulse duration (microseconds) associated with the transmit pattern giving rise to the reported value of MI. Derated peak rarefactional pressure associated with the transmit pattern giving rise to the value reported under MI (Megapascals).
-
Page 173: Glossary
Glossary General terms For ultrasound terms not included in this glossary, refer to Recommended Ultrasound Terminology, Third Edition, published in 2008 by AIUM. AIUM American Institute of Ultrasound in Medicine The guiding principle of ultrasound use, which states that you should keep as low as reasonably patient exposure to ultrasound energy as low as reasonably achievable for achievable (ALARA) - Page 174 The ratio of total acoustic power to the acoustic power required to raise tissue temperature by 1°C under defined assumptions. See “Direct, indirect, and thermal index (TI) receiver controls” on page 152 for a more complete description of TI and how to manage it.
-
Page 175: Chapter 13: It Network
SonoSite iViz system from the WLAN. However, SonoSite iViz can initiate a connection to servers on the WLAN and beyond. The SonoSite iViz USB port can only be used to export data to a USB memory stick. Computer access to the system through the USB port is blocked. -
Page 176: Data Flow
Port 80 for HTTP web servers Anti-virus software is not installed on this device. Data flow DICOM MWL Server -----------> SonoSite iViz ----------------> PACS Study order Study data (DICOM MWL) (DICOM Storage) *Please refer to the DICOM Conformance Statement for details. -
Page 177: It Network Failure Recovery Measures
IT network failure recovery measures Connection to an IT network may become, at times, unreliable, and this may lead to failure to perform the functions described in “Functions” on page 167. As a result, the following hazardous situations may occur: Table 13-1: IT network failure recovery Network failure Impact on equipment... - Page 178 Table 13-1: IT network failure recovery Network failure Impact on equipment Hazard countermeasures iViz prevents a user Infection by computer Leak of exam data from loading software virus and executing it. 1 Connection of equipment to an IT network that includes other systems, could result in previously unidentified risks to patients, operators or third parties.
- Page 179 IT network failure recovery measures...
- Page 181 P20016-05 *P20016-05*...
Need help?
Do you have a question about the SonoSite iViz and is the answer not in the manual?
Questions and answers