Table of Contents
Advertisement
Quick Links
Advertisement
Table of Contents

Related Manuals for Burmester Classic 101


Summary of Contents for Burmester Classic 101
- Page 1 Owner‘s Manual Classic Line 101 Integrated Amplifier...
-
Page 3: Table Of Contents
Table of Content About This Device . . . . . . . . . . . . . . . . . . . . . . . . . . . . . . . . . . . . . . . . . . . . . . . . . . . . 5 About These Operating Instructions . - Page 4 BURLINK (BURmester LINK Connection) . . . . . . . . . . . . . . . . . .
-
Page 5: About This Device
. As expected from Burmester, the 101 also features a fully balanced circuit layout . Its pre-out and headphone amplifiers are DC-coupled, meaning they dispense entirely with distorting coupling capacitors in the signal path . -
Page 6: About These Operating Instructions
About these oPerAtIng InstructIons About These Operating Instructions These operating instructions describe the set-up, connection, and operation of your 2-channel 101 integrated amplifier (hereinafter referred to as "integrated amplifier" or 101) . Please note the following: ► Read and follow the information given, in particular the safety information and warnings . -
Page 7: Important Safety Information
. Static discharges may damage the electronics inside the device . Connection cables Burmester produces symmetric and asymmetric connection cables, as well as speaker cables in all lengths to transmit the best possible sound quality . The impedance of our cables is adapted for all BURMESTER components . -
Page 8: Power On
ImPortAnt sAfety InformAtIon Power on ► Switch off all devices in the HiFi system before installation . Do not switch the devices back on until you are certain that all devices have been connected completely and correctly . ► Do not try to operate the device if it has obviously been damaged or penetrated by water . -
Page 9: Unpacking And Setting Up The Device
unPAckIng AnD settIng uP the DevIce Unpacking and Setting Up the Device CAUTION Heavy device The device is very heavy and may cause injury if it falls . ► The device should only be unpacked and set up by individuals who are experienced in handling heavy loads . -
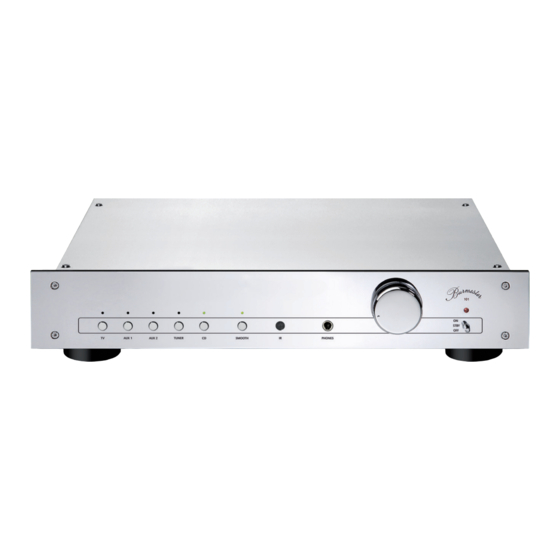
Page 10: The Device At A Glance
the DevIce At A glAnce The Device at a Glance Front side 1 Input selection LEDs The lit LED indicates the signal source selected with the input selection button (6) . 2 LED (SMOOTH) • LED lit: Smooth function active . •... -
Page 11: Back Side
the DevIce At A glAnce Back side 23 24 10 Right speaker output, positive Right channel, positive connection (+) 11 Right speaker output, negative Right channel, negative connection (–) 12 Left speaker output, negative Left channel, negative connection (–) 13 Left speaker output, positive Left channel, positive connection (+) 14 Surround Thruput Switch 15 BURLINK interface... -
Page 12: The Remote Control
the DevIce At A glAnce The remote control The device is delivered with the 067 remote control as standard . The remote control allows you to quickly access some frequently used functions, such as device power on/off, volume control, as well as signal source selection . To enable use of the remote control, the device must be switched on or in standby mode . -
Page 13: Connecting The Device
connectIng the DevIce Connecting the Device The connectors are located on the back side of the device . Before connecting the device, pay attention to the signal source operating instructions . All devices in your music system should be switched off while connecting . Connecting the inputs Input connectors (18) to (22) are joined with the corresponding signal source outputs . -
Page 14: Connecting The Outputs
A connection can be made using either cable lugs or 4-mm banana plugs . For acoustic reasons, Burmester recommends equipping the ends of the speaker cables with cable lugs . Connecting cables to these terminals requires the use of ready-to-fit wires or must be performed by a qualified professional . -
Page 15: Connecting The Speaker Outputs
connectIng the DevIce Headphone output (4) CAUTION High-intensity sound Loud output signals may damage your hearing . ► Please note that the volume is controlled by the connected device when the Surround Thruput is activated . . ► Do not increase the volume before putting on the headphones; increase to the desired volume once you have put them on . -
Page 16: Connecting The Preamplifier Output
BURLINK interface Control systems such as PC, CRESTRON, AMEX, etc . can be connected to the BURmester-LINK connector (14) . This enables convenient control of your entire system, e .g . via a touch panel which you can program individually . -
Page 17: Connecting The Remote Output
By connecting the REMOTE DC OUT (23) socket to the corresponding REMOTE DC IN socket on a BURMESTER device, the device can be switched on or off remotely when switching the 101 on and off . In this operating mode, the 101 assumes the master function . -
Page 18: Operating The Device
oPerAtIng the DevIce Operating the Device ► Before switching the integrated amplifier on, check all cable connections for correct polarity (POS, NEG) . After initial or re-wiring, we recommend slowly increasing the volume until you are certain that everything is connected correctly . Power on/off The device is equipped with two control elements for power on/off: •... -
Page 19: Selecting A Signal Source
oPerAtIng the DevIce Switching the device off completely: During longer periods of absence or if the device is not in use and thus should not consume any electricity, you can turn it off completely using the mains switch . Once it is off, you can no longer switch it back on with the remote control . -
Page 20: Smooth Function
oPerAtIng the DevIce Smooth function The switchable “Smooth” function ensures a rounded, detailed sound, even at low volumes . ► Press the SMOOTH button (7) to enable the Smooth function . The Smooth function is activated and the LED (2) is lit . ... -
Page 21: Pre-Out Only Mode
oPerAtIng the DevIce Pre-out only mode To operate the preamp on an external power amp, the pre-out only mode can be used to switch off the internal power amp . This improves the technical data of the integrated amplifier and saves energy . CAUTION High-intensity sound Loud output signals may cause a permanent damage to both your hearing and your... -
Page 22: Remote Output
Remote output If a REMOTE DC OUT connector on the integrated amplifier is connected to the remote input on a BURMESTER component, this component is switched on and off together with the integrated amplifier . Protective functions The integrated amplifier is equipped with extensive protection circuits that protect the amplifier and the connected speakers from being damaged in the case of an error . -
Page 23: Burlink (Burmester Link Connection)
(burmester lInk connectIon) BURLINK (BURmester LINK Connection) Connectors The BURLINK interface can be operated via the 9-pin D-SUB socket (RS-232) (14) . RS-232 configuration: • 9600 baud • 8 bits • Parity: none • 1 stop bit • No hardware handshake Commands The commands for operating the 101 integrated amplifier are listed below . -
Page 24: Maintenance, Repair, And Care
mAIntenAnce, rePAIr, AnD cAre Maintenance, Repair, and Care Replacing defective fuses A defect fuse may render the device inoperative, meaning the device does not turn on even though a power supply is present . DANGER Lethal electrical voltage When the power plug is connected and the mains switch is on, a lethal electrical voltage is present after opening the fuse holder inside the fuse compartment . -
Page 25: Technical Data
technIcAl DAtA Technical Data Power amp Stereo: 2 x 120 W (at 4 Ω) acoustic performance Input sensitivity: 550 mV 1% THD + N Performance 5 Hz – 60 kHz (-3 dB) frequency response THD + N 0 .015 % Damping factor >... - Page 26 Notes...
- Page 28 Burmester Audiosysteme GmbH Wilhelm-Kabus-Straße 47 10829 Berlin Germany +49 (0) 30 7879 680 www .burmester .de BA-Version 1 .6 / 1606...
Need help?
Do you have a question about the Classic 101 and is the answer not in the manual?
Questions and answers