
Related Manuals for Tecfluid FLOMID Series


Summary of Contents for Tecfluid FLOMID Series
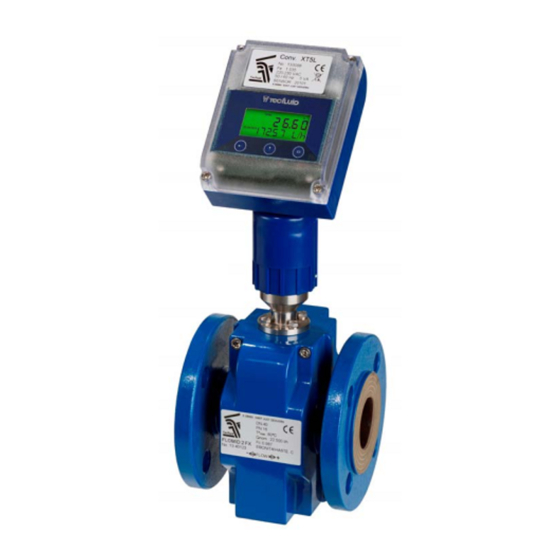
- Page 1 Instructions manual Series FLOMID Sensor FLOMID-FX Converter MX4 The art of measuring R-MI-FIMX4 Rev.: 2 English version...
- Page 2 PREFACE Thank you for choosing a product from Tecfluid S.A. This instruction manual allows installation, configuration, programming and maintenance. It is recommended to read it before using the equipment. WARNINGS • This document shall not be copied or disclosed in whole or in any part by any means, without the written permission of Tecfluid S.A.
-
Page 3: Table Of Contents
TABLE OF CONTENTS FLOMID-FX SENSOR WORKING PRINCIPLE ..............RECEPTION .................. Unpacking ................Storage temperatures ............HANDLING ................... INSTALLATION ................Sensor position ..............Straight pipe sections ............4.2.1 Mixtures ..............Valves ................Pumps ................Aeration ................Reduction of DN ..............Vibrations ................Magnetic fields .............. - Page 4 2.2.4 Analog output wiring ..........2.2.5 Pulse output wiring ..........REMOTE SENSOR ................. Preparing the cable ............Cable installation ..............Cable connection to sensor ..........Cable connection to converter ..........Cable specifications ............CONVERTER INTERFACE .............. MAIN MENU .................. Passwords to access the menus .......... INSTALLATION PARAMETERS ............
- Page 5 7.5.1.1 Alarm ............7.5.1.2 Empty pipe ..........7.5.1.3 Negative flow ..........7.5.2 Pulse output ............7.5.2.1 Pulse output configuration ......7.5.2.2 Units ............7.5.2.3 Pulses ............. 7.5.2.4 Duty cycle ..........7.5.3 Analog output ............7.5.3.1 4-20 mA output configuration ....7.5.3.2 Programming of the 4-20 mA output ..
-
Page 6: Working Principle
WORKING PRINCIPLE The FLOMID electromagnetic flowmeters are based on Faraday’s induction law. When an electrically conductive liquid flows through a magnetic field, perpendicular to the flow direction, it induces a voltage Vm proportional to the liquid velocity. Two electrodes in contact with the liquid and positioned perpendicularly to the magnetic field, sense this voltage V. -
Page 7: Handling
HANDLING It should always be done with care and without knocks. The large diameter sensors have rings for holding the elevation elements. If the flowmeter is held using slings, these should hold on the sensor and not on the electronics housing (see drawing). -
Page 8: Sensor Position
Sensor position The most adequate position is with the electrodes in a horizontal plane. In this way, deposits of particles on the electrodes are avoided. Straight pipe sections They are necessary before and after the sensor. The minimum distances are the following: Upstream 5 DN Downstream... -
Page 9: Mixtures
4.2.1 Mixtures If liquids of different conductivities are mixed it is necessary to install the sensor a minimum of 30 DN from the point of mixture in order to obtain a uniform conductivity of the liquid and stabilize the readings. If this distance is shorter, readings may be unstable. -
Page 10: Aeration
Aeration If there is a point where the difference in level is higher than 5 m an air inlet valve should be installed after the sensor to avoid a vacuum effect that could damage the sensor liner. Reduction of DN In installations where, due to reasons of the flow rate to be measured, a sensor of a smaller DN than the pipe DN must be mounted, the reduction must be done with an angle smaller than 4º... -
Page 11: Magnetic Fields
Magnetic fields Strong magnetic fields close to the sensor should be avoided. Temperature In open air installations it is recommended to install a protection to avoid direct sun light on the flowmeter. With thermally insulated pipes DO NOT insulate the sensor. High temperatures can damage The maximum liquid temperatures are shown on page 53. -
Page 12: Mounting
MOUNTING Parallelism The maximum parallelism error must be less than 0.5 mm (Lmax—Lmin ≤ 0.5 mm). Gasket position In the wafer mounted sensors, in order to avoid leakage of the liquid into the sensor, it is necessary to ensure that the rubber gasket (A) of the figure is well centered, so that it presses directly on the plastic liner. -
Page 13: Sensor Earth Connection
Sensor earth connection To obtain correct operation the sensor should have its functional earth connected to a point that is in direct contact with the liquid whose flow rate wants to be measured. The earth cables should assure a good electrical contact. To obtain this, they should be well screwed down and with a good contact on both sides of the sensor. -
Page 14: Tightening Torque
Earthing disks are supplied in two versions: Metallic, disk in stainless steel EN 1.4404 (AISI 316L), for liquids compatible with this material. Plastic, with an electrode to make the contact with the liquid. The materials (plastic and metal) depend on the working liquid. Dimensions in mm Metallic Plastic... -
Page 15: Mx4 Converter
MX4 CONVERTER INTRODUCTION The MX4 converter unit can be used with the different FLOMID and FLOMAT series of electromagnetic flow sensors. The electronic circuit is based on the most advanced technology in digital signal processing, in order to obtain accurate and reliable measurements. -
Page 16: Remote Converter
2.1.2 Remote converter One of the ends of the cable has a header and two wires, to connect them to the sensor. The connection is as explained in point 2.1.1. The other end has to be connected to the converter, and has five wires. The cable must be passed through the cable gland and the connection for each wire is explained in chapter 3. -
Page 17: Power Supply Wiring
2.2.1 Power supply wiring Before starting the installation of the equipment, check that the supply voltage available is the same as marked on the label of the converter. Terminal Power supply AC Power supply DC Earth Neutral Phase It is very important to connect the mains earth to the instruments with AC power supply due to the presence of a mains filter inside the converter that uses this connection. -
Page 18: Remote Reset Input Wiring
Terminal Description Relay Normally Open Relay 1 Common Relay 1 Normally Open Relay 2 Common Relay 2 The relay outputs provide relays with potential free contacts (see characteristics in page 53). The status of the relay contacts corresponds to the relay at rest. -
Page 19: Analog Output Wiring
Terminal Contact Contact These terminals correspond to an input that resets the value of the totalizer. A potential free normally open push button can be connected. The push button contact must be a good quality snap action switch to guarantee correct working at low voltages and reduce contact bounce effects. -
Page 20: Pulse Output Wiring
Active output Passive output 2.2.5 Pulse output wiring Terminal Collector Emitter The pulse output is opto-isolated. The terminals are the collector and emitter of a NPN bipolar transistor. In the case of using inductive loads, in order to protect the output transistor, the use of free wheeling diodes is required. -
Page 21: Remote Sensor
Example. Connection with the load at the collector LOAD Example. Connection with the load at the emitter LOAD REMOTE SENSOR When an installation requires that the electromagnetic sensor is separated from the control unit, the union between these two elements must be made by means of an interconnection cable. -
Page 23: Cable Installation
Cable installation The following points must be taken into account: • The cable should be installed in a conduit or should be securely fixed, given that movements of the cable can induce reading errors. • The cable should be placed as far as possible from sources of electrical noise such as switching gear and electrical machines. -
Page 24: Cable Connection To Converter
• Slide the cover on the sensor neck until it meets its stop. • Tighten the two fixing screws to anchor the cover. • Tighten the cable gland to guarantee water tightness. Cable connection to converter Terminal Top coil (red cable) Bottom coil (black cable) Rear electrode (white cable) Ground (shield) -
Page 25: Cable Specifications
Cable specifications Model: CERVITRONIC PAR-POS Code 04754502 Construction Conductor: Annealed electrolytic copper, tinned As Norm: UNE 21064 Isolator: Polyolefin (PE - Solid) Composition: By pars Par shield: Tape Al/Pet + Drain Cu Sn Cover : 100 % Physical All over shield: Tape Al/Pet + Drain Cu Sn Cover: 100 % Physical... -
Page 26: Converter Interface
CONVERTER INTERFACE The MX4 converter has a graphic LCD and a keyboard with 4 push buttons. The keyboard has four numeric keys to introduce the values of installation and programming. Two of these keys are used also as cursors. The following figure shows the functionality of the converter keys. (Down / Left) To switch between flow rate, totalizer and fluid velocity screens. -
Page 27: Main Menu
MAIN MENU To access the main menu of the converter, press the key (Enter). The following screen appears: Number of menu items Selected item The "Installation" option allows the basic configuration of the instrument, as explained in Chapter 6 of this manual. The "Programming"... - Page 28 When the "Password" option is selected, a screen that indicates the password status for this menu appears. Selecting “Enable”, the screen to enter the new password appears. Once entered, the new password is asked again to avoid possible inadvertent error. the re-entered password does not match the first one, the following error message appears and the process should be carried out again.
-
Page 29: Installation Parameters
If the password needs to be changed or disabled, the procedure is the same. Once entered the "Password" menu, the following screen appears: If “Change” is selected, the equipment will ask for a password again. If “Disable” is selected, the following message will appear: INSTALLATION PARAMETERS Power on the electronic converter with the voltage indicated on the label. -
Page 30: Language
Language You can choose the language in which all the menus will be displayed. Sensor factor In this screen the sensor factor is shown. It should coincide with the Fc parameter on the sensor label. Converter factor The electronic converter factor is shown. It should coincide with the Fe parameter on the converter label. -
Page 31: Parameters
6.5.1 Parameters This screen allows the diagnosis of the coil current, the differential voltage on the sensor electrodes, and the conductivity of the liquid. In the first row, a possible damage of the sensor coils can be detected. If there is a symbol Ѵ... -
Page 32: Mains Frequency
Press again the Escape key until the working screen. 6.5.3 Mains frequency If the power supply of the converter is AC, the following screen will appear: Normally "Automatic" should be selected. In this case, the instrument automatically detects the frequency of the mains and thus uses the most appropriate coil excitation to eliminate noise from the mains. -
Page 33: Converter Programming
CONVERTER PROGRAMMING By programming the converter the visualization and the outputs of the instrument can be configured. Turn on the converter and press (Enter) to enter the main menu. The following screen appears: With the keys (Down / Left) and (Up), select Programming, and then validate with the key (Enter). -
Page 34: Units
Units In this screen the units for the liquid velocity, the flow rate and the totalizer can be chosen independently. Flow rate decimals In this screen the number of decimals for the flow rate indication can be selected. To select the number of decimals it must be taken into account that the instrument has 5 digits for flow rate indication. -
Page 35: Flow Rate
Flow rate This screen displays a submenu to modify different aspects related to flow reading, such as empty pipe detection, cut off, reversal flow, filtering and offset. 7.4.1 Empty pipe Detection can be programmed in two different ways. In the event that “Error” is selected, when the converter detects empty pipe, it will display the following error message instead of readings. -
Page 36: Reversal Flow Rate
7.4.3 Reversal flow rate The MX4 is a bi-directional converter. The flow rate changes its sign automatically when the flow is reversed. If after the converter has been installed it is necessary to reverse the flow rate sign, in this screen it can be done by selecting the option “REVERSAL– Yes”. 7.4.4 Damping The MX4 converter has an adaptive filter (damping) to provide stable flow rate and analog... -
Page 37: Offset
7.4.5 Offset In order to obtain a perfect linearization of the instrument, it is recommended to make an adjustment of the zero offset each time an installation is performed. The flow rate must be zero, that is, the liquid inside the pipe where the flowmeter is installed should be completely stopped. -
Page 38: 7.5.1.1 Alarm
7.5.1.1 Alarm If “Alarm” is selected, we have access to program the flow rate at which the relays will change its status and to the level of hysteresis. By level of hysteresis we understand the difference between activation and deactivation of the output. To avoid that an alarm output is continuously moving from activate to deactivate status, we must program the points of connection and disconnection. -
Page 39: 7.5.2.2 Units
If “Unidirectional” is chosen, the output will give pulses proportional to flow rate when the flow rate is positive, and will not give them when the flow rate is negative. If “Bidirectional” is chosen, the output will give pulses proportional to flow rate in both flow directions. -
Page 40: Ma Output Configuration
7.5.3.1 4-20 mA output configuration It allows to choose between unidirectional and bidirectional. If “Unidirectional” is chosen, the analog output will have a value proportional to the flow rate when positive, and it will provide always 4 mA when negative. If “Bidirectional”... -
Page 41: Totalizer
Totalizer In this screen you can configure the totalizer operation mode depending on the flow direction. Thus, the value indicated by the totalizer will always be true regardless of the application where the flowmeter is installed. The first screen after selecting “Totalizer” is the following: In this screen you can choose the flow direction for which you want to configure the action that the totalizer will do. -
Page 42: Modbus
Installation in which for a time a first product flows through the pipe, and after that a second product flows in the opposite direction. The programming will be: Positive flow rate action: Increase Negative flow rate action: Increase The totalizer will indicate the volume corresponding to the sum of both products. Note: To reset the totalizer, go to chapter 5 (page 27). -
Page 43: Starting Current
STARTING CURRENT It may happen that the chosen power supply can not provide the required current for the equipment to operate properly. In this case an information message will appear indicating this situation. MAINTENANCE No special maintenance is required. For cleaning, a humid cloth can be used, and if necessary with a little neutral soap. Solvents or other aggressive liquids which could damage the housing material should not be used. -
Page 44: Associated Software Winsmeter Mx4
ASSOCIATED SOFTWARE WINSMETER MX4 Most of the steps in the preceding paragraphs can be done by means of the device associated software Winsmeter MX4, which allows working in a more comfortable and intuitive way. Such software can be downloaded from the “Downloads” section of the Tecfluid S.A. website www.tecfluid.com/downloads 13.1... -
Page 45: Port Connection
Connect the USB cable at one end to the converter and at the other to the computer where the software is installed. Power on the electronic converter. Execute the program WinsmeterMX4 following the sequence Start – Programs – Tecfluid S.A. - WinsmeterMX4. -
Page 46: Access To Installation And Programming
13.3 Access to installation and programming In order to change the data contained in the "Install" tab, you must enter a password. The default password is install, and it can be changed using the boxes on the right of the "Installation"... - Page 47 Once the password is written, press "Enter" or "Open", and the installation or programming tab will open. At the bottom of each section the text "Installation tab open" or "Programming tab open" will be displayed. To enter the Installation window, just click the corresponding tab. In the installation window the parameters that adapts the converter to a sensor and to a certain installation can be configured.
- Page 48 Likewise, to enter into the programming window, just click the corresponding tab. Changing the parameters of this screen, (see previous page) you can program the different functions of the equipment. As in the previous paragraph, to program this data to the MX4 converter, press the “Send” button.
-
Page 49: Datalogger
13.4 Datalogger In this window the process of the different variables of the equipment can be registered in a file. The time between samples, as well as the start and end time of the record can be selected. When the "Register" button is pressed, the screen that allows to name the file and select its location appears. - Page 50 The created file has CSV format, which can be viewed directly with a spreadsheet.
-
Page 51: Visualization
13.5 Visualization When the communication with the computer port is established (see section 12.2), the tab "Visualization" opens. This tab lets you view real-time flow rate, totalizer and velocity values, as well as the current value of the analog output and the status of the relay outputs. It is an intuitive tool to verify that the instrument has been installed and programmed correctly. -
Page 52: Firmware Updates
13.6 Firmware updates New firmware updates can be published in the website. These updates contain improvements or bug fixes that make the equipment operates at best conditions. The updates can be downloaded from the “Downloads” section of the Tecfluid S.A. website www.tecfluid.com/downloads To update the equipment, go to menu “Firmware”... -
Page 53: Technical Characteristics
TECHNICAL CHARACTERISTICS Accuracy ±0.5% reading value for v > 0.4 m/s ±0.2 % reading value for v < 0.4 m/s v (m/s) Repeatability ± 0.1% reading value Velocity range 0.2 ...10 m/s Temperature Process temperature: PP: -10ºC … +80ºC PTFE, PVDF: -20ºC … +120ºC Ebonite: -20ºC …... - Page 54 Flow rate indication Nº of digits: 5 (up to 2 decimals configurable)** Digit size: 11 mm ** When the available digits are full and the integers overflow a decimal is automatically lost. Liquid velocity indication Nº of digits: 5 (2 decimals) Digit size: 11 mm General characteristics...
-
Page 55: Safety Instructions
manual, that can be downloaded from Tecfluid S.A. website. SAFETY INSTRUCTIONS The series FLOMID flowmeters are in conformity with all essential requirements of all EC directives applicable to them: 2014/68/EU Pressure equipment directive (PED) 2014/30/EU Electromagnetic compatibility directive (EMC) 2012/19/EU Waste electric and electronic equipment (WEEE). -
Page 56: Dimensions
electromagnetic FLOMID-0FX (EN 1092-1 wafer mounted) Weight (kg) 10,4 11,8 FLOMID-0FX (ANSI B16.5 wafer mounted) Weight Class (kg) ⅛" ⅜" ½" ¾" 1" 1¼" 1½" 150# 2" 2½" 3" 4" 5" 10,4 6" 11,8 (All dimensions in mm) - Page 59 FLOMID-2FX (EN 1092-1 flanges) Weight l x n (kg) 14 x 4 14 x 4 14 x 4 14 x 4 18 x 4 18 x 4 18 x 4 10,5 18 x 8 12,0 18 x 8 14,0 18 x 8 18,0 18 x 8 20,0...
- Page 62 Sanitary connection FLOMID sensor, common dimensions...
- Page 63 FLOMID-1FX (DIN 11851) Rd 28 x 1/8" Rd 34 x 1/8" Rd 44 x 1/6" Rd 52 x 1/6" Rd 58 x 1/6" Rd 65 x 1/6" Rd 78 x 1/6" Rd 95 x 1/6" Rd 110 x 1/4" Rd 130 x 1/4" FLOMID-3FX (SMS 1145) 22.5 Rd 40 x 1/6"...
- Page 64 FLOMID-5IFX (CLAMP ISO 2852) 12.0 10.0 34.0 12.7 10.7 34.0 17.2 15.2 34.0 21.3 19.3 34.0 25.0 22.6 50.5 33.7 31.3 50.5 38.6 35.6 50.5 51.0 48.6 64.0 63.5 60.3 77.5 76.1 72.9 91.0 101.6 97.6 119.0 * OD = pipe outside Ø according to ISO 2037 FLOMID-5DFX (CLAMP DIN 32676) 34.0 34.0...
- Page 65 FLOMID-5TFX (TRI-CLAMP®) Coup ½" 12.7 25.0 ¾" 19.0 15.7 25.0 1" 25.4 22.1 50.4 1½" 38.1 34.8 50.4 2" 50.8 47.5 63.9 2½" 63.5 60.2 77.4 3" 76.2 72.9 90.9 4" 101.6 97.4 118.9 * OD = pipe outside Ø according to ASME BPE DT-1 ®...
- Page 66 FLOMID-7FX (ISO 2853) 10.0 Tr 22.89 x 1/8" 15.0 15.2 Tr 29.26 x 1/8" 21.2 19.3 Tr 33.53 x 1/8" 25.4 22.6 Tr 37.13 x 1/8" 29.0 31.3 Tr 45.97 x 1/8" 38.0 35.6 Tr 50.65 x 1/8" 42.5 48.6 Tr 64.16 x 1/8"...
- Page 67 FLOMID-9WDFX (DIN 11850 weld-on connections) (All dimensions in mm)
- Page 68 MX4 REMOTE CONVERTER (wall mounting) * Use DIN 571 or similar screws (depending on installation) MX4 REMOTE CONVERTER (pipe mounting) * Fittings are supplied for mounting on pipes of Ø53 max.
-
Page 69: Troubleshooting
TROUBLESHOOTING Problem Probable cause Solution Make sure that the pipe is completely full, for example, Pipe is empty installing the flowmeter in a vertical pipe with upwards flow Connect the functional ground of The functional earth is not the flowmeter to a metallic point of connected the installation in contact with the The screen shows... -
Page 70: Annex A Flow Rate Diagram
ANNEX A... - Page 72 WARRANTY Tecfluid S.A. guarantee all the products for a period of 24 months from their sale, against all faulty materials, manufacturing or performance. This warranty does not cover failures which might be imputed to misuse, use in an application different to that specified in the order, the result of service or modification carried out by personnel not authorized by Tecfluid S.A., wrong handling or accident.
Need help?
Do you have a question about the FLOMID Series and is the answer not in the manual?
Questions and answers