Advertisement
Quick Links
Instructions for
Real Good Toys'
Congratulations on your choice of a Real Good Toys product. Your kit has been precision made with meticulous care by
our craftspeople using carefully selected materials. This Dollhouse will last for years, even generations, if heirloom care
and attention is given during assembly. Take your time and read the instructions completely. If you have questions, ask
the experts at your local Dollhouse store or at info@realgoodtoys.com
You have already opened the box and
Before you begin -
see all the parts organized in boxes and bundles. For the
moment, keep them that way. There are important things to
do before you open your glue bottle.
Choose your color scheme
munity, models in your local Dollhouse shop or at our web-
site: realgoodtoys.com; look at plan books from a paint store
or architectural books at your library (a favorite is: Painted
Ladies by Michael Larsen and Elizabeth Pomada). You will
be painting some of the parts right away so get the paint
now. Choose high-quality semi-gloss latex enamel paints
for ease of use and durability.
:
Prepare your space
This dollhouse will spread out over a
large area while it is being built. You will need a large flat
tabletop for the house, several boxes to keep parts organized
until they are needed, and several trays lined with waxed
paper for holding small parts like windows and railings.
A snap-lid box will keep your tools and supplies
handy between building sessions.
Supplies and tools:
Masking tape: ¾" or 1" high tack tape (not 'painter's tape'); Utility knife and/or coarse double-cut file, Ruler, Sticky-Notes
Paint: Interior semi-gloss latex paint... Almost everything gets at least one coat before assembly - get the paint now.
Paintbrushes 1" or 2" foam brushes for each color, 3" foam roller for interior painting; Fine toothed saw like X-Acto Razor Saw
Sandpaper: 320 grit, 3-5 sheets... a sheet of coarse sandpaper (100 or 120 grit) is handy too
Glue: Aleene's Tacky Glue for the dollhouse, Solvent-Based panel cement for shingles
Wiring: it's easiest to install some parts during assembly... order wiring supplies now.
Wallpaper paste: Roman's "Border" Paste or Grandmother Stover's
Waxed Paper to keep painted parts from sticking
Real Good Toys 122 Gallison Hill Road Montpelier, VT 05602 802 479-2217 www.realgoodtoys.com
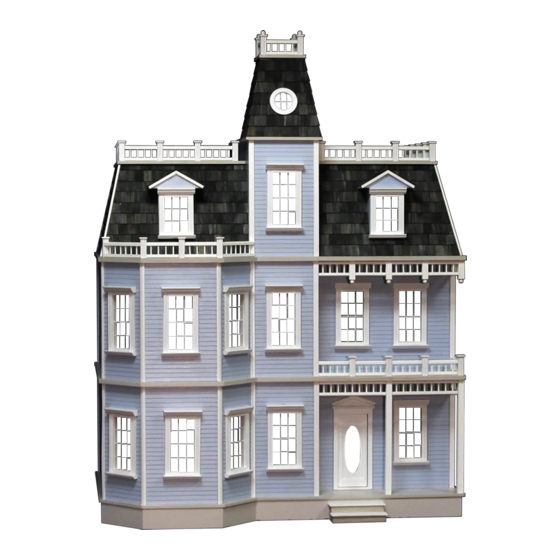
the
New Haven
.
Look at houses in your com-
Measure and identify the parts
groupings that protect the parts, and that is how the Parts
List is organized. As you measure and identify the parts,
label them with sticky notes using the names from the parts
list, and check them off the parts list so you know you have
everything. Taking the time now to identify and organize
the parts also makes them familiar so you will understand
what the instructions intend as you read ahead.
See page 26 for options
and accessories.
Kit #DH 77K
©08/19
:
The kit is packed in
• Plan ahead so you know
where you are going
• Read ahead so you know
how to get there
• Paint ahead so the parts are
ready when you need them
Advertisement

Subscribe to Our Youtube Channel
Related Manuals for Real Good Toys the New Haven DH 77K


Summary of Contents for Real Good Toys the New Haven DH 77K
- Page 1 Real Good Toys’ Congratulations on your choice of a Real Good Toys product. Your kit has been precision made with meticulous care by our craftspeople using carefully selected materials. This Dollhouse will last for years, even generations, if heirloom care and attention is given during assembly.
-
Page 2: Identify The Parts
Parts List page 2 Instructions for Kit #DH77K Identify the parts: Open one bundle at-a-time. Measure, identify, and label each part; mark it on the parts list. (1) J1070 Base Floor ( ) 16 x 31 Measurements shown are approximate and for identification purposes only. (1) J1071 Base Floor Extension ( ) 13 angled... - Page 3 Parts List page 3 Instructions for Kit #DH77K Drawings are not all the same scale (12) W12A Assembled Standard Window Frames W22A Assembled Dormer Window Frames (14) E6496 Window Pediment ( molding): 3 ” (14) E6497 Window Stool Cap ( molding): 3 ”...
- Page 4 Assembly tips page 4 Instructions for Kit #DH77K Overview of the Build: Slideshows, demos, useful links, details, and photos are all at: www.realgoodtoys.help Details of each step will be expanded along the way, but lots of folks like to see how it all fits together before they start Glue the shingles on with glue that doesn’t have any water Identify and label all of the parts...
- Page 5 Window or Door to see how it fits. 5408-10 at www.realgoodtoys.com Our pro uses Real Good Toys’ Shingle Dye Stain the Shingles: (available at www.realgoodtoys.com or through your Real Good Toys miniature dealer) when dying the shingles for this house.
- Page 6 Paint page 6 Instructions for kit #DH77K (before painting; page 9) B. Pre-Assembly Divider is a straight-edge Glue and tape together the Floors and Floor Extensions: Corner Floor Floor Extension Angled corner is here - line up carefully using a Divider as a straight-edge Note: The Base Floor and Base Floor Extension ”...
- Page 7 Paint page 7 Instructions for kit #DH77K The Attic Divider is temporarily assembled and used as a locator during assembly. These instructions will refer to it as a single part, but keep it Attic Divider un-glued until you can test different floor layouts in the “Finish the inside” section at the end.
- Page 8 PreAssembly/Paint page 8 Instructions for kit #DH77K B. Pre-Assembly (continued) Without glue, line up the edges of the Foundation Set Glue and tape together the Foundation set. with a floor to keep it square as the glue dries. Back Foundation x 31 up-side-down Mid Foundation (...
- Page 9 Instructions for kit #DH77K Paint page 9 Painting: www.RealGoodToys.help has painting and sanding videos Primer is designed to help paint stick to an impervious surface or Use interior semi-gloss latex paint. Details can be to join layers of dissimilar paints. In this application, the first coat painted with ‘Samplers’, which may be a lower-gloss of paint soaks right into the wood and fills the grain - you could do finish (harder to clean) or with craft paints.
- Page 10 Foundation and Base Floor page 10 Instructions for kit #DH77K Wiring? If you are going to wire your house, be prepared to cut slots for the tapewire each time a floor is ready to glue down. An Oscillating Multitool makes running wire later just as easy but for builders who will be cutting slots with a rotary tool or ‘drilling and carving’, follow the tracing (in the PreAssembly step) and cut the hole 5 ”...
- Page 11 Instructions for kit #DH77K Walls and Floors page 11 □ Outside & 2B. Tape together the Left Wall set with the clapboard right-side-up profile lined up at the bottom. Turn the set over and lift the joints for glue. Spread glue on the bottom edges.
- Page 12 Walls and Floors page 12 Instructions for kit #DH77K □ 3A. Glue and tape Wall F to the back of Wall E and Wall G to the Base Floor, spaced with the 13” Divider from the Base Floor’s right edge. Wall F Wall E1 13”...
- Page 13 Instructions for kit #DH77K Walls and Floors page 13 □ 3D. Stand Dividers to hold Walls G and H straight. Weight the Right Side Walls. Let the glue dry. Weight Temporary use of Dividers to hold the walls straight Tape Let the glue dry - then take off the weights and tape □...
- Page 14 Walls and Floors page 14 Instructions for kit #DH77K □ 5. Assemble the Second Floor Wall Sections in the same manner as steps #2 and #3. Stand back from your house and check to see that all the Corners line up. ”...
- Page 15 Tower page 15 Instructions for kit #DH77K □ 7A. Prepare a flap of tape on the bottom of each Front Roof to stick out diagonally at the corner and to the back. B. Glue and tape the Side Roof to the back of the Front Roof, lined up on the outside (angled) edges, and flat at the top.
- Page 16 Roofs page 16 Instructions for kit #DH77K 9. Temporarily, set Dividers between each floor to hold them straight. in back Glue, tape, and weight the Tower Wall set to the Top Floor, located as you did in step 8. Square Lined up Lined up Lined up...
- Page 17 Instructions for kit #DH77K page 17 Lined up in back 11. Space the Attic Divider a bit away from the Tower Side so glue squeezings won’t get on the Attic Divider in the next step. Glue, tape, and weight a Rooftop to the Roofs and Tower Side, lined up in back, and with the overhang on the side even from front-to-back.
- Page 18 Instructions for kit #DH77K page 18 13. Draw Shingling Guidelines on the Tower Roofs; the first guideline at 1 ” and the rest spaced 1” apart. 1” Glue and tape together the Tower Roofs. Tape together Dividers to hold the Tower Roofs square with each other as the glue dries.
- Page 19 Instructions for kit #DH77K page 19 www.realgoodtoys.help has many shingling slideshows and guidance on shingle dye and glue options. Shingle Board Recommended option: Shingle boards cut from Stripwood make shingling easier and make the shingles less vulnerable □ Starter Course 15.
- Page 20 Instructions for kit #DH77K page 20 16. Pre-assembled windows and Door (see “Painting” page 9) Pull the pin out of the bottom of the Door to disassemble it for painting (save the pins or use a cut-off of a paperclip to replace a lost pin). Take out the Door Top and plexiglass.
- Page 21 Instructions for kit #DH77K page 21 The next 3 pages are 18. Post and Railing Assembly a railing addendum See www.realgoodtoys.com for Railing Painting and Assembly slideshows A. Paint and sand the Rails and Dowels before assembly. Wipe any paint out of the grooves, and do not paint the Rail ends at all.
- Page 22 Page 1 Paint and Assemble Railings Painting Rail Parts: Sand everything. Sand until the paint is smooth and “silky” Use interior semi-gloss latex paint. Details can be painted feeling, transparent, and some of the wood is showing through. with ‘Samplers’, which may be a lower-gloss finish (harder Fold the sandpaper as needed to keep it fresh.
- Page 23 Paint and Assemble Railings Page 2 2. Assemble the Railings: a. Match Rails into assembly pairs (the same length). b. Set the first Rail of each assembly pair on the drawing, lined up on each end, and with a Stripwood support ready. Dip a Dowel in a puddle of glue for a scant dab on the end.
- Page 24 Railing Assembly Patterns DH77K: length dowels # of rails 8 Sets ” 11 Sets ” 2 Sets ” @45° 2 Sets ” 11 Sets ”...
- Page 25 Glue Door and Window Trim to the inside of the Door and Real Good Toys has provided materials for some basic Windows after the wall finish is done. interior work, but you may choose to do it differently.
- Page 26 Instructions for kit #DH77K page 23 #DH37K Two Story Addition 12W x 12D x 24H pictured on the #DH77K with Nosing and Brackets (GS Ledge) each sold separately - curtains not included www.realgoodtoys.com 20: Room Plan and layout The Tower Walls and Dividers next to the stairs are necessary but the rest of your Dividers can go wherever your interior plan directs or they can be cut and re-arranged to make the house one-of-a-kind.
- Page 27 Instructions for kit #DH77K page 24 Top Block Stair Block Glue 21. Dividers: The hall is narrow and finishing around or in front of the stairs is hard. The 13” Divider (the one next to the stairs) must be installed and finished (paint or wallpaper) and the nstall the 13”...
- Page 28 Instructions for kit #DH77K page 25 22: Stairs and Landing Paint, sand, assemble, and paint again all parts before installing them. Do not paint in Rails’ grooves or Liners’ holes. If you are staining and varnishing, a staining sealer gives more even penetration of the stain. When gluing parts together, scrape sections of bare wood for the glue to grab (glue doesn’t stick well to paint).
- Page 29 Accessories page 26 Instructions for Kit #DH77K The construction part of your project is done... Enjoy the Rest! Customizing? Options for building Real Good Toys’ Dollhouses www.realgoodtoys.com Lighting Fixtures HW2306 HW2304 HW2323 Doors and Windows Real Good Toys’ #7999 Bigger Best1...
Need help?
Do you have a question about the the New Haven DH 77K and is the answer not in the manual?
Questions and answers