Table of Contents
Advertisement
Quick Links
Instructions for
Real Good Toys'
Congratulations on your choice of a Real Good Toys product. Your kit has been precision made with meticu-
lous care by our craftspeople using carefully selected materials. This Dollhouse will last for years, even genera-
tions, if heirloom care and attention is given during assembly. Take your time and read the instructions com-
pletely. If you have questions, ask the experts at your local Dollhouse store or at info@realgoodtoys.com
Before you begin -
For the moment, keep them that way. There are important things to do before you open your glue bottle.
Prepare your space:
over a large area while it is being built. You will need
a large flat tabletop for the house, several boxes to keep
parts organized until they are needed, and several trays
lined with waxed paper for holding small parts like
windows and railings.
A snap-lid box will keep your tools and supplies handy
between building sessions.
Preview the Overview
your build; this helps make it fun and fulfilling.
Supplies:
Paint: Interior semi-gloss latex paint... Everything gets at least one coat before assembly - get the paint now.
Paintbrushes 1" or 2" foam brushes for each color, 3" foam roller for interior painting
Sandpaper: 320 grit, 3-5 sheets
Glue: Aleene's Tacky Glue for the dollhouse, Solvent-Based panel cement for shingles
Masking tape: ¾" or 1"
Wiring: it's easiest to install some parts during assembly... order wiring supplies now.
Screwdriver: #1 Phillips
Wallpaper paste: Roman's "Border" Paste
Real Good Toys 122 Gallison Hill Rd Montpelier VT 05602 802 479-2217 www.realgoodtoys.com
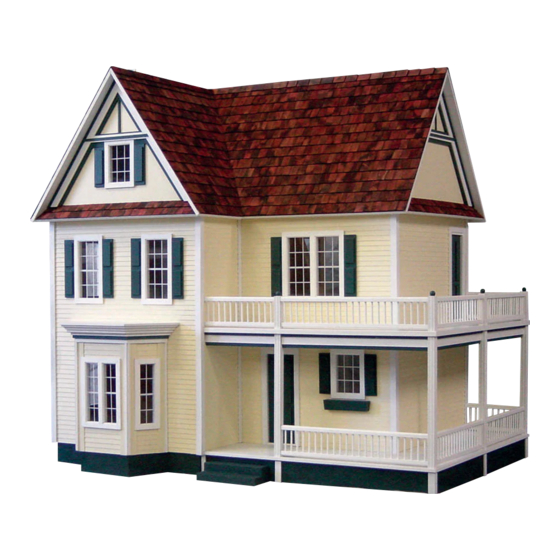
Victoria's Farmhouse
the
You have already opened the box and see all the parts organized in boxes and bundles.
This dollhouse will spread out
(page 3) to plan and organize
Measure and identify the parts:
groupings that protect the parts, and that is how the Parts
List is organized. As you measure and identify the parts,
label them with sticky notes using the names from the parts
list, and check them off the parts list so you know you have
everything. Taking the time now to identify and organize
the parts also makes them familiar so you will understand
what the instructions intend as you read ahead.
• Plan ahead so you know where you are going
• Read ahead so you know how to get there
• Paint ahead so the parts will be ready when you need them
Special Edition Kit #JM-1065
The kit is packed in
www.realgoodtoys.help
©06/16
Advertisement
Table of Contents

Related Manuals for Real Good Toys Victoria’s Farmhouse


Summary of Contents for Real Good Toys Victoria’s Farmhouse
- Page 1 ©06/16 Real Good Toys’ Congratulations on your choice of a Real Good Toys product. Your kit has been precision made with meticu- lous care by our craftspeople using carefully selected materials. This Dollhouse will last for years, even genera- tions, if heirloom care and attention is given during assembly. Take your time and read the instructions com- pletely.
- Page 2 Window and Door trim Baseboard and Crown Split Octagonal Shingles #5042 #5015 #5041 #5037 Shingle Dye Dye1: Reddish Brown Dye3: Dark Grey Best1 Real Good Toys’ Dollhouse Wiring Set Trim and Stripwood Flute24 SW16 RGT8 Wallpaper P2000 HH444 #4017 Pine Stair 6803 Banister and Landing Set &...
-
Page 3: Assembly Tips
Assembly Notes /Getting Started (A) page 3 Instructions for Special Edition Kit #JM-1065 Victoria’s Farmhouse Overview of the Build: Slideshows, demos, useful links, details, and photos are all at: www.realgoodtoys.help Details of each step will be expanded along the way, but lots of folks like to see how it all fits together before they start. - Page 4 Parts List page 4 Instructions for Special Edition Kit #JM-1065 Victoria’s Farmhouse Identify the parts: Open one bundle at-a-time. Measure each part and find it on the parts list. Label the parts and group them by the ‘instruction section #’ at the end of each part’s name These groups are how the parts will be used.
- Page 5 Parts List page 5 Instructions for Special Edition Kit #JM-1065 Victoria’s Farmhouse Box “A” (1) E8139 Front Step mdf) 5 x 2 (1) E8140 Front Step mdf) 5 x 1 Front Roof AccessBay Hardware Bag 4 : (2) E8168 1” Hinge (8) E8169 #2 Screws (1) E8124 Access Bay Base Floor...
- Page 6 Stain the Shingles: Our pro uses Real Good Toys’ Shingle Dye (available through your Real Good Toys miniature dealer) when dying the shingles for this house. Batch dye or stain the shingles several days ahead of time so they will be dry when the time comes to use them (instructions are with the shingle dye).
- Page 7 Paint (B) / Housebody (1) page 7 Instructions for Special Edition Kit #JM-1065 Victoria’s Farmhouse Can I do it differently? Yes you can - it’s your house! The information on these pages is offered as “best practices” advice, and it is what we do when we build this house. But if you are customizing or have something else in mind, test-ahead to make sure your planning includes everything! For many photos of the build go to www.realgoodtoys.help and click on “JM1065”...
- Page 8 Instructions for Special Edition Kit #JM-1065 Victoria’s Farmhouse Housebody (1) page 8 Painting: www.realgoodtoys.help has painting and sanding videos Paint (first-coat) everything. Don’t try to sand , fill, primp, or do much of anything to the wood before the first coat. The first coat fills and reinforces the wood so sanding clips off the fibers rather than pushing them around.
- Page 9 Instructions for Special Edition Kit #JM-1065 Victoria’s Farmhouse Housebody (1) page 9 2. Glue and tape the Gable Front to the Gable Illustration #5 Left Side panel (the Front overlaps the Side), with the Gable Front Overlaps grooves perfectly lined up (use a divider to make sure the Gable Left Side the grooves line up) see Illustration #5.
- Page 10 Housebody (1) page 10 Instructions for Special Edition Kit #JM-1065 Victoria’s Farmhouse Note: clean paint out of the grooves! Test the Middle Floor in the grooves in the Gable Front: Gable Front and Gable Left Side. Sand the top and bot- fits in the groove tom at the edges if necessary for a good fit.
- Page 11 There are interior finishing decisions that should be made now. For suggestions, see the “Customizing a Victoria’s 1” Farmhouse” Blog on the Real Good Toys website. You can find a link here: www.Victirias-Farmhouse.com Gable Triangle 1. Glue and tape the Gable Triangle and Attic End- wall Triangles to the Top Floor.
- Page 12 Front Bay (3) page 12 Instructions for Special Edition Kit #JM-1065 Victoria’s Farmhouse Exterior Painting: Finish all of the Exterior painting now! Illustration #1 Glue and Tape Together III. Assemble the Front Bay: the Bay Foundation 1. Lay the house assembly on its Back. Glue the Gable Foundation to the front of the house’s foundation, lined up on the left.
- Page 13 AccessBay (4) page 13 Instructions for Special Edition Kit #JM-1065 Victoria’s Farmhouse IV. Assemble the Access Bay: The Access Bay allows the decorator access to the gable’s Illustration #1 front rooms. Glue and tape the Access Bay 1. (this may already be done) Glue and tape the Access Floors to the Housebody’s Floors.
- Page 14 AccessBay (4) page 14 Instructions for Special Edition Kit #JM-1065 Victoria’s Farmhouse 6. Set an Access Bay Side on the edge of your work- Illustration #4 bench with the clapboard up. Let the Access Bay Front Hang off the front of the workbench. Fold the Hinges across Access Bay Left Side the clapboard surface of the Access Bay Side.
- Page 15 Windows (5) page 15 Instructions for Special Edition Kit #JM-1065 Victoria’s Farmhouse V. Window Assembly: The parts used in this section should be Illustration #1 painted ahead of time. If they have not been painted, do so now. These hands are holding the frame parts down against the table (not squeezing them together) www.realgoodtoys.help has more window assembly photos...
- Page 16 Windows (5) page 16 Instructions for Special Edition Kit #JM-1065 Victoria’s Farmhouse 10. Paint the Shutter parts. Without glue, adjust the spacing of the Shutter Panels on the Shutter Cores. Remove the Shutter Panel, put a scant line of glue on each edge of the back surface, Shutter Panel then replace the Shutter Panel.
- Page 17 Trim (7) page 17 Instructions for Special Edition Kit #JM-1065 Victoria’s Farmhouse Gable and Attic Endwall Trim: Cut the Trim material with a fine toothed saw (such as an x-acto razor saw or a hack saw). Line up the ™ Illustration #1 trim material with the pattern and mark the cuts with a pencil ...
- Page 18 Trim (7) page 18 Instructions for Special Edition Kit #JM-1065 Victoria’s Farmhouse 3. Shingle the False Eave (Illustration #5) one full shingle course and one course of shingles cut ” long. See the shin- gling instruction on page 17. ” 4.
- Page 19 Trim (7) page 19 Instructions for Special Edition Kit #JM-1065 Victoria’s Farmhouse 7. Cut, paint, and install the Front Illustration #8 Bay Facia (Illustration #8). 8. Cut, paint, and install the Wall Trim as shown in Illustration #9. A Trim Cutting photo gallery is at www.realgoodtoys.help ”...
- Page 20 Roof, or Line of Adhesive “Flash” the edge with a ” strip of copper (#SC from Real Good Toys is available through your One Inch dealer) to prepare the bottom edge of the Roof for the first row of shingles B.
- Page 21 Railings and Porch (9) page 21 Instructions for Special Edition Kit #JM-1065 Victoria’s Farmhouse IX. Porch Assembly: Preview: In this section, you will assemble and install the Porch Posts and Railings. A Railing Assembly demo is available at www.realgoodtoys.help Assemble the Rails 1.
- Page 22 Railings and Porch (9) page 22 Instructions for Special Edition Kit #JM-1065 Victoria’s Farmhouse Illustration #3 4 sets 9 Note: Variations in printers and “Print Scaling” in your printer dialogue box effect the size of these graphics. If your rails don’t match up exactly, center them on the diagram.
- Page 23 Railings and Porch (9) page 23 Instructions for Special Edition Kit #JM-1065 Victoria’s Farmhouse 4. Assemble the Flutepost and Beads (Illustration #5). Note: Variations in printers and “Print Scaling” Wait to install the Railings until the Windows and Doors are in in your printer dialogue box can effect the size place, and the Shingling is done.
- Page 24 Railings and Porch (9) page 24 Instructions for Special Edition Kit #JM-1065 Victoria’s Farmhouse 6. Set up the Rails, Facia, and Posts as Illustration #8 shown in Illustration #8. Use a ” Dowel to elevate the Railing sets above the Porch Floor. ”...
- Page 25 ” or carpeting? Every choice makes a difference 9” x 2 ” in the order of finishing. Real Good Toys has provided materials for some basic interior work, but you may choose to do it differently. Make your choices Get your materials...
- Page 26 Here are some Builder’s Photos... just for fun!
Need help?
Do you have a question about the Victoria’s Farmhouse and is the answer not in the manual?
Questions and answers