
Related Manuals for Carel µAM


Summary of Contents for Carel µAM
- Page 1 µAM controllo elettronico per condizionamento Air-Conditioning electronic controller Manuale d’uso User manual...
- Page 3 Manuale d’uso...
- Page 4 100% della sua produzione, sulle più innovative tecnologie di produzione disponibili nel mercato. CAREL e le sue filiali/affiliate non garantiscono tuttavia che tutti gli aspetti del pro- dotto e del software incluso nel prodotto risponderanno alle esigenze dell’applicazione finale, pur essendo il prodotto costruito secondo le tecniche dello stato dell’arte.
-
Page 5: Table Of Contents
Indice 1. INTRODUZIONE 1.1 Presentazione del prodotto .........................7 1.2 Funzioni principali µe-dronic ......................7 1.3 Modelli µAM ............................7 1.4 Glossario ..............................7 1.5 Tipi di impianto ............................8 2. INTERFACCIA UTENTE 2.1 Il display ..............................13 2.2 I tasti .................................13 3. INSTALLAZIONE 3.1 Installazione a parete ..........................14 3.2 Connessioni linea dati ..........................14 3.3 Connessioni di alimentazione ......................15 4. -
Page 7: Introduzione
10 zone indipendenti, ciascuna composta da un massimo di 6 termoventilconvettori (fan coil) dotati di controllori CAREL e-drofan. Il sistema ottimizza in modo sinergico e puntuale il funzionamento del gruppo frigorifero/pompa di calore (chiller/hp) se equipaggiato con controllore CAREL µC SE, utilizzando le strategie di Energy Saving in funzione del carico rilevato, della temperatura e dell’umidità... -
Page 8: Tipi Di Impianto
chiller/hp: chiller pompa di calore changeover commutazione raffreddamento / riscaldamento per chiller/hp e fan coil; RS-485 linea di trasmissione dati che collega µAM , µC SE ed e-drofan master; t-LAN linea di trasmissione dati che collega un e-drofan master al proprio terminale (acqua o e-droset) e ai propri e-drofan slave. - Page 9 1.5.1 IMpIANTO A 4 TUbI µAM CONNESSO A µC CONFIGURAZIONI µAM parametro valore significato En01 µC SE presente En02 Impianto a 4 tubi En03 Caldaia presente e comandata da µC Tab 1.b Nota: Per la procedura di configurazione vedi Capitolo “Configurazione e avvio”.
- Page 10 1.5.2 IMpIANTO A 2 TUbI µAM CONNESSO A µC CONFIGURAZIONI µAM parametro Valore Significato En01 µC SE presente En02 Impianto a 2 tubi En03 0= Caldaia non presente 1= Caldaia presente e comandata da µC Tab 1.c Nota: Per la procedura di configurazione vedi Capitolo “Configurazione e avvio”.
- Page 11 1.5.3 IMpIANTO A 4 TUbI µAM NON CONNESSO A µC CONFIGURAZIONI µAM parametro valore significato En01 µC SE non presente En02 Impianto a 4 tubi Tab 1.d Nota: Per la procedura di configurazione vedi Capitolo “Configurazione e avvio”. Fig. 1.h SETPOINT - MODE t-LAN Lunghezza...
- Page 12 1.5.4 IMpIANTO A 2 TUbI µAM NON CONNESSO A µC CONFIGURAZIONI µAM parametro valore significato En01 µC SE non presente En02 Impianto a 2 tubi Tab 1.e Nota: Per la procedura di configurazione vedi Capitolo “Configurazione e avvio”. Fig. 1.i µAM +030220460 rel.
-
Page 13: Interfaccia Utente
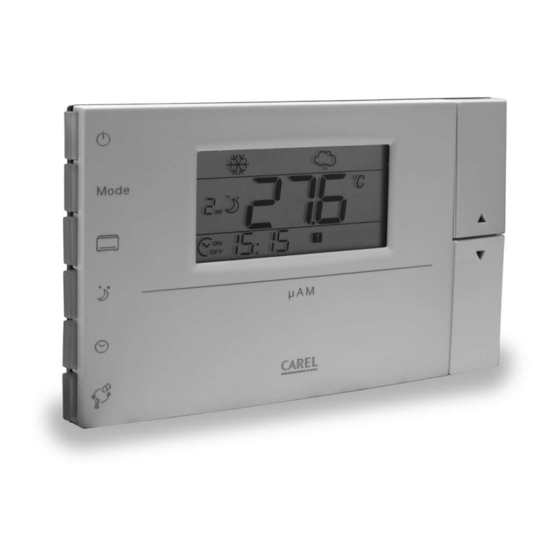
2. INTERFACCIA UTENTE 2.1 Il display Importante: i simboli sono visualizzati in funzione della configurazione del sistema e del modello di µAM Modalità RISCALDAMENTO Modalità RAFFREDDAMENTO Funzionamento AUTOMATICO In abbinamento a 1: DEUMIDIFICA automatica attiva. Da solo: DEUMIDIFICA manuale attiva. UMIDIFICA automatica attiva Visualizza, a seconda delle situazioni: temperatura rilevata, set point temperatura, umidità... -
Page 14: Installazione
10 e-drofan master (controllori per fan coil). • Ogni e-drofan master comunica con un terminale acqua o e-droset e con un massimo di 5 e-drofan slave tramite linea dati CAREL di tipo tLAN. • Per collegare un e-drofan master e il controllore µC SE alla linea dati RS485 di µAM è... -
Page 15: Connessioni Di Alimentazione
3.3 Connessioni di alimentazione Avvertenze • I collegamenti elettrici devono essere eseguiti esclusivamente da un tecnico elettricista qualificato. • Installare obbligatoriamente un fusibile con corrente di intervento di 250 mAT tra la linea di alimentazio- ne e il morsetto G. µAM non è dotato di fusibile di protezione interno. Informazioni •... -
Page 16: Configurazione E Avvio
4. CONFIGURAZIONE E AVVIO 4.1 Configurazione di base dei dispositivi e-drofan master e µC Attenzione: Prima di alimentare µC SE collegato alla comune linea dati RS485, è necessario configurare i dispositivi seguendo la procedura descritta di seguito. Se ciò non viene rispettato, si possono verificare alterazioni nei dati di funzionamento impostati nei dispositivi, con rischi anche di guasto nel funzionamento dell’unità... -
Page 17: Configurazione Di Μam: Funzioni Da Attivare In Fase Di Installazione
4.2 Configurazione di µAM: Funzioni da attivare in fase di installazione Informazione Le impostazione di µAM hanno conseguenze sulle modalità di funzionamento di µC SE (se presente) e sulle modalità disponibili da tasto MODE per e per gli e-drofan. Per una panoramica completa vedere µAM la “Tabella riassuntiva modalità... - Page 18 Per disabilitare la funzione, impostare il parametro Ch01 al valore 0. Come funziona Una volta abilitata la funzione, impostando AUTO, valuterà i tipi di richiesta (riscaldamento/ µAM raffreddamento) degli e-drofan master in stato di ON e non in allarme e: •...
- Page 19 Informazioni aggiuntive Questa modalità centralizza presso solo il set point e la modalità riscaldamento/raffreddamento di µAM tutti gli e-drofan. Rimane in ogni caso possibile impostare ad OFF un singolo e-drofan master utilizzando il relativo terminale acqua o e-droset. • (Ch01=3): “In base al tipo prevalente di richieste degli e-drofan” Come funziona Quando µAM...
- Page 20 Esempio di funzionamento e-drofan master #1: sonda 16 °C, set point 22 °C, differenza: -6 °C, modalità AUTOMATIC-riscaldamento e-drofan master #2: sonda 14 °C, set point 23 °C, differenza: -9 °C, modalità AUTOMATIC-riscaldamento e-drofan master #3: sonda 21 °C, set point 18 °C, differenza: +3 °C, modalità AUTOMATIC-raffreddamento Ch02 = 3 °C.
- Page 21 • (Co01=2): “In base alla differenza tra la temperatura misurata dalla sonda di µAM e il suo set point” Come funziona utilizza la differenza tra la temperatura misurata dalla sua sonda e il suo set point come dato di par- µAM tenza per modificare il set point della temperatura dell’acqua del chiller/hp, in base ai grafici delle figure successive.
-
Page 22: Funzioni Di Μam Attivabili Durante Il Funzionamento
5. FUNZIONI DI µAM ATTIVAbILI DURANTE IL FUNZIONAMENTO 5.1 ON/STANDBY dell’impianto Il tasto POWER permette di attivare (ON) e disattivare (STANDBY PERMANENTE o TEMPORANEO) il funzionamento dell’impianto. L’impostazione è mantenuta anche in assenza di alimentazione. Nota: non dispone di un interruttore di spegnimento; non appena è alimentato, inizia a funzionare. Il µAM tasto POWER ha solo funzionalità... -
Page 23: Auto: Attivazione Changeover/Energy Saving
Informazioni aggiuntive Funzione disponibile solo ad una delle seguenti condizioni: • l’impianto è del tipo a 4 tubi; • oppure: l’impianto è a 2 tubi con µC SE presente e con heat pump o caldaia; • oppure: l’impianto è a 2 tubi senza µC 5.4 AUTO: attivazione Changeover/Energy Saving Informazioni Funzione disponibile, se abilitata in fase di installazione, solo per alcuni tipi di impianti (vedi sotto). -
Page 24: Controllo Umidità Ambiente
Premere ripetutamente il tasto fan coil (il simbolo 16 del display si accende) fino a far apparire nel campo 15 il numero corrispondente all’indirizzo dell’e-drofan desiderato (0 = indirizzo 10); si possono scorrere tutti gli e-drofan rilevati automaticamente da µAM sulla linea dati. il campo 18 e 19 visualizzano la temperatura ambiente rilevata dalla sonda dell’e-drofan;... -
Page 25: Modalità Notturna (Sleep)
5.6.1 Funzionamento automatico Informazioni É di fabbrica abilitato in µAM Come fare Regolare il set point unico di umidità (parametro Hu01), premendo ripetutamente TEMP finché si accendono contemporaneamente i simboli 8 “set” e 9 “%rH”. Fig. 5.l Per disabilitare la funzione Deumidifica impostare Hu03 al suo valore massimo (per modificare vedi Capitolo “Parametri”). -
Page 26: Fasce Orarie
5.8 Fasce orarie Impostando il funzionamento controllato a fasce orarie è possibile programmare in orari prefissati, per tutti i dispositivi dell’impianto, lo stato STANDBY/ON ed eventualmente l’invio di un set point comune. Sono disponibili: • 2 orari comuni ai primi cinque giorni della settimana (Lunedì-Venerdì) •... -
Page 27: Visualizzazioni Alternative
5.8.2 Attivare/disattivare il funzionamento a fasce orarie Informazione Non è possibile attivare il funzionamento se per tutti e quattro gli orari è stata impostata l’azione ON oppure OFF. Come fare Assicurarsi che il funzionamento dell’impianto sia attivato (vedi Paragrafo “ON/STANDBY dell’impianto”). Per attivare/disattivare il controllo delle fasce orarie premere CLOCK: il simbolo 17 si accende/si spegne. -
Page 28: Parametri
6. pARAMETRI 6.1 Procedura per accedere alla modifica parametri Partendo da visualizzazione normale premere e rilasciare il tasto TEMP (compare una visualizzazione diversa dalla visualizzazione normale), e, entro 5 secondi, premere e mantenere premuto per 3 secon- di il tasto UP: lampeggia la sigla del primo parametro (Ch01) e compare il suo valore. con UP/DOWN scegliere il param. - Page 29 4 = Abilitazione changeover automatico in base alla media dei DT tra temperatura misurata e set point di ogni e-drofan master in ON e non in allarme. Selezionare solo se sono soddisfatte contemporaneamente le seguenti condizioni: • En02=0: impianto a 2 tubi •...
- Page 30 En02 Tipologia di impianto: 0 = 2 tubi; 1 = 4 tubi (solo se chiller non heat pump). Nota: In base all’impostazione di Ch01, En01, En02, En03, alcuni modi di funzionamento per µAM, e-drofan e µC SE possono non essere disponibili; consultare la “Tabella riassuntiva modalità di funzionamento” En03 Presenza caldaia comandata da µChiller SE con comando ON / OFF...
-
Page 31: Tabella Riassuntiva Modalità Di Funzionamento
6.3 Tabella riassuntiva modalità di funzionamento Tab 6.d +030220460 rel. 1.0 - 08.05.2007 µAM... -
Page 32: Allarmi
7. ALLARMI µC e-drofan µAM visualizza gli stati di allarme provenienti da e dagli Informazioni • Quando si verifica un allarme, nel display viene visualizzato il simbolo 12 ALLARME lampeggiante. • I codici numerici degli allarmi attivi vengono visualizzati in sequenza nel campo principale 6, alternati alla visualizzazione normale. -
Page 33: Caratteristiche
8. CARATTERISTIChE 8.1 Caratteristiche Tecniche Tensione di alimentazione 24 Vac ±15 %, 50/60 Hz 70 mA 1,5 VA oppure 31 Vdc ± 29 % 70 mA (secondo EN60730-1) 24 Vac, 50-60Hz, Class 2 25.5 - 36.25 Vdc, Class 2 Ingresso alimentazione (Classificazione secondo UL873) Potenza assorbita, max 1 watt Uscite: connessione seriale RS485, Class 2 0...50 °C... - Page 35 User manual...
- Page 36 100% of its products, and on the most innovative production technology avail- able on the market. CAREL and its subsidiaries nonetheless cannot guarantee that all the aspects of the product and the software included with the product respond to the requirements of the final application, despite the product being developed according to start-of-the-art techniques.
- Page 37 Contest 1. INTRODUCTION 1.1 Presentation of the product .........................7 1.2 Main functions of the µe-dronic ......................7 1.3 µAM models ............................7 1.4 Glossary ..............................7 1.5 Types of system ............................8 2. USER INTERFACE 2.1 Display ..............................13 2.2 Buttons ..............................13 3. INSTALLATION 3.1 Wall mounting ............................14 3.2 Data line connections ...........................14 3.3 Power supply connections ........................15 4.
-
Page 39: Glossary
– area controller – Micro Area Manager, fitted with built-in temperature and humidity probe, µAM can manage up to 10 independent zones, each made up of a maximum of 6 fan coils fitted with CAREL e-drofan controllers. The system synergically optimises the operation of the chiller/heat pump if fitted with the CAREL µC... -
Page 40: Types Of System
chiller/hp: chiller/heat pump changeover change between cooling / heating mode for chiller/hp and fan coil units; RS-485 data transmission line that connects µAM , µC SE and the master e-drofan; t-LAN data transmission line that connects a master e-drofan to its terminal (acqua or e-droset) and to the con- nected slave e-drofan devices. - Page 41 1.5.1 4-PIPE SYSTEM µAM CONNECTED TO µC µAM CONFIGURATIONS parameter value meaning En01 µC SE available En02 4-pipe system En03 Boiler available and controlled by µC Table 1.b Note: For the configuration procedure, see the Chapter “Configuration and start-up”. Fig. 1.f MODE DEUMIDIFICAZIONE COMPENSAZIONE...
- Page 42 1.5.2 2-PIPE SYSTEM µAM CONNECTED TO µC µAM CONFIGURATIONS parameter value meaning En01 µC SE available En02 2-pipe system En03 0=Boiler not available 1=Boiler available and controlled by µC Table 1.c Note: For the configuration procedure, see the Chapter “Configuration and start-up”. Fig.
- Page 43 1.5.3 4-PIPE SYSTEM µAM NOT CONNECTED µC µAM CONFIGURATIONS parameter value meaning En01 µC SE not available 4-pipe system En02 Table 1.d Note: For the configuration procedure, see the Chapter “Configuration and start-up”. Fig. 1.h SETPOINT - MODE t-LAN Lunghezza max 3Om SETPOINT - MODE +030220460 rel.
- Page 44 1.5.4 2-PIPE SYSTEM µAM NOT CONNECTED µC µAM CONFIGURATIONS parameter value meaning En01 µC SE not available En02 4-pipe system Table 1.e Note: For the configuration procedure, see the Chapter “Configuration and start-up”. Fig. 1.i µAM +030220460 rel. 1.0 - 08.05.2007...
-
Page 45: User Interface
2. USER INTERFACE 2.1 Display Information: the symbols are displayed according to the configuration of the system and the model of µAM HEATING mode COOLING mode AUTOMATIC operation In combination with 1: automatic DEHUMIDIFICATION active. From only: manual DEHUMIDIFICATION active. Automatic HUMIDIFICATION active Displays, depending on the situation: temperature measured, temperature set point, humidity measured, humidity set point, value of the parameter being set... -
Page 46: Installation
(fan coil controllers). • Each master e-drofan communicates with an acqua or e-droset terminal and with a maximum of 5 slave e-drofan units, via the CAREL tLAN data line. • To connect a master e-drofan and the µC SE controller to the µAM RS485 data line, the following RS485... -
Page 47: Power Supply Connections
3.3 Power supply connections Warnings • The electrical connections must only be performed by a qualified electrician. • Install a 250 mAT fuse between the power supply line and terminal G. µAM does not have an internal protection fuse. Information •... -
Page 48: Configuration And Start-Up
4. CONFIGURATION AND START-UP 4.1 Basic configuration of the master e-drofan and µC SE devices Important: Before powering up the µC SE connected to the common RS485 data line, the devices must be configured, following the procedure described below. If this is not done, there may be alterations in the operating data set by the manufacturer, with the risk of faults in the operation of the chiller/hp. -
Page 49: Configuring The Μam: Functions To Be Activated During Installation
4.2 Configuring the µAM: Functions to be activated during installation Information The settings of the µAM affect the operating mode of the µC SE (if used) and the modes available from MODE button for the µAM and for the e-drofan units. For a complete overview, see the “Summary table of operating modes”... - Page 50 How it works Once the function has been enabled, when setting AUTO, will analyse the control signals (heating/coo- µAM ling) from the master e-drofan units that are ON and have no alarms and: • will stop the unit for the production of cold water (chiller) if all the units require hot water; •...
- Page 51 • (Ch01=3): “Based on the prevalent requirements of the e-drofan units” How it works When the µAM is set in AUTO mode, all the e-drofan units are set to automatic mode, and the master e- drofan units that are ON and without alarms are monitored to see which require heating and which require cooling.
- Page 52 Example of operation e-drofan master #1: probe 16 °C, set point 22 °C, difference: -6 °C, AUTOMATIC mode - heating e-drofan master #2: probe 14 °C, set point 23 °C, difference: -9 °C, AUTOMATIC mode - heating e-drofan master #3: probe 21 °C, set point 18 °C, difference: +3 °C, AUTOMATIC mode - cooling Ch02 = 3 °C.
- Page 53 • (Co01=2): “Based on the difference between the temperature measured by the µAM probe and its set point” How it works uses the difference between the temperature measured by its own probe and its set point as the µAM starting point to adapt the water temperature set point of the chiller/hp, based on the graphs shown in the following figures.
-
Page 54: Μam Functions Available During Operation
5. µAM FUNCTIONS AVAILABLE DURING OPERATION 5.1 System ON/STANDBY The POWER button is used to activate (ON) and deactivate (PERMANENT or TEMPORARY STANDBY) the operation of the system. The setting is maintained even when power is not connected. Note: the µAM does not have an OFF switch; as soon as it is powered, it starts operating. The POWER button simply has the purpose of activating / deactivating the operation of the system. -
Page 55: Auto: Changeover/Energy Saving Activation
Other information Function available only when one of the following conditions is true: • 4-pipe system; • or: 2-pipe system with µC2SE connected and with heat pump or boiler; • or: 2-pipe system without µC 5.4 AUTO: Changeover/Energy Saving activation Information Function available, if enabled during installation, only for some types of systems (see below). -
Page 56: Ambient Humidity Control
Press the Fan Coil button repeatedly (symbol 16 comes on) until field 15 shows the number correspon- ding to the address of the desired e-drofan (0 = address 10); all the e-drofan units automatically detected by the µAM on the data line can be scrolled. Fields 18 and 19 display the ambient temperature measured by the e-drofan probe;... -
Page 57: Sleep Mode
5.6.1 Automatic operation Information By default this is enabled on the µAM Procedure Set the humidity set point (parameter Hu01) by pressing TEMP repeatedly until symbols 8 “set” and 9 Fig. 5.l “%rH” come on at the same time. To disable the Dehumidification function set Hu03 to its maximum value (to do this see the chapter on “Parameters”). -
Page 58: Time Bands
5.8 Time bands The operation of all the devices in the system can be controlled based on set time bands, managing the status (STANDBY / ON) and if necessary setting a common set point. The following are available: • 2 common time bands for the first five days of the week (Monday-Friday) •... -
Page 59: Alternative Displays
5.8.2 Activating / deactivating time band operation Information Time band operation cannot be activated if the action all four time bands is set to ON or OFF. Procedure Make sure the operation of the system is activated (see the section “System ON / STANDBY”). To activate / deactivate time band management, press CLOCK: symbol 17 comes on / goes off. -
Page 60: Parameters
6 PARAMETERS 6.1 Parameter setting procedure Starting from normal display mode, press and release the TEMP button (display changes from the normal display), and, within 5 seconds, press and hold the UP button for 3 seconds: the code of the first parameter (Ch01) flashes and its value is displayed. - Page 61 4 = Enable automatic changeover based on the average of DT between the temperature measured and the set point on each master e-drofan that is ON and without alarms. Select only if the following conditions are true at the same time: •...
- Page 62 En02 Type of system: 0 = 2 pipes; 1 = 4 pipes (chiller only, not heat pump). Note: Based on the settings of Ch01, En01, En02, En03, some operating modes for the µAM, e-drofan and µC SE may not be available; see the “Summary table of operating modes”...
-
Page 63: Summary Table Of Operating Modes
6.3 Summary table of operating modes Tab 6.d +030220460 rel. 1.0 - 08.05.2007 µAM... -
Page 64: Alarms
7. ALARMS µAM displays the alarms deriving from the µC SE and from the e-drofan units. Information • When an alarm is activated, the display shows the ALARM symbol (12), flashing. • The numeric codes of the active alarms are displayed in sequence in field 6, alternating with the normal display. - Page 65 8. CARACTERISTICS 8.1 Technical specifications 24 Vac ±15 %, 50/60 Hz 70 mA 1,5 VA or Power supply 31 Vdc ± 29 % 70 mA (to EN60730-1) 24 V ac, 50-60Hz, Class 2 25.5 - 36.25 V dc, Class 2 Power supply input (classification to UL873) Power input, max 1 watt Outputs: RS485 serial connection, Class 2...
- Page 66 NOTES:...
- Page 68 Agenzia / Agency: CAREL S.p.A. Via dell’Industria, 11 - 35020 Brugine - Padova (Italy) Tel. (+39) 049.9716611 - Fax (+39) 049.9716600 e-mail: carel@carel.com - www.carel.com...
Need help?
Do you have a question about the µAM and is the answer not in the manual?
Questions and answers