
Related Manuals for GRASS VALLEY NV9000


Summary of Contents for GRASS VALLEY NV9000
- Page 1 NV9608 AND NV9616 NV9000 CONTROL PANEL User’s Guide VERSION 1.2 UG0046-02 2015-07-02 www.grassvalley.com...
- Page 2 Grass Valley USA, LLC, Miranda, NV9608, NV9616, Kaleido, NVISION, iControl, and Densité are trademarks or registered trademarks of Grass Valley USA, LLC. Belden Inc., Grass Valley USA, LLC, and other parties may also have trademark rights in other terms used herein.
- Page 3 NV9608 and NV9616 User’s Guide Electrostatic Discharge (ESD) Protection Electrostatic discharge occurs when electronic components are improperly handled and can result in intermittent failure or complete damage adversely affecting an electrical circuit. When you remove and replace any card from a frame always follow ESD-prevention procedures: •...
- Page 4 Notices immédiatement à l'eau savonneuse. Ne jamais ingérer le liquide. La toxicité est extrêmement faible, mais la prudence demeure de mise en tout temps. Recycling Visit www.grassvalley.com for recycling information. Certification and Compliance Safety Compliance This equipment complies with the requirements of CSA/UL/IEC/EN 60950-1, 2 Ed.
-
Page 5: Table Of Contents
Adding a Panel to an NV9000 Configuration ........ - Page 6 Table of Contents 5 Operation ..........29 Summary.
- Page 7 NV9608 and NV9616 User’s Guide XY/MD Mode.............43 Undefined .
- Page 8 Table of Contents...
-
Page 9: Preface
Preface Chapter 1 is an introduction to the NV9608 User’s Guide. Summary Chapter Structure ..............1 The PDF Document . -
Page 10: Terms, Conventions And Abbreviations
• NV960, NV920, or NV915 Quickstart Guide(s). • NV9000-SE Utilities User’s Guide (or NV9000-SE Utilities help files). • The router manuals for whatever routers you have in your system. You should also be familiar with the NV9000-SE Utilities software and NV9000 family router control systems. -
Page 11: Introduction
Introduction Chapter 2 provides functional descriptions of the NV9608. Summary Summary ................3 Panel Organization . -
Page 12: Panel Organization
Ethernet port are available. The AC connector has a compartment in which you can find a spare fuse. (The Ethernet port is 10baseT. The NV9000 supports 10baseT as well as 100baseT.) Panel Organization LCD Button Array The NV9616 has 16 LCD button units. -
Page 13: Scroll Buttons
NV9608 and NV9616 User’s Guide • Levels (in X-Y mode). The button at the top left represents the selected destination. The remaining 15 buttons (or 7 buttons on the NV9608) buttons represent the levels of the selected destination. • Menu functions (in menu mode). Some of the LCD buttons execute menu functions. •... -
Page 14: Modes Of Operation
Introduction Modes of Operation The ordering of suffixes and mnemonics on these fixed buttons is arbitrary. See Category Selection page 33 for more information. The other 14 function buttons can be assigned any available function. The set of available functions (28) is the same in X-Y mode and MD mode. Modes of Operation The panels can operate in one of 2 modes: •... -
Page 15: Secondary Modes
NV9608 and NV9616 User’s Guide Operators perform a take by selecting a destination, (optionally) selecting levels, selecting a source, and pressing the take button under any of the selected LCD buttons. The operator uses the function buttons to select a source and to select a destination. See Category Selection page 33... - Page 16 Introduction Additional Control Panel Features Additional Control Panel Features The panel supports gang switching in multi-destination mode. The operator may route single or multiple sources to multiple destinations in a single operation. The LCD buttons can be green (for sources), amber (for destinations), yellow, or red. Each button provides three levels of tally: off, low, and high.
-
Page 17: Installation
Testing ................11 Package Contents If you have ordered one or more NV9616 or NV9608 control panels from Grass Valley, inspect the shipping container for damage. If you find any container damage, unpack and inspect the contents. -
Page 18: Installing Software And Documentation
This document is available through the Grass Valley web site. You must use NV9000-SE Utilities to configure the NV9616 or NV9608 control panel. Contact Grass Valley if you need to obtain the latest version of this NV9000 configuration software. You may use the Panel IP Configuration Utility if you want to your panel to have a static IP address (with respect to the system controller) or to use DHCP. -
Page 19: Testing
(All panel IDs must be unique.) You can now prepare an NV9616 or NV9608 configuration in NV9000-SE Utilities and upload the configuration to the NV9616 or NV9608. You need the panel ID to create a panel configuration. - Page 20 NV9000-SE Utilities. 3 Is the system controller actually running? With the typical noise levels in a facility, it can sometimes be difficult to tell. Use the ‘System’ pages of NV9000-SE Utilities to make the determination. 4 Is NV9000-SE Utilities installed and operating? If so, can you upload a configuration to...
-
Page 21: Configuration
Adding a Panel to an NV9000 Configuration ........ - Page 22 NV9616. In the ID field, enter the panel ID you assigned to the panel while it was in setup mode. (You can change the panel ID in NV9000-SE Utilities.) Give a name to the panel in the name field and select a user.
- Page 23 NV9608 and NV9616 User’s Guide 3 Create an entirely new configuration file. In the first and third cases, you will create a new configuration file whose name you .616 designate. The file extension for an NV9616 configuration file is . The file extension for .608 an NV9608 configuration file is .
-
Page 24: Nv9616 Panel Configuration Page
Configuration NV9616 Panel Configuration Page NV9616 Panel Configuration Page This is the default NV9616 panel configuration page in NV9000-SE Utilities: Panel Image: Button Definition Section Panel Options Fig. 4-1: NV9616 Configuration Page (Default) The NV9608 configuration page is functionally identical, but instead of showing 16 LCD button proxies, it shows only 8. -
Page 25: Regions Of The Configuration Page
NV9608 and NV9616 User’s Guide button restores the last saved version of the panel configuration, canceling any changes you just made. Regions of the Configuration Page Above the ‘Revert to Saved’ and ‘Save’ buttons (always present) there are 4 main regions: •... -
Page 26: Panel Options
Configuration Panel Options Panel Options The panel options section, at the right of the configuration page, has two parts: drop-down menus and checkbox options. These are the drop-down menus: These are its drop-down menu options: Panel Type XY/Multi- The panel configuration allows the operator to switch destination between X-Y mode and multi-destination mode at any time. - Page 27 A list of “name sets” appears in the drop-down menu. The name sets can be defined under the System Management pane of NV9000-SE Utilities. Choose ‘System Name’ in this list if you do not want, or do not care about, device name aliases.
-
Page 28: Checkbox Options
Configuration Checkbox Options Checkbox Options The checkbox options section is at the bottom of the panel options section: A check in the box enables the option. Clearing the checkbox disables the option. By default, all the check box options are clear except ‘Use Continuous Scrolling’ . The following items are the checkbox options: •... - Page 29 NV9608 and NV9616 User’s Guide • Deselect all destinations and turn off hold after take. After selecting many MD destinations (with ‘Hold’ mode on), it can be time-consuming to find them all (and no others) to deselect them after a take. When you enable this option, the NV9616 does exactly that (and turns off hold mode).
-
Page 30: Button Definitions
During configuration, certain button fields contain a colon (:) and a number after the data in the field. The number is the record ID of the object in the NV9000 configuration database. The record IDs can be ignored but might be of some use when the configurer is searching for items in the configuration database. - Page 31 The names of devices in categories are composed of the category name followed by one or more suffices. (Device names are limited to 8 characters, however.) NV9000-SE Utilities allows configurers to designate a separator character which is inserted between the parts of the device name. ...
- Page 32 In MD mode, the panel turns the buttons for protected destinations red. It also displays “Protect by ‹user›” on the buttons of protected destinations (where ‹user› is one of the user names defined in the NV9000 system). Free Source The button selects a pre-defined phantom device that can be used to release or “free”...
- Page 33 NV9608 and NV9616 User’s Guide Type Description Hold In multi-destination mode, Hold retains destination selections after a take. In X-Y mode, Hold retains breakaway levels after a take. The button definition has no fields to configure. Information Although an information button is present in the drop-down menu for button types, you should not configure an information button on the panel, because an information button does nothing.
- Page 34 Configuration Button Types Type Description Preset The button removes locks and protects from preset source devices. This Release button is not needed if source locks and protects are not used in your system. The button definition has no fields to configure. Previous The button presets the previously routed source to the currently selected Source...
- Page 35 NV9608 and NV9616 User’s Guide Type Description Source Means “the source is the master” and makes the source device the master. Master Otherwise, the destination device is the master. This button (and these concepts) apply only to machine control routes only. The button definition has no fields to configure.
- Page 36 Configuration Button Types...
-
Page 37: Operation
Active LCD buttons are green, amber, yellow, or red. (Red indicates a lock or a protect.) Please refer to the NV9000-SE Utilities User’s Guide (or the NV9000-SE Utilities help files) if you are unfamiliar with the concepts used in this chapter. Modes of Operation The panels can operate in one of 2 modes: •... -
Page 38: X-Y Mode
Operation Modes of Operation Operators perform a take by (optionally) scrolling to an MD page, pressing an LCD button to select a destination, selecting a source, and pressing the take button under the selected LCD button. The operator uses the function buttons to select a source. In MD mode, all the LCD buttons are normally green —... -
Page 39: Button Legends
NV9608 and NV9616 User’s Guide • Setup mode — where the NV9616 is freshly powered up, but disconnected from the network. In this mode, the configurer can preset the NV9616’s panel ID and perform a few diagnostic tasks. Usually, only configurers need be concerned with setup mode. Setup Mode on page 54. -
Page 40: Operating Concepts
Operating Concepts Levels In the NV9000-SE Utilities and in the NV9000 router control system, routes occur on levels. A level is typically SD, HD, analog video, AES, analog audio, or machine control. Various devices are defined as sending and receiving signals on certain levels. The set of levels handled by a device belong to what is called a level set. -
Page 41: Breakaway
NV9608 and NV9616 User’s Guide Breakaway In X-Y mode, a hold button retains breakaway levels after a take. Simply press the hold button at any time before the take. A hold button is a toggle. Press it once to put the panel in hold mode; press it again to remove hold mode. -
Page 42: Lock, Protect, And Release
Operation Lock, Protect, and Release At this point, you could press a ‘Clear’ button — as you would a backspace key — to erase the most recent entries in the name. If you press ‘Clear’ once, it would erase the “2”... -
Page 43: Scenario 2 - X-Y Mode, Breakaway
NV9608 and NV9616 User’s Guide Press ‘Destination Mode’ to begin selection of a destination. Then press a category button to choose a destination category. Then press additional category buttons to append a suffix to the category mnemonic to generate the destination name. The name you generate appears on the left (or top left) LCD button on the panel. -
Page 44: Scenario 4 - Md Mode, Multiple Destinations
Operation Takes Press the destination’s LCD button. After pressing the destination’s LCD button, you can optionally assign a new desti- nation to that button. To do so, press ‘Destination Mode’ to begin selection of a destination. Then, press a category button to choose a destination category. Then press additional category buttons to append a suffix to the category mnemonic to generate the destination name. -
Page 45: Gang Takes
NV9608 and NV9616 User’s Guide Gang Takes Gang takes occur in MD mode only. However, the ‘Gang Take’ button will perform ordinary takes when your panel is in X-Y mode. In MD mode, the ‘Gang Take’ button performs takes to multiple MD destinations (which have presets) simultaneously. -
Page 46: Chop
Operation Buttons Thereafter, pressing a category button appends the suffix represented by the button to the device name. When you have constructed the device name of choice, you simply stop pressing suffix buttons. A category button operates in source mode or destination mode. In source mode, it selects a source category or a suffix for the source category. -
Page 47: Default State
The same destination does however turn red on other users’ NV9616s or NV9608s (and on certain other panels in your NV9000 system). You must select at least one level on which to protect the destination. To unprotect a destination, select exactly those levels and press ‘Destination Protect’... -
Page 48: Free Source
The button selects a pre-defined phantom device that can be used to release or “free” devices on the data (machine control) level. A free source is also used with tielines to free the tieline for others to use. The actual free source used is defined in the NV9000 configuration. -
Page 49: Level Map
NV9608 and NV9616 User’s Guide Level Map The ‘Level Map’ button cross-connects levels (typically in the same physical router). The function is typically used to shuffle audio channels, for example, to connect AES1/2 to AES3/4. Level mapping is possible only in X-Y mode. Follow these steps to create a level mapping: 1 Select a destination and preset a source. -
Page 50: Panel Lock
Operation Buttons Panel Lock The button prevents accidental changes to the panel settings, especially router crosspoints. When the panel is locked, the button array becomes blank except for the Panel Lock button which becomes high tally amber. The button is a toggle: press the panel lock button again to revert the panel to its previous state. -
Page 51: Source Mode
NV9608 and NV9616 User’s Guide Source Mode The button places the panel in source mode. Category selections in source mode select source devices. Category buttons that are not source categories become disabled in source mode. Categories that include both source and destinations appear in both source mode and destination mode. -
Page 52: Name Sets
Name Sets NV9000-SE Utilities allows configurers to define multiple name sets. Each name set contains aliases (alternate names) for any and all devices in the NV9000 system. The aliases can appear in the displays of your panel. Further, your panel can have a ‘Name Set Toggle’ buttons that allows you to switch between the “default”... -
Page 53: Removing Broadcast Routes
NV9608 and NV9616 User’s Guide Implicit in the ‘Broadcast’ button is the “source is master” mode. It is not necessary to press ‘Source is Master’ repeatedly. The reason you must press ‘Source is Master’ the first time is that “broadcast mode” is not yet active. Removing Broadcast Routes To cancel a route, route the source to another destination normally. -
Page 54: Using The Save Preset Buttons
Operation Saving and Loading Presets 4 When you finish entering the description, press the button that reads ‘Press When Finished’: PRESS PRESS MY PST–– MY PST–– UPPER UPPER LOWER LOWER WHEN WHEN –––––––– –––––––– CANCEL CANCEL SYMBOLS SYMBOLS NUMERALS NUMERALS CASE CASE CASE... -
Page 55: How To Load A Preset
NV9608 and NV9616 User’s Guide Button 7 The button reads ‘Upper Case’ . Press this button to switch to upper case letters (especially if you have been entering symbols or numerals). Button 8 The button reads ‘Lower Case’ . Press this button to switch to lower case letters (especially if you have been entering symbols or numerals). -
Page 56: Menu Mode
Operation Menu Mode You can define “local salvos” (in the menu, if your panel has one) by recording actions performed at the panel. Both system salvos and local salvos appear on salvo pages, inter- mixed: LOCAL LOCAL LOCAL LOCAL LOCAL LOCAL DIAG DIAG... -
Page 57: User Submenu
NV9608 and NV9616 User’s Guide User Submenu Press the second menu button to display the user submenu: USER USER USER ID USER ID ENVYUSER ENVYUSER 01 01 EXIT EXIT The user submenu shows the user name and the user ID assigned to the panel. Panel Submenu Press the third menu button to display the panel submenu: PANEL... -
Page 58: Function Button Illumination
Operation Function Button Illumination Function Button Illumination Press the fourth menu button to display the function button illumination submenu: HIGH HIGH EXIT EXIT 100% 100% This submenu is labeled ‘LED Control’ because the function buttons are illuminated with LEDs. Press ‘LED High’ to change the high-tally level; press ‘LED Low’ to change the low-tally level. After you press either of these buttons, all the function buttons illuminate with the current illumination level. -
Page 59: Local Salvos Submenu
NV9608 and NV9616 User’s Guide Local Salvos Submenu Local salvos are not supported in NV915 system controllers. They are fully supported in NV960 and NV920 system controllers. Press the sixth menu button to display the local salvos submenu: START START ERASE ERASE... -
Page 60: Cancel Salvo
Operation Local Salvos Submenu When you select that button, the salvo naming submenu appears: ENTER ENTER –––––––– –––––––– UPPER UPPER LOWER LOWER SALVO SALVO –––––––– –––––––– CANCEL CANCEL SYMBOLS SYMBOLS NUMERALS NUMERALS CASE CASE CASE CASE DESC DESC –––––––– –––––––– Enter a salvo name using the functions provided. - Page 61 NV9608 and NV9616 User’s Guide WXYZ The characters on this button are also controlled by the buttons labeled ‘Upper Case’ , ‘Lower Case’ , ‘Symbols’ , and ‘Numerals’ . Button 4 The button reads ‘Cancel’ if you have not entered anything yet. Reads ‘Back’...
-
Page 62: Setup Mode
Operation Setup Mode Setup Mode Setup mode occurs when the NV9616 is disconnected from its network and is freshly powered up. In setup mode, you can set or change the panel ID, identify the software version, and perform a test of the panel’s buttons. It is in setup mode that you must initially set the panel ID. -
Page 63: Viewing The Software Versions
NV9608 and NV9616 User’s Guide Viewing the Software Versions Press ‘Software Versions’ to view the software versions: CPLD 1 CPLD 1 CPLD 2 CPLD 2 SV0546- SV0546- VERSION VERSION VERSION VERSION EXIT EXIT 05 A0 05 A0 02 02 01 01 Press ‘Exit’... - Page 64 Operation Panel Test Mode...
-
Page 65: Technical Details
Technical Details Chapter 6 provides electrical and mechanical specifications for the NV9616 and NV9608. Summary Power Specifications ..............57 NV9616 and NV9608 Specifications . -
Page 66: Environmental Specifications
Technical Details Environmental Specifications Specification Detail Weight NV9608 9.35 lb (4.24 kg). NV9616 9.6 lb (4.35 kg). Connectors Power: AC. Ethernet: 1 connector, 10 baseT, RJ-45 jack. RS-232: 1 connector, 9-pin D type, for diagnostics and upgrades. Grounding terminal None. The RS-232 connector has this pinout: n.c. -
Page 67: Dhcp
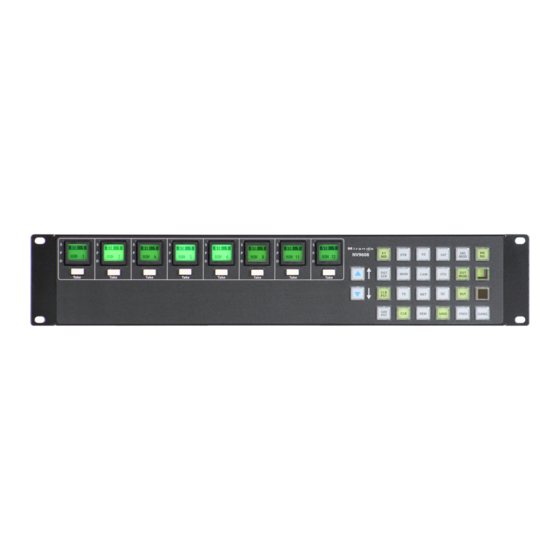
NV9608 and NV9616 User’s Guide Status monitor: None XY data routing: Automatic. MD data routing: Automatic. Default name set: System names Multi-dest device limit: Use continuous scroll: Enabled (check box checked) All other options: Disabled (check boxes clear). DHCP The panel is set up to respond to DHCP from the factory. It is possible to assign the panel a fixed IP address using the Panel IP Configuration Utility. - Page 68 Technical Details Drawings NV9608 NV9616 Fig. 6-1: Front Views of the NV9608 and NV9616...
- Page 69 NV9608 and NV9616 User’s Guide Fig. 6-2: Rear and Top Views of the Either the NV9608 or NV9616...
- Page 70 Technical Details Drawings...
-
Page 71: Misc. Topics
The NV9616 has panel options that use a timeout value. You can set the timeout value in NV9000-SE Utilities. Choose the ‘SysParams’ table from the ‘Tables’ folder under the ‘Views’ navigation pane. Click ‘Add’ and enter a timeout value as shown: Fig. - Page 72 Misc. Topics Setting the Timeout Value...
-
Page 73: Glossary
A port is the physical connection on a router. A port can only be an input port or an output port. Salvo A salvo is a stored group of commands that can be recalled and executed at an NV9000 control panel. Source/ The term “source device”... - Page 74 AES matrix could be divided into AES 1/2 and AES 3/4 virtual levels. X-Y (mode) A mode on an NV9000 control panel that switches one destination at a time, in contrast to multi-destination mode. In X-Y mode, some panels can display the virtual levels for the selected destination.
-
Page 75: Index
Index menu ....7, 25, 31, 37, 41, 48 name set toggle ....25, 41, 44 next . - Page 76 Disabled buttons ......31 Contact Grass Valley ......73 Display Continuous scrolling .
- Page 77 Level ........25 Grass Valley, contact ......73 breakaway .
- Page 78 Menu (button) ....7, 25, 31, 37, 41, 48 NV9000 configuration ..... . . 13 Menu mode .
- Page 79 NV9616, front ......3 SE (abbreviation for NV9000-SE Utilities) NV9616, rear ......4 Search, Acrobat .
- Page 80 Index Setup mode ......7, 11, 31, 54 Software ........10 Software version (submenu) .
-
Page 81: Contact Us
1-800-547-8949 (US and Canada) or +1 530 478 4148. To obtain a local phone number for the support center nearest you, please consult the Contact Us section of Grass Valley’s website ( www.grassvalley.com An online form for e-mail contact is also available from the website.
Need help?
Do you have a question about the NV9000 and is the answer not in the manual?
Questions and answers