Table of Contents
Advertisement
Quick Links
M IS T PR O CE S SO R
S PA M IS T II
Model AK-160
O p e r a t i n g I n s t r u c t i o n s
Thank you for purchasing our product.
Please read through this manual and
this note carefully before installing or
using.These instructions provide important
information for correct usage of the product
to avoid personal injuries or property
damages against you or your clients.
This product is intended for the exclusive
use in hair salon or esthetic salon
for their treatment and service, and must
be operated or handled by the
qualified/professional hairdressers
or by their staff under the supervision
of hairdressers.
Table of Contents
Name of Each Part...........................
Location of Warning Label...............
Accessories/Optional Items ............
Control Panel.................................
Description of Keys........................
Default Setting of Modes ...............
Preparation .................................
Operation Procedures.....................
Care and Cleaning ........................
State Indication...........................
Before Asking for Repairs ............
Disposing of the Product...............
Guidance on Daily Inspection.........
Main Specifications .....................
201411
1
4
4
5
6
6
8
8
9
11
18
23
24
25
26
27
27
28
28
29
Rev.1
Book No.1A0FTPA0
Advertisement
Table of Contents

Related Manuals for Takara Belmont SPA MIST II AK-160


Summary of Contents for Takara Belmont SPA MIST II AK-160
-
Page 1: Table Of Contents
M IS T PR O CE S SO R S PA M IS T II Table of Contents Safety Precautions (To be strictly observed) Model AK-160 Name of Each Part……………………… O p e r a t i n g I n s t r u c t i o n s Location of Warning Label……………... -
Page 3: Safety Precautions (To Be Strictly Observed)
Safety Precautions (To be strictly observed) Before Using the Product Carefully read the "Safety Precautions" and use the product correctly. For safe use of the product, be sure to perform the daily inspection following the procedures described in Guidance on Daily Inspection (page 29). In case the product is continually used without performing daily inspections, product failure or accidents may occur. Precautions stated here are for the purpose of the following: Ensuring safe use of the product and preventing harm and damage to yourself and other persons. Each of the precautions identifies an important item concerning safety. Be sure to observe them. The following section provides detailed explanations of the precautions. Fully understand the meaning before reading the body text. Improper handling of the product and failure not to heed this WARNING warning will lead to critical risks that may result in death or serious personal injury. Should this indication be neglected and the product be handled CAUTION improperly, the possibilities of minor physical injuries, mild physical disorder, or material damages are increased. Indicates general prohibited Indicates enforcement or instruction of general user behaviors. behaviors. Indicates the instruction to Indicates prohibition of water disconnect the power plug from splashing and use near water. the outlet. Indicates prohibition of Indicates the necessity for paying disassembly, repair, or attention to high temperatures. modification. WARNING Do not insert a hand or foreign matter into Do not climb onto or lean against the machine the water‑supply bottle. or the stand. Ignoring this precaution may result in The inside of the machine is hot. Do not injuries due to falling or sudden move of insert hands or fingers into the machine the machine since the stand and wagon are... - Page 4 Safety Precautions (To be strictly observed) WARNING Disconnect the power plug before fixing the product. Do not expose the machine to water. Be sure to disconnect the power plug when Do not expose the main unit parts directly fixing the product. Do not do this with to water nor wipe them with a wet waste wet hands. Ignoring this precaution may cloth. Ignoring this precaution may result result in electrical shock hazard or injury. in electrical shock hazard or ignition. Warning concerning Power Supply Never disassemble or repair the machine by yourself. Be sure to disconnect the power plug from Persons other than the repair engineer must the outlet after closing the work for the not disassemble, repair, or modify the day or when the product is not used for a machine. Ignoring this precaution may cause long period of time on holidays. Ignoring ignition or abnormal operations, thus this precaution may result in electrical resulting in physical injuries. fire due to deteriorated insulation. Never touch the parts inside the product. Be sure to turn off the power to the main Never touch the parts inside the product unit each time the work is completed. since there is a possibility of an electric Be sure to disconnect the power plug shock hazard. Be sure to ask the before moving the product. after‑sales division of our company for maintenance of the product. If the blades or the area near the blades of power plug is contaminated with waste Do not practice in different operation modes. hair or chemical agents, wipe the area well with a dry cloth. Be sure to practice in the mode that is adequate for the practice.
- Page 5 Safety Precautions (To be strictly observed) CAUTION Handling of Power Cord Do not put hot water into the water‑supply bottle. Do not put hot water into the water‑supply When disconnecting the power plug, do not bottle. When you do this, burns, machine hold it at the cord, but pull it out while errors, or machine failure may result. holding the plug part at the end. Do not touch the water‑supply cap when it is hot. Be sure to use the power cord in the state where it is affixed to the main unit with Do not touch the water‑supply cap during the screws attached (see page 5). Ignoring operation or right after the operation. this precaution may result in fire or Since the cap is hot, burns may result. electric shock hazard. Do not flush the inside of the water‑supply If the power cord or the power plug is bottle pan with a flushing agent. damaged or when with the connection to the wall outlet is loose, do not use the Ignoring this precaution may result in cord or the plug. machine failure or physical injuries caused by malfunction of the machine. Do not move the main unit by holding the power cord. Do not damage, break, Do not put a heavy object on the main product unit. forcibly bend, twist, pull, or bundle the cord. Furthermore, putting a heavy object Do not put an object exceeding 1 kg on the on the cord, jamming of the cord into machine. Ignoring this precaution may objects, or modifying the cord will damage result in burns or physical injuries the cord, resulting in fire or electric caused by falling, deformation, or shock hazard.
-
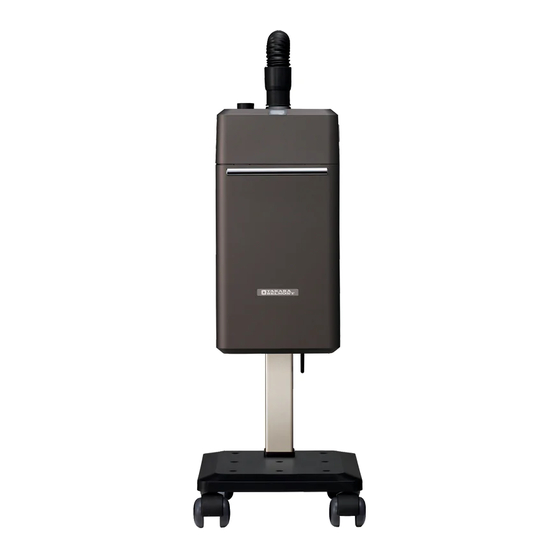
Page 6: Name Of Each Part
Name of Each Part Standalone Type Back Side of Main Unit Front Side of Main unit Detachable tray Control panel Exhaust nozzle Hose main body holder Water‑supply bottle pan Water‑supply bottle Power switch State indication lamp Drain tank Handle Inlet Drain cock Power plug Power cord Drain outlet Cord hook Stand Caster Wagon Type Water‑supply bottle Top plate Hook Water‑supply cap Storage basket Caster Location of Warning Label Water Container May Cause Burns. Add water when the CAUTION Caution:Boiling Water Do not remove. water level is no longer May Cause Burns Do not touch the supply cap... -
Page 7: Accessories/Optional Items
Accessories Check that all of the following accessories are provided. Cap Joint N Takara Deionizer (EX‑TJ5) Flexible Hose Inside Outside Joint packing 1 piece 1 piece 2 pairs (spare packing: 2) Optional in some countries Operating Instructions (This manual) Warranty Card Options (Standard accesories in some countries) ※ Options are sold separately. For purchasing the options, contact the nearest dealers or our company directly. (See page 30 "Information.") Mist Cap Open Mist Ball Nozzle Aromatherapy Diffuser Holder Sucking disk ※The Open mist ball nozzle is ※ Use the one adequate for the (spare disk: 1 piece) also required. practice. Joint hose (spare hose: 1 piece) Aromatherapy diffuser pad 1 pair 1 pair 2 pieces (containing 5 sheets) Turban Storage Basket Flexible Hose Holder ※This can also be used for the standalone type. -
Page 8: Control Panel
Control Panel 3 Temperature level lamp 7 8 Mode selection key Start/Stop key 5 Mist level lamp 1 Display panel 2 4 Time setup key 9 Temperature level key Volume key 6 Mist level key Description of Keys 1 2 Display Panel Time Setup Key ●Display the operation time you set. ●Display the remaining time until the completion of operation. ●Use this key to change the setting time. (Example) ●Display the elapsed time after the completion of operation. Either for the (UP) or the (DOWN) key, each press of the key ※Depending on the mode, the cooling function is activated after the increases or decreases the time in units completion of operation and either of of one minute. Furthermore, a continuous displays to is displayed. press on the key increases or decreases the time in units of five minutes. - Page 9 Description of Keys 7 Mode Selection Key and Lamp (The lamp illuminates when the key is turned on.) When a mode is selected, the temperature level you set, mist level, time, etc., are indicated. ※The cooling time (Enabled / Disabled) will be set according to the mode. Open Mist Color Use this key during shampoo or massage Use this key to warm up treatment of the when chemical agents such as cleansing acidic hair dye (hair manicure, etc.). liquid, treatment liquid, etc., are ※Cooling time: 5 minutes applied during shampoo or in the Use the dedicated mist cap. Spa Menu. Lamp Lamp ※The mist cap is not used. Scalp Care Perm Use this key when warming up the scalp Use this key to warm up the treatment before or after applying the scalp of the heating‑type permanent wave agent cleansing agent, and for enhancement of or the curling agent, which is the scalp treatment agent. classified as a cosmetic. ※Use the dedicated mist cap. Lamp ※Use the dedicated mist cap. Lamp Hair Care Hand Care Use this key to warm up the hand when Use this key to warm up the hair after the cosmetic for hand care is applied applying the hair treatment agent. or during massage. ※Cooling time: 2 minutes ※No cap, etc., is used.
-
Page 10: Default Setting Of Modes
Default Setting of Modes/Change and Memorization of Setups Default Setting of Modes Default Setting Mode Temperature Mist Time Cooling Level Level 60 minutes 6 3 Open Mist 5 3 5 minutes Scalp Care 8 minutes 5 3 2 Hair Care 15 minutes 4 1 5 Color ※1 10 minutes 3 1 Perm 2 1 5 minutes Hand Care ※1 Color Mode The default setting is set to Mist Level 1, considering dripping, etc. If you want to enhance the dyeing capacity, increase the mist level, paying attention to dripping when using the color mode. -
Page 11: Preparation
Preparation ( ) For cases other than the cap practice, also see the method for using the appropriate option. Attach the cap joint N to the mist cap (option). 1 (For cases other than the cap practice, also see the method for using the appropriate option.) Be careful about the fixing direction of the [UP] mark on the inner cap joint N. Type of Mist Cap Direction of Inner Cap Joint N For YUME and open mist ball nozzle For rear shampoo and YUME Install the joint with the markset in the [UP] direction. For styling chair and perm/color For CALME and men's chair Install the joint with the markset in the [UP] direction. Caps other than those for CALME and men's chair Mist cap Installation opening ※The position differs according to the types of cap. Cap for CALME and men's chair Joint packing Outer cap joint N Inner cap joint N Be sure to use the dedicated mist cap and the cap joint N. Information Be sure to install the joint so that the [UP] mark on the inner cap joint N faces the correct direction when using the mist cap. The mist cap (consumable item) is an option. For purchasing the cap, contact the nearest dealer or our company directly. See page 30 "Information." List of Mist Caps for SPA MIST II Type Product Code For YUME and open mist ball nozzle EA‑CMC‑YB (containing 2 pieces) For hair care For rear shampoo, YUME ... - Page 12 Preparation 2 Pour water into the water‑supply bottle. 1 Remove the water‑supply cap and pour water. ※Be sure to use the water Takara Deionizer (EX‑TJ5) that comes with the product or the purified water STO (BM‑ET1) dedicated for the machine. Be sure to use the dedicated water‑supply bottle and the water‑supply cap. ・Do not use the water‑supply bottle if breakage or cracks are noted. Ignoring this precaution may cause the error (see the "State Indication" on page 26) or water leakage. ・Never use any liquids, such as the perm solution, essence cosmetic liquid, aromatherapy oil, and mineral water other than the deionized water or the purified water dedicated for the machine.Ignoring this precaution may result in machine failure. CAUTION ・When the machine is continuously used without using the Takara Deionizer, impurities will attach to the heater in the machine, thus causing machine failure or accidents. ・Do not pour hot water into the water‑supply bottle. When you do this, burns, abnormal machine operation, or failure may result. ・Do not touch the water‑supply bottle or the water‑supply cap during operation or right after operation. The bottle or the cap is hot, which may cause burns. Feeding water should be done after the water‑supply bottle or the water‑supply cap has been sufficiently cooled down. 2 Close the water‑supply cap. Be sure to close the cap tightly. Ignoring this precaution may result in an error ("State Indication" on page 26) or water leakage. CAUTION 3 Check that the drain cock has been closed and no water remains in the drain tank. (If the drain cock is open, close it. If water remains in the drain tank, discharge the water.) No water should Closed status remain in the drain tank. Drain cock Be sure to install the drain tank. Ignoring this precaution may allow the mist or water to enter the machine, thus resulting in machine failure, short circuit, CAUTION electric shock hazard, etc.
-
Page 13: Operation Procedures
Operation Procedures( ) For cases other than the cap practice, also see the method for using the appropriate option. 1 Insert the flexible hose into the exhaust nozzle. Insert the flexible hose into the exhaust nozzle of the main unit. ※ When you have the optional Flexible hose holder, set the holder on the flexible hose in advance by referring to the procedures shown on page 24. Flexible hose holder (Option) Flexible hose ② Insert the flexible hose fully to the end of the Exhaust nozzle exhaust nozzle. Flexible hose ① ※ The optional Flexible hose holder will be used for head spa, treatment, color, or perm using the styling chair or the men's chair. 2 Set the main unit behind the customer. As illustrated at the right, set the main unit so that the flexible hose side Flexible Flexible hose (exhaust nozzle side) can be positioned closer hose to the customer. Exhaust Exhaust ・Be careful about interference with nozzle nozzle other equipment.Ignoring this precaution may damage other CAUTION equipment or cause physical injury. Setup State (Styling chair) Setup State (Shampoo bowl) ・When the product is moved and the flexible hose or the exhaust nozzle located at the root of the hose is held, the nozzle may be... - Page 14 Operation Procedures( ) For cases other than the cap practice, also see the method for using the appropriate option. 3 Press the key for the desired mode. Choose the desired mode out of the six modes provided on the control panel and press the key. The default setup for the selected mode will be indicated on the control panel. ※ To change the setups for the modes, refer to "Change and Memorization of Setups" on page 8. Do not press the keys on the ※ When a mode is selected, the lamp for the control panel with hard or Start/Stop key will start to blink. CAUTION pointed objects. 4 Press the Start/Stop key to implement preheating. This action will warm the water in the machine to the specified temperature to put the machine in the operation start standby status. ・The and (preset time) indications will blink alternately on the display panel, and the temperature level lamp and the mist level lamp will also blink. ・Upon completion of the memorization, short electronic beeping sounds will indicate that the setting has been saved. In addition, the state indication lamp and the start/stop key lamp will also start to blink, and the machine will go into operation standby status. (After 10 minutes, the operation standby status will be cancelled, and the status will be restored to the heat‑retention status. Information ・When the start/stop key is pressed during the preheating phase, preheating will be cancelled. (The status is restored to the heat‑retention status.) ・You can change the setup during the preheating phase. However, preheating will be terminated when the temperature level is set to "0" and the status is put in the operation standby status. When the temperature level is changed to a level from "0," the operation standby status is cancelled to initiate the preheating operation. When a change is made to the temperature level during preheating (while PH is blinking) and Temperature Level 0 is indicated once (the change is made to a different level via Temperature Level 0), the mist with low temperature will be atomized. Therefore, the control unit judged the situation as failure of the temperature detector, and the E2 indication may be issued later. In addition, the same can be applied to the case where the temperature level is increased during operation at Temperature Level 0. Therefore, the operations as stated above should not be executed. Note that the E2 indication in this case does not mean a failure. Turn off the power switch once and then execute the operation again with the correct operation procedures.
- Page 15 Operation Procedures 5 Press the Start/Stop key to start the operation. When preheating is completed and the machine is in the operation standby state, press the Start/Stop key to start operation. Information During operation, the state indication lamp will illuminate. 6 During Operation During operation, the lamp for the Start/Stop key, the state indication lamp, and the lamp that indicates the selected mode will illuminate, and the remaining time will be indicated. ・Do not cover the open end of the flexible hose or the opening of the exhaust nozzle, and do not put any foreign matter into the hose or the nozzle. Ignoring this precaution may result in abnormal machine operation or machine failure. CAUTION ・During operation, the head of the customer is heated by the mist. Should the customer feel sick, stop using the machine. Changing the conditions during operation 4 Press the key for the operation to be changed. Operation time 1 2 Mist temperature 3 Mist quantity 4 Mode Sound volume 5 2 3 1 5 When the mode is changed during operation (the perm mode and the color mode cannot be Information changed), the machine operation stops and the standard setup of the mode after the change will be indicated. (The operation state is restored to the heat‑retaining state.) Stopping the operation When the user wants to stop machine operation, press the Start/Stop key. While the machine is stopped, the lamp for the Start/Stop key and the indication of the Information remaining time will blink. (When ten minutes elapses in this state, the operation state...
- Page 16 Operation Procedures 7 Cooling (Only for the hair care mode and the color mode) When the preset time has elapsed, an electronic alarm sound (two blips) is initiated, and the machine enters the cooling process. (In modes other than the hair care and color modes, no cooling operation is provided, and the machine is put in the time‑up state.) ※During the cooling operation, the letter "C" and the remaining time will be indicated on the display panel. The cooling time can be changed by using the time setup key. The cooling operation can be stopped with the Start/Stop key. When the cooling operation is completed, an electronic alarm sound (three blips with a longer third sound) is initiated, and the machine is put in the time‑up state. 8 Time‑up When the preset time has elapsed (the time indication shows 0), the machine operation will stop, an electronic alarm sound (three blips with a longer third sound) is initiated, and the machine is put in the time‑up state. ※During the time‑up state, the laps time after the stop of the machine operation will be indicated on the display panel. With the time‑up state, press the △ key of the time setup key and press the Start/Stop key. Then, extended operation will be initiated with the original setup. (The extension time can randomly be changed with the time setup key.) A press on the mode key under the time‑up state will put the machine into the heat‑retention state. 9 Turn off the power after Power switch finishing the work. Turn off the power switch provided at the front panel of the main unit. Clear out the water accumulated in the drain tank. Detach the drain tank located at the front part of the main unit, and clear out the water accumulated in the tank. On the drain tank, there is a hole Drain tank for preventing the overflowed water from entering the machine. Firmly hold the drain Pull the tank to your side, tank at both ends.
- Page 17 Operation Procedures Drain the inside water when closing the work. Put a washbowl or the like beneath the drain outlet, and open the drain cock to drain the water. Upon completion of draining, close the drain cock. ※To use the machine always in a sanitary condition, be sure to drain the water every day when closing the work. Draining the water every day can significantly reduce the generation of scale that may cause machine failure. ※When draining the water, keep the water‑supply bottle Open status inserted in the main unit. This will also keep the inside of the main unit clean. ・Drain the water after the machine has sufficiently cooled. The machine is hot during operation or right after operation, and there is a possibility of machine breakage or physical injuries. ・When draining the water, do not put your hands, feet, etc., close to the drain outlet. Hot water may come out of the outlet, and there is a possibility of burns or physical injuries. CAUTION ・When the room temperature decreases to 0°C or below, the inside water will be frozen, which will cause the machine to become inoperable. Be sure to drain the water. ・If you forget to close the drain cock, water overflows from the drain outlet when water is fed. Be sure to close the drain cock. Accommodating the flexible hose As shown in the illustration below, the flexible hose can be temporarily accommodated in the hose holder. Hose holder Be sure to clean out the water remaining in the flexible hose. Ignoring this precaution may cause bad odors from the remaining water or deterioration of the flexible hose. CAUTION...
-
Page 18: Installing/Detaching The Mist Cap (Option)
Installing/Detaching the Mist cap 1 Practice using the shampoo bowl ※The customers who have the optional Open bowl nozzle are requested to see the description on page 23. Use either of the following: The mist cap for YUME and open mist ball nozzle (EA‑CMC‑YB); or The mist cap for rear shampoo and YUME (EA‑SMC‑RSW), according to the bowl you use. Installing the mist cap Lift the head of the customer, and overlap While pulling the turban at both ends, attach 1 2 the turban with the mist cap, and set it it to the forehead, and put the hook and loop under the head. fasteners together. Rubber portion Mist cap Turban At this time, align the center part of the turban with the rubber portion of the mist cap and overlap them. While lapping the rubber Adjust and fix the right While pressing the stopper, 3 4 5 portion of the mist cap and the left fasteners, pull the string tight and with the turban, put the one at a time. fix the stopper. hook and loop fastener at the right and left ends together. Fastener Stopper Hook and loop fastener Information Be careful not to... - Page 19 Insert the leading edge of the flexible hose into the cap joint N. At this time, be careful not to twist 6 the mist cap, and insert the flexible hose with the [UP] mark of the inner cap joint N facing UP. (See the section "Preparation" on page 9.) ※If the flexible hose is hard to insert, apply water to the inside of the plug‑in portion of the flexible hose, which will make your work easier. Cap joint N Inner cap joint N Do not use the machine with the mist cap crushed by the flexible hose. Ignoring this precaution may result in mist that will not be atomized correctly, the customer will feel sick, or CAUTION the customer will get burned. 7 This completes the installation of the mist cap. Detaching the mist cap 2 Release the stopper and loosen the strip. Pull off the leading edge of the flexible hose 1 from the cap joint N. Water drops accumulate in the Information mist cap. Be careful about water dripping from the cap. Raise the customer's head, and remove the 4 Unfasten the hook and loop fasteners of the 3 mist cap and the turban. mist cap and the turban. ・Be sure to drain the water in the flexible hose into the bowl after use. ・Be careful not to bend or twist the flexible hose. ・Use of the machine without draining the water in the flexible CAUTION hose or with the hose bent or twisted may make it difficult to Be sure to drain the atomize the mist or may result in machine failure or accidents accumulated water after each operation.
- Page 20 Installing/Detaching the Mist Cap Practice using the styling chair Use the mist caps (EA‑SMC‑SW, PC, PCB, PCS) for the styling chair and perm/color. Installing the mist cap. (Use of the optional Flexible hose holder is recommended.) 1 Apply the turban by using either method of A or B shown below. Method for fixing the hook and loop Method for fixing the hook and loop fasteners on the forehead fastener at the neckline. Set the center of the turban on the forehead, and secure Position the center of the turban at the back the hook and loop fasteners so that the turban comes down center of the customer's neck, and secure the to the lowest neckline of the customer. tape onto the forehead. *If you are concerned about mist leakage, Method (B) is recommended. Turban Turban Open the fastener of the mist cap, overlap the rubber portion on the turban, and then mate the right and 2 the left hook and loop fasteners of the mist cap on the forehead. First, mate the center of the mist cap Open‑fastener state and the back center of the turban. Mist cap Rubber portion To prevent mist leakage, be sure to overlap the turban with the mist cap tightly, and Information secure the hook and loop fasteners without allowing any gaps. 3 4 5 Pull and tighten the string Tighten the fasteners at the Insert the leading edge of the right and the left sides, flexible hose into the cap and secure it with the stopper.
- Page 21 6 This completes the installation of the mist cap. At this time, insert the flexible hose with the [UP] mark on the inner cap joint N facing [UP], while paying attention not to twist the mist cap. (See the section "Preparation" on page 9.) Flexible hose holder (option) Detaching the Mist Cap Release the stopper, and loosen the Detach the hook and loop fasteners, and then remove 2 1 string. the mist cap. Stopper Information Pay attention to dripping when removing the mist cap, since water drops are accumulated in the mist cap. Wipe off the water accumulated in the mist cap 3 4 Detach the turban. with a towel or the like. Drain the water in the flexible hose, and then detach the cap from the flexible hose. Mist cap Flexible hose Information Detaching the mist cap without draining the water may cause dripping. The water returned into the flexible hose will enter the drain tank provided at the front of the main unit. Discharge the water accumulated in the tank before the water level exceeds the indicated line on the drain tank. ・Be sure to drain the water accumulated in the flexible hose after use. ・Be careful not to bend or twist the flexible hose. ・Use of the machine without draining the water accumulated CAUTION in the flexible hose or with the hose bent or twisted may Be sure to drain the accumulated water make it difficult to atomize the mist or may result in after each operation.
- Page 22 Installing/Detaching the Mist Cap Practice using CALME, men's chair Use the mist cap for CALME, men's chair (EA‑SMC‑CA). Installing the mist cap At this time, adjust the pillow position to allow Recline the backrest of CALME for an adequate 1 angle. (Swing Button) a gap of about 5 cm (thickness of two palms) Lift the head of the customer, and set the pillow between the backrest and the back of the head. beneath the neck. Pillow Gap of about 5 cm (thickness of two palms) Pillow Backrest ・Without allowing an adequate gap between the backrest and the back of the head, the mist will not reach throughout the head. ・Even when the practice is done from the state where the mist cap is already installed on Information the head, the pillow should be set as shown above. ・Even when a towel or the like is used instead of a pillow, it should be set so that a gap of about 5 cm is ensured as stated above. While pulling the turban at both ends, attach it Lift the head of the customer, and overlap the 3 2 to the forehead, and put the hook and loop turban with the mist cap, and set it under the fasteners together on the forehead. head. Rubber portion Mist cap At this time, align the center part of the turban with Turban the rubber portion of the mist cap and overlap them. Turban While lapping the rubber portion 4...
- Page 23 5 6 Adjust and secure the right and the left Pull the string tight and fix the stopper. fasteners, one at a time. Fastener Stopper Information Be careful not to jam the customer's To prevent mist leakage, be sure to pull the hair in the fastener. CAUTION string tight. Insert the leading edge of the flexible hose into the cap joint N. At this time, be careful not to twist 7 the mist cap, and insert the flexible hose with the [UP] mark of the inner cap joint N facing [UP]. (See the section "Preparation" on page 9.) ※ If the flexible hose is hard to insert, apply water to the inside of the plug‑in portion of the flexible hose, which will make your work easier. Cap joint N Inner cap joint N Flexible hose Do not use the machine with the mist cap crushed by the flexible hose. Ignoring this precaution may result in failure CAUTION to atomize the mist correctly, and the customer may get burned. 8 This completes the installation of the mist cap. ・Be sure to drain the water in the flexible hose into the bowl after use. ・Be careful not to bend or twist the flexible hose. ・Use of the machine without draining the water in the CAUTION flexible hose or with the hose bent or twisted may make Be sure to drain the it hard to atomize the mist or may result in machine failure accumulated water after or accidents due to increased temperatures. each operation.
- Page 24 Detaching the Mist Cap 1 2 Release the stopper, and loosen the string. Detach the hook and loop fasteners, and then remove the mist cap. Stopper Information Pay attention to dripping when removing the mist cap, since water drops are accumulated in the mist cap. 4 Detach the mist cap from the flexible hose after Detach the turban. 3 returning the water accumulated in the mist cap back into the flexible hose. Mist cap Flexible hose Information Detaching the mist cap without draining the water may cause dripping. The water returned back into the flexible hose will enter the drain tank provided at the front of the main unit. Discharge the water accumulated in the tank before the water level exceeds the indicated line on the drain tank.
-
Page 25: Using The Open Mist Ball Nozzle (Option)
Using the Open Mist Ball Nozzle (Option) ※Use the machine under the open mist mode. 1 Install the Open mist ball nozzle on the bowl by using the suction pad. Information Wipe and clean the position in advance to which the Open mist ball nozzle is installed to remove wetting, etc. Ignoring this precaution may make the suction pad hard to attach. <Recommended position of YUME Series bowl><Recommended position of RS Series bowl> 2 Install the flexible hose on the Open mist ball nozzle. Flexible hose Open mist ball nozzle Information If the flexible hose is hard to insert, apply water to the inside of the flexible hose, which will make your work easier. 3 Adjust the nozzle (outlet of mist) in the desired direction in which the mist is atomized. Pay attention to the positions of the nozzle and the customer's Nozzle head. For the RS Series product, in particular, be careful about temperatures, since the distance to the head is closer. Decrease the temperature setting if the customer feels too warm. Stop CAUTION using the machine if the customer feels sick or is in bad shape due to excessive temperatures. Ignoring this precaution may result in burns or dizziness. Applying the cap practice by using the Open mist ball nozzle Do not apply the cap practice under the open mist mode. Using the nozzle at a high‑temperature level will raise the temperature in the cap, thus resulting in dizziness, burns, etc. CAUTION Preparation Install the cap joint N on the mist cap 1... -
Page 26: Using The Aromatherapy Diffuser Holder (Option)
Using the Aromatherapy Diffuser Holder (Option) ※To use the Aromatherapy Diffuser Holder, the Open mist ball nozzle (option) is necessary. Use the holder under the open mist mode. Preparation 2 Detach the lid of the Aromatherapy Insert the Aromatherapy diffuser pad into the lid. 1 Diffuser Holder. Aromatherapy diffuser pad Apply several drops of aromatherapy oil on 3 4 Close the lid tightly. the Aromatherapy diffuser pad. Be careful that the aromatherapy oil will not attach to places other than the Aromatherapy diffuser pad. If it does accidentally, immediately wipe it off. Ignoring this precaution will CAUTION result in breakage of the machine from corrosion or cracking. Operation Procedure 1 Insert the Aromatherapy Diffuser Holder into the Open mist ball nozzle. Open mist Information ball nozzle If the Aromatherapy Diffuser Holder is Aromatherapy hard to insert, apply water to the Diffuser Holder inside of the holder, which will make your work easier. How to attach/detach the Flexible Hose Holder (Option) How to attach How to detach Insert the rubber end of the Flexible Hose into the Pull out the Flexible Hose from the mist nozzle, 1 1 mouth ring of the Flexible Hose Holder. with the Flexible Hose Holder attached. Mouth ring Slant the Flexible Hose a little and pull it 2... -
Page 27: Care And Cleaning
Fixing the Machine The plastic, plated, or painted parts should be Before fixing the machine, be sure to disconnect cleaned with a dry soft cloth the power plug from the wall outlet. Soft cloth Power plug The control panel or the metallic parts may When tough stains or oil content adhere, wipe become inoperable or rust when exposed to water. them off with a cloth that is immersed in a When this is the case, immediately wipe the water neutral detergent diluted with water and tightly off with a dry soft cloth or the like. squeezed. Soft cloth Soft cloth Neutral The parts are not resistant to moisture and water. When chemical agents, such as treatment, perm, Hand wash the mist cap with a neutral detergent. and color liquids adhere to the main unit, In addition, if chemical agents, such as color immediately wipe them off with a cloth that is agents adhere, immediately clean them with water. immersed in a neutral detergent diluted with Leaving such chemical agents as they may cause water and tightly squeezed. Leaving such chemical stains or discoloration on the surfaces. agents as they may cause stains or discoloration on the surfaces. Never use materials such as volatile chemicals including thinner, alcohol, gasoline and kerosene oil, as well as wax, sponges, or scrubbing brushes that contain abrasive compounds. Do not clean the inside of the water‑supply bottle pan, water‑supply bottle, and inside of the drain tank using chemical agents. Thinner Alcohol Chemical Kerosene agents... -
Page 28: State Indication
State Indication When an indication showing the state of the main machine unit is displayed on the display panel, take necessary measures according to the table stated below: → Wait until the machine is warmed up. Indicate preheating is in process. Indicate cooling is in progress → Indicate the remaining time of cooling phase. and the elapsed time. Pour water into the water‑supply bottle. Indicate shortage of water in → Then, a press on the Start/Stop key will cancel the water‑supply bottle. the error. → 1. Detach the water‑supply bottle and drain the Too much water is in the machine water in the main unit. (See the section ↓ "Operation Procedures" on page 13.) The possible causes may be that the machine wobbles or the 2. Pour water into the water‑supply bottle, and water‑supply cap is not closed tight. check for any abnormal states including water leakage and breakage of the water‑supply bottle. 3. When no problem is found, set the bottle on the main unit. 4. After completing the water supply, a press on the Start/Stop key can cancel the error. Indicates the failure of the 1. In case the accordion hose is lose, rectify the problem. temperature detection unit or the heater in the machine. -
Page 29: Before Asking For Repairs
Before Asking for Repairs When the problem cannot be rectified even if an inspection is made according to the table shown below, immediately stop using the machine, turn off the power switch, disconnect the power plug, and immediately contact the nearest dealer or our company directly. Phenomenon Check Point Countermeasures Is the power plug correctly inserted Insert the power plug firmly into The power cannot be into the wall outlet? the wall socket. turned on (No indication on the Is the power switch turned on? Set the power switch to the "ON" control panel) position. Is the fuse on the distribution panel Set the fuse on the distribution or the breaker switch in the shop in panel or the breaker switch to the the "ON" position? "ON" position. Is the problem not rectified when the Immediately stop using the machine, power plug is disconnected and is turn off the power switch, disconnect then inserted again? the power plug, and then immediately contact the nearest dealer or our company directly. Failure of the machine might be Immediately stop using the machine, The power cannot be turn off the power switch, disconnect suspected. turned on though the the power plug, and then immediately power switch is set to contact the nearest dealer or our the "ON" position. -
Page 30: Consumable Supplies (Including Options)
Consumable Supplies (Including Options) The term "consumable supplies" implies parts that are predicted to be worn, deteriorated, changed in appearance, or broken when used. The warranty clauses for repair or replacement shall not apply to those parts, and the repair or the replacement shall be charged. (※The degree or timing of wear, deterioration, and breakage differ depending on the environment and/or conditions at the place where customers use the product.) In addition, customers can replace the following parts by themselves. (In this case, the customers do not need to bear the basic charge and the technical fee, but customers are asked to bear the shipping charges separately. If you do not understand the replacement procedures, contact your nearest dealer or our company directly.) If the product is subjected to significant wear or deterioration or should it be broken, inspection or part replacement is necessary. If this is the case, immediately contact the dealer or out company directly. Consumable Supplies (The following parts are not warrantable and the cost will be charged.) □Water‑supply bottle □Water‑supply cap □Drain tank □Flexible hose □Cap joint N □Power cord □Caster □TAKARA deionizer □Deionizer cartridge Optional Items (The optional items are not warrantable and the cost will be charged. ※Including the accessories) □Open mist ball nozzle □Aromatherapy Diffuser Holder □Mist cap □Flexible hose holder □Turban Guidance on Daily Inspection WARNING Be sure to perform daily inspections according to this Guidance. Continued use of the machine without performing daily inspections may result in machine failure or accidents. To ensure safe use of the product, the following inspections must be performed. ■Items to be inspected on a daily basis (Inspection before starting the work) Possible hazard when the Inspection Item Inspection Procedures inspection revealed NG □Check that there is no Check before operating the product: There is a possibility of electric deformation, breakage or □Check that there is no deformation, shock hazard or burn due to fire or breakage, or deterioration on the deterioration on the power electric leakage. Since the parts power plug and the power cord. -
Page 31: Main Specifications
Guida n ce on Da i ly In spec tio n ■Items to be inspected on a daily basis (Inspection before starting the work) Possible hazard when the Inspection Item Inspection Procedures inspection revealed NG □Check that the power switch When operating the power switch, When the product is used in the operates correctly and the... - Page 32 Caution Be careful of use. Be careful of use. The appliance is not to be used by children or persons Children shall not play with the appliance. with reduced physical, sensory or mental capabilities, or lack of experience and knowledge, unless they have Be careful of use.
Need help?
Do you have a question about the SPA MIST II AK-160 and is the answer not in the manual?
Questions and answers