Takara Belmont YUME ESPOIR Installation Instructions Manual
Hide thumbs
Also See for YUME ESPOIR:
- Operating instructions manual (64 pages) ,
- Installation instructions manual (28 pages) ,
- Quick operation manual (12 pages)
Table of Contents
Advertisement
Quick Links
YUME ESPOIR
YUME SUITE
YUME NOBLE
YUME ESPOIR
YUME SUITE
YUME NOBLE
Basin body
EX-ESYM* [For Back wash (same as YUME basin)]
EX-ESSS* [For Side wash]
Seat body
SC-ESF* [ESPOIR Fixed Legrest]
SC-ESL* [ESPOIR Movable Legrest]
SC-YMSIN* [SUITE]
Seat
SU-ESB* [ESPOIR Basic]
SU-ESP* [ESPOIR Premium]
SU-YMSI* [SUITE]
SU-YMNB*[NOBLE]
Base plate
EA-ESBP
(Image is of EX-ESSS*/SC-YMSI*/SU-YMSI/EA-ESBP)
(Image is of EX-ESYM*/SC-YMSI*/SU-YMNB*/EA-ESBP)
Installation Instructions
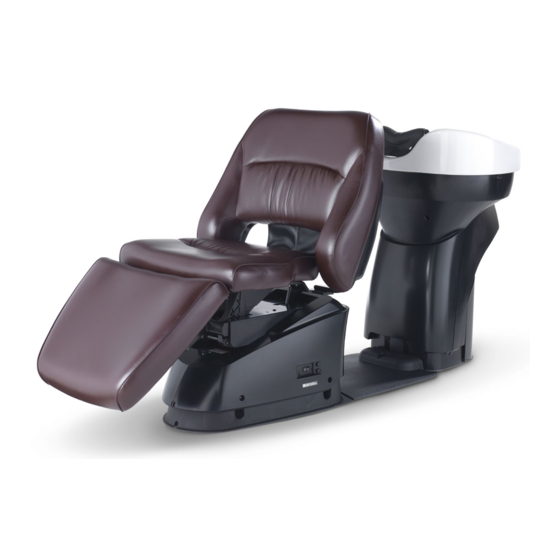
(Image is of EX-ESSS*/SC-ESF*/SU-ESB*/EA-ESBP)
To the installer
• The instructions should be thoroughly read and
understood before installation to ensure that the
product is installed correctly.
• After installation, give these instructions to the
customer.
To the customers
• Customers must not install the product by themselves.
• Customers must store these instructions in a safe
place so as not to lose them.
* The actual shape of the product and the images and
dimensions listed in these instructions may be
modified and are subject to change without notice.
The precautions listed here are to ensure that the
product can be installed safely, and to prevent any
danger or risk to the person installing the product or
those around them. All of these precautions are
important for safety. Takara Belmont is not
responsible for any damage or risk to the person
installing the product or those around them due to
accidents if the product is installed without adhering
to the precautions.
Precaution
If the product is installed after ignoring this symbol,
"there is the risk of light or moderate injury or physical
damage".
1
Contents
Version 9
2022.09
2
9
10
15
16
16
18
19
20
22
22
23
24
25
26
27
28
28
30
31
Advertisement
Table of Contents

Related Manuals for Takara Belmont YUME ESPOIR


Summary of Contents for Takara Belmont YUME ESPOIR
-
Page 1: Table Of Contents
All of these precautions are important for safety. Takara Belmont is not responsible for any damage or risk to the person installing the product or those around them due to accidents if the product is installed without adhering to the precautions. -
Page 2: Before Installation
Before installation [ Uni t : mm] Overall layout diagram : YUME ESPOIR Basin body: EX-ESYM* [For Back wash (same as YUME basin)] Seat body: SC-ESF [ESPOIR fixed legrest] Seat: SU-ESB[ESPOIR Basic] Top view * If the basin body is EX-ESSS* [side basin], the dimensions are as shown in ( ). - Page 3 [ Uni t : mm] Overall layout diagram : YUME ESPOIR Basin body: EX-ESYM* [For Back wash(same as YUME basin)] Seat body: SC-ESL [ESPOIR Movable legrest] Seat: SU-ESB[ESPOIR Basic] Top view * If the basin body is EX-ESSS* [side basin], the dimensions are as shown in ( ).
- Page 4 [Unit : mm] Overall layout diagram : YUME ESPOIR Basin body: EX-ESYM* [For Back wash (same as YUME basin)] Seat body: EX-ESF [ESPOIR fixed legrest] Seat: SU-ESP[ESPOIR Premium] Top view * If the basin body is EX-ESSS* [side basin], the dimensions are as shown in ( ).
- Page 5 [Uni t : mm] Overall layout diagram : YUME ESPOIR Basin body: EX-ESYM* [For Back wash(same as YUME basin)] Seat body: SC-ESL [ESPOIR Movable legrest] Seat: SU-ESP[ESPOIR Premium] Top view * If the basin body is EX-ESSS* [side basin], the dimensions are as shown in ( ).
- Page 6 [Unit : mm] Overall layout diagram : YUME SUITE Basin body: EX-ESYM* [For Back wash(same as YUME basin)] Seat body: SC-YMSI [SUITE] Seat: SU-YMSI [SUITE] Top view * If the basin body is EX-ESSS* [side basin], the dimensions are as shown in ( ). 520 (550) 210 (240) Hot water...
- Page 7 [Unit : mm] Overall layout diagram : YUME NOBLE Basin body: EX-ESYM* [For Back wash(same as YUME basin)] Seat body: SC-YMSI [SUITE] Seat: SU-YMNB [NOBLE] Top view * If the basin body is EX-ESSS* [side basin], the dimensions are as shown in ( ). 520 (550) 210 (240) Hot water...
- Page 8 Power To turn the power on, install the C-4 plug. When the plug is changed due to a reason related to the customer, install a power plug that is suitable for the product. [Rated current] [Rated frequency] [Rated electricity consumption] 110V Specifications 50/60Hz 4.3/2.8A...
-
Page 9: Usage Conditions
Installation of pipes The following are important points to adhere to during the installation of pipes. Read through the details carefully and ensure that the pipes are installed correctly. When installing this product, ensure that installation of pipes adheres to the instructions outlined in "Precautions during installation of pipes". -
Page 10: Content Of Packing
Content of Packing <Basin body> Content of packaging Basin Air mat Protective tape Main body cover Maintenance cover Protective tape * The Urea screws are held down the main body with the maintenance cover. (Urea screw M5 × 15) Precaution An air mat is attached to the basin, and protective tape applied to the main body cover. - Page 11 <Seat body> Content of packaging Backrest Backrest Supporting column Areas that must not be used to carry the * There is no legrest main body for the SC-ESF. Legrest Areas that can be used to carry the main body Base Footing Wood frame (Image is of the SC-ESL)
- Page 12 <Seat> Content of packaging 【ESPOIR】 [Fixed legrest type] Seat fixing Seat Backrest Backrest cover screw set [Movable legrest type] Seat fixing Seat Backrest Backrest cover screw set 【SUITE】 Seat fixing Lumbar Cushion ...
- Page 13 Packaging shape and size, weight <Basin body: For Back wash> Basin body 37 kg, Wood frame 30 kg <Basin body: For Side wash > Basin body 34 kg, Wood frame 30 kg...
- Page 14 <ESPOIR Seat body: Fixed legrest type> Basin body 46.5 kg, Wood frame 30 kg <ESPOIR Seat body: Movable legrest type> Basin body 48 kg, Wood frame 30 kg <SUITE / NOBLE Seat body: Movable legrest type> Basin body 48 kg, Wood frame 30 kg...
-
Page 15: Carrying The Main Body
Carrying the main body Carrying the basin 1 Unpack the wood frame. 2 Remove the maintenance cover from the main body. Remove the protective tape and the Urea screws from the maintenance Basin cover. * Remove the maintenance cover keeping the protective tape taped to the main body cover. Precaution Edge Do not lose the Urea screws holding down the maintenance cover. -
Page 16: Installation Of Main Body
Installation of main body * The basin or seat may not be able to be installed correctly depending on installation procedures of the main body. Always install the main body using the following procedures. Main body installation procedure 1 Install the basin 8 Attach the base cover After attaching the base cover, install base plate F to base plate H. - Page 17 2 Attach pipe gasket (1) Cut a slit in the pipe gasket to suit the position of the pipes to be installed. Cut a slit (2) Peel away the sheet from the adhesive surface of the pipe gasket and stick to the floor surface. (3) Cut out a circle around the slit cut in the pipe gasket to suit the pipe surface, and fill in any gaps with caulking materials.
-
Page 18: Attach Piping
* Drain trap If water leaks due to damage to the drain trap, contact your closest dealer or Takara Belmont directly. Drain trap 2 Attach the water supply pipe and hot water supply pipe Frame Precaution •... -
Page 19: Checks After Installation Of Pipes
Checks after installation of pipes 1 Test water flow Precaution Always test the water flow to prevent accidents during use. * Test the water flow and inspect the following items. The hot water may be slightly tainted at the start of the water flow test, however this does not indicate any problem. -
Page 20: Install The Seat
3 Attach the maintenance cover to the basin Precaution Take care not to hit or trap other parts when installing the cover. Doing so may damage the parts and cause malfunctions. Main body cover (1) Insert the maintenance cover into the main body cover. (2) Attach the cover with the screws. - Page 21 2 Install base plate H to the seat (2) Fasten (1) Hold the specified section at the base of the seat (see page 11), press against the ribbed section of base plate H and fasten with the screws. (2) Insert the supplied of spacer to suit the height specifications of the seat.
-
Page 22: Remove Pp Band
Remove PP band Remove the PP band from the seat. Precaution PP band • Always remove this PP band. Operating this product with this PP band attached may cause incorrect operation or malfunctions in the seat. * When moving the seat body at a later date PPバンドは機器設置後に... -
Page 23: Wiring
* The fastening methods for base plate U is outlined in number 2 below. * Always use the extension power cables (sold separately) specified by Base Takara Belmont. Base plate U Power cable (seat body) Hole Extension power cable... -
Page 24: Attach Base Cover
* Check that there is no damage or dirt on the cover before installing it. If there are any problems found in preliminary checks, contact your closest dealer or Takara Belmont directly. 1 Remove the oil plug from the oil tank. -
Page 25: Check Operation
(1) Turn the main power switch on. Press the right side ( symbol) of the main power switch. Foot control (2) Press the foot control and check operation of the seat. For operating procedures, see the separate "YUME ESPOIR/YUME SUITE/YUME NOBLE Seat lowering switch Instruction Manual". -
Page 26: Attach Backrest And Seat
Attach backrest and seat 1 Attach backrest and seat Sticker (1) Insert the backrest into the supporting column in Seat back frame Seat back Seat back frame vertical state, align with the back frame and attach with screws through the attachment holes (middle). Attachment hole (M6 ×... -
Page 27: Check Operation
(1) Turn the main power switch on. Press the right side ( symbol) of the main power switch. (2) Press the foot control and check operation of the seat. For operating procedures, see the separate "YUME ESPOIR/ YUME SUITE/YUME NOBLE Instruction Manual". (3) Once operation has been confirmed, check the attachment condition of the following items. -
Page 28: After Installation
After installation Remove the air mat attached to the basin and protective tape applied to the main body cover. Precaution Always conduct the following inspections to prevent accidents during use. Inspection items (basin body) Inspection items (seat body) (1) Are there any screws that have not been attached? (1) Are there any screws that have not been attached? (2) Is there any rattling? - Page 29 <Side wash basin> Attach neck cushion (1) Check the direction of the neck cushion and neck (2) Hold the neck cushion and adjust the neck core. core so that it is aligned with the center of the neck cushion. <Top View>...
-
Page 30: Attach Hair Catchar And Drain Cap
Attach hair catchar and drain cap Attach hair catchar and drain cap Drain cap Put the hair catcher into the drain port and place the drain cap on the top as shown in the image. Hair catcher Drain... -
Page 31: Main Body Attachment Diagram
Main body attachment diagram... - Page 32 TAKARA BELMONT CORPORATION 1-1, 2-Chome, Higashi-shinsaibashi,Chuo-ku,Osaka,Japan TEL : +81-6-6213-5945 FAX : +81-6-6212-3680 Printed in Japan 1A04NKD0...
Need help?
Do you have a question about the YUME ESPOIR and is the answer not in the manual?
Questions and answers