AEG BSE576321M User Manual
Hide thumbs
Also See for BSE576321M:
- User manual (160 pages) ,
- User manual (28 pages) ,
- User manual (28 pages)
Table of Contents
Advertisement
Quick Links
Advertisement
Table of Contents

Related Manuals for AEG BSE576321M


Summary of Contents for AEG BSE576321M
- Page 1 BSE576321M User Manual Steam oven USER MANUAL...
-
Page 2: Table Of Contents
13. ENERGY EFFICIENCY..................... 36 FOR PERFECT RESULTS Thank you for choosing this AEG product. We have created it to give you impeccable performance for many years, with innovative technologies that help make life simpler features you might not find on ordinary appliances. Please spend a few minutes reading to get the very best from it. - Page 3 ENGLISH manufacturer is not responsible for any injuries or damages that are the result of incorrect installation or usage. Always keep the instructions in a safe and accessible location for future reference. 1.1 Children and vulnerable people safety This appliance can be used by children aged from 8 •...
-
Page 4: Safety Instructions
Ensure that the appliance is switched off before • replacing the lamp to avoid the possibility of electric shock. Do not use a steam cleaner to clean the appliance. • Do not use harsh abrasive cleaners or sharp metal •... - Page 5 ENGLISH such a way that it cannot be removed • Do not let sparks or open flames to without tools. come in contact with the appliance • Connect the mains plug to the mains when you open the door. socket only at the end of the •...
- Page 6 2.6 Internal lighting – Do not open the appliance door during the steam cooking operation. WARNING! – Open the appliance door with Risk of electric shock. care after the steam cooking • The type of light bulb or halogen operation.
-
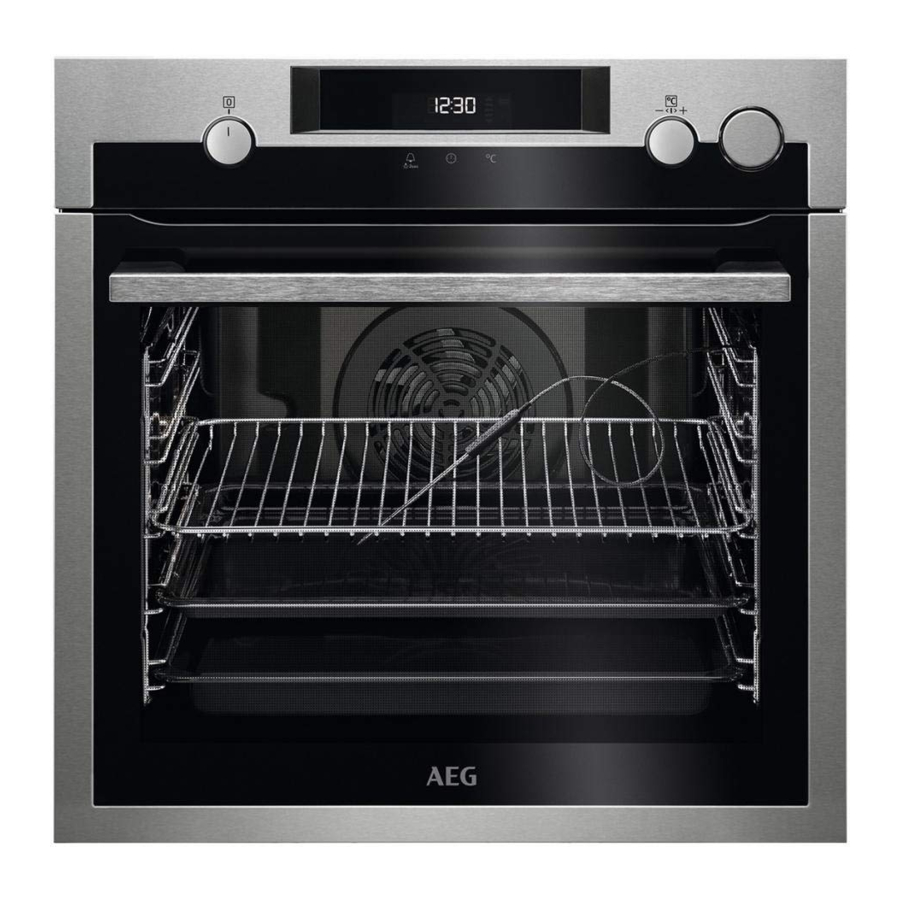
Page 7: Product Description
ENGLISH 3. PRODUCT DESCRIPTION 3.1 General overview Control panel Knob for the heating functions Water tank indicator Display Knob for the temperature Temperature indicator / symbol Water drawer Heating element Socket for the core temperature sensor Lamp Shelf support, removable Draining pipe Water outlet valve Shelf positions... -
Page 8: Daily Use
6. Let the oven operate for 15 minutes. 1. Set the function and the 7. Turn off the oven and let it cool maximum temperature. down. 2. Let the oven operate for 1 hour. Accessories can become hotter than 3. - Page 9 ENGLISH Oven function Application Oven function Application To bake on up to three To bake pizza. To make shelf positions at the intensive browning and a same time and to dry crispy bottom. True Fan Pizza Setting food. Cooking Set the temperature 20 - To bake and roast food 40 °C lower than for Con- on one shelf position.
-
Page 10: Clock Functions
5. Set the temperature between 130 °C 1. Prepare the draining pipe (C), and 230 °C. included in the package with the user Steam cooking gives good results manual. Put the connector (B) onto with this temperature range. one of the ends of the draining pipe. - Page 11 ENGLISH Clock function Application To set when the appliance deactivates. TIME DELAY To combine DURATION and END function. MINUTE MINDER To set countdown time. This function has no effect on the operation of the appliance. You can set the MINUTE MIND- ER at any time, also when the appliance is off.
-
Page 12: Using The Accessories
6.7 Cancelling the clock 2. Press to set the necessary functions time. The Minute Minder starts automatically after 5 seconds. 1. Press the again and again until 3. When the set time ends, an acoustic the necessary function indicator signal sounds. - Page 13 ENGLISH 7.3 Telescopic Runners Keep the installation instructions for the telescopic runners for future use. With telescopic runners you can put in and remove the shelves more easily. CAUTION! Do not clean the telescopic runners in the dishwasher. Baking tray/ Deep pan: Do not lubricate the telescopic runners.
- Page 14 7.4 Accessories for steam Injector tube (C) cooking The steam kit accessories are not supplied with the oven. For more information, please contact your local supplier. The dietary baking dish for steam cooking functions Injector for direct steam cooking (D)
- Page 15 ENGLISH • Do not use the baking dish on a hot cooking surface. 2. Put the baking dish onto the second shelf position from the bottom. 3. Put the other end of the injector tube into the steam inlet. • Do not clean the baking dish with abrasives, scourers and powders.
-
Page 16: Additional Functions
2. Put the baking dish onto the first or WARNING! second shelf position from the Be careful when you use the bottom. injector when the oven Make sure that you do not crush the operates. Always use oven injector tube or let it touch a heating gloves to touch the injector element on the top of the oven. - Page 17 ENGLISH Cooking meat and fish The temperature and baking Use a deep pan for very fatty food to times in the tables are prevent the oven from stains that can be guidelines only. They permanent. depend on the recipes and Leave the meat for approximately 15 the quality and quantity of minutes before carving so that the juice...
- Page 18 Food Top / Bottom Heat True Fan Cooking Time (min) Comments Tempera- Shelf posi- Tempera- Shelf posi- ture (°C) tion ture (°C) tion Apple 2 (left and 80 - 100 In two 20 cake (Ap- right) cm cake moulds on...
- Page 19 ENGLISH Food Top / Bottom Heat True Fan Cooking Time (min) Comments Tempera- Shelf posi- Tempera- Shelf posi- ture (°C) tion ture (°C) tion Meringues 80 - 100 In a baking - one level tray Merin- 2 and 4 80 - 100 In a baking gues- two tray...
- Page 20 Food Top / Bottom Heat True Fan Cooking Time (min) Comments Tempera- Shelf posi- Tempera- Shelf posi- ture (°C) tion ture (°C) tion 10 - 20 In a baking Scones tray 1) Preheat the oven for 10 minutes. Flans...
- Page 21 ENGLISH Food Top / Bottom Heat True Fan Cooking Time (min) Comments Tempera- Shelf posi- Tempera- Shelf posi- ture (°C) tion ture (°C) tion Shoulder 120 - 150 With rind of pork Shin of 100 - 120 2 pieces pork Lamb 110 - 130 Chicken...
- Page 22 Food Quantity Time (min) Pieces Quantity (kg) 1st side 2nd side Pork chops 12 - 16 12 - 14 Chicken (cut in 2) 30 - 35 25 - 30 Kebabs 10 - 15 10 - 12 Breast of chicken...
- Page 23 ENGLISH Poultry Food Tempera- Time (min) Food Tempera- Time (min) ture (°C) ture (°C) Turkey, 2.5 - 160 - 180 120 - 150 Poultry por- 200 - 220 30 - 50 3.5 kg tions, 0.2 - 0.25 kg each Turkey, 4 - 6 140 - 160 150 - 240 Chicken, half,...
- Page 24 Food Accessories Temperature Shelf posi- Time (min) (°C) tion Fish fillet, 0.3 kg pizza pan on wire shelf 30 - 40 Pouched meat, baking tray or dripping 35 - 45 0.25 kg Shashlik, 0.5 kg baking tray or dripping...
- Page 25 ENGLISH Food Quantity Defrosting Further defrost- Comments (kg) time (min) ing time (min) Butter 30 - 40 10 - 15 Cream 2 x 2.0 80 - 100 10 - 15 Cream can also be whip- ped when still slightly fro- zen in places.
- Page 26 Food Tempera- Time (min) Shelf po- Comments ture (°C) sition Tarts 30 - 40 In a 26 cm cake mould Fruit cake 80 - 90 In a 26 cm cake mould Sponge cake 35 - 45 In a 26 cm cake mould...
- Page 27 ENGLISH Steam reheating Reheat your dish on the plate. Food Tempera- Time (min) Preheat the oven for 10 minutes. ture (°C) Use the second shelf position. Roast beef - 45 - 50 rare, 1 kg Food Tempera- Time (min) Roast beef - 55 - 65 ture (°C) medium, 1...
- Page 28 Food Time (min) Food Time (min) Celery slices 30 - 35 Polenta 40 - 45 Meat 9.11 Core temperature sensor Use the second shelf position. table Set the temperature to 150°C. Food Food core tempera- Food Time (min) ture (°C)
- Page 29 ENGLISH Food Function Accesso- Shelf Tem- Time (min) Comments ries posi- pera- tion ture (°C) Small True Fan Baking 150 - 20 - 35 Put 20 small cakes cake Cooking tray per one baking tray. Small True Fan Baking 2 and 150 - 20 - 35 Put 20 small cakes...
-
Page 30: Care And Cleaning
Food Function Accesso- Shelf Tem- Time (min) Comments ries posi- pera- tion ture (°C) Beef bur- Grilling Wire shelf max. 20 - 30 Put the wire shelf and drip- on the fourth level 6 pieces, ping pan and the dripping 0.6 kg... - Page 31 ENGLISH During the cleaning procedure, some water can drip from the steam inlet onto the cavity of the oven. Put a dripping pan on the shelf level directly below the steam inlet to prevent water from falling onto the bottom 2.
- Page 32 3. Turn on the oven and set the 3. Find the hinge to the left side of the function: True Fan + Steam. Set the door. temperature between 130 and 230 °C. Turn off the oven after 10 minutes.
-
Page 33: Troubleshooting
ENGLISH 6. Put the door on a soft cloth on a after the installation the surface of the stable surface. glass panel frame on the screen-printing 7. Hold the door trim (B) on the top zones is not rough when you touch it. edge of the door at the two sides When installed correctly the door trim and push inwards to release the clip... - Page 34 Problem Possible cause Remedy The oven does not heat up. The necessary settings are Make sure that the settings not set. are correct. The oven does not heat up. The fuse is blown. Make sure that the fuse is the cause of the malfunction.
-
Page 35: Installation
ENGLISH We recommend that you write the data here: Model (MOD.) ......... Product number (PNC) ......... Serial number (S.N.) ......... 12. INSTALLATION WARNING! Refer to Safety chapters. 12.1 Building In min. 550 min. 560 min. 1200 min. 550 min. 560 min. -
Page 36: Energy Efficiency
This appliance is supplied only with a main cable. 13. ENERGY EFFICIENCY 13.1 Product Fiche and information according to EU 65-66/2014 Supplier's name Model identification BSE576321M Energy Efficiency Index 95.3 Energy efficiency class Energy consumption with a standard load, conven- 0.93 kWh/cycle... - Page 37 ENGLISH 13.2 Energy saving depending on the duration of the cooking. The residual heat inside the The oven contains features oven will continue to cook. which help you save energy Use the residual heat to warm up other during everyday cooking. dishes.
- Page 38 www.aeg.com...
- Page 39 ENGLISH...
- Page 40 www.aeg.com/shop...
Need help?
Do you have a question about the BSE576321M and is the answer not in the manual?
Questions and answers