Table of Contents
Advertisement
Quick Links
Advertisement
Table of Contents

Related Manuals for AEG BSE578370M


Summary of Contents for AEG BSE578370M
- Page 1 BSE578370M User Manual Oven USER MANUAL...
-
Page 2: Table Of Contents
FOR PERFECT RESULTS Thank you for choosing this AEG product. We have created it to give you impeccable performance for many years, with innovative technologies that help make life simpler – features you might not find on ordinary appliances. Please spend a few minutes reading to get the very best from it. -
Page 3: Safety Information
15.1 Menu..........43 recommended accessories....31 11.3 Cooking tables for test institutes..32 16. ENVIRONMENTAL CONCERNS.....44 My AEG Kitchen app Subject to change without notice. SAFETY INFORMATION Before the installation and use of the appliance, carefully read the supplied instructions. The manufacturer is not responsible... -
Page 4: Children And Vulnerable People Safety
Children should be supervised to ensure that they do not • play with the appliance and mobile devices with My AEG Kitchen . Keep all packaging away from children and dispose of it •... -
Page 5: Safety Instructions
SAFETY INSTRUCTIONS Only a qualified person must install this appliance and • replace the cable. Do not use the appliance before installing it in the built-in • structure. Disconnect the appliance from the power supply before • carrying out any maintenance. If the mains power supply cable is damaged, it must be •... -
Page 6: Electrical Connection
SAFETY INSTRUCTIONS • Always take care when moving the appliance as it is heavy. Always use safety gloves and enclosed footwear. • Do not pull the appliance by the handle. • Install the appliance in a safe and suitable place that meets installation requirements. •... -
Page 7: Use
SAFETY INSTRUCTIONS • Do not use multi-plug adapters and extension cables. • Make sure not to cause damage to the mains plug and to the mains cable. Should the mains cable need to be replaced, this must be carried out by our Authorised Service Centre. •... -
Page 8: Care And Cleaning
SAFETY INSTRUCTIONS • Do not apply pressure on the open door. • Do not use the appliance as a work surface or as a storage surface. • Open the appliance door carefully. The use of ingredients with alcohol can cause a mixture of alcohol and air. -
Page 9: Steam Cooking
SAFETY INSTRUCTIONS – any removable objects (including shelves, side rails etc., provided with the product) particularly any non-stick pots, pans, trays, utensils etc. • Read carefully all the instructions for Pyrolytic cleaning. • Keep children away from the appliance while the Pyrolytic cleaning operates. The appliance becomes very hot and hot air is released from the front cooling vents. -
Page 10: Disposal
• Remove the door catch to prevent children or pets from becoming trapped in the appliance. 3. INSTALLATION WARNING! Refer to Safety chapters. 3.1 Building in www.youtube.com/electrolux www.youtube.com/aeg How to install your AEG/Electrolux Oven - Column installation (*mm) min. 550 min. 560 10/48... -
Page 11: Securing The Oven To The Cabinet
INSTALLATION (*mm) min. 550 min. 560 3.2 Securing the oven to the cabinet 11/48... -
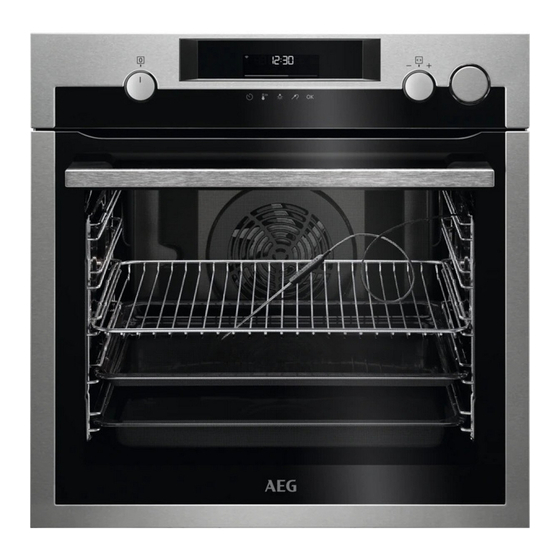
Page 12: Product Description
PRODUCT DESCRIPTION 4. PRODUCT DESCRIPTION 4.1 General overview Control panel Knob for the heating functions Display Control knob Water drawer Heating element Socket for the food sensor Lamp Shelf support, removable Draining pipe Water outlet valve Shelf positions Steam inlet 4.2 Accessories •... -
Page 13: How To Turn Appliance On And Off
HOW TO TURN APPLIANCE ON AND OFF 5. HOW TO TURN APPLIANCE ON AND OFF 5.1 Retractable knobs To use the appliance press the knob. The knob comes out. 5.2 Control panel Control panel sensor fields Press Turn the knob Fast Food Sen‐... -
Page 14: Before First Use
BEFORE FIRST USE Timer indi‐ cators: Wi-Fi indicator - flashes when the oven can be Remote operation indicator - the oven connected to Wi-Fi. can be controlled remotely. Wi-Fi connection is turned on. Remote operation is turned on. Progress bar - for temperature or time. The bar is fully red when the oven reaches the set tempera‐... -
Page 15: Wireless Connection
To connect the appliance you need: • Wireless network with the Internet connection. • Mobile device connected to your wireless network. Step 1 Download the mobile app My AEG Kitchen and follow the instructions for the next steps. Step 2 Turn the knob to select: Frequency 2.4 GHz WLAN... -
Page 16: Software Licences
6.4 Software licences The software in this product contains components that are based on free and open source soft‐ ware. AEG gratefully acknowledges the contributions of the open software and robotics communi‐ ties to the development project. To access the source code of these free and open source software components whose license conditions require publishing, and to see their full copyright information and applicable license terms, please visit: http://aeg.opensoftwarerepository.com (folder NIU5). -
Page 17: Heating Functions
DAILY USE Steam cooking Press the cover Fill the water Push the water Select the of the water drawer with 900 drawer to its ini‐ steam heating Set the temperature. drawer to open ml of water. tial position. function. 7.2 Heating functions Standard heating functions Heating function Application... -
Page 18: Notes On: Moist Fan Baking
DAILY USE Heating function Application To grill thin pieces of food and to toast bread. Grill To roast large meat joints or poultry with bones on one shelf position. To make gratins and to brown. Turbo Grilling To enter the Menu: Assisted Cooking, Cleaning, Settings. Menu 7.3 Notes on: Moist Fan Baking This function was used to comply with the energy efficiency class and ecodesign requirements... -
Page 19: How To Set: Assisted Cooking
DAILY USE Emptying the water tank Turn off the oven, leave it with the door Step 1 open and wait until the oven is cold. Connect the draining pipe (C) to the outlet Step 2 valve (A) through the connector (B). Keep the end of the pipe below the level of Step 3 A and push B repeatedly to collect remain‐... -
Page 20: Assisted Cooking
DAILY USE 7.6 Assisted Cooking Legend Food sensor available. Place the Food sensor in the thickest part of the dish. The oven turns off when the set Food sensor temperature is reached. Add water to the tank. Preheat the oven before you start cooking. Shelf level. - Page 21 DAILY USE Dish Weight Shelf level / Accessory Duration time Roast Beef, rare (slow ~ 75 min cooking) 2; baking tray Roast Beef, 1 - 1,5 kg; 4 Use your favourite spices or simply salt medium (slow - 5 cm thick ~ 85 min and fresh grounded pepper.
- Page 22 DAILY USE Dish Weight Shelf level / Accessory Duration time Spare Ribs 2 - 3 kg; use 90 min 3; deep pan raw, 2 - 3 Add liquid to cover the bottom of a dish. cm thin Turn the meat after half of the cooking spare ribs time.
- Page 23 DAILY USE Dish Weight Shelf level / Accessory Duration time Other Meat loaf 1 kg ~ 60 min 2; wire shelf Use your favourite spices. Fish Whole fish, 0,5 - 1 kg ~ 30 min 2; baking tray grilled per fish Fill the fish with butter and use your fa‐...
- Page 24 DAILY USE Dish Weight Shelf level / Accessory Duration time Wegdes 1 kg 35 min 3; baking tray lined with baking pa‐ Use your favourite spices. Cut potatoes into pieces. Grilled mixed 1 - 1,5 kg 30 min 3; baking tray lined with baking pa‐ vegetables Use your favourite spices.
-
Page 25: Clock Functions
CLOCK FUNCTIONS Dish Weight Shelf level / Accessory Duration time All grain / 1 kg 60 min 2; baking tray lined with baking rye / dark paper / wire shelf bread all grain in loaf 8. CLOCK FUNCTIONS 8.1 Clock functions Clock Function Application Minute minder. - Page 26 CLOCK FUNCTIONS How to set: Minute minder Step 1 Step 2 Step 3 The display shows: 0:00 Set the Minute minder Press: Press: Timer starts counting down immediately. How to set: Cooking time Step 1 Step 2 Step 3 Step 4 The display shows: 0:00...
-
Page 27: How To Use: Accessories
HOW TO USE: ACCESSORIES 9. HOW TO USE: ACCESSORIES 9.1 Inserting accessories A small indentation at the top increases safety. The indentations are also anti-tip devices. The high rim around the shelf prevents cookware from slipping of the shelf. Wire shelf: Push the shelf between the guide bars of the shelf support and make sure that the feet point down. - Page 28 HOW TO USE: ACCESSORIES There are two temperatures to be set: The oven temperature. The core temperature. For the best cooking results: Ingredients should be at Do not use it for liquid During cooking it must remain in room temperature. dishes.
-
Page 29: Additional Functions
ADDITIONAL FUNCTIONS Step 5 - press to set the core temperature of the sensor. Step 6 - press to confirm. When food reaches the set temperature, the signal sounds. You can choose to stop or to continue cooking to make sure the food is well done. Step 7 Remove Food Sensor plug from the socket and remove the dish from the oven. -
Page 30: Cooling Fan
HINTS AND TIPS The Automatic switch-off does not work with the functions: Light, Food sensor, Time Delay. 10.3 Cooling fan When the appliance operates, the cooling fan turns on automatically to keep the surfaces of the appliance cool. If you turn off the appliance, the cooling fan can continue to operate until the appliance cools down. -
Page 31: Moist Fan Baking - Recommended Accessories
HINTS AND TIPS (°C) (min) Poached meat, baking tray or dripping 35 - 45 0.25 kg Shashlik, 0.5 kg baking tray or dripping 25 - 30 Cookies, 16 baking tray or dripping 20 - 30 pieces Macaroons, 24 baking tray or dripping 25 - 35 pieces Muffins, 12... -
Page 32: Cooking Tables For Test Institutes
HINTS AND TIPS Ramekins Pizza pan Baking dish Flan base tin Ceramic Dark, non-reflective Dark, non-reflective Dark, non-reflective 8 cm diameter, 28 cm diameter 26 cm diameter 28 cm diameter 5 cm height 11.3 Cooking tables for test institutes Information for test institutes Tests according to IEC 60350-1. - Page 33 HINTS AND TIPS (°C) (min) Sponge Conven‐ Wire shelf 40 - 50 Preheat the oven cake, tional for 10 minutes. cake Cooking mould Ø26 cm Sponge True Fan Wire shelf 40 - 50 Preheat the oven cake, Cooking for 10 minutes. cake mould Ø26 cm...
-
Page 34: Care And Cleaning
CARE AND CLEANING 12. CARE AND CLEANING WARNING! Refer to Safety chapters. 12.1 Notes on cleaning Clean the front of the appliance with a microfibre cloth with warm water and a mild detergent. Use a cleaning solution to clean metal surfaces. Cleaning Clean stains with a mild detergent. -
Page 35: How To Use: Pyrolytic Cleaning
CARE AND CLEANING Step 3 Pull the rear end of the shelf support away from the side wall and remove it. Step 4 Install the shelf supports in the opposite sequence. The retaining pins on the tele‐ scopic runners must point to the front. -
Page 36: Cleaning Reminder
CARE AND CLEANING Pyrolytic Cleaning During the cleaning the oven lamp is off. When the oven is at the set temperature, the door locks. Until the door unlocks the display shows: When the cleaning ends: Turn off the oven and wait Clean the cavity with a soft Remove the residue from the until it is cold. -
Page 37: How To Remove And Install: Door
CARE AND CLEANING When the cleaning ends: Turn off the oven. Empty the water Rinse the water tank and Clean the drain pipe tank. Refer to Daily clean the remaining lime‐ with warm water use, "Emptying the stone residue with a soft and a mild deter‐... - Page 38 CARE AND CLEANING Step 2 Lift and pull the latches until they click. Step 3 Close the oven door halfway to the first opening position. Then lift and pull to remove the door from its seat. Step 4 Put the door on a soft cloth on a sta‐ ble surface.
-
Page 39: How To Replace: Lamp
CARE AND CLEANING Make sure that you put the glass panels (A and B) back in the correct sequence. Check for the symbol / printing on the side of the glass panel, each of the glass panels looks different to make the disassembly and as‐ sembly easier. -
Page 40: Troubleshooting
TROUBLESHOOTING 13. TROUBLESHOOTING WARNING! Refer to Safety chapters. 13.1 What to do if... In any cases not included in this table please contact with an Authorised Service Centre. The oven does not turn on or does not heat up Problem Check if... -
Page 41: Service Data
TROUBLESHOOTING Error codes Err F102 The oven door is closed. Err F102 The door lock is not broken. 00:00 There was a power cut. Set the time of day. If the display shows an error code that is not in this table turn the house fuse off and on to restart the oven. -
Page 42: Energy Efficiency
......... Serial number (S.N.) ......... 14. ENERGY EFFICIENCY 14.1 Product Information and Product Information Sheet* Supplier's name Model identification BSE578370M 949494774 Energy Efficiency Index 81.2 Energy efficiency class Energy consumption with a standard load, conventional 0.93 kWh/cycle mode Energy consumption with a standard load, fan-forced 0.69 kWh/cycle... -
Page 43: Energy Saving
MENU STRUCTURE 14.2 Energy saving The appliance has features which help you save energy during everyday cooking. Make sure that the appliance door is closed when the appliance operates. Do not open the appliance door too often during cooking. Keep the door gasket clean and make sure it is well fixed in its position. -
Page 44: Environmental Concerns
ENVIRONMENTAL CONCERNS O1 - O15 Adjust the value Select the Menu, Select the set‐ Confirm setting. Confirm setting. Settings. ting. and press Settings Time of day Change Display brightness 1 - 5 Key tones 1 - Beep Buzzer volume 1 - 4 2 - Click 3 - Sound off Food Sensor Action... - Page 45 45/48...
- Page 46 46/48...
- Page 47 47/48...
- Page 48 www.aeg.com/shop...
Need help?
Do you have a question about the BSE578370M and is the answer not in the manual?
Questions and answers