3Com EtherLink III User Manual

3Com EtherLink III User Manual

Parallel tasking 16-bit isa adapter
Hide thumbs Also See for EtherLink III:
Table of Contents

Advertisement

Quick Links

L
ifetime
3Com's EtherLink®,TokenLink® III 16/4,and FDDILink™
adapters have a Lifetime Warranty.
To ensure the very best 3Com service and support, take
the time to complete the product registration card.
Any defective 3Com adapter will be repaired or
replaced, at 3Com's option, for as long as the adapter
resides in its original IBM® Personal Computer,
Personal System/2®, or compatible computer (driver
software is covered by the standard 90-day limited
software warranty).
W
arranty

Advertisement

Table of Contents
loading
Need help?

Need help?

Do you have a question about the EtherLink III and is the answer not in the manual?

Questions and answers

Summary of Contents for 3Com EtherLink III

  • Page 1 3Com's EtherLink®,TokenLink® III 16/4,and FDDILink™ adapters have a Lifetime Warranty. To ensure the very best 3Com service and support, take the time to complete the product registration card. Any defective 3Com adapter will be repaired or replaced, at 3Com's option, for as long as the adapter resides in its original IBM®...
  • Page 2 U.S. address on the front of the card. ■ Italy, Greece, Spain, Portugal, Malta ■ Asia 3Com Mediterraneo Sri, 3Com Asia Ltd., Marketing Department Marketing Department Room 1009,10th Floor Asia Pacific Via Michelangelo Buonarroti, 1 Finance Tower, Citibank Plaza...
  • Page 3 EtherLink® III ® arallel asking 16-B ISA A dapter uide A m em ber o f th e 3Com EtherLink III fa m ily o f adapters * • « ♦ • # Part No. 09-0554-002 Published April 1995...
  • Page 4 3Com Corporation reserves the right to revise this documentation and to make changes in content from tim e to tim e w ith o u t obligation on the part of 3Com Corporation to provide notification of such revision or change.
  • Page 5: Table Of Contents

    ontents roduct verview Overview System Requirements Features Roadmap to the User Guide nstalling the dapter Getting Started Inserting the Adapter Connecting to the Network Connecting to the On-board Transceiver Connecting to an External Transceiver Auto Select Media Type onfiguring the dapter AutoLink Software for NetWare Environments Using the AutoLink Program...
  • Page 6 RJ-45 Connector Pin Assignments AUI Connector Pin Assignments Cable Specifications echnical upport On-line Technical Services 3Com Bulletin Board Service World Wide Web Site Ask3Com on CompuServe 3ComFacts Automated Fax Service Support from Your Network Supplier Returning Products for Repair imited...
  • Page 7 igures ISA Adapter Types 1 Connecting Thin Ethernet Cable Slide Latch Connecting the AUI Cable 1 AutoLink Information Screen Main Menu Main Window with Multiple Adapters Configuration Dialog Box Assembling a Loopback Plug RJ-45 Connector Pin Assignments...
  • Page 8 ISA Adapter Cable and Connector Specifications Topic Locator for the User Guide Notice Icons 1 Connectors for EtherLink III Adapters 1 Option Settings 3-12 Diagnostic Programs AUI Connector Pin Assignments...
  • Page 9: Roduct O Verview

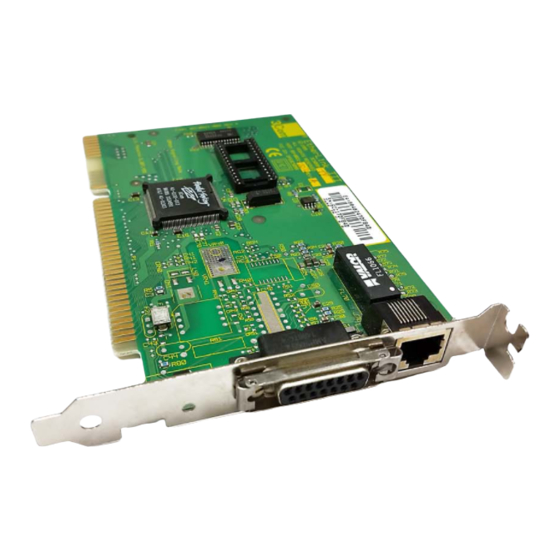
    These adapters are functionally identical; they differ only in the layout of the components and the type of media supported on the backplates, as shown in Figure 1-1.The name "EtherLink III adapter" is used in this guide to refer to all four adapters unless otherwise specified.
  • Page 10: Isa Adapter Types

    10BT 10BT Figure 1-1 ISA Adapter Types EtherLink III adapters connect your IBM® personal computer or compatible to an Ethernet network wired with IEEE 802 standard 10BASE2 or 10BASE5 coaxial cable, or 10BASE-T twisted-pair cable.The cable specifications and connector types for each adapter are shown in Table 1 -1.
  • Page 11: System Requirements

    System Requirements The host system in which the EtherLink III adapter is installed must meet these minimum requirements: ■ 80286 CPU or above ■...
  • Page 12: Roadmap To The User Guide

    Table 1 -2 Topic Locator for the User Guide Turn to: If you are looking for: Chapter 1 An overview of EtherLink III ISA adapters Chapter 2 Adapter installation instructions Chapter 2 Instructions for connecting the adapter to the network...
  • Page 13: Nstalling The A Dapter

    You can maintain grounding by wearing a wrist strap attached to the chassis. You can install the EtherLink III adapter in either one of the following environments: ■ An ISA adapter in an ISA computer ■...
  • Page 14: Inserting The Adapter

    Connecting to the Network This section describes how to connect different types of network cables to the EtherLink III adapters. Table 2-1 lists the types of network cable connectors that are found on the EtherLink III ISA adapters.
  • Page 15: Connecting To The On-Board Transceiver

    Connecting to the Network C onnecting to th e O n -b o ard Transceiver Each EtherLink III adapter is equipped with an on-board transceiver to allow easy connection to the network. Connecting to Thin Ethernet Cable The EtherLink III coax adapter (3C509B) and the 3C509B-COMBO adapter are factory-set to use the on-board transceiver with thin Ethernet cable.
  • Page 16: Connecting To An External Transceiver

    Connecting to Twisted-pair Cable The EtherLink III 10BASE-T adapters (3C509B-TP and 3C509B-TPO) are factory-set to use the on-board transceiver with twisted-pair cable. 1 Make sure that the connector on your cable is wired appropriately for standard 10BASE-T adapter cards.
  • Page 17: Auto Select Media Type

    The Auto Select Media Type function is only implemented by the drivers contained on the EtherDisk® diskette supplied with the EtherLink III adapter.This includes NetWare ODI drivers, NDIS 2.01 drivers, Windows for Workgroups drivers, and Windows NT™ drivers for Intel® architecture. If you have...
  • Page 18 2: I hapter nstalling the dapter Drivers from the previous generation o f EtherLink ill adapters (that is, adapters without a "B"suffix) do not support the Auto Select Media Type function. If it is unable to detect which cable is connected or if there is no cable connected, the Auto Select Media Type function defaults to the type of connector that is set in the EEPROM.
  • Page 19: Onfiguring The A Dapter

    Plug and Play function a t the end o f this chapter. AutoLink Software for NetWare Environments 3Com's AutoLink auto installation software is designed to automatically configure a single EtherLink III adapter in an ISA computer running NetWare.The AutoLink program automatically configures the adapter and installs all necessary NetWare DOS ODI client software.
  • Page 20: Using The Autolink Program

    Using th e A u to Lin k Program To use the AutoLink program to configure a single EtherLink III adapter, follow the steps below. If you have more than one EtherLink III adapter in your computer, see the section "Configuring Multiple Adapters" later in this chapter.
  • Page 21: Autolink Information Screen

    3Com's auto installation software (AutoLink) automatically configures your adapter and workstation for use as a NetWare client. To use AutoLink: * Have only one 3Com EtherLink III adapter installed * Use NetWare v2.X, v3.1X, or v4.X as your network operating system * Have DOS on the client being installed AutoLink edits your AUTOEXEC.BAT and CONFIG.SYS files and saves the old...
  • Page 22: Main Menu

    6 When the main menu screen shown in Figure 3-2 appears, select NetWare DOS ODI Client, and press [Enter]. gtherDisk for the EtherLink III Adapter Family v.X.X ..-. -i ESCaCaneei_ _ ______ ' _ ...
  • Page 23: Configuring Multiple Adapters

    Configuring Multiple Adapters Configuring Multiple Adapters If you have installed more than one adapter in an ISA computer, follow the steps below to configure the adapters. C onfiguring th e First A d a p te r After you have started the EtherDisk diskette program, as explained in steps 1 through 5 in the previous section, "Using the AutoLink Program,"...
  • Page 24: Configuration Dialog Box

    3: C hapter onfiguring the dapter The menu selection Configure Adapter appears already highlighted. Press [Enter]. A configuration screen similar to that shown in Figure 3-4 appears. ££££{^9 JB33330B3E HK3H IB "SB Auto Configure [ENTER]=<Auto Con£igure> Automatically Configures the Adapter [Alt]+<Higfclighted Key>=Executa Function [TAB]=Next Field [SHIFT+TAB]=Previous Field...
  • Page 25: Configuring The Remaining Adapter(S)

    For driver installation instructions, proceed to Chapter 4, "Installing the Network Drivers." Non-NetWare Environments To configure a single EtherLink III adapter for a non-NetWare NOS, proceed as follows: 1 Follow steps 1 through 5 in the section "Using the AutoLink Program"...
  • Page 26 3: C hapter onfiguring the dapter CAUTION: An ISA adapter configured for an EISA computer will not work in an ISA computer without being reconfigured. Refer to the section "Reconfiguring the Adapter for an ISA Computer" later in this chapter for instructions. To configure the adapter to work in an EISA computer, follow steps 1 through 5 in the section "Using the AutoLink Program"...
  • Page 27: Reconfiguring The Adapter For An Isa Computer

    Reconfiguring the Adapter for an ISA Computer Exit the program and remove the EtherDisk diskette. Insert the EISA configuration diskette provided with your computer. 9 Turn off the computer. Wait 10 seconds and then turn it on again. Follow the instructions that accompanied your EISA computer to run the EISA configuration program.
  • Page 28 3: C hapter onfiguring the dapter Do one of the following: ■ If you have a single adapter installed, the menu selection Configure Adapter appears already highlighted. Press [Enter], ■ If you have multiple adapters installed, use the arrow keys to select an adapter and press [Enter], A screen identifying the adapter then appears with the Test menu bar item highlighted.
  • Page 29: Changing Software Option Settings

    Follow the instructions given in Chapter 2, "Installing the Adapter." Changing Software Option Settings You should change the default settings of an EtherLink III adapter only if a conflict with another device or card exists. For information on settings of other standard devices, select the Configuration/Diagnostic/Troubleshooting option on the EtherDisk diskette main menu.
  • Page 30: Option Settings

    Plug and Play Enabled * Refer to the section "ROM Size and Base Register" in the EtherLink III Parallel Tasking ISA, EISA, Micro Channel, and PCMCIA Adapter Driver Technical Reference for the size and base address table that gives the boot PROM's location in memory.
  • Page 31 Changing Software Option Settings 3-13 A screen identifying the adapter then appears with the Test menu bar item highlighted. Use the left arrow key to select the Install menu bar item. The Configure Adapter option will be highlighted. Press [Enter], Press [Tab] several times to highlight the first option in the main dialog box, and use the arrow keys to highlight the parameter option you want to change.
  • Page 32: Plug And Play

    BIOS and you are not using Plug and Play software. ■ The adapter driver does not support Plug and Play.The only drivers that support Plug and Play are DOS ODI and DOS NDIS 2.01 drivers. ■ You want to configure the EtherLink III adapter manually.
  • Page 33: Nstalling The N Etwork D Rivers

    This chapter describes how to install the network drivers required to let the EtherLink III adapter operate with your network operating system (NOS). If you are running NetWare 2.x, 3.1 x, or 4.x, you can use 3Com's AutoLinkauto installation feature, which automatically installs all the NetWare DOS ODI client software (including drivers).
  • Page 34: Netware 4.0 Server Drivers

    Refer to your network operating system manuals for instructions for using the driver with your network operating system. All network adapters in the EtherLink III Parallel Tasking adapter family (except for the EtherLink III PCMCIA adapters) use the same drivers. These drivers are backward-compatible with the previous generation o f EtherLink III adapters.
  • Page 35: Using Transcend Etherlink Smartagent Software

    3Com LinkBuilder® hubs. It will also let you discover and track PC and adapter hardware, software, configurations, and users. When you install the EtherLink III adapter and drivers, make sure the Transcend EtherLink SmartAgent driver agents are fully installed and configured.This includes entry of user-definable information in NET.CFG files for NetWare PCs...
  • Page 36: Using Multiple Adapters In A Computer

    Using Multiple Adapters in a Computer The following information is helpful if you have more than one EtherLink III adapter per computer. Refer to the documentation accompanying your operating system for complete details. If You A re Running LAN M a n a g er If you are running Microsoft®...
  • Page 37: D Iagnostic T Ests

    You can run the diagnostic tests after installing one or more EtherLink III adapters, or you can run them when a fault is suspected. If the tests in their default configuration do not isolate the problem, you can change the test parameters to meet specific situations.
  • Page 38: Starting The Diagnostic Program

    5: P hapter erforming roubleshooting a n d iagnostic ests The Group 2 test (for the 3C509B coax and 3C509B-COMBO adapters only, not twisted-pair adapters) checks the adapter's ability to transmit and receive data via the internal transceiver. The Group 3 test (the Echo Exchange Test) tests the adapter's ability to transmit and receive data while on the network.
  • Page 39: Running The Group 1 Tests

    Starting the Diagnostic Program Running th e G ro u p 1 Tests The Group 1 tests include: ■ Register Access Test ■ EEPROM Vital Data Test ■ EEPROM Configurable Data Test ■ FIFO Loopback Test ■ Interrupt Test ■ Ethernet Core Loopback Test ■...
  • Page 40: Running The Group 2 Test

    Figure 5-1 .You can purchase the terminators from your network supplier (3Com part number 3C535). Starting th e Group 2 Test To run the Group 2 Test on an EtherLink III adapter, follow these steps: 1 Connect the loopback plug to the round BNC connector on the back of the adapter.
  • Page 41: Running The Group 3 Test

    <Start> command button to make the computer an echo server. If you are setting up an echo server using a 3Com adapter other than an EtherLink III adapter, follow these steps: 1 Select a computer to use as an echo server.
  • Page 42: Diagnostic Programs

    The program notifies you that your computer is now set up as an echo server. Starting the Group 3 Test To run the Group 3 test on an EtherLink III adapter, follow these steps: 1 Start the Configuration and Diagnostic Program. This program must be on the computer containing the adapter you want to test.
  • Page 43: Getting Help If A Test Fails

    Getting Help If a Test Fails 5 -7 After the test is completed: a Exit the program on the echo server, Exit the Configuration and Diagnostic Program. Getting Help If a Test Fails If any test fails, you can get additional information as follows: ■...
  • Page 44 5: P 5 -8 hapter erforming roubleshooting and iagnostic ests If you are running the Group 2 test (only on the 3C509B coax or 3C509B-COMBO adapter), make sure that the loopback plug is securely attached to the adapter's BNC connector and that the adapter is attached to a properly cabled nonproduction network.
  • Page 45: Changing The Test Setup

    Getting Help If a Test Fails 5 -9 If you experience problems that occur only when using the AutoLink program, display or print the AUTOLINK.LOG file. The AUTOLINK.LOG file contains a log of all the events that occurred during the AutoLink installation and configuration process.
  • Page 46: Miscellaneous Checks

    If any problem persists, refer to Appendix B, "Technical Support." Link Beat LED The EtherLink III twisted-pair and COMBO adapters have an LED for the link beat (see Figure 1-1).The link beat LED confirms that there is an active connection between the adapter and the hub.
  • Page 47 Miscellaneous Checks 5-11 If you are experiencing any problems, first make sure that your hub complies with the 10BASE-T specifications and then check the LED.The meaning of LED activity is given below: If the LED is on, the link beat is working. If the LED is off, the link beat has not been established or there is a problem with the connection between the adapter and the hub.
  • Page 49: S Pecifications

    This appendix lists the specifications, connector pin assignments, and cable requirements for the EtherLink III adapter. Adapter Specifications Network Interface 3C509B Ethernet IEEE 802.3 industry standard for a 10 Mbps baseband CSMA/CD local area network 3C509B-TPO Ethernet IEEE 802.3i 10BASE-T...
  • Page 50: Rj-45 Connector Pin Assignments

    A -2 A: S ppendix pecifications RJ-45 Connector Pin Assignments Figure A-1 shows the RJ-45 connector pin assignments. Figure A-1 RJ-45 Connector Pin Assignments AUi Connector Pin Assignments Table A-1 lists the pin assignments for the AUI (attachment unit interface) connector. Table A-1 AUI Connector Pin Assignments Function Function...
  • Page 51: Cable Specifications

    A -3 Cable Specifications In order to maintain compliance with the limits of a Class B digital device, 3Com requires that you use quality interface cables when connecting to this device. Changes or modifications not expressly approved by 3Com could void the user's authority to operate this equipment.
  • Page 53: T Echnical S Upport

    3Com provides easy access to technical support information through the variety of services described in this appendix. On-line Technical Services 3Com offers worldwide product support seven days a week, 24 hours a day, through the following on-line systems: ■ 3Com Bulletin Board Service (3ComBBS) ■...
  • Page 54: Ask3Com On Compuserve

    1 Log on to CompuServe. Enter go threecom Press [Return] to see the Ask3Com main menu. 3Com Facts A u to m ate d Fax Service 3Com Corporation's interactive fax service, 3ComFacts, provides data sheets, technical articles, diagrams, and troubleshooting instructions on 3Com products 24 hours a day, seven days a week.
  • Page 55: Support From Your Network Supplier

    Support from Your Network Supplier ■ NetFacts provides data sheets and technical articles on 3Com Corporation's hub, bridge, router, terminal server, and software products. Document 8888 provides you with an index of system product documents. Call 3ComFacts using your touch-tone telephone.
  • Page 56: Returning Products For Repair

    Japan (81) (3) 33457251 Returning Products for Repair A product sent directly to 3Com for repair must first be assigned a Return Materials Authorization (RMA) number. A product sent to 3Com without an RMA number will be returned to the sender unopened, at the sender's expense.

This manual is also suitable for:

3c509b-tpo3c509b coax3c509b-tp3c509b-combo

Table of Contents