
Subscribe to Our Youtube Channel
Related Manuals for 3Com EtherLink 3C590


Summary of Contents for 3Com EtherLink 3C590
- Page 1 THER ® ARALLEL PCI B ETWORK Members of the 3Com EtherLink III family of adapters Part No. 09-0597-001 Published April 1995 ASKING ASTER DAPTERS UIDE...
- Page 2 file named LICENSE.TXT. If you are unable to locate a copy, please contact 3Com and a copy will be provided to you.
-
Page 3: Lifetime Warranty
Any defective 3Com adapter will be repaired or replaced, at 3Com’s option, for as long as the adapter resides in its original IBM Personal Computer, Personal System/2 , or compatible computer (driver software is covered by the standard 90-day limited software warranty). - Page 4 Customers in other non-U.S. locations should send the registration card to the U.S. address on the front of the card. Asia 3Com Asia Ltd., Marketing Department Room 1009, 10th Floor Asia Pacific Finance Tower, Citibank Plaza 3 Garden Road, Central...
-
Page 5: Table Of Contents
ONTENTS BOUT UIDE Introduction i How to Use This Guide i Conventions ii NTRODUCTION Features 1-3 PCI Technology 1-3 PCI A NSTALLING THE DAPTER Before You Begin 2-1 Installing the Adapter 2-2 Connecting to the Network 2-3 Connecting to the On-board Transceiver 2-3 Connecting to Thin Ethernet Cable 2-3 Connecting to Twisted-pair Cable 2-4 Connecting to an External Transceiver 2-5... - Page 6 Multiple Adapters in a Server 3-10 Driver Installation with NetWare 3.11 3-10 Driver Installation with NetWare 3.12 3-11 Non-NetWare Environments 3-11 NDIS Drivers 3-12 Additional Drivers 3-12 Using Transcend PC Link SmartAgent Software 3-12 Desktop Management Interface 3-13 ERFORMING ROUBLESHOOTING AND ESTS Troubleshooting with the Diagnostic Tests 4-1 Starting the Diagnostic Program 4-2...
- Page 7 ECHNICAL UPPORT On-line Technical Services C-1 3Com Bulletin Board Service C-1 World Wide Web Site C-2 Ask3Com on CompuServe C-2 3ComFacts Automated Fax Service C-2 Support from Your Network Supplier C-4 Returning Products for Repair C-5 LOSSARY NDEX IMITED ARRANTY...
- Page 8 IGURES 1-1 3C590 Adapter Backplates 1-2 2-1 PCI and EISA Bus Connectors in a PCI Computer 2-2 2-2 Connecting Thin Ethernet Cable 2-4 2-3 Slide Latch 2-5 2-4 Connecting the AUI Cable 2-5 3-1 AutoLink Information Screen 3-7 3-2 Main Menu 3-7 4-1 Assembling a Loopback Plug 4-4 A-1 Main Menu A-3 A-2 Main Window with Multiple Adapters A-4...
- Page 9 ABLES 1 Text Conventions ii 2 Notice Icons ii 1-1 3C590 PCI Adapter Cable and Connector Specifications 1-2 2-1 Connectors for 3C590 PCI Adapters 2-3 3-1 Accessing DOS from Other Operating Systems 3-2 4-1 Diagnostic Programs 4-6 A-1 Option Settings A-2 B-1 AUI Connector Pin Assignments B-2...
-
Page 10: About This Guide
BOUT Introduction This guide describes how to install the following 3Com EtherLink III Parallel Tasking 10 Mbps PCI bus master network adapters: 3C590-COMBO (10BASE-T, thin coax, and thick coax) adapter 3C590-TPO (10BASE-T) adapter Also included is information about installing network drivers, troubleshooting the adapter, and using the diagnostic tests if an adapter malfunction occurs. -
Page 11: Conventions
BOUT UIDE Conventions The following tables list text and icon conventions that are used throughout this guide. Table 1 Text Conventions Convention Description Text represented as This typeface is used to represent displays that appear on your terminal screen, for example: screen display NetLogin: Text represented as... -
Page 12: Introduction
NTRODUCTION The 3Com EtherLink III Parallel Tasking adapters are a family of third-generation Ethernet adapters. This family includes the 32-bit bus master Peripheral Component Interconnect (PCI)10 Mbps Ethernet network adapter, which conforms to the PCI 2.1 specification. This guide contains... -
Page 13: C590 Adapter Backplates
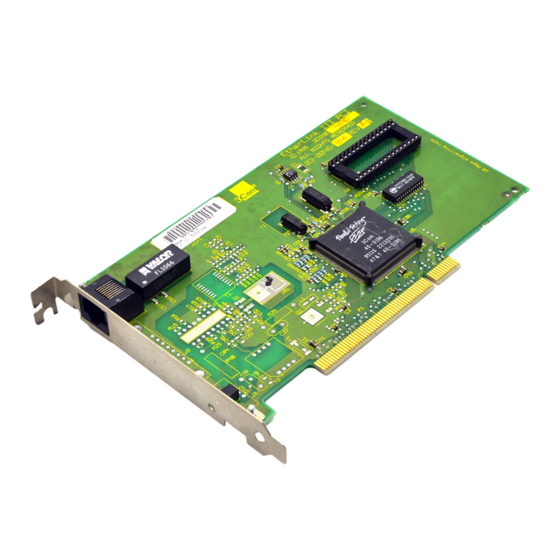
1: I HAPTER NTRODUCTION RJ-45 connector 10BASE-T Figure 1-1 3C590 Adapter Backplates Table 1-1 3C590 PCI Adapter Cable and Connector Specifications Adapter Type Cable Specification 3C590-COMBO 10BASE-T Thin coax (10BASE2) Thick coax (10BASE5) 3C590-TPO 10BASE-T The 3C590 PCI adapter can only be installed in computers containing PCI bus master expansion slots. -
Page 14: Features
Features The 3C590 PCI adapter supports the following features: AutoLink auto installation software, which installs and configures all Novell NetWare DOS ODI client software into your operating system Auto Select Media Type capability, which enables drivers to automatically detect the type of media connector that connects the adapter to the network Network management support through Transcend PC Link SmartAgent software... - Page 15 1: I HAPTER NTRODUCTION The PCI specification supports the following features: High performance. The PCI local bus runs at a clock speed of 33 MHz and employs a 32-bit data bus that supports multiple peripheral components and add-in cards at a peak bandwidth of 132 MBps, up to an order of magnitude greater than that of other PC buses (ISA, EISA, and MCA).
-
Page 16: Installing The Pci Adapter
NSTALLING THE DAPTER This chapter describes how to install the 3C590 PCI adapter in your computer. It includes instructions for inserting the adapter into the computer and connecting the adapter to the network using the on-board transceiver or an external transceiver. After installing the adapter, you can load the network drivers, as detailed in Chapter 3. -
Page 17: Installing The Adapter
2: I PCI A HAPTER NSTALLING THE Installing the Adapter To insert the adapter into the computer, follow these steps: 1 Turn off the computer and disconnect the unit from its power source. 2 Remove all jewelry from your hands and wrists. 3 Select an appropriate expansion slot and remove its expansion cover plate. -
Page 18: Connectors For 3C590 Pci Adapters
slower than access to the PCI bus. In some cases this is slow enough to cause the EISA bus to time out and hang the computer. Refer to the documentation provided by the computer’s manufacturer for details on installing expansion boards. Connecting to the Network You must connect the adapter to the network before installing the drivers. -
Page 19: Connecting To Twisted-Pair Cable
2: I PCI A HAPTER NSTALLING THE RJ-45 connector connector connector Figure 2-2 Connecting Thin Ethernet Cable 2 Align the T connector’s slots with the pegs on the BNC connector. 3 Push the T connector in and twist it clockwise until it stops. The next step is to load the drivers, as explained in Chapter 3. -
Page 20: Connecting To An External Transceiver
Connecting to an External Transceiver You can install AUI-equipped adapters and, by employing an external transceiver, use either thin or thick coax, fiber-optic, or twisted-pair cabling. Follow these steps to connect to an external transceiver: 1 Locate the adapter’s AUI connector and move the slide latch to the open position, as shown in Figure 2-3. -
Page 21: Using Auto Select Media Type
2: I PCI A HAPTER NSTALLING THE Figure 2-4 Connecting the AUI Cable 3 Move the slide latch to the closed position to lock the cable in place. 4 Connect the other end of the AUI cable to the external transceiver. - Page 22 Using Auto Select Media Type...
- Page 23 2: I PCI A HAPTER NSTALLING THE DAPTER...
-
Page 24: Installing The Network Drivers
3C590 PCI adapter operate with your network operating system. If you are running NetWare 2.x, 3.1x, or 4.x, you can use 3Com’s AutoLink auto installation feature, which automatically installs all the NetWare DOS ODI client software, including drivers. If you are running any other network operating system, follow the driver installation instructions in the section “Non-NetWare Environments”... -
Page 25: Accessing Dos
HAPTER NSTALLING THE Accessing DOS The 3Com program is a DOS-based program that loads network drivers, modifies some adapter parameters, and runs diagnostic tests on the adapter. If you are using an operating interface other than DOS, such as OS/2 or Windows 3.x, you must exit from that interface before installing the drivers. -
Page 26: Finding The Adapter's Port Address
ODI environment, follow the instructions in this section. The 3Com DOS ODI driver is 3C59X.COM. DOS ODI client drivers that support the 3Com PCI adapter support shared interrupts. However, since there is no industry-standard way to support shared interrupts, other adapters may support them differently, or not at all. -
Page 27: Autolink Requirements
HAPTER NSTALLING THE ETWORK AutoLink Requirements 3Com’s AutoLink auto installation software is designed to automatically install all necessary NetWare DOS ODI client software, including drivers. It also modifies the CONFIG.SYS and AUTOEXEC.BAT files. It automatically logs on to the server and updates the client software if your system administrator has already configured a 3Install account on... -
Page 28: Detailed Installation
4 The first time you use the diskette to install an adapter, a license screen appears. To accept the terms and conditions of the 3Com end-user software license agreement, type the following: To view the full text of the license agreement, press [F1]. - Page 29 3: I HAPTER NSTALLING THE ETWORK The AutoLink information screen appears, as shown in Figure 3-1. 5 Read the screen and press [Enter]. 6 When the main menu screen shown in Figure 3-2 appears, select NetWare DOS ODI Client, and press [Enter]. Auto installation may take a few moments.
-
Page 30: Autolink Information Screen
3Com's auto installation software (AutoLink) automatically configures your adapter and workstation for use as a NetWare client. To use AutoLink: * Have only one 3Com EtherLink III PCI adapter installed * Use NetWare v2.X, v3.1X, or v4.X as your network operating system * Have DOS on the client being installed AutoLink edits your AUTOEXEC.BAT and CONFIG.SYS files and saves the old... -
Page 31: Multiple Adapters In A Client
3: I HAPTER NSTALLING THE Multiple Adapters in a Client If you are running NetWare and have installed multiple adapters in a PCI computer, follow these steps: 1 With the main menu displayed (Figure 3-2), select Network Drivers. 2 When the Network Drivers screen appears, select Install Novell NetWare Drivers. -
Page 32: Driver Installation With Netware 3.11
Driver Installation with NetWare 3.11 To install the 4.x server driver while running NetWare 3.11, follow these steps: 1 Copy the contents of the appropriate \NETWARE subdirectory to the boot partition of the server’s hard disk. 2 When you start the server, enter the following commands: load C:LSLENH.NLM [Enter] load C:3C59X.LAN PORT=XXXX [Enter] where XXXX is the adapter’s port address. -
Page 33: Multiple Adapters In A Server
3-10 3: I HAPTER NSTALLING THE Multiple Adapters in a Server If you are running NetWare and have installed multiple adapters in a PCI computer that is functioning as a server, follow the instructions in this section. The 3C59X EtherDisk diskette contains a NetWare 4.x server driver (3C59X.LAN) and the NetWare Loadable Modules (NLMs) that enable the NetWare 4.x driver to be used with NetWare 3.11 or 3.12 software. -
Page 34: Driver Installation With Netware 3.12
Driver Installation with NetWare 3.12 To install the 4.x server driver while running NetWare 3.12, follow these steps: 1 Copy the contents of the appropriate \NETWARE subdirectory to the boot partition of the server’s hard disk. 2 When you start the server, enter the following commands: load C:3C59X.LAN PORT=XXXX NAME=X [Enter] load C:3C59X.LAN PORT=XXXX NAME=Y [Enter] where XXXX is the adapter’s port address and NAME X and Y... -
Page 35: Ndis Drivers
NDIS Drivers If you have installed NDIS drivers in a computer with multiple 3Com adapters, you must specify the slot number for each adapter as documented in the PROTOCOL.INI file on the 3C59X EtherDisk diskette. The file is located on the startup diskette or the hard drive. -
Page 36: Desktop Management Interface
Management Information File (MIF), which is included with the DMI software. DMI supports NetWare ODI DOS and NDIS DOS drivers. For information about DMI software and instructions on how to install it, access 3Com’s bulletin board service, as described in Appendix C. - Page 37 3-14 3: I HAPTER NSTALLING THE ETWORK RIVERS...
-
Page 38: Performing Troubleshooting And Diagnostic Tests
ERFORMING ROUBLESHOOTING AND IAGNOSTIC This chapter explains how to isolate and solve 3C590 PCI adapter problems. Make sure that the adapter is correctly installed. (See Chapter 2 for installation instructions.) Troubleshooting with the Diagnostic Tests The three diagnostic tests on the 3C59X EtherDisk diskette check the adapter’s overall operation and permit the isolation of faults. -
Page 39: Starting The Diagnostic Program
4: P HAPTER ERFORMING ROUBLESHOOTING AND The Group 2 test (for the 3C590-COMBO adapter only, not the 3C590-TPO adapter) checks the adapter’s ability to transmit and receive data via the internal transceiver. The Group 3 test (the Echo Exchange Test) tests the adapter’s ability to transmit and receive data while on the network. -
Page 40: Running The Group 1 Tests
Running the Group 1 Tests The Group 1 tests include: Register Access Test EEPROM Test FIFO Loopback Test Ethernet Core Loopback Test Encoder/Decoder Loopback Test Interrupt Test For a description of each Group 1 test, access Help by pressing [F1]. When the Help screen appears, tab to the <Index> command button and press [Enter]. -
Page 41: Running The Group 2 Test
To assemble the loopback plug, connect two 50-ohm network cable terminators to a T connector, as shown in Figure 4-1. You can purchase the terminators from your network supplier (3Com part number 3C535). T connector Terminator Figure 4-1 Assembling a Loopback Plug... -
Page 42: Running The Group 3 Test
Server menu item under the Test menu, and click the <Start> command button to make the computer an echo server. If you are setting up an echo server using a 3Com adapter other than a 3C590 PCI adapter, follow these steps: 1 Select a computer to use as an echo server. -
Page 43: Starting The Group 3 Test
4: P HAPTER ERFORMING ROUBLESHOOTING AND 3 Start the diagnostic program on the echo server. The diagnostic program that you use depends on the adapter that is installed in the echo server. After the system prompt of the drive containing the Configuration and Diagnostic Program, enter the name of the appropriate program (for example, 3C523) from Table 4-1. -
Page 44: Getting Help If A Test Fails
5 After the test is completed: a Exit the program on the echo server. b Exit the Configuration and Diagnostic Program. Getting Help If a Test Fails If any test fails, you can get additional information as follows: Highlight the test that failed in the Run Tests dialog box and press [Enter]. - Page 45 4: P HAPTER ERFORMING ROUBLESHOOTING AND performance in a bus master slot, but will work in a non-bus master slot. Refer to your computer documentation. The original slot may be defective. 4 Make sure that you booted your computer under DOS version 6.x or later, and that no device drivers or memory managers are loaded.
-
Page 46: Changing The Test Setup
10 Install the adapter in another functioning computer and run the tests again. Your computer may be defective. If the adapter passes the tests in the second computer, contact the reseller or manufacturer of the original computer. 11 If you experience problems that occur only when using the AutoLink program, display or print the AUTOLINK.LOG file. -
Page 47: Miscellaneous Checks
4-10 4: P HAPTER ERFORMING ROUBLESHOOTING AND c In the Repetitions box, specify the number of times you want to run the tests, or use the arrow keys to select the Continuous option. d In the Errors box, press the [Space Bar] to select or deselect the Halt on Error parameter. - Page 48 Miscellaneous Checks 4-11 If you are experiencing any problems, first make sure that your hub complies with the 10BASE-T specifications and then check the LED. The meaning of LED activity is given below: If the LED is on, the link beat is working. If the LED is off, the link beat has not been established or there is a problem with the connection between the adapter and the hub.
- Page 49 4-12 4: P HAPTER ERFORMING ROUBLESHOOTING AND IAGNOSTIC ESTS...
-
Page 50: Changing Software Option Settings
OFTWARE ETTINGS When you insert one or more 3C590 PCI adapters in a PCI-compliant PC, the adapter is automatically configured. The PCI automatic configuration utility sets the I/O Port Address and Interrupt Request Level parameters. You cannot change these settings. It also enters default software settings for these options: Boot PROM Media Type... -
Page 51: Appendix A: Software Option Settings
A: S PPENDIX OFTWARE PTION You want to deactivate the Auto Select Media Type option. (Select this option if you are unsure of the media connection to your adapter.) You want to change the type of network connector. You want to enable full duplex. Table A-1 lists each software option, the default setting, and the available settings. -
Page 52: A-1 Main Menu
4 The first time you use the diskette to install an adapter, a license screen appears. To accept the terms and conditions of the 3Com end-user software license agreement, type the following: To view the full text of the license agreement, press [F1]. -
Page 53: A-2 Main Window With Multiple Adapters
Select Initial Adapter Selection Installed Adapters 3Com 3C590-TP PCI Dev/Slot 12: Node Address = 00608C001358 3Com 3C590-COMBO PCI Dev/Slot 13: Node Address = 00608C001368 Select the adapter to be configured and/or tested. (C) Copyright 1995, 3Com Corporation. All Rights Reserved [ENTER]=<Select>... -
Page 54: A-3 Configuration Dialog Box
I/O Port Address Interrupt Request Level Auto Configure Modify File Options (C) Copyright 1995, 3Com Corporation. All Rights Reserved [ENTER]=<Auto Configure> Automatically Configures the Adapter [Alt]+<Highlighted Key>=Execute Function [TAB]=Next Field [SHIFT+TAB]=Previous Field [F1]=Help [ESC]=Cancel Figure A-3 Configuration Dialog Box 11 Press [Enter]. -
Page 55: Saving Software Option Settings
A: S PPENDIX OFTWARE PTION ETTINGS Saving Software Option Settings If you want to use the same settings on other adapters, you can save the configuration settings to a file. Select <Save> under <File Options> in the Adapter Configuration dialog box. -
Page 56: Adapter Specifications
PECIFICATIONS This appendix lists the specifications, connector pin assignments, and cable requirements for the 3C590 PCI adapters. Adapter Specifications Network Interface 3C590-TPO 3C590-COMBO Physical Dimensions Length: Height: Environmental Operating Range Operating temperature: 0˚ to 70˚ C (32˚ to 158˚ F) Humidity: Power Requirements Operating voltage:... -
Page 57: B-1 Rj-45 Connector Pin Assignments
B: S PPENDIX PECIFICATIONS RJ-45 Connector Pin Assignments Figure B-1 shows the RJ-45 connector pin assignments. T D + T D – R D + R D – Figure B-1 RJ-45 Connector Pin Assignments AUI Connector Pin Assignments Table B-1 lists the pin assignments for the AUI (attachment unit interface) connector. -
Page 58: Cable Requirements
Cable Requirements Cable Requirements In order to maintain compliance with the limits of a Class B digital device, 3Com requires that you use quality interface cables when connecting to this device. Changes or modifications not expressly approved by 3Com could void the user’s authority to operate this equipment. -
Page 59: Technical Support
3Com provides easy access to technical support information through the variety of services described in this appendix. On-line Technical Services 3Com offers worldwide product support seven days a week, 24 hours a day, through the following on-line systems: 3Com Bulletin Board Service (3ComBBS) -
Page 60: World Wide Web Site
PPENDIX ECHNICAL UPPORT World Wide Web Site Access the latest networking information on 3Com’s World Wide Web site by entering our URL into your Internet browser: http://www.3Com.com/ This service features news and information about 3Com products, customer service and support, 3Com’s latest news releases, selected articles from 3TECH , 3Com’s... - Page 61 Document 9999 provides you with an index of adapter documents. NetFacts provides data sheets and technical articles on 3Com Corporation’s hub, bridge, router, terminal server, and software products. Document 8888 provides you with an index of system product documents.
-
Page 62: Support From Your Network Supplier
A list of system hardware and software, including revision levels Details about recent configuration changes, if applicable If you are outside the U.S. and Canada, contact your local 3Com sales office to find your authorized service provider: Country Telephone Number... -
Page 63: Returning Products For Repair
Returning Products for Repair A product sent directly to 3Com for repair must first be assigned a Return Materials Authorization (RMA) number. A product sent to 3Com without an RMA number will be returned to the sender unopened, at the sender’s expense. -
Page 64: Glossary
LOSSARY 10BASE2 The IEEE standard for a 10 megabit per second baseband network on thin coaxial cable. 10BASE5 The IEEE standard for a 10 megabit per second baseband network on thick coaxial cable. 10BASE-T The IEEE standard for a 10 megabit per second baseband network on twisted-pair cable. - Page 65 LOSSARY Auto Select Media Type A utility that detects the type of network cable connected to the adapter and automatically selects that connection for packet transmission. This function is implemented by all NetWare ODI drivers, Windows for Workgroups drivers, NDIS 2.01 drivers, and Windows NT drivers.
- Page 66 Desktop Management Interface. The management scheme, developed by the Desktop Management Task Force (DMTF), to make management of a PC easier through standardized means of access to information from managed devices. The standard supported by the DMI defines how information on PCs is made available and accessible.
-
Page 67: Network Adapter
LOSSARY Industry Standard Architecture. A 16-bit extension of the original IBM PC bus architecture. The IBM Personal Computer AT bus. Loopback A type of diagnostic test in which the transmitted signal is returned to the sending device after passing through all, or a portion of, a data communications link or network. - Page 68 It reduces the computational load on the network management station and alleviates management-oriented traffic on the network while performing automated functions for a network management system or 3Com application. SoftHub Software that translates between SNMP and driver agents in Ethernet and token ring adapters.
-
Page 69: Twisted-Pair
LOSSARY Transceiver A hardware device that links a node to a network cable and functions as both a transmitter and a receiver. Twisted-pair Wiring similar to that found in the telephone system, consisting of two insulated wires loosely twisted around each other to help cancel out induced noise in balanced circuits. - Page 70 3C590-TPO and 3C590-COMBO adapters 1-1, 1-2 backplates 1-2 connectors for 2-3 network interface B-1 3C59X.COM driver 3-3 3C59X.LAN server driver 3-8, 3-9 3Com Bulletin Board Service (3ComBBS) C-1 3Com sales offices C-4 3ComFacts C-2 3Install 3-6 adapter backplates 1-2 adapter management 3-12...
- Page 71 NDEX default option settings A-1, A-2 Desktop Management Interface (DMI) 1-3, 3-13 diagnostic program, starting 4-2 diagnostic tests 4-1 changing parameters 4-9 failed 4-7 Group 1 4-1, 4-3 Group 2 4-2, 4-4 Group 3 4-2, 4-5 help 4-7 purpose 4-1 starting 4-2 DOS 3-2, 3-5, A-2 DOS ODI client 1-3, 3-1, 3-4, 3-6...
- Page 72 NDIS drivers 3-12 NET.CFG file 3-8, 3-13 NetFacts C-3 NetWare 4.x server drivers 3-8, 3-10 DOS ODI client 3-1, 3-4 environment 3-2 with multiple adapters 3-8, 3-10 NetWare Loadable Modules (NLMs) 3-8, 3-10 network cables, connecting fiber-optic 2-5 thick coaxial 2-5, B-3 thin coaxial 2-5, B-3 twisted-pair 2-4, B-3 Network Driver Optimization option A-2...
- Page 73 NDEX UNIX driver 3-12 unshielded twisted-pair connections B-3 Windows for Workgroups 3-12 Windows NT 3-12 WorkGroup Manager for Windows 3-13 Zoom 4-7...
- Page 74 Other hardware products Spare parts and spares kits If a product does not operate as warranted during the applicable warranty period, 3Com shall, at its option and expense, repair the defective product or part, deliver to Customer an equivalent product or part to replace the defective item, or refund to Customer the purchase price paid for the defective product.
- Page 75 AUTHORIZES ANY OTHER PERSON TO ASSUME FOR IT ANY OTHER LIABILITY IN CONNECTION WITH THE SALE, INSTALLATION, MAINTENANCE OR USE OF ITS PRODUCTS. 3COM SHALL NOT BE LIABLE UNDER THIS WARRANTY IF ITS TESTING AND EXAMINATION DISCLOSE THAT THE ALLEGED DEFECT IN THE PRODUCT DOES NOT EXIST OR WAS CAUSED BY...
- Page 76 This booklet is available from the U.S. Government Printing Office, Washington, D.C. 20402. Stock No. 004-000-00345-4. NOTE: In order to maintain compliance with the limits of a Class B digital device, 3Com requires that you use quality interface cables when connecting to this device. Changes or modifications not expressly approved by 3Com could void the user’s authority to operate this equipment.
Need help?
Do you have a question about the EtherLink 3C590 and is the answer not in the manual?
Questions and answers