Permobil Explorer Mini User Manual
Hide thumbs
Also See for Explorer Mini:
- Service manual (78 pages) ,
- Quick reference card (2 pages) ,
- User manual (84 pages)
Table of Contents
Advertisement
Advertisement
Chapters
Table of Contents
Troubleshooting

Subscribe to Our Youtube Channel
Related Manuals for Permobil Explorer Mini


Summary of Contents for Permobil Explorer Mini
- Page 1 User manual American English Explorer Mini...
- Page 3 Welcome to the Permobil family Your child's journey to explore the world with the Explorer Mini has just started, and we hope that he or she will have lots of fun together with the Explorer Mini. This wheelchair is designed to provide the highest possible comfort and enjoyment while meeting both safety and environmental requirements.
- Page 4 Text Produced and published by Permobil Edition: Rev. M Date: 2020-02-28 Order no: 334335 eng-US...
- Page 5 Tel.: +1 800 736 0925 Fax: +1 800 231 3256 E-mail: support@permobil.com Web: www.permobil.com Head office of the Permobil group Permobil AB Per Uddéns väg 20 861 36 Timrå Sweden +46 60 59 59 00 Tel.: Fax: +46 60 57 52 50 E-mail: info@permobil.com...
-
Page 7: Table Of Contents
Contents Explorer Mini Important information..........................11 Indications for use ..........................12 Warranty ............................12 Product approval ..........................13 Technical support..........................14 Reporting incidents ..........................14 Spare parts and accessories .........................14 Ordering documentation........................15 Scrapping and recycling ........................15 Safety instructions ............................17 Preparation checklist ...........................18 Electromagnetic interference.........................19 Descriptions of admonitions........................20 Warnings and precautions ........................22... - Page 8 Battery saving function.........................85 Driving technique..........................86 Adjusting the maximum speed setting ....................88 Locking and unlocking the Explorer Mini ....................90 Driving restrictions ..........................93 Joystick error when the Explorer Mini is turned on..................101 5.10 Joystick error and flashing LEDs ......................102 5.11 Electrical fault...........................103 5.12...
- Page 9 Contents Explorer Mini Troubleshooting .............................125 Troubleshooting guide ........................126 Electromagnetic compatibility .......................131 Electromagnetic emissions ........................133 Electromagnetic immunity ........................134 Recommended separation distance......................138 Index ...............................139...
-
Page 11: Important Information
Explorer Mini Important information 1 Important information Before your child starts to use the Explorer Mini, it is important that you read and understand the contents of this user manual, and in particular the safety instructions. This manual is intended to be read and applied by the caregiver. -
Page 12: Indications For Use
35 pounds and maximum length of up to 39 inches tall, between 12-36 months of age, who position themselves in a sitting position in the wheelchair and has the capacity to operate a joystick hand control. Explorer Mini is intended for use indoor and outdoor on dry, firm, flat surfaces. Warranty Contact your dealer or Permobil Inc. -
Page 13: Product Approval
Unapproved replacement of parts If any part is replaced without approval from Permobil, the wheelchair warranty will become void. Permobil accepts no liability for any loss that occurs as a result of a control system component being opened, adjusted or modified without permission. -
Page 14: Technical Support
This is usually the same person you were in contact with at the time of purchase. To get in touch with your contact, use the link at www.permobil.com. Open your country page and the contact page. The page provides the necessary contact information and a document to help you provide us with the information we need to investigate the incident. -
Page 15: Ordering Documentation
Explorer Mini Important information Ordering documentation Should you need another copy of this manual, one may be ordered from Permobil. Ask for the order number specified on the back cover. Scrapping and recycling Contact Permobil for information about scrapping agreements in... - Page 16 Explorer Mini Important information...
-
Page 17: Safety Instructions
The Explorer Mini must only be used when an adult is close and monitors the child continuously. Make sure to test the buttons and their settings on the control panel, before your child starts to use the... -
Page 18: Preparation Checklist
Explorer Mini Safety instructions All parts of the Explorer Mini that the user will get in contact with are made of biocompatible material. Preparation checklist The Explorer Mini is fully assembled when it is delivered. In addition to the Explorer Mini, the following parts are supplied: •... -
Page 19: Electromagnetic Interference
Explorer Mini Safety instructions Before you start to use the Explorer Mini, we also recommend that you charge the batteries. For instructions on how to charge the batteries, see 5.12.1 Charging the batteries . Electromagnetic interference The electronics in your power wheelchair may be affected by... -
Page 20: Descriptions Of Admonitions
Explorer Mini Safety instructions If your power wheelchair moves unintendedly, turn it off. Contact your nearest Permobil representative to report the incident and note whether there was a radio wave source nearby. Descriptions of admonitions The following admonitions describing warnings, remarks and... - Page 21 Explorer Mini Safety instructions CAUTION! Caution admonition Indicates a hazardous situation which, if not avoided, could result in minor or moderate injury as well as damage to the product or other property. NOTICE Notice admonition Indicates an important but not hazardous situation which, if not avoided, could result in damage to the product or other property.
-
Page 22: Warnings And Precautions
Do not lift or move the wheelchair by any of its removable parts. The Explorer Mini must only be used when an adult is present Doing so could lead to personal injury and property damage, and continuously monitors the child. - Page 23 Weight limitations Do not use the wheelchair to pull any kind of object and never The child must not use the Explorer Mini if he or she exceeds the hang objects on the Explorer Mini. Doing so could lead to...
- Page 24 Prevent accidental movement in a motor vehicle Make sure that the Explorer Mini is turned off before the child is The child must not sit in the Explorer Mini while the Explorer Mini put in or lifted out of it.
- Page 25 Hot surfaces in sunlight Maintenance and service Do not place the Explorer Mini in direct sunlight for an extended Only carry out the minor adjustments and maintenance period of time. If you do, surfaces can get hot and cause bodily specified in the user manual.
- Page 26 If you feel the Explorer Mini is not behaving as it should in any get damaged. It may also cause overheating and cause a risk regard or if you suspect that something is wrong, stop use, turn of fire.
- Page 27 Discontinue use following a serious accident CAUTION! Stop using the Explorer Mini if it has been dropped, crushed, EMC requirements exposed to fire, submerged in water, or involved in a vehicular accident, or other extraordinary event. Events like these can...
- Page 28 Explorer Mini Safety instructions...
-
Page 29: Getting To Know Your Wheelchair
Explorer Mini Getting to know your wheelchair 3 Getting to know your wheelchair Overview............................31 Technical specifications........................32 3.2.1 Dimensions and weight........................33 3.2.2 Wheels..............................35 3.2.3 Performance ............................36 3.2.4 Electronics ............................38 3.2.5 Batteries ............................39 3.2.6 Control force ............................39 3.2.7 Circuit breakers ..........................39 3.2.8 Operating and storage conditions ......................39... - Page 30 Explorer Mini Getting to know your wheelchair Accessories ...........................53 3.5.1 Sticker kit............................54 Labels ............................55 3.6.1 Serial number on the base module......................56 3.6.2 Read the instructions..........................57 3.6.3 Pinch risk ............................57 3.6.4 Driving restrictions ..........................58 3.6.5 Main circuit breaker and start button .....................58 3.6.6...
-
Page 31: Overview
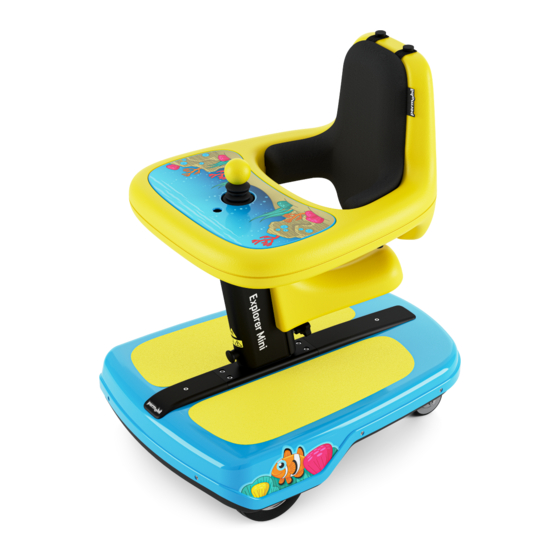
E. Caster wheel F. Drive wheel G. Joystick H. On/off button I. Table (part of the table and backrest unit) J. Column K. Base module L. Serial number M. Start button N. Main circuit breaker Figure 1. Explorer Mini overview. -
Page 32: Technical Specifications
Explorer Mini Getting to know your wheelchair Technical specifications Product name (P): Explorer Mini Wheelchair class (W): Height (A) Minimum: 28.7″ Maximum: 36.6″ Width (B) 19.3″ Length (C) 25″... -
Page 33: Dimensions And Weight
Explorer Mini Getting to know your wheelchair 3.2.1 Dimensions and weight Height Minimum: 28.7″ Maximum: 36.6″ 9 steps at 1″ each. Overall height in standing position 36″ The measurement is done from the test surface to the highest part of the wheelchair (the backrest) when the table and backrest unit is adjusted to its highest position. - Page 34 Explorer Mini Getting to know your wheelchair Distance from table to base module (footrest) Minimum: 14.2″ Maximum: 22″ 9 steps at 1″ each. Distance from table to backrest 6.1″ Distance between armrests 9.8″ Distance from armrest to seat 8.1″ Seat width 7.5″...
-
Page 35: Wheels
Explorer Mini Getting to know your wheelchair 3.2.2 Wheels Tire types Solid Drive wheel dimensions Width (A): 2″ Outside diameter (B): 6″ Caster wheel dimensions Width (A): 1.2″ Outside diameter (B): 3″... -
Page 36: Performance
3.2.3 Performance The performance values represent the extreme conditions under which the Explorer Mini could be operated in a controlled test environment. However, information provided in chapter 5 Handling and driving describes the safest, recommended conditions for driving the Explorer Mini in the real world. - Page 37 Explorer Mini Getting to know your wheelchair Rated slope 6° 9° Static stability downhill Static stability sideways 9° 9° Static stability uphill Static stability in standing position Most stable ≥18° (18° is maximum of the inclined test plane.) Least stable 10°...
-
Page 38: Electronics
The Explorer Mini endured 20,000 cycles in the modified multi drum fatigue test. Electromagnetic Compatibility The Explorer Mini complies with the limit values of harmonized standards for the EU (European Union), in the Medical Device Directive, No 93/42/EEC. The Explorer Mini has not been tested for immunity in standing position. The only... -
Page 39: Batteries
Explorer Mini Getting to know your wheelchair 3.2.5 Batteries Battery type 2 x 12 V AGM lead-acid batteries in series Battery capacity 5 Ah (C20) Charging time Battery weight 2 x 4.2 lb. Cut-off voltage 21.5 V (during 255 s) 3.2.6... -
Page 40: Design And Function
It is intended to be used indoors on dry, flat, firm, and clean surfaces and outdoors in dry weather on dry, paved, and flat surfaces. The Explorer Mini is not intended to be used as a seat in a motor vehicle. WARNING! -
Page 41: Seat
Explorer Mini Getting to know your wheelchair 3.3.1 Seat The seat height has four different settings. If needed, the seat can be removed. For instructions on adjustments of the seat, see 4 Adjustments . Figure 2. Adjustment range for the seat height. - Page 42 Explorer Mini Getting to know your wheelchair 3.3.2.1 Tray top The tray top covers the table and is attached with magnets. You can remove it to access the functions of the control panel, and to clean areas which easily become dirty.
-
Page 43: Base Module
The main circuit breaker is used to turn on and off the main power. It is positioned on the right side of the base module, below the start button. It also functions as a fuse, and the Explorer Mini will automatically be turned off if an electrical fault occurs. This means... - Page 44 Before turning off the main circuit breaker Make sure that the power to the control panel is turned off before the main circuit breaker is turned off, to avoid an electrical fault when you start the Explorer Mini again. NOTICE Investigate tripped main circuit breaker A tripped main circuit breaker can indicate an electrical fault.
- Page 45 Explorer Mini Getting to know your wheelchair 3.3.3.2 Start button The start button is positioned on the right side of the base module, above the main circuit breaker. For instructions on how to use the start button, see 5 Handling and driving .
-
Page 46: Control Panel
Explorer Mini Getting to know your wheelchair Control panel A. Battery indicator B. Maximum speed indicator C. On/off button D. Reduce speed E. Charger socket F. Horn button G. Increase speed H. Joystick Figure 9. Control panel overview. - Page 47 Explorer Mini Getting to know your wheelchair The control panel has functions for driving, and charging the batteries. It has a joystick, function buttons, indicators for speed, a battery charger, and a charger socket. The charger socket is positioned at the front of the control panel. The on/off button on the control panel is always accessible.
-
Page 48: Charger Socket
Getting to know your wheelchair 3.4.1 Charger socket Only use the charger socket to charge the batteries of the Explorer Mini. While the Explorer Mini charges, it is automatically locked and cannot be driven. NOTICE Only use supplied battery charger Only use the supplied charger. -
Page 49: On/Off Button
When the control panel is activated, you can drive the Explorer Mini and use all the functions on the control panel. Figure 13. On/off button. When the control panel is off, the Explorer Mini cannot be driven and the functions of the control panel cannot be used. 3.4.3... -
Page 50: Maximum Speed Indicator
Explorer Mini Getting to know your wheelchair 3.4.4 Maximum speed indicator The maximum speed indicator has five settings. The LEDs on the speed indicator show the current maximum speed setting: • When the fifth LED (A) is lit, the maximum setting is active. -
Page 51: Battery Indicator
• When the battery level is critically low, the red LED (A) flashes and a beep sounds. This means that you have to charge the batteries immediately to prevent that the Explorer Mini stops working. • If all LEDs (A, B, and C) flash, there is a problem with the... -
Page 52: Joystick
Getting to know your wheelchair 3.4.7 Joystick The joystick is used to control the Explorer Mini. The neutral position is in the center. Always put the joystick in the neutral position before you turn on or off your child’s wheelchair. This prevents joystick errors. -
Page 53: Accessories
Explorer Mini Getting to know your wheelchair Accessories Only use accessories intended to be used with the Explorer Mini. You can order them from your Permobil dealer. Accessories for Permobil products are in continuous development. Contact your Permobil dealer for more information about the accessories available for the Explorer Mini. -
Page 54: Sticker Kit
Getting to know your wheelchair 3.5.1 Sticker kit A sticker kit with self-adhesive pictures is supplied with the Explorer Mini. You and your child can use these pictures to decorate the Explorer Mini. Figure 19. Examples of positions for the pictures. -
Page 55: Labels
The labels contain important information for safe and proper use. WARNING! Accident risk – Always replace missing labels Never remove a label from the wheelchair. If a label becomes difficult to read or falls off, order a replacement label from Permobil. -
Page 56: Serial Number On The Base Module
Explorer Mini Getting to know your wheelchair 3.6.1 Serial number on the base module The serial number label is attached between the caster wheels at the base module. Information on the serial number label: A. Made in (country of final assembly) by (address to site of final assembly). -
Page 57: Read The Instructions
Explorer Mini Getting to know your wheelchair 3.6.2 Read the instructions This label indicates that there are instructions that must be read and understood before use or adjustment. Figure 22. Read the instructions. 3.6.3 Pinch risk This label shows that there is a pinch risk when you adjust the height of the seat and the table and backrest unit. -
Page 58: Driving Restrictions
Driving restrictions This label shows restrictions for driving. A. Explorer Mini must not be used as a seat in a motor vehicle. B. The maximum safe slope for hill-climbing is 3°. C. The maximum height for obstacle climbing is 0.5″. -
Page 59: Wiring Diagram
Explorer Mini Getting to know your wheelchair 3.6.6 Wiring diagram The label shows wiring diagram for the batteries and fuses. It includes the battery polarities, the main fuse, and the position of the activation switch. Figure 26. Label that shows the wiring diagram for the... -
Page 60: Electromagnetic Interference
Explorer Mini Getting to know your wheelchair 3.6.7 Electromagnetic interference A tag with information about electromagnetic interference (EMI) hangs on the Explorer Mini. Figure 27. Tag with information about electromagnetic interference (EMI). -
Page 61: Adjustments
Explorer Mini Adjustments 4 Adjustments Seat..............................63 4.1.1 Adjusting the seat height ........................63 4.1.2 Removing the seat ..........................65 4.1.3 Installing the seat ..........................68 Table and backrest unit ........................71 4.2.1 Adjusting the height of the table and backrest unit ...................72 Tray top ............................73 4.3.1... - Page 62 For instructions on how to turn off the Explorer Mini, see 5 Handling and driving . WARNING! Do not adjust while the child is in the wheelchair Do not adjust the settings while the child is in the Explorer Mini.
-
Page 63: Seat
Explorer Mini Adjustments Seat 4.1.1 Adjusting the seat height The seat height is dependent on the height of the table and backrest unit. When the height of the table and backrest unit is adjusted, the distance between the seat and the base module is also changed. - Page 64 3. Release the plunger knob (A). A click signals that the plunger knob is locked. WARNING! Risk of injury Make sure that the seat and the table and backrest unit are locked in their Figure 28. Adjusting the seat height. positions before the child sits in the Explorer Mini.
-
Page 65: Removing The Seat
Explorer Mini Adjustments 4.1.2 Removing the seat An adult or health-care provider must decide if seat removal is applicable for the child, taking into consideration his or her age and capacity. The center of gravity is affected when the seat is removed. - Page 66 Explorer Mini Adjustments 2. Remove the tightening knob (A) from the column. 3. Pull out the plunger knob (B). Figure 29. Prepare removal of the seat. 4. Push down the seat and slide it off the column. Figure 30. Remove the seat from the column.
- Page 67 Explorer Mini Adjustments 5. Put back the tightening knob and tighten it by hand. Figure 31. Put back the tightening knob.
-
Page 68: Installing The Seat
Explorer Mini Adjustments 4.1.3 Installing the seat The center of gravity is affected when the seat is installed. The table and backrest unit must be in the highest position before you can install the seat. Otherwise there will not be enough space to install the seat. - Page 69 Explorer Mini Adjustments 3. Pull out the plunger knob (A). Figure 33. Pull out the plunger knob (A) from the seat. 4. Push the seat into the groove on the column. 5. Carefully move the seat up or down to a setting.
- Page 70 Explorer Mini Adjustments 6. Release the plunger knob (A). A click signals that the plunger knob is locked. 7. Put back the tightening knob (B) and tighten it by hand. Figure 35. Release the plunger knob (A) and put back...
- Page 71 Explorer Mini Adjustments Table and backrest unit When the height of the table and backrest unit is adjusted, it affects the distance between the seat and the base module. The center of gravity changes when you change the position of the table and backrest unit.
-
Page 72: Adjusting The Height Of The Table And Backrest Unit
Explorer Mini Adjustments 4.2.1 Adjusting the height of the table and backrest unit 1. Loosen the tightening knob (A). 2. Hold the table in its position (B) to prevent it from sliding down on the base module. 3. While you hold the table in its current position, pull out the plunger knob (C). -
Page 73: Tray Top
Do not drive the wheelchair while the tray top is removed Do not let the child drive the Explorer Mini while the tray top is removed. The child may press the maximum speed buttons and affect the speed of the wheelchair by mistake. -
Page 74: Attaching The Tray Top
Explorer Mini Adjustments 4.3.2 Attaching the tray top Hold the tray top with its metal inserts facing downward. Put the tray top on the table. Figure 38. Put the tray top in place. -
Page 75: Cushion
Explorer Mini Adjustments Cushion 4.4.1 Removing the cushion The wheelchair has a removable cushion. There are four screws, attached to the cushion, that hold the cushion in place. 1. Remove the four screws from the attachment points on the backrest. -
Page 76: Attaching The Cushion
Explorer Mini Adjustments 4.4.2 Attaching the cushion 1. Put the cushion in place on the backrest. 2. Put the four screws into the attachment points on the backrest and tighten them by hand. Figure 40. Attach the cushion with the screws in the... -
Page 77: Handling And Driving
Standing position..........................82 Turning on the Explorer Mini .......................83 Turning off the Explorer Mini .......................84 Battery saving function .........................85 Driving technique..........................86 Adjusting the maximum speed setting..................88 Locking and unlocking the Explorer Mini ..................90 5.7.1 Locking .............................90 5.7.2 Unlocking ............................91 Driving restrictions........................93 5.8.1... - Page 78 Explorer Mini Handling and driving Joystick error when the Explorer Mini is turned on..............101 5.10 Joystick error and flashing LEDs ....................102 5.11 Electrical fault..........................103 5.12 Batteries............................104 5.12.1 Charging the batteries ........................108 5.13 Transporting the wheelchair ......................111 5.13.1 Preparations for air transportation.......................114...
- Page 79 The Explorer Mini must only be used when an adult is present and continuously monitors the child. WARNING! Prevent accidental movement Make sure that the Explorer Mini is turned off before the child is put in or lifted out of it.
- Page 80 WARNING! Passengers are not permitted The Explorer Mini must only be used by the child to whom it was prescribed. The child must not attempt to carry passengers. If he or she does, the Explorer Mini can tip and cause bodily injury.
-
Page 81: Positions For Driving
5.1.1 Sitting position When the Explorer Mini is used in the sitting position, the child sits with one leg on each side of the column. The feet should touch the friction surface of the base module. The arms should be positioned on the table, to make sure that he or she can reach the joystick easily. -
Page 82: Standing Position
The arms should be positioned on the table, to make sure that he or she can reach the joystick easily. If needed, the seat can be removed before the Explorer Mini is used in the standing position. An adult or health-care provider must decide if seat removal is applicable for the child, taking into consideration his or her age and capacity. -
Page 83: Turning On The Explorer Mini
Explorer Mini Handling and driving Turning on the Explorer Mini You must turn on the main circuit breaker and press the start button before you activate the control panel. There is no feedback to confirm that you have pressed the start button. -
Page 84: Turning Off The Explorer Mini
2. Remove the tray top and make sure that the LEDs on the control panel are off. 3. If the Explorer Mini is going to be stored for a week or more, turn off the main circuit breaker (B). Figure 45. Positions for the on/off button (A) and main... -
Page 85: Battery Saving Function
Battery saving function The battery saving function starts automatically when the Explorer Mini has not been in use for ninety minutes. When this occurs, you have to press the start button for at least one second before you activate the control panel again. -
Page 86: Driving Technique
CAUTION! Do a test of functions and settings Do a test of applicable functions and adapted settings before the child will be using the Explorer Mini for the first time, to prevent accidental operation. WARNING! Obstacles at head level Make sure that there are no obstacles at head level for the child while he or she uses the Explorer Mini. - Page 87 The joystick will move to its neutral position. Please note that the back of the Explorer Mini drifts when it turns. Figure 48. The wheelchair moves in the direction your child pushes the joystick. Neutral position is in the...
-
Page 88: Adjusting The Maximum Speed Setting
Always start with the lowest maximum speed setting. Do not increase the maximum speed until the child has experience of using the Explorer Mini. CAUTION! Driving in narrow spaces Do not use the highest maximum speed setting when driving in narrow spaces. - Page 89 Explorer Mini Handling and driving 1. Make sure that the Explorer Mini is turned on. 2. Remove the tray top to get access to the maximum speed buttons. Figure 49. Maximum speed buttons. 3. Use the maximum speed buttons to increase or reduce the maximum speed: •...
-
Page 90: Locking And Unlocking The Explorer Mini
Figure 51. The Explorer Mini can be locked to prevent other users from driving it. 5.7.1 Locking The Explorer Mini is unlocked with the steps below. Step 3 and 4 must be done swiftly, otherwise the procedure gets interrupted and you must start again from step 1. -
Page 91: Unlocking
Figure 52. Procedure for locking. 5.7.2 Unlocking The Explorer Mini is unlocked with the steps below. Step 4 and 5 must be done swiftly, otherwise the procedure gets interrupted and you must start again from step 2. - Page 92 4. Push the joystick forward until a beep sounds. 5. Pull the joystick backward until a beep sounds. 6. Release the joystick. A beep sounds and the Explorer Mini is unlocked and can be driven. Figure 53. Procedure for unlocking.
-
Page 93: Driving Restrictions
Explorer Mini. WARNING! Dangerous environment Do not use the Explorer Mini in environments that may cause a risk of injury, for example close to traffic, staircases, high obstacles and steep hills. -
Page 94: Driving Restrictions For Different Surfaces
Explorer Mini Handling and driving WARNING! Tipping risk The base module must not hit the ground when driving over obstacles, on uneven surfaces or on slopes. Make sure that there is enough space between the base module and the ground to prevent the risk of tilting. - Page 95 CAUTION! Do not use the Explorer Mini on dirty ground Debris or dirt might get in the wheel shaft or the bearings if the ground is dirty. The driving performance might decrease and there is a risk of...
-
Page 96: Driving Over Obstacles
Explorer Mini Handling and driving 5.8.2 Driving over obstacles The Explorer Mini can climb obstacles up to 0.5 inch. WARNING! Driving — high obstacles Do not drive over obstacles higher than 0.5″. There is a risk that the Explorer Mini might tilt. -
Page 97: Driving On Side Slopes
Explorer Mini Handling and driving 5.8.3 Driving on side slopes Make sure that the maximum speed is set to a speed that your child can handle and that the slope is not steeper than 6°, which means a slight slope, for example a threshold ramp. -
Page 98: Driving Downhill
Explorer Mini Handling and driving 5.8.4 Driving downhill The stopping distance increases when your child drives downhill. Make sure that the maximum speed is set to a speed that your child can handle and that the downhill gradient is not greater than 6°, which corresponds to for example a threshold ramp. -
Page 99: Driving Uphill
Explorer Mini Handling and driving 5.8.5 Driving uphill Make sure that the maximum speed is set to a speed that your child can handle and that the uphill gradient is not greater than 6°, which corresponds to for example a threshold ramp. -
Page 100: Driving Statically Against Obstacles
If the Explorer Mini drives statically against an obstacle, the drive wheels cannot turn. The wheelchair will be turned off automatically to protect it from being overloaded. Move the Explorer Mini from the obstacle before you turn on the wheelchair again. Figure 58. An object causes blockage for driving. -
Page 101: Joystick Error When The Explorer Mini Is Turned On
Explorer Mini is turned on. To prevent joystick errors when the Explorer Mini is turned on, make sure that the joystick is in the neutral position. Press the on/off button and wait until the control panel has been active for a few seconds before you move the joystick. -
Page 102: Joystick Error And Flashing Leds
If an electrical fault occurs in the control panel, the LEDs on the battery indicator will flash quickly and the joystick will not work properly. The Explorer Mini needs to be turned off and then on again. Figure 60. The LEDs on the battery indicator. -
Page 103: Electrical Fault
The main circuit breaker also functions as a fuse, and the Explorer Mini will automatically be turned off if an electrical fault occurs. If this happens you can try to turn on the Explorer Mini again. If the Explorer Mini is overloaded because of high power consumption, the main circuit breaker may be tripped, and a major electrical fault may be the cause. -
Page 104: Batteries
Batteries How often the batteries need to be charged depends on several things, for example how you use the Explorer Mini, the ambient temperature, and how old the batteries are. Batteries lose capacity as they age. The length of their service life is... - Page 105 Explorer Mini Handling and driving WARNING! Only use supplied battery charger If you use other chargers it may cause problem to charge the wheelchair, the battery lifetime may be shortened, and the batteries, the electronics of the wheelchair or the charger may get damaged. It may also cause overheating and cause a risk of fire.
- Page 106 The charger can get hot. • If the charging connector to the battery charger or the socket on the Explorer Mini is damaged or gets too hot during charging, it must be replaced. Contact your dealer for replacement of parts.
- Page 107 NOTICE Do not use an extension cable Do not use an extension cable with the supplied charger cable. Make sure that the Explorer Mini is positioned close enough to a wall socket before connecting the cable.
-
Page 108: Charging The Batteries
For information on the battery status, see 3.4.6 Battery indicator . If an error occurs when you charge the Explorer Mini, use the Figure 61. Position of the charging socket. trouble shooting guide for remedies. See 7.1 Troubleshooting guide . - Page 109 Explorer Mini Handling and driving NOTICE Prevent sunlight Make sure that the Explorer Mini and the charger are not positioned in immediate sunlight during charging. NOTICE Automatically locked for driving The Explorer Mini is automatically locked for driving during charging. If it is still possible to drive during charging, contact your dealer.
- Page 110 Figure 62. Connect the charging connector to the charging socket. 3. Connect the charger contact to the wall socket. 4. Charge the batteries. 5. Disconnect the charger contact from the wall socket. 6. Disconnect the charging connector from the charging socket of the Explorer Mini.
-
Page 111: Transporting The Wheelchair
Do not use the Explorer Mini as a seat in a motor vehicle The child must not sit in the Explorer Mini while the Explorer Mini is transported in a vehicle. The Explorer Mini is not designed to transport anyone inside a motor vehicle. There is a high risk of bodily injury if this Figure 63. - Page 112 Handling and driving 1. Adjust the table and backrest unit to its lowest position. 2. Lift the Explorer Mini by the handgrips at the front and back of the base module. Figure 65. Lift the Explorer Mini by the handgrips.
- Page 113 CAUTION! Damage during transportation You must inform Permobil as soon as possible after the event if the wheelchair and its accessories have suffered transportation damage, damage during driving or damage from other causes. There is a risk that the wheelchair and its accessories can no longer be used safely and...
-
Page 114: Preparations For Air Transportation
Please contact your specific airline for more information and to make sure the wheelchair can be transported safely. 5.13.1.1 Batteries The Explorer Mini is equipped with spill-proof batteries. The batteries are securely attached inside the base module and they meet the requirements of Packing Instruction 872 of special provision A67, meaning they are approved for air transport. - Page 115 Explorer Mini Handling and driving 5.13.1.3 Preparing the wheelchair for transportation It is important to prevent damage to the wheelchair during transportation. Follow the instructions below to prepare the wheelchair for transportation: 1. Adjust the column to its lowest position.
- Page 116 Explorer Mini Handling and driving...
-
Page 117: Maintenance And Repairs
Explorer Mini Maintenance and repairs 6 Maintenance and repairs Maintenance and inspection schedule ..................119 Batteries and storage........................120 6.2.1 Short-term storage ..........................120 6.2.2 Long-term storage ..........................120 Cleaning............................122 6.3.1 Control panel ...........................122 6.3.2 Plastic and metal surfaces........................123 6.3.3 Cushion cover ..........................123... - Page 118 Explorer Mini operates well. CAUTION! Maintenance by a qualified service technician Only qualified service technicians should perform the maintenance and repair specified in this manual. Read all instructions carefully before proceeding. If any questions arise, contact Permobil for assistance.
-
Page 119: Maintenance And Inspection Schedule
Follow the recommendations in the maintenance and inspection schedule. Contact your dealer for all service-related needs or questions, including packing and shipping instructions. Replacement units are not available when the Explorer Mini is serviced or repaired. Maintenance and inspection schedule... -
Page 120: Batteries And Storage
Explorer Mini Maintenance and repairs Batteries and storage Do not store the Explorer Mini in areas with condensation and moisture on the surfaces, for example laundry rooms. 6.2.1 Short-term storage For short-term storage of the batteries, the room must be at least 41 °F. - Page 121 Explorer Mini Maintenance and repairs Always store the Explorer Mini in an upright position. Do not put heavy objects on the wheelchair. The plastic parts on the Explorer Mini can be damaged if they are exposed to mechanical forces during the long-term storage.
-
Page 122: Cleaning
Maintenance and repairs Cleaning Regular care and maintenance will prevent unnecessary wear to the Explorer Mini. If the Explorer Mini belongs to more than one child, we recommend that you do the cleaning procedure after each child has used the wheelchair. -
Page 123: Plastic And Metal Surfaces
4. Turn the cover inside out and follow the cleaning instructions on the label. Use a washing bag to prevent that the screws damage your washing machine. 5. Put back the cover on the cushion. 6. Attach the cushion on the Explorer Mini. For instructions, see 4.4.2 Attaching the cushion . - Page 124 Explorer Mini Maintenance and repairs...
-
Page 125: Troubleshooting
Explorer Mini Troubleshooting 7 Troubleshooting Troubleshooting guide........................126... -
Page 126: Troubleshooting Guide
Troubleshooting guide This troubleshooting guide describes the most common events that can occur when you use the Explorer Mini. It also describes possible causes and remedies. This troubleshooting guide is not exhaustive. Contact your service provider or Permobil if you need service. For contact information, see 1.4 Technical support . - Page 127 For instructions, see 5.4 Battery saving function . Explorer Mini is turned off. The main Reset the main circuit breaker and press circuit breaker is turned off or tripped. and hold the start button for at least one second.
- Page 128 The Explorer Mini stops during driving. The main circuit breaker is tripped. Reset the main circuit breaker. For instructions, see 5.2 Turning on the Explorer Mini . The batteries are discharged. Charge the batteries. For instructions, see 5.12.1 Charging the batteries .
- Page 129 For instructions, see 5.2 Turning on the Explorer Mini . The main circuit breaker is turned on, Press and hold the start button for at least but the start button is not pressed.
- Page 130 Explorer Mini Troubleshooting...
-
Page 131: Electromagnetic Compatibility
Explorer Mini Electromagnetic compatibility 8 Electromagnetic compatibility Electromagnetic emissions ......................133 Electromagnetic immunity ......................134 Recommended separation distance...................138... - Page 132 EU (European Union), in the Medical Device Directive, No 93/42/EEC. The Explorer Mini has not been tested for immunity in standing position. The only difference between the sitting and standing position is the height of the seat and the height of the table and...
-
Page 133: Electromagnetic Emissions
The Explorer Mini and the battery charger (PF2401A5SL) are intended for use in the electromagnetic environment specified below. The customer or the user of the Explorer Mini and the battery charger (PF2401A5SL) should assure that they are used in such an environment. -
Page 134: Electromagnetic Immunity
The Explorer Mini and the battery charger (PF2401A5SL) are intended for use in the electromagnetic environment specified below. The customer or the user of the Explorer Mini and the battery charger (PF2401A5SL) should assure that they are used in such an environment... - Page 135 Explorer Mini Electromagnetic compatibility Electrical fast transient/ ±2 kV for power ±2 kV for power Mains power quality should be that of a typical burst IEC 61000-4-4 supply lines supply lines commercial or hospital environment. ±1 kV for input/output ±1 kV for input/output...
- Page 136 The Explorer Mini and the battery charger (PF2401A5SL) are intended for use in the electromagnetic environment specified below. The customer or the user of the Explorer Mini and the battery charger (PF2401A5SL) should assure that they are used in such an environment...
- Page 137 RF transmitters, an electromagnetic site survey should be considered. If the measured field strength in the location in which the Explorer Mini and the battery charger (PF2401A5SL) are used exceeds the applicable RF compliance level above, the Explorer Mini and the battery charger (PF2401A5SL) should be observed to verify normal operation.
-
Page 138: Recommended Separation Distance
The Explorer Mini and the battery charger (PF2401A5SL) are intended for use in an electromagnetic environment in which radiated RF disturbances are controlled. The customer or the user of the Explorer Mini and the battery charger (PF2401A5SL) can help prevent electromagnetic interference by maintaining a minimum distance between portable and mobile RF communications equipment (transmitters) and the Explorer Mini and/or the battery charger (PF2401A5SL) as recommended below, according to the maximum output power of the communications equipment. -
Page 139: Index
Explorer Mini Index Index Control panel, cleaning ....122 Electromagnetic compatibility ..132 Control panel, overview ....47 Electromagnetic interference ..132 Accessories........53 Cushion, adjustments ....75 Electronics ........39 Adjustments, seat ......63 Cushion, attaching....... 76 Electronics, specifications ..... 38 Admonitions ....... - Page 140 Explorer Mini Index Joystick, driving......86 Maximum speed indicator .... 50 Seat, adjustments ......63 Joystick, error......101 Seat, installing ......68 Joystick, function......52 Seat, removing ......65 Serial number......56 Spare parts and accessories .... 14 On/off button, function....49 Specifications, control force..
- Page 141 Explorer Mini Index Tray top, attaching ...... 74 Tray top, removing...... 73 Troubleshooting, charging ..126 Troubleshooting, driving ... 126 Troubleshooting, electrical fault.. 126 Troubleshooting, starting ... 126 Troubleshooting, stopping ..126 Turning off wheelchair ....84 Turning on wheelchair ....83 Warranty ........
- Page 142 7 330818 349699...
Need help?
Do you have a question about the Explorer Mini and is the answer not in the manual?
Questions and answers