Table of Contents
Advertisement
Advertisement
Table of Contents

Subscribe to Our Youtube Channel
Related Manuals for Permobil M3 Corpus


Summary of Contents for Permobil M3 Corpus
- Page 1 M3 Corpus User manual American English...
- Page 2 Welcome to the Permobil family We hope that you enjoy your new power wheelchair. Permobil Inc. Permobil's founder, Dr. Per Uddén, believed that every person 300 Duke Drive has the right to have his or her disability compensated as far as...
-
Page 3: Table Of Contents
Introduction 4.9.3 Backrest tilt 4.9.4 Removing the backrest Overview 4.9.5 Armrest 4.9.6 Leg rest tilt Wheelchair specification 4.9.7 Footplates Tool bag 4.9.8 Lumbar support General control panel 4.9.9 Trunk support Omni2 4.9.10 Knee support Connected wheelchair 4.9.11 Rotational panel holder Lights and reflectors 4.9.12 Parallel panel holder... -
Page 4: Introduction
It instructs you on how to properly and safely use and care for your wheelchair. This user manual and additional information concerning our products are available at www.permobil.com or by telephone. Your power wheelchair is a complex medical device prescribed to you by your healthcare provider and configured to meet your needs. -
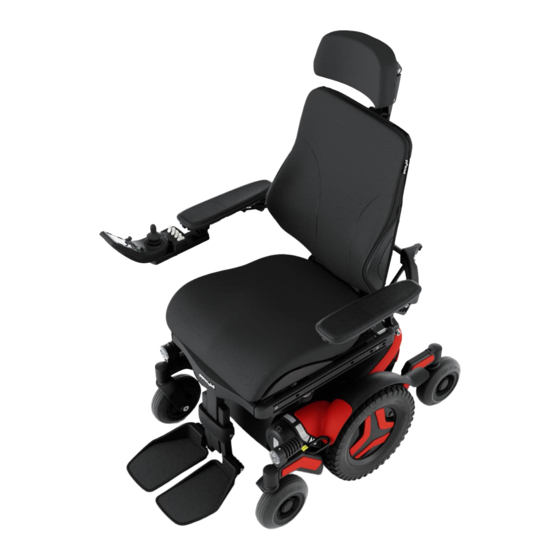
Page 5: Overview
This chapter gives you an overview of your wheelchair. The parts on the overview image are described in more detail throughout the manual. The M3 Corpus is a mid-wheel drive power wheelchair for indoor use. It is intended for people limited to a seated position. The M3 Corpus can be used outdoors with restrictions, as it is not an all-terrain wheelchair. -
Page 6: Wheelchair Specification
Wheelchair specification M3 Corpus Product name: Model version: Wheelchair class: Height, width, and length Height: 960–1170 mm (38"–46") Width: 650–790 mm (25.5"–31") Length: 1016 mm (40") Smallest transportation size Height: 823 mm (32.5") Width: 650–790 mm (25.5"–31") Length: 855 mm (33.5") Weight specification Wheelchair with batteries: 176 kg (388 lb.) -
Page 7: Tool Bag
Tool bag The wheelchair comes with a tool bag for maintenance and adjustments. It contains the following tools: Wrench General maintenance. 11 mm 13 mm Allen keys General maintenance and seat adjustment. 3–6 mm Socket wrench General maintenance. 15 mm Overview - 7... -
Page 8: General Control Panel
General control panel Joystick Example of button functions A. On/off B. Horn C. Decrease maximum speed D. Increase maximum speed For more information, see the user manual of your control panel: https://documentation.permobil.com/ manuals/control_panels/ 8 - Overview... -
Page 9: Omni2
Omni2 Your wheelchair can be equipped with an Omni2. An Omni2 is a device that makes it possible to operate the wheelchair with something other than a standard joystick. Button configuration for Omni2. A. On/off E. LCD screen B. Profile F. -
Page 10: Connected Wheelchair
Connected wheelchair ConnectMe contains a radio transmitter. In certain areas, radio transmission is not allowed and ConnectMe must be set to flight mode For more information, see the user manual of your control panel: https://documentation.permobil.com/ manuals/control_panels/ 10 - Overview... -
Page 11: Lights And Reflectors
Lights and reflectors The wheelchair is equipped with reflectors at the front, the rear, and the sides. Front lights, rear lights, and turn signals are optional. Front reflectors Rear reflectors Side reflectors Overview - 11... -
Page 12: Wheels
Wheels The wheelchair drive wheels have pneumatic tires or flat-free (foam filled) tires. The caster wheels have solid polyurethane tires. Pneumatic tires Flat-free (foam filled) tires Inflating the pneumatic tires. See page 65. 12 - Overview... -
Page 13: Tie-Down Points
Tie-down points The wheelchair is equipped with four tie-down points used for transportation . Two in the front and two in the rear Vehicle transportation. See page 35. Overview - 13... -
Page 14: Serial Number Label
Serial number label The serial number label is located on the lower, left hand side of the wheelchair chassis. Remove the rim for access to the serial number label A. Made in (country of final assembly) by (address of site of final assembly) B. -
Page 15: Accessories
2.10 Accessories Accessories for Permobil products are subject to continuous development. Contact your nearest Permobil dealer for more information on the accessories available for your product. Only use accessories that are authorized by Permobil. Overview - 15... -
Page 16: Spare Parts
2.11 Spare parts Spare parts must be ordered through your dealer. Only use spare parts that are authorized by Permobil. 16 - Overview... -
Page 17: User Manual
2.12 User manual Main text area Main illustration area Text correlates to the illustration to the right Tool list Instruction steps Warning sign Chapter and page number Overview - 17... -
Page 18: Safety
This chapter contains important information about how Indicates important information. to safely use your wheelchair. Permobil is not responsible for personal injuries or property Warning signs damage resulting from any person’s failure to follow the warnings and instructions in this manual or from failure to WARNING! Do not overload the exercise good judgment. - Page 19 WARNING! Avoid steep slopes WARNING! Drive extra carefully when lifted or tilted Do not drive the wheelchair on slopes steeper than 7.5°. If you do, the wheelchair can become less stable and injure you. For If the seat or backrest is lifted or tilted on flat ground, drive at a maximum performance and stability, use caution on slopes low speed.
- Page 20 IMPORTANT! Armrest falling rearward other causes, you must inform Permobil as soon as possible and immediately stop using your wheelchair. There is a risk that the wheelchair or its accessories can no longer be used Some combinations of armrest height and armrest angle can safely.
- Page 21 Events like these can WARNING! No passengers lead to significant damage that is impossible to detect upon inspection. Contact your service provider or Permobil. Do not use the wheelchair to carry passengers, regardless of Damage caused by these types of incidents exceeds the their age or weight.
- Page 22 WARNING! Supervise children WARNING! Turn the wheelchair with caution Do not let children drive the wheelchair without supervision. Do not turn the wheelchair at high speed. If you do, the wheelchair can become less stable and injure you. CAUTION! First drive The first time you drive your wheelchair must be in the CAUTION! Do not use the wheelchair presence of a person who is qualified to ensure that the...
- Page 23 CAUTION! Do not use the wheelchair in extreme conditions WARNING! Drive carefully in narrow or Permobil recommends that you do not use the wheelchair in confined spaces extreme conditions, such as heavy rain, thick snow, or excessive heat or cold.
- Page 24 If you use a different charger, there is a risk of fire information about safety and proper use. If a label becomes or explosion which can lead to bodily injury or property difficult to read or falls off, order a replacement from Permobil. damage. WARNING! Place feet correctly and...
- Page 25 They must be close to your body and not held away and repairs must be carried out by a qualified service by parts of the wheelchair. If the belt restraints are not placed technician authorized by Permobil. correctly, it can lead to bodily injury. CAUTION! Always turn off the power...
-
Page 26: Labels
Pinch risk WARNING! Turn off the power before you This label indicates a pinch risk. When you see this label, be transfer or before you lift the armrest extra careful to avoid pinching yourself or your belongings. Turn off the power before you transfer in or out of the wheelchair or lift the armrest. -
Page 27: Wheelchair Usage
To drive your wheelchair, you must first turn on the power. The power button or switch is most commonly located on the wheelchair’s control panel, which is usually attached to the armrest. Most Permobil wheelchairs also include a joystick on the control panel. Use this joystick to turn the wheelchair and to drive forward and rearward. - Page 28 Permobil recommends that you do not use the wheelchair in extreme conditions, such as heavy rain, thick snow, or excessive heat or cold. The driving range of your wheelchair is approximately 25 km (16 mi) when the battery temperature is 25°C (77°F).
-
Page 29: Seat Functions
WARNING! Do not cross obstacles at an angle When you drive over an obstacle, always directly face it. You can drive over obstacles up to 75 mm (3"). If you drive over higher obstacles, there is a greater risk of tipping and of damage to the wheelchair. Please note that the type of spring and setting can affect the wheelchair’s ability to climb obstacles. - Page 30 Due to the custom nature of Permobil products, your wheelchair is equipped with one of numerous different ways to adjust its seat functions. For additional information on how to control your wheelchair, refer to any other documentation received with your wheelchair or contact your Permobil dealer.
- Page 31 4.2.1 Seat lift The seat lift lifts and lowers the seat. When the seat is lifted, the maximum speed of the wheelchair can be reduced automatically or the ability to drive the wheelchair can be restricted completely. The reduced maximum speed can be indicated with a turtle on the display of the control panel, and the drive restriction can be indicated with a red light.
- Page 32 4.2.3 Anterior tilt The anterior tilt has programmable positions to meet individual needs. Typical tilt positions are 5°, 10°, and 20°. • 10° makes it easier to reach objects, for instance on a table. • 20° extends your reach even further. When you tilt the seat forward or rearward, it will stop when it reaches a preprogrammed position or a neutral, not tilted, position.
- Page 33 4.2.5 Leg rest tilt The leg rest tilt tilts the leg rest. When the leg rest is tilted, the maximum speed of the wheelchair can be reduced automatically or the ability to drive the wheelchair can be restricted completely. The reduced maximum speed can be indicated with a turtle on the display of the control panel and by a yellow light on the switch box.
-
Page 34: Charging The Batteries
Charging the batteries You can charge your wheelchair from the control panel. The charger socket is located at the front of the joystick. WARNING! Always follow charging instructions Always connect the charger to the wheelchair first before you connect the charger to the wall. -
Page 35: Freewheel Mode
Freewheel mode The wheelchair is fitted with two freewheel levers. When the freewheel levers are released, the wheelchair’s brakes are disengaged from the motor. When in freewheel mode, the wheelchair can be moved manually, but cannot be controlled electronically. WARNING! Use freewheel mode cautiously 4.4.1 Entering freewheel mode 1. - Page 36 4.5.1 Securing the wheelchair in a vehicle This chapter describes how you secure the wheelchair in a vehicle. You can either secure the wheelchair at its tie-down points or use a docking system that complies with ISO 10542–1:2012, which is an international standard that governs wheelchair tie-downs and occupant-restraint systems.
- Page 37 After you have secured the straps to your wheelchair, secure the other end of the straps to your vehicle according to the appropriate instructions. The end- fitting on the strap must comply with ISO 10542–1:2012, which is an international standard that governs wheelchair tie-downs and occupant- restraint systems.
- Page 38 4.5.2 Using the wheelchair as a seat in a vehicle Permobil recommends that you transfer to a vehicle seat and that you use the vehicle’s restraint systems. The unoccupied wheelchair should be stored in a cargo area or secured in the vehicle during travel. Follow the instructions below if you want to use the wheelchair as a seat in a vehicle.
-
Page 39: Air Transportation
The shoulder-belt restraint should be worn over the shoulder. The pelvic-belt restraint should be worn low across the pelvis and within the preferred zone of 30° to 75°. It is desirable to have a steeper angle within the preferred zone. Make sure that the wheelchair is not lifted or tilted. -
Page 40: Main Circuit Breaker
Cover the control panel and other sensitive objects with soft, shock-absorbing material (foam plastic or similar). Push the control panel toward the backrest. Tape any loose cables to the seat or covers. Main circuit breaker Your wheelchair has a main circuit breaker with two functions. You can use it to turn off the main power, for example before you transport the wheelchair. -
Page 41: Manual Adjustments
When you store for a long time, fully charge the batteries. Remember to switch off the main circuit breaker. Charge the batteries every month. Manual adjustments The wheelchair can have functions that are adjusted manually. Available functions vary depending on the equipment fitted on your wheelchair. If you do not have the power lift function on your wheelchair, seat height must only be adjusted by authorized service providers. - Page 42 This is how you adjust the height and depth of the headrest. 1. Loosen handle on the backrest. 2. Adjust the height or depth as required. 3. Tighten handle This is how you adjust the angle of the headrest. 1. Loosen handle on the rear of the headrest.
-
Page 43: Headrest With Link Hardware
This is how you remove and install the headrest. 1. Loosen handle on the backrest. 2. Lift the headrest straight up. Install the headrest in the reverse order. You can remove and install the headrest without affecting current settings. 4.9.2 Headrest with link hardware This chapter shows you how to adjust the height, depth, and angle of the headrest. - Page 44 This is how you adjust the height and depth of the headrest. Allen key 5 mm 1. Loosen the screw at each link 2. Change the angle of the links as required. 3. Tighten the screws. This is how you adjust the angle of the headrest. Allen key 5 mm 1.
-
Page 45: Backrest Tilt
This is how you remove and install the headrest. 1. Loosen handle at the rear of the backrest. 2. Lift the headrest straight up ( ). Install in the reverse order. You can remove and install the headrest without affecting current settings. 4.9.3 Backrest tilt You can adjust the backrest to several fixed positions. -
Page 46: Removing The Backrest
4.9.4 Removing the backrest You can remove the backrest to make transportation of the wheelchair easier. Do not place any weight on the backrest while you adjust it. First, remove backrest cushion . It is attached with Velcro. Then carefully undo clip on the backrest and pull the upper part of the backrest straight up ( ). - Page 47 4.9.5.1 Swiveling armrest This chapter describes how you adjust a swiveling armrest. A swiveling armrest is an armrest that you can push in or out as preferred between certain settings. There are three swivel settings ( , , and ) and one locked setting ( ).
- Page 48 4.9.5.2 Armrest height and armrest angles This chapter shows you how to adjust the height of the armrest and the angles of the armrest. There are two ways to adjust the armrest angle. This is how you adjust the height of the armrest. You can see the current height of the armrest on the backrest.
- Page 49 This is one way to adjust the angle of the armrest. The lower lock nut has a left-hand thread. Wrench 14 mm 1. Loosen the two lock nuts on adjustment bar 2. Turn the adjustment bars to adjust the armrest angle to the preferred position.
- Page 50 This is the other way to adjust the angle of the armrest. Allen key 5 mm 1. Move the screw from fixed position to flexible position 2. Adjust the armrest to the preferred angle. 3. Tighten screw 50 - Wheelchair usage...
-
Page 51: Leg Rest Tilt
4.9.6 Leg rest tilt The leg rest on your wheelchair can be adjusted to several positions from vertical to horizontal. 1. Pull out handle of the quick-acting lock so that the locking tube moves freely. 2. Tilt the leg rest to the desired angle. 3. - Page 52 This is how you adjust the height of the footplates. Adjusts both footplates to the same height Adjusts the footplates separately, if you prefer them at different heights 1. Undo the locking screws. 2. Adjust the footplates to the preferred height. 3.
-
Page 53: Lumbar Support
4.9.8 Lumbar support This chapter shows you how to adjust the lumbar support. The lumbar support consists of three cushions with Velcro. If you want to adjust it, simply remove the backrest cushion and adjust the lumbar support as preferred. Wheelchair usage - 53... -
Page 54: Trunk Support
4.9.9 Trunk support This chapter shows you how to adjust the height of the trunk support. This is how you adjust the height of the trunk support. Allen key 5 mm 1. Remove the backrest cushion. 2. Loosen screw on the backrest that holds the trunk support in place. 3. -
Page 55: 4.9.10 Knee Support
4.9.10 Knee support This chapter shows you how to remove and attach the knee support. All adjustments of the knee support must be made by an authorized service technician. You can remove the knee support from the leg rest to make it easier to get in and out of the wheelchair. -
Page 56: 4.9.11 Rotational Panel Holder
4.9.11 Rotational panel holder You can adjust the distance between the armrest and the control panel, the resistance of the rotational panel holder, and the angle of the rotational panel holder. This is how you adjust the distance between the armrest and the control panel. - Page 57 You can angle the rotational control panel to either side. This is how you adjust the angle. Allen key 4 mm 1. Remove screw on the side you want to angle. 2. Loosen the other screw 3. Adjust panel to the preferred angle. 4.
-
Page 58: 4.9.12 Parallel Panel Holder
4.9.12 Parallel panel holder You can adjust the distance between the armrest and the control panel. It is also possible to adjust the angle of the control panel. This is how you adjust the distance between the armrest and the control panel. - Page 59 This is how you adjust the angle of the control panel. Allen key 4 mm Slide the panel to the preferred position. You can loosen or tighten screw to adjust the resistance. Wheelchair usage - 59...
-
Page 60: 4.9.13 Positioning Belt
4.9.13 Positioning belt Always wear your positioning belt. There is an accessory rail on each side of the seat frame where you can attach for example a positioning belt. Wrench 10 mm 1. Screw the positioning belt in place in the rail’s upper groove. 2. -
Page 61: Maintenance
Only carry out maintenance and minor adjustments that are specified in the user manual. All other maintenance, service, and repairs must be carried out by a qualified service technician authorized by Permobil. CAUTION! Qualified service technician... -
Page 62: Maintenance And Inspection Schedule
Maintenance and inspection schedule Permobil recommends compliance with the following maintenance and inspection schedule. Contact your authorized dealer for all service-related needs or questions. Maintenance and inspection schedule Daily Weekly Monthly Yearly Check battery level indicator and charge the wheelchair if necessary. - Page 63 Maintenance and inspection schedule Daily Weekly Monthly Yearly Check that the freewheel mode and the freewheel lever work properly. Complete inspection, safety check, and service performed by an authorized wheelchair dealer. Maintenance - 63...
-
Page 64: Cleaning
Cleaning Regular care and maintenance will prevent unnecessary wear and damage to your Permobil product. CAUTION! Always turn off the power before cleaning the wheelchair 5.2.1 Metal surfaces Due to the high quality powder coating, optimum corrosion protection is guaranteed. Ideally, use a soft cloth or sponge, hot water, and a mild detergent for normal cleaning. -
Page 65: Inflating The Drive Wheel Tires
Inflating the drive wheel tires Only drive the wheelchair with the correct tire pressure. The tire pressure for the drive wheel tires is 250 kPa (35 psi). Permobil recommends that you check the tire pressure weekly and after any significant change in temperature or altitude. -
Page 66: Positioning Belt
Positioning belt Check the condition of the positioning belt regularly in case any damage or wear has occurred. If signs of damage or wear appear, replace the positioning belt immediately through your Permobil dealer. 66 - Maintenance... -
Page 67: Troubleshooting
Note that the guide cannot describe all the problems and events which may occur and you should always contact your service provider or Permobil technical support if you need additional assistance. Troubleshooting and repairs of electronics must always be performed by qualified personnel with good knowledge of the wheelchair’s electronics. - Page 68 Possible cause Remedy Event The battery charger is connected. Disconnect the battery charger. The wheelchair is in freewheel mode. Exit freewheel mode and restart the wheelchair. The wheelchair is locked. Unlock the wheelchair. The wheelchair cannot be driven. A seat function has triggered the Make sure that the backrest and the leg automatic drive inhibit.
-
Page 69: General Information
This chapter contains information about warranty, standards and regulations, reporting incidents, scrapping, and technical specifications. Warranty Contact your dealer or Permobil Inc. USA for information about the warranty period for this product. Product Warranty Information sets forth the conditions of the warranty. For further information about applicable warranties, see https://permobilus.com/... -
Page 70: Technical Specifications
Technical specifications Mass of the heaviest part Backrest 7.5 kg (16.5 lb.) Pivot width 1100 mm (43") Minimum turning diameter 1120 mm (44") Required width of angled corridor 830 mm (33") Required doorway entry depth 1140 mm (45") Required corridor width for side opening 700 mm (28") Ground clearance 80 mm (3") - Page 71 How to contact your production unit Nashville, USA Timrå, Sweden PU TIM PU NAS Permobil AB Permobil Inc. Per Uddéns väg 20 300 Duke Drive Lebanon, TN 37090 861 36 Timrå Sweden +46 60 59 59 00 +1 800 736 0925...
- Page 73 Dealer’s address and telephone number...
- Page 74 337243 eng-CAN www.permobil.com 7 330818 365897...
Need help?
Do you have a question about the M3 Corpus and is the answer not in the manual?
Questions and answers
Does Corpus M3 height raise + lower? How? Can’t find in manual
Yes, the Permobil M3 Corpus allows for height adjustment through its "Active Height" feature. This feature enables the user to drive at up to 5 km/h while the seat is fully elevated. The seat lift can adjust the height by up to 300 mm.
This answer is automatically generated
My seat elevator will not go all the way down. It stops about 2 inches short. This just started today
The seat elevator on the Permobil Corpus may not be going all the way down and stopping 2 inches short due to a setting or restriction related to the armrest and seat configuration. Some configurations have preset limits, such as 10–12 inches or 14–16 inches, that restrict full movement. Adjusting the settings or checking for restrictions in your specific configuration may resolve the issue.
This answer is automatically generated
getting a error message "JSM Bad Cable 7F01'. I have a brand new M3
The error message "JSM Bad Cable 7F01" on a Permobil M3 Corpus indicates a communication or connection problem with the Joystick Module (JSM). It typically means there may be a faulty or disconnected cable between the joystick and the power module or controller.
This answer is automatically generated
I have a permobil M3 corpus MPO HD.The 4 lights on seat controls are so bright now that it blinds me i can't look down. how do i turn them down?
How to turn off the sound on the control panel?
Set time on wheelchair