
Related Manuals for Nanoptix SPILL PROOF


Summary of Contents for Nanoptix SPILL PROOF
- Page 1 SPILL PROOF ● SPILL PROOF CUTS Service Manual First Edition: August 2002 Last Revision: December 2015 Document # 720003-0000...
- Page 2 Legal Notices Disclaimer Information in this document is subject to change without notice. Consult your Nanoptix Inc. sales representative for information that is applicable and current. Nanoptix Inc. reserves the right to improve products as new technology, components, software and firmware become available.
- Page 3 AC line filtering, over-current and short-circuit protection. Use of this product with a power supply other than the Nanoptix Inc. power supply will require you to test the power supply and Nanoptix Inc. printer for FCC and CE mark certification.
-
Page 4: Table Of Contents
SPILL PROOF / SPILL PROOF CUTS Service Manual Table of Contents Table of Contents ................... 4 1 About the printer ..................8 Description of printer ....................8 General ........................... 9 Printer Interface Ports ....................11 Spill Proof ..........................11 Spill Proof Cuts ........................12 2. - Page 5 Instruction SPC-C: Removal of the main PCB ............37 7 Printer Cleaning Instructions ..............38 8 Service & Support ..................41 Returning printers back to NANOPTIX for repairs (RMA) ........41 Technical Support Contact Information ..............41 Document # 720003-0000...
- Page 6 SPILL PROOF / SPILL PROOF CUTS Service Manual Figures 1: S & S ..........8 IGURE PILL ROOF PILL ROOF 2: I - SP ............... 11 IGURE NTERFACE PORTS 3: I - SPC ............12 IGURE NTERFACE PORTS 4: O - SP ................
- Page 7 SPILL PROOF / SPILL PROOF CUTS Service Manual Tables 1: S ............9 ABLE PILL ROOF PECIFICATION 2: S ..........10 ABLE PILL ROOF PECIFICATIONS 3: I - SP ..............11 ABLE NTERFACE ORTS 4: I - SPC.............. 12 ABLE...
-
Page 8: About The Printer
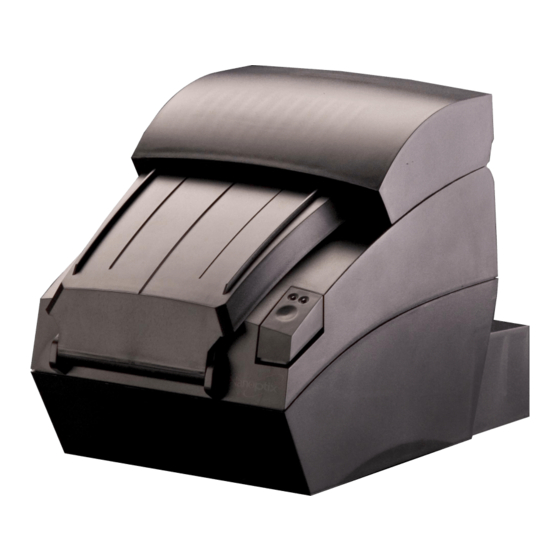
1 About the printer Description of printer The Nanoptix Spill Proof and Spill Proof Cuts printers are extremely fast, quiet, and very reliable. With thermal printing technology, there is no ribbon cassette to change, and paper loading is extremely simple. The printers are small enough to fit almost anywhere and are easy to use with the ticket exiting from the top. -
Page 9: General
SPILL PROOF / SPILL PROOF CUTS Service Manual General Direct Thermal Print Method 8 dot/mm (203 dpi) Resolution 80mm Print Width 80mm or 82.5 mm Paper Width 82.5mm Max Roll Diameter 0 to 50 C Operating Temperature -40 C to +65 C... -
Page 10: Table 2: Spill Proof Cuts Specifications
SPILL PROOF / SPILL PROOF CUTS Service Manual Direct Thermal Print Method 8 dot/mm (203 dpi) Resolution 80mm Print Width 80mm or 82.5 mm Paper Width 82.5mm Max Roll Diameter 0 to 50 C Operating Temperature -40 C to +65 C... -
Page 11: Printer Interface Ports
SPILL PROOF / SPILL PROOF CUTS Service Manual Printer Interface Ports Spill Proof Port Identification Connector Type Function DC Jack 24 VDC USB type mini B USB Communication RJ25 Cash drawer DB9 plug RS232 C Communication position D (optional) DB9 receptacle... -
Page 12: Spill Proof Cuts
SPILL PROOF / SPILL PROOF CUTS Service Manual Spill Proof Cuts Port Identification Connector Type Function IEC-603220 Line supply 100-240 VAC RJ25 Cash drawer DB25 receptacle RS232-C Communication USB type B USB communication Table 4: Interface ports - SPC Figure 3: Interface ports - SPC... -
Page 13: Printer Controls
SPILL PROOF / SPILL PROOF CUTS Service Manual 2. Printer controls Paper Loading Caution: To prevent data loss, do not operate the printer if it runs out of paper. Spill Proof 1. Open printer door by holding on to both sides of cover and lifting upwards Figure 4: Open door - SP 2. - Page 14 SPILL PROOF / SPILL PROOF CUTS Service Manual 3. Close cover (with both hands) onto paper. In some instances a short piece of paper may be fed. Figure 6: Close door - SP 4. Tear off and discard excess paper...
-
Page 15: Spill Proof Cuts
SPILL PROOF / SPILL PROOF CUTS Service Manual Spill Proof Cuts 1. Open protective cover, then open printer door by pressing the door open button and lifting on the door. Figure 8: Open door - SPC 2. Insert new roll of paper (unwinding from the top) - Page 16 SPILL PROOF / SPILL PROOF CUTS Service Manual 3. Close door by pressing on the grey “push here” area then close the protective cover. The printer will feed and cut a small amount of paper which should be discarded. Figure 10: Close door and cover - SPC...
-
Page 17: Resetting Printer
SPILL PROOF / SPILL PROOF CUTS Service Manual Resetting Printer Spill Proof In the event of a fault condition, simply disconnect and reconnect the printer’s power connection to reset. Once the printer is re-connected, it will go through a startup routine and reset itself. -
Page 18: Paper Feed Button
SPILL PROOF / SPILL PROOF CUTS Service Manual Paper Feed Button Press form feed button to advance the paper. Spill Proof Figure 13: Paper Feed - SP Spill Proof Cuts Figure 14: Paper Feed - SPC Document # 720003-0000 December 2015... -
Page 19: Status Led
SPILL PROOF / SPILL PROOF CUTS Service Manual Status LED Spill Proof Condition LED Status (Green) Unit ready Unit is in Reset or Booting Unit in standby (powered off) Paper Out Slow Blink Door Open Fast Blink Paper Jam Fast Blink... -
Page 20: Spill Proof Cuts
SPILL PROOF / SPILL PROOF CUTS Service Manual Spill Proof Cuts Condition LED Status (Red) Power LED (Green) Unit ready Unit is in Reset or Booting Unit in standby (powered off) Paper Out Slow Blink Door Open Fast Blink Paper Jam... -
Page 21: Testing The Printer
SPILL PROOF / SPILL PROOF CUTS Service Manual Testing the Printer This test can be used to verify the correct operation of the printer. The test prints a resident ticket listing the current printer settings. This ticket can also be used to verify the printing quality. -
Page 22: Troubleshooting The Printer
SPILL PROOF / SPILL PROOF CUTS Service Manual 3 Troubleshooting the Printer Pin designation of Communication Interfaces RS-232 (DB-9) receptacle Signal Name Printer I/O Host I/O Printer Function AUX_PWR 5V Output Aux Power (100mA) RS232_TXD Output Input Data transmit RS232_RXD... -
Page 23: Rs-232 / Rs-485 (Db-15) Receptacle
SPILL PROOF / SPILL PROOF CUTS Service Manual RS-232 / RS-485 (DB-15) Receptacle Signal Name Printer I/O Host I/O Printer Function AUX_PWR 5V Output Aux Power (100mA) RS232_TXD Output Input Data transmit RS232_RXD Input Output Data receive No connect or CTS... -
Page 24: Rs-232 (Db-25) Receptacle
SPILL PROOF / SPILL PROOF CUTS Service Manual RS-232 (DB-25) receptacle Signal Name Printer I/O Host I/O Printer Function DGND Ground Ground Signal Ground/Aux Ground RS232_TXD Output Input Data transmit RS232_RXD Input Output Data receive RS232_RTS Output Input Handshaking RS232_CTS... -
Page 25: Sensors An Switches
SPILL PROOF / SPILL PROOF CUTS Service Manual Sensors and Switches Sensor / Switch Function Door Closed Paper Out Table 12: Sensors / Switches Figure 18: Sensors & Switches Document # 720003-0000 December 2015... -
Page 26: Printing Problems
SPILL PROOF / SPILL PROOF CUTS Service Manual Printing Problems The table below can be used to determine the cause and resolution of the most common problems that may occur. If the information in this section does not correct the problem, contact your authorized service representative. -
Page 27: Connector Layout, Main Controller Pcb
SPILL PROOF / SPILL PROOF CUTS Service Manual Connector Layout, Main Controller PCB PCB – Spill Proof Letter Cable Connector Main PCB Function designation Color designation None beige J500 paper feed, LED None beige J400 feeder motor None black J300... -
Page 28: Media And Supplies Guide
SPILL PROOF / SPILL PROOF CUTS Service Manual 4 Media and Supplies Guide Thermal Paper Specifications The printer requires qualified thermal paper with the following dimensions: Spill Proof Printer Width Diameter Outside Core Diameter 80 mm ± .2 mm (3.15 in. ± .008 in.) 115 mm max. -
Page 29: Ordering Thermal Paper
Numbers 1.888.KANZAKI Kanzaki Specialty Papers Tel: 888-526-9254 (USA) 1350 Main Street Fax: 413-731-8864 Springfield, MA 01103 Figure 21: Ordering Thermal Paper Additional grades can be qualified and made available. Please contact Nanoptix for more information. Document # 720003-0000 December 2015... -
Page 30: Ordering Miscellaneous Supplies
Adaptor harness (DB9 Female to RJ45) 102911-0001R Over moulded cable (IGT specific) “Axiohm” 102270-0000R Cash Drawer harness (RJ11-RJ11) Table 18: Communication Cables Part Numbers Please note: The NANOPTIX part number must be specified when ordering communication cables. Document # 720003-0000 December 2015... -
Page 31: Mechanical Drawings
SPILL PROOF / SPILL PROOF CUTS Service Manual 5 Mechanical Drawings Figure 22: Dimensions (in mm) - SP Document # 720003-0000 December 2015... - Page 32 SPILL PROOF / SPILL PROOF CUTS Service Manual Figure 23: Dimensions (in mm) – SPC Document # 720003-0000 December 2015...
-
Page 33: Spare Parts Replacement Instructions
SPILL PROOF / SPILL PROOF CUTS Service Manual 6 Spare parts replacement instructions Note: Follow instructions below for disassembly of defective parts. Follow instructions in the reverse order for reassembly. Use ESD protection (such as a wrist strap) anytime a PCB is exposed... -
Page 34: Instruction Sp-B: Removal Of The Main Pcb
SPILL PROOF / SPILL PROOF CUTS Service Manual Instruction SP-B: Removal of the main PCB 1. Remove top shell by following instruction A 2. Disconnect all power and communication connections 3. Remove two (2) screws as shown in Figure 25 using tool 1 4. - Page 35 SPILL PROOF / SPILL PROOF CUTS Service Manual 3. Lift up on front part of mechanism then slide forward to release from the two (2) lances Figure 28 as shown in Figure 27: Printing Mechanism 2 - SP Document # 720003-0000...
-
Page 36: Spill Proof Cuts
SPILL PROOF / SPILL PROOF CUTS Service Manual Spill Proof Cuts Tools required: REFERENCE DESCRIPTION SOCKET HEAD TOOL 1 SCREWDIRVER. # 3/16 (5.5mm) TOOL 2 SCREWDRIVER, PHILIPS #1,#2 TOOL 3 SCREWDRIVER, FLAT #1/4 (6mm) Table 20: Tools Required – SPC Instruction SPC-A: Removal of the top shell 1. -
Page 37: Instruction Spc-B: Removal Of Daughter Pcb
SPILL PROOF / SPILL PROOF CUTS Service Manual Instruction SPC-B: Removal of Daughter PCB Figure 29 1. Remove four (4) screws as shown using tool 1&2. 2. Then slide board out to remove Figure 29: PCB mounting plate - SPC Instruction SPC-C: Removal of the main PCB 1. -
Page 38: Printer Cleaning Instructions
Note: Under normal operating conditions, the minimum interval for cleaning the NANOPTIX SPILL PROOF & SPILL PROOF CUTS printer is 3 months or 5 km of paper printed, whichever comes first. Isopropyl alcohol cleaning pens and pre-saturated cleaning cards are available form Nanoptix. - Page 39 SPILL PROOF / SPILL PROOF CUTS Service Manual Step: 2 Clean the print line (black line on the print head) with a cotton swab and isopropyl alcohol. Spill proof Spill proof cuts Figure 32: Clean print head Step 3: Clean roller with a cotton swab and a soap solution (20% Simple Green / 80% water)
- Page 40 SPILL PROOF / SPILL PROOF CUTS Service Manual Step 4: Clear dust off static brushes using a vacuum or light brush (Spill Proof Cuts only) Figure 34: Clean brushes – SPC Step 5: Clean sensor with a cotton swab and a soap solution (20% Simple Green / 80% water)
-
Page 41: Service & Support
SPILL PROOF / SPILL PROOF CUTS Service Manual 8 Service & Support Returning printers back to NANOPTIX for repairs (RMA) Send return approval request to NANOPTIX Inc. which should include: Printer model # Serial # Brief problem description ...
Need help?
Do you have a question about the SPILL PROOF and is the answer not in the manual?
Questions and answers