Mobotix D16 DualDome Manual
Hide thumbs
Also See for D16 DualDome:
- Quick install (2 pages) ,
- Quick install (2 pages) ,
- Quick install (2 pages)
Table of Contents
Advertisement
Quick Links
Advertisement
Table of Contents

Related Manuals for Mobotix D16 DualDome


Summary of Contents for Mobotix D16 DualDome
- Page 1 Camera Manual D16 DualDome...
- Page 2 Copyright © 1999-2019, MOBOTIX AG, Langmeil, Germany. Technical information subject to change without notice. MOBOTIX AG and its subsidiaries do not assume any liability for technical or editorial errors or omissions contained herein.
-
Page 3: Table Of Contents
1.5.7 Ethernet Patch Cable for Bayonet Catch 1.5.8 NPA-PoE-Set 1.5.9 MX-Overvoltage-Protection-Box 1.5.10 MX-NPA-Box 1.5.11 MX-GPS-Box 1.5.12 MX-232-IO-Box 1.5.13 ExtIO Expansion Module 1.5.14 Mx2wire+ Media Converter 1.5.15 Other Accessories 1.6 MOBOTIX Software 1.6.1 Integrated Camera Software (Firmware) 1.6.2 MxManagementCenter 1.6.3 MOBOTIX MxBell... - Page 4 Table of Contents Installation Overview of Mounting Options 2.1.1 Mounting Indoor Cameras to a Ceiling or Wall (without Accessories) 2.1.2 Outdoor Installation on a Wall, Pole or Corner (with Accessories) Network Connections Overview 2.2.1 Power-Over-Ethernet (PoE Conforming to IEEE 802.3af) 2.2.2 Uninterruptible Power Supplies (UPS) 2.2.3 Preparing the Camera Connections, Wall Outlets 2.2.4 Wiring, Fire Prevention, Lightning and Surge Protection...
- Page 5 3.5.2 Formatting the MicroSD Card 3.5.3 Activating Recording 3.5.4 Accessing Data on the MicroSD Card 3.5.5 Deactivating Card Recording 3.5.6 Using a MicroSD Card in a Different MOBOTIX Camera 3.5.7 Limitations on Warranty When Using Flash Storage Media 3.6 Configuration of the D16 in the Browser 3.6.1 Overview...
-
Page 6: Safety Warnings
Make sure that you install this product as outlined in Chapter 2, «Installation» of this manual. A faulty installation can damage the camera! • When installing this product, make sure that you are only using genuine MOBOTIX parts and MOBOTIX connection cables. •... -
Page 7: Legal Notes
D16, the recording of video and sound data may be subject to special documentation or it may be prohibited. All users of MOBOTIX products are therefore required to familiarize themselves with all applicable regulations and to comply with these laws. MOBOTIX AG is not liable for any illegal use of its products. -
Page 8: Foreword
If you have any questions, our support and international sales staff are available at intl-support@mobotix.com from Monday to Friday, 8 am to 6 pm (German time). We would like to thank you for your trust and wish you all the best with your new MOBOTIX camera D16 DualDome! - Page 9 Mx-D16A/B* with Outdoor Wall Mount Corner and Pole Mount with Vandalismus-Set and Outdoor Wall Mount 2 image sensors on Sensor modules 2 image sensors on Pano sensor bridge (individually adjustable) Fix sensor bridge *Variant Mx-D16B supports MOBOTIX MxBus modules...
-
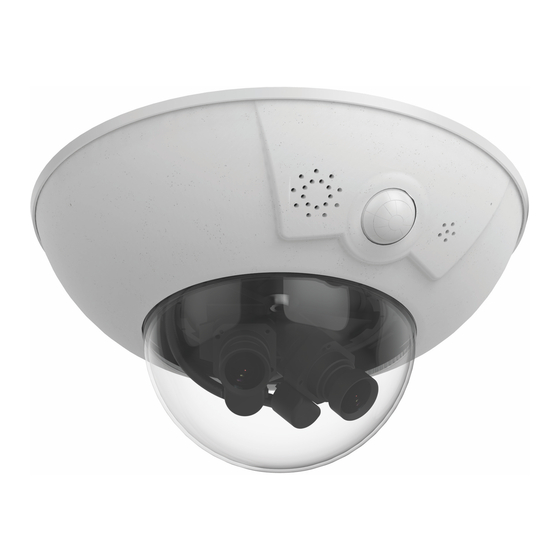
Page 10: Product Overview
D16 Camera Manual: Product Overview PRODUCT OVERVIEW D16 – Lenses, Hardware, Image Formats Objektive, Sensoren MX-B016 Hemispheric – MX-B036 Super Wide-Angle • MX-B041 Super Wide-Angle • MX-B061 Wide-Angle • MX-B079 Standard • MX-B119 Tele • MX-B237 Tele • MX-B500 Tele –... -
Page 11: D16 - Software Features
MX-232-IO-Box Programming interface/HTTP API • Security features (HTTPS/SSL, IP-based access control, IEEE • 802.1X network authentication) Video Analysis Video Motion detector • MxAnalytics • MxActivitySensor • Video Management Software Free-of-charge download MxManagementCenter • from www.mobotix.com MOBOTIX MxBell • or App Store/Google Play... -
Page 12: D16 - Technical Data
Model Variants Mx-D16A/B* “D16-DNight” (2 Day/Night/LPF sensor units B036 – B237 on parallel sensor bridge) *Variant Mx-D16B supports MOBOTIX MxBus modules MX-B036 to MX-B237 (20 to 135 mm in 35 mm format), Lens Options 103° to 15° horizontal angle of view Color sensor (6MP): 0.1 Lux at 1/60 s, 0.005 Lux at 1 s... - Page 13 D16 – Technical Data User/group management, HTTPS/SSL, IP address filter, IEEE 802.1x, intrusion Security detection, digital image signature EN55032:2012, EN55022:2010; EN55024:2010, EN61000-6-1:2007, EN61000-6- Certifications 3:2007+A1:2011, EN61000-6-4:2007+A1:2011, AS/ NZS CISPR22:2009+A1:2010 Year-round Power-over-Ethernet (IEEE 802.3af); Power Supply PoE class variable Power Consumption Typ.
-
Page 14: Delivered Parts And Dimensions
D16 Camera Manual: Product Overview Delivered Parts and Dimensions 1.4.1 The D16 Camera Camera housing (item 1.1) 3 mm Allen wrench (item 1.10) TX20 Torx wrench (item 1.11) 2 lenses (item 1.2) 2 lens mounts (item 1.3) Domes (item 1.7), Outer shell (item 1.8) 1x transparent, 1x tinted Custom tool... - Page 15 Stainless steel washers, diam. 5.3 mm M.1.3 Stainless steel wood 4.5 x 60 mm screws with TX20 head Camera Housing and Connectors – D16 The MOBOTIX D16 consists of three main components (camera housing, outer shell and dome). LED default settings: Power (on), error (flashes)
-
Page 16: The D16-Panorama/180
D16 Camera Manual: Product Overview 1.4.2 The D16-Panorama/180° Camera housing (item 2.1) 3 mm Allen wrench (item 2.10) TX20 Torx wrench (item 2.11) 2 lenses (item 2.2) 2 lens mounts (item 2.3) 1 sensor bridge (item 2.14) XL domes (item 2.7), Outer shell (item 2.8) 1x transparent, 1x tinted Custom tool... - Page 17 Delivered Parts and Dimensions Camera Housing and Connectors – D16-Panorama/180° The MOBOTIX D16-Panorama/180° consists of three main components (camera housing, outer shell and dome). LED default settings: Power (on), error (flashes) Sealing ring Recording (flashes) Water outlet open- ings Outer shell...
-
Page 18: The D16-Dnight
D16 Camera Manual: Product Overview 1.4.3 The D16-DNight Camera housing (item 3.1) 3 mm Allen wrench (item 3.10) TX20 Torx wrench (item 3.11) 2 lenses (item 3.2) 2 lens mounts (item 3.3) 1 sensor bridge (item 3.14) XL domes (item 3.7), Outer shell (item 3.8) 1x transparent, 1x tinted Custom tool... - Page 19 Delivered Parts and Dimensions Camera Housing and Connectors – D16-DNight The MOBOTIX D16-DNight consists of three main components (camera housing, body shell and dome). LED default settings: Sealing ring Power (on), error (flashes) Water outlet open- Recording (flashes) ings Outer shell...
-
Page 20: Delivered Parts For The Outdoor Wall Mount (Accessory)
D16 Camera Manual: Product Overview 1.4.4 Delivered Parts for the Outdoor Wall Mount (Accessory) Bottom plate (item 4.2) 4 Allen screws, M4x25 mm (item 4.10) 4 screw anchors, 10 mm 4 washers, diam. 4.3 mm (item (item 4.3) 4.11) 4 washers Make sure to check diam. -
Page 21: Delivered Parts For The Corner And Pole Mount (Accessory)
Delivered Parts and Dimensions 1.4.5 Delivered Parts for the Corner and Pole Mount (Accessory) 4 Allen screws, M8x30 mm (item 5.2) 2 steel straps (item 5.5) 4 washers diam. 9 mm (item 5.3) 4 hex nuts, M8 (item 5.4) Item Number Part Name Corner and Pole Mount... -
Page 22: Available Accessories
D16 Camera Manual: Product Overview Available Accessories 1.5.1 Replacement Dome Order No.: MX-D16-OPT-DCT/DCS (transparent/tinted) The standard D16 dome is available as a transparent version or as a 50 percent-tinted version (also available as an XL dome for D16-Panorama/180° and D16-DNight). 1.5.2 Vandalism Set Order No.: MX-D16-Vandal-ESMA/ESPO/PUGR/PUWH/ *In D16 models with an XL... -
Page 23: Miniusb Cable To Miniusb (Straight/Straight Or Straight/Angled)
No.: MX-CBL-MU-STR-05/2/5 (Straight/Straight) on the camera only Order No.: MX-CBL-MU-EN-STR-05/2/5 (Straight/Angled) With this cable, which is up to five meters long, MOBOTIX add-on modules (MX-232-IO-Box, ExtIO, CamIO) can be connected directly to the D16. 1.5.6 MiniUSB Cable to USB a Socket Order No.: MX-CBL-MU-STR-AB-05/2/5... -
Page 24: Mx-Overvoltage-Protection-Box
Weatherproof network connector (protection class IP65, –30 to 60 °C/–22 to 140 °F) with surge protec- tion of up to 4 kV for MOBOTIX IP cameras , ideal for replacing the MX-Patch-Box. At the same time, the MX-Overvoltage-Protection-Box provides a weatherproof connection of a camera’s patch cable to a network patch... -
Page 25: Mx-232-Io-Box
D-Sub 15-HD connector. The MX-232-IO-Box can be connected as an add-on module to all MOBOTIX cameras with an MxBus or USB interface. The maximum length of the MxBus cable (diameter: 0.8 mm) is 50 m. If the MiniUSB connection is used, the maximum cable length is 5 m. -
Page 26: Other Accessories
D16 Camera Manual: Product Overview 1.5.15 Other Accessories Since the range of accessories for the MOBOTIX system keeps growing, you will find the list of applicable accessories in the Camera Configurator on the MOBOTIX website www.mobotix.com. THE MOBOTIX INFORMATION CHANNELS Support on the MOBOTIX Website www.mobotix.com/en/support... -
Page 27: Mobotix Software
The MOBOTIX MxBell for iOS and Android devices (iOS 11/Android 5.0 and higher) is also available free of charge from the App Store/... -
Page 28: Mxmanagementcenter
MxManagementCenter is perfectly designed in combination with MOBOTIX cameras repre- senting the decentralized concept at its best. MxMC allows controlled recording access via the camera or later directly to the NAS. -
Page 29: Mobotix Mxbell
Never miss another visitor, thanks to push notifications! Use MOBOTIX MxBell on your smart- phone or tablet to receive notifications from the doorbell of a MOBOTIX IP Video Door Station and live views from MOBOTIX cameras. This app helps you open the door and enables hands- free talking, automatic camera search, a live view, camera connection via SSL and display of the connection status. -
Page 30: Installation
2.1.1 Mounting Indoor Cameras to a Ceiling or Wall (without Accessories) In order to mount the MOBOTIX D16 to a ceiling or wall, you need to drill the holes for the fixtures. Use the supplied drilling template (fold-out at the end of this manual) to mark the... -
Page 31: Outdoor Installation On A Wall, Pole Or Corner (With Accessories)
If you would like to mount the MOBOTIX D16 to the corner of a building or to a pole, you should consider using the MOBOTIX Corner And Pole Mount. This mount can only be used together with the Outdoor Wall Mount. -
Page 32: Network Connections Overview
Power-Rack (MX-NPA-Set, MX-NPR-4 and MX-NPR8/20) are suitable for use with the D16. Note The MOBOTIX D16 can also be powered by switches or routers that support the PoE (Power-over-Ethernet) standard and conform to IEEE 802.3af. Advantages of PoE power supply: •... -
Page 33: Uninterruptible Power Supplies (Ups)
UPS-protected power supply by injecting power into the Ethernet cables (max. 100 m). This kind of protected power supply can be used either with MOBOTIX PoE products (MX-NPA-PoE plus Universal Power Supply) or with PoE-compliant switches according to IEEE 802.3af. -
Page 34: Wiring, Fire Prevention, Lightning And Surge Protection
When installing the wiring inside or outside of buildings, make sure you always adhere to the relevant regulations on wiring, fire prevention, and protection against lightning. A range of measures are used to protect MOBOTIX cameras against the effects of small elec- trical surges. These measures, however, cannot prevent the camera from being damaged when stronger electrical surges occur. - Page 35 Network Connections Overview Lightning and Surge Protection More information on preventing lightning or surge damage is available from organizations such as the International Electrotechnical Commission (www.iec.ch) or from the manufac- turers of lightning and surge protectors.
-
Page 36: First Installation Steps
First Installation Steps 2.3.1 Mounting Sensor Modules The standard models in the MOBOTIX D16 series are supplied with a pre-installed dome. Sensor modules (lens mount, image sensor and lens) are usually delivered separately. Lens units are installed as described below if this is the case. - Page 37 First Installation Steps Use the supplied custom tool 1. Remove the outer shell : Remove the outer shell using the supplied custom tool. Insert the tip of the custom tool into the three small holes of the shell, one by one. Lift the outer shell to loosen it from the fixtures.
- Page 38 D16 Camera Manual: Installation 5. Connect the sensor cable to the lens mount : Connect the R and L sensor cables with the image sensors in accordance with the table. Example : In the case of a D16-DNight (color/black and white), the R sensor cable must always be connected to the lens mount marked with RGB, while the L sensor cable must always be con- nected to the lens mount marked SW.
- Page 39 First Installation Steps 9. Mount the dome : Pick up the dome using the supplied plastic foil or a cotton cloth and screw the transparent dome in a clockwise direction onto the housing until the dome sits securely (but not too tightly) in the seal. Make sure that the dome is not tilted and that it is securely fitted to the seal on all sides.
-
Page 40: Overview Of Cable Connections
2.3.2 Overview of Cable Connections The following cables can be used with the D16: MOBOTIX Ethernet cable : This MOBOTIX cable is pre-installed at delivery and is intended • for direct connection to a network outlet or PoE switch. If the D16 is to be installed outdoors, the MOBOTIX MX-Overvoltage-Protection-Box should be used (optional accessory). -
Page 41: Connecting The Ethernet Cable With The Mx-Overvoltage-Protection-Box
Products > System Components > Interface Boxes and Sensors section. 2.3.4 Connecting the MiniUSB Cable Existing additional modules like the MOBOTIX ExtIO (USB) can be connected via the MiniUSB Use the supplied custom tool connector. - Page 42 D16 Camera Manual: Installation 5. Insert USB cable : Insert the MOBOTIX USB cable from below through the cable outlet (see figure) and wrap it around the camera within the cable guides. 6. Plug in the USB connector : Insert the MiniUSB connec- tor in the appropriate socket.
-
Page 43: Connecting Mxbus Modules
First Installation Steps 10. Secure the cable : Properly lead the cable through the cable guides at the outer rim of the housing and make sure that the outer shell can be properly mounted later on. 11. Attach the outer shell : Hold the outer shell so that the round hole of the shell is positioned over the PIR sensor of the camera. -
Page 44: Replacing The Microsd Card
D16 Camera Manual: Installation 2.3.6 Replacing the MicroSD Card If the pre-installed MicroSD card is to be replaced (for example, by a 64 GB MicroSD card), it is best to do so before the camera is installed. The cards should only be replaced when the Use the supplied custom tool camera is disconnected from the power supply. - Page 45 First Installation Steps 5. Insert the MicroSD card : Push the MicroSD card as shown (electrical contacts pointing toward the dome) into the card slot using a tweezers. Make sure that you hear a click when the card is inserted. The card is now locked and can be used.
-
Page 46: Mounting The Camera With Outdoor Wall Mount
The PIR sensor has a range of approximately 10 m and a detection angle of approximately ±15 degrees. The positions that are available depend on how high the MOBOTIX D16 has been mounted and the alignment of the camera on the bottom plate, which can be completed in 15° incre- ments. -
Page 47: Mounting The Outdoor Wall Mount
Ideally, the Outdoor Wall Mount is mounted over the tested wall outlet that provides the connections (network, Power-over-Ethernet) to the camera. In-wall socket MX-Overvoltage-Protection-Box or wall outlet MOBOTIX Ethernet patch cable (1 m) D16 Outdoor Wall Mount Mounting the Outdoor Wall Mount over the... - Page 48 3. The rectangular opening on the rear of the wall mount is intended to cover the installed in-wall socket or a MOBOTIX interface box.
-
Page 49: Aiming The Camera
Mounting the Camera with Outdoor Wall Mount 2.4.3 Aiming the Camera The camera can be installed once the Outdoor Wall Mount has been mounted to the wall or pole. The bottom plate closes off the outdoor wall mount from below and also holds the camera. The upper side of the bottom plate has 24 holes for the M4 stainless steel hex nuts. -
Page 50: Connecting The Camera With Bottom Plate
D16 Camera Manual: Installation 2.4.4 Connecting the Camera with Bottom Plate To mount the camera to the bottom plate, use three of the supplied M4x25 mm Allen screws, three washers (diam. 4.3 mm) and the corresponding hex nuts. Caution When fastening the Allen screws using the 3 mm Allen wrench, make sure that you do not scratch the camera dome! 1. -
Page 51: Connecting And Securing The Camera
Mounting the Camera with Outdoor Wall Mount Mounting the camera on the bottom plate 5. Make sure that you have properly fastened the three M4x25 Allen screws. 2.4.5 Connecting And Securing The Camera 1. Plug the camera connection cables into the appropriate wall outlets or adapters. 2. -
Page 52: Mounting The Corner And Pole Mount
Mounting the Corner and Pole Mount 2.5.1 Overview If you want to mount the MOBOTIX D16 to the corner of a building or to a pole, you should consider using the MOBOTIX Corner and Pole Mount. This mount is designed as an additional mounting option for the Outdoor Wall Mount. -
Page 53: Mounting To The Corner Of A Building
Mounting the Corner and Pole Mount 2.5.2 Mounting to the Corner of a Building Use the supplied screw anchors, screws and washers to affix the Corner and Pole Mount to a building corner. 1. Mark the four screw anchor holes on the corner of the building. -
Page 54: Mounting To A Pole
D16 Camera Manual: Installation 2.5.3 Mounting to a Pole Use the stainless steel straps supplied to affix the Corner and Pole Mount to a pole. 1. Guide the stainless steel straps through the holes in the pole mount (see figure). Make sure that you are using the slots of the mount that best fit for the thickness of the pole. -
Page 55: Mounting The Outdoor Wall Mount
Mounting the Corner and Pole Mount 2.5.4 Mounting the Outdoor Wall Mount Use the stainless steel screws, washers and hex nuts supplied with the Corner and Pole Mount to affix the Outdoor Wall Mount to the installed Corner and Pole Mount. 1. -
Page 56: Adjusting The Lens
Mount the dome again using a soft cotton cloth. Notes The focusing aid provides a visual aid when setting the image sharpness of a MOBOTIX camera lens (see the The Focusing Aid Of The Camera section on the The Live View Of The MOBOTIX Camera page in the camera online help). -
Page 57: Network And Power Connection
2.7.1 Notes on Cable Lengths and Power Supply • Power may only be supplied to the camera via its Ethernet connector. We recommend using a MOBOTIX PoE adapter or other similar high-quality PoE product to loop-in the power supply: – One camera: with the PoE adapter (MX-NPA-PoE) –... -
Page 58: Power Supply Using A Switch
PoE adapter For the D16 you should use (MX-NPA-PoE) the blue MX-NPA-PoE-Set or Switch/router Power supply the MX-NPA-Box – previous MOBOTIX network power accessories, such as the NPA-Set, Power-Box and Power-Rack (MX-NPA-Set, Camera MX-NPR-4 and MX-NPR8/20) are not suitable for RJ45 use with the D16. -
Page 59: Power Supply When Connected Directly To A Computer
Network and Power Connection 2.7.4 Power Supply When Connected Directly to a Computer The IP addresses in 1. Connect the factory pre-installed cable of the camera to the camera connector of the diagram are shown the PoE adapter. only as an example 2. -
Page 60: Variable Poe
D16 Camera Manual: Installation 2.7.5 Variable PoE The power consumption of the camera depends on the functions in use as well as any periph- eral devices connected (see table). PoE classes 1, 2 or 3 may be selected in the browser-based user interface in order to optimally adjust the camera to your system design (PoE switch in use, emergency power concept, etc.). - Page 61 Notes...
-
Page 62: Operating The Camera
D16 Camera Manual: Operating the Camera OPERATING THE CAMERA Manual and Automatic Operation – Overview MOBOTIX cameras do not require any extra software. Thus, you can set up and operate the Download the free-of-charge MxManagementCenter soft- MOBOTIX camera using a JavaScript-enabled browser on all common operating systems ware at www.mobotix.com... - Page 63 Manual and Automatic Operation – Overview • Network with fixed IP addresses In order to access the camera, it must have an IP address within the range of the local network. To set the camera’s network parameters, you can use one of these methods: –...
-
Page 64: First Images And The Most Important Settings
D16 Camera Manual: Operating the Camera First Images and the Most Important Settings Once the MOBOTIX camera has been connected to the network, you need to set up the cam- era’s network interface accordingly. This step involves setting up and checking the network parameters of the camera. - Page 65 First Images and the Most Important Settings Windows 8.1: 1. Open Start > Settings > Control Panel > Network Connections. Clicking on Properties opens the dialog box shown. 2. Double-click on Internet Protocol (TCP/IP). On the General tab, ac tivate the Use the following IP address option.
- Page 66 2. Set up the target network parameters of the MOBOTIX camera: 1. Open a web browser on the computer and enter the default IP address of the MOBOTIX camera in the address bar of the browser (for example, 10.8.0.99). Clicking Enter displays the user interface of the MOBOTIX camera (see also Section 3.2.2, «First Images...
-
Page 67: First Images And The Most Important Settings In The Browser
3.2.2 First Images and the Most Important Settings in the Browser Once the MOBOTIX camera has been connected to the power supply and to the network, you can access the user interface with the live camera image in the web browser. Internet Explorer, Firefox, Safari or any other graphical browser with activated JavaScript is suitable. - Page 68 D16 Camera Manual: Operating the Camera Camera Views: Live, Player, MultiView The MOBOTIX camera automatically displays the live screen when it starts up (factory default set- ting). You can set a different start page in Admin Live view: http://<camera IP>/ Menu >...
-
Page 69: First Images And Network Parameter Configuration In Mxmc
MOBOTIX cameras. The number of found cameras is shown next to the Add button. This number is updated automatically if the number of MOBOTIX cameras on the network has changed (i.e., by connecting new/disconnecting existing cam- eras).. - Page 70 Reconfiguring Network Addresses of Cameras Using Bonjour*, MxManagementCenter finds not only cameras on the same network as your computer, but also MOBOTIX cameras located in other subnets (status: ). In such a case, you would not be able to establish any connection to cameras in a different network or subnet.
- Page 71 . Move to the next page and click on Finish. For more information, see the MxManagementCenter Tutorial, which can be downloaded as a PDF file from the MOBOTIX website: www.mobotix.com > Support > Download Center > Documentation > Brochures & Guides > Tutorials.
-
Page 72: Start Options Of The Camera
D16 Camera Manual: Operating the Camera 3.2.4 Start Options of the Camera By default, the camera starts as DHCP client and automatically tries to get an IP address from a DHCP server. To start the camera in a mode different from the default mode, you can activate the boot menu of the camera. - Page 73 First Images and the Most Important Settings Starting the Camera with Factory Default (Network) Settings If you use the camera’s start option 2 to load the factory configuration, this configura- tion is not automatically saved in the camera’s flash memory. When the camera is next rebooted without using start option 2, the last stored configuration will be used.
-
Page 74: Virtual Ptz And Full Image Recording
D16 Camera Manual: Operating the Camera Virtual PTZ and Full Image Recording 3.3.1 Preparing the Virtual PTZ Function The virtual PTZ function allows you to use a mouse or joystick to continuously zoom in on images from the selected video source and “virtually” move the enlarged image section within the entire image sensor area. - Page 75 MxManagementCenter Tutorial on www.mobotix.com, Support > Download Center > Documentation > Brochures & Guides > Tutorials. The latest versions of all the manuals are available for download from the MOBOTIX website www.mobotix.com under Support > Download Center > Documentation >...
-
Page 76: Full Image Recording
D16 Camera Manual: Operating the Camera 3.3.2 Full Image Recording It is possible to record a full image, regardless of the live image stream that is being displayed. This ensures that the recording always contains the full image of the lens used, even though the operator may have used the vPTZ features to zoom into the image in order to examine a specific detail. - Page 77 Virtual PTZ and Full Image Recording Activate/Deactivate Full Image Recording in the Browser To configure this feature, open the Setup Menu > Event Control > Recording dialog box and activate or deactivate the Full Image Recording option.
-
Page 78: Image Optimization
D16 Camera Manual: Operating the Camera Image Optimization 3.4.1 Correction of Lens Distortion (B036 and B041 Only) If you are using a camera with either the B036 or B041 wide-angle lenses, the image, par- ticularly around the edges, may be slightly distorted due to the extreme angle of view of the lenses. - Page 79 Image Optimization Since activated lens distortion correction requires additional processing power, you should consider disabling it in situations where it is not really necessary. You will only notice a minimal distortion of the image, especially if you use the zoom. However, the maximum frame rate for high resolution may be reduced (by 10 to 25 percent), which means you have to choose between maximum distortion correction or maximum frame rate.
-
Page 80: Adjusting The Panorama Image (D16-Panorama/180° Only)
D16 Camera Manual: Operating the Camera 3.4.2 Adjusting the Panorama Image (D16-Panorama/180° Only) The D16-Panorama/180° with integrated panorama feature has two wide-angle lenses B036* (103°) that are mounted on a sensor bridge in such a way that they produce a panorama image. - Page 81 Image Optimization Using the OnScreen Control: Image sensor selection Horizontal image panning Clicking the central point Vertical image panning of the dial resets the image to the corresponding Zoom factory default settings Rotate Select image sensor: The two rectangular checkboxes in the top right corner display which sensor image is currently selected and can be configured.
- Page 82 D16 Camera Manual: Operating the Camera Step 3: Save the settings and exit the function When you have finished adjusting the image, set the value field to the right of the Configuration Of Panorama View Quick Control to deactivated. This opens a dialog box. Confirm by clicking Yes to save the current settings and then switch back to the live image of the camera.
-
Page 83: Dual Image Exposure
Image Optimization 3.4.3 Dual Image Exposure In general, the exposure settings for the D16 are determined automatically or manually. In any case, exposure is set separately for each image sensor using customizable exposure windows. You can either select a pre-defined set of exposure windows (using the Exposure Control quick control) or define a custom exposure window (in Setup Menu >... -
Page 84: Microsd Card Recording
Admin Menu > Camera Status dialog box. Conservative Memory Usage Thanks to MOBOTIX MxFFS File System MxFFS formatting of the MicroSD card means that MOBOTIX camera software will use the flash device as evenly as possible, thus allowing for the maximum possible number of write/delete cycles. - Page 85 Monitoring The Cell Wear Of Flash Storage Devices MOBOTIX uses its own technology for this purpose and has a pending patent. You can view the flash wear in the status bar of the live image or by open- ing Admin Menu >...
-
Page 86: Formatting The Microsd Card
/ Flash Device Storage on External File Server / Flash Device): 1. Make sure that there is a MicroSD card in the card slot of the MOBOTIX camera. 2. Click Format in the SD Memory Card line. 3. Note down the characters shown in the Encryption password field or enter your own password. -
Page 87: Activating Recording
Storage on External File Server / Flash Device 1. Make sure that there is a MicroSD card in the card slot of the MOBOTIX camera. 2. Make sure that the MicroSD card is formatted in MxFFS format. 3. Activate the SD Flash Card option. -
Page 88: Accessing Data On The Microsd Card
In MxManagementCenter: Play back the recorded video sequences with audio by accessing the MicroSD card in the MOBOTIX camera via the camera or with a direct access to the MicroSD card via a card reader connected to the computer (coming soon). -
Page 89: Using A Microsd Card In A Different Mobotix Camera
MicroSD Card Recording 3.5.6 Using a MicroSD Card in a Different MOBOTIX Camera A MicroSD card containing recorded video data from a MOBOTIX camera can be inserted into any MicroSD card-enabled MOBOTIX camera. Once a MicroSD card recording has been activated (requires a reboot), the ”new” MOBOTIX camera automatically synchronizes with the card and resumes recording. -
Page 90: Configuration Of The D16 In The Browser
HTTP commands using programs and scripts of the embedded software. The settings are stored in the camera’s flash memory. This section contains an overview of the basic browser settings of the MOBOTIX camera as well as further configuration options. Detailed information on the software functions is pro-... - Page 91 MOBOTIX camera. The camera can use either NTP time servers or Time Protocol servers. For more information on this topic, refer to the online help for the specific dialog boxes.
-
Page 92: General Browser Settings
(Image Programs Quick Control). • Set the resolution of the live image: By default, all MOBOTIX cameras are factory-set to an image resolution of 640 x 480 pixels. You can select the desired resolution using the Resolution Quick Control. - Page 93 (for all IT and Secure models). If, for example, the camera’s housing receives a blow, it automatically registers it and sends a notification via a network message or telephone call. A general advantage is that MOBOTIX cameras are extremely tough because of the absence of mechanical moving parts. This allows them to stay fully operational when they are subject to strong vibrations.
-
Page 94: Additional Notes
D16 Camera Manual: Operating the Camera Additional Notes 3.7.1 Password for the Admin Menu Accessing the Admin Menu of the camera (Admin Menu softbutton) is only possible after entering a user name and password. Factory default user name is admin . •... -
Page 95: Activating Event Control And Motion Detection
Text and logos can be also deactivated or indi- and the MOBOTIX logo at the top of the image. Once the camera arming has been activated, vidually configured the text at the bottom of the live image (event, action, messaging and recording symbols) will also appear. -
Page 96: Cleaning The Camera And Lens
& Declarations of Conformity. 3.7.11 RoHS Declaration The products of MOBOTIX AG are in full compliance with Art. 5 of the German Electrical and Electronic Equipment Act and the E.U. Directive 2011/65/EU on the Restriction of the Use of Certain Hazardous Substances in Electrical and Electronic Equipment (RoHS) as far as they are subject to these regulations. -
Page 97: Disposal
Electrical and electronic products contain many reusable materials. For this reason, we would ask that you dispose of MOBOTIX products at the end of their service life in accordance with all legal requirements and regulations (or deposit these products at a municipal col- lection center). - Page 98 D16 Camera Manual Notes...
- Page 99 VAT ID: DE202203501 You can fi nd the latest version of this and other documents (e.g., declarations of confor- mity) at www.mobotix.com in the Support > Download Center > Documentation > Manuals section. Technical specifi cations subject to change without notice!
- Page 100 Camera Manual D16 DualDome...
Need help?
Do you have a question about the D16 DualDome and is the answer not in the manual?
Questions and answers