Advertisement
Quick Install
Allround Outdoor Camera for Ceiling, Wall and Pole Mounting
with Outdoor Wall Mount
with On-Wall Set
with Cavity Wall Installation Set
• Includes MxAnalytics video analysis tools out-of-the-box
• Recording on internal microSD card (SDXC, SDHC installed)
• Signal inputs/outputs via optional MxBus modules
• Audio (microphone and speaker) using optional accessory (ExtIO)
• Sensors for temperature and shock detection integrated
• Simply mounted to poles using Pole Mount (accessory)
1.18
1.17
1.16
1.15
1.14
1.13
1.12
1.11
1.10
You can find detailed information on the installation and connections of the D25 in the D25 Camera Manual (PDF, available on
www.mobotix.com > Support > Manuals).
Regarding the initial operation of the D25, please see the D25 Camera Manual in Chapter 3, «Initial Operation» .
Outer shell
Installation on Walls or Ceilings Without Accessories
After drilling the holes for fixtures (see «Drilling Templates» ), attach the mounting
ring of the D25 at the designated position using dowels and screws. Next,
connect the cabling, point the camera into the viewing direction and adjust
the focus of the lens (see «Initial Operation of the D25» ). Finally, install the
dome and the outer shell.
Installation With On-Wall Set/On-Wall Set 10° (Accessory)
After drilling the holes for fixtures (see «Drilling Templates» ), attach the On-Wall Set
at the designated position using dowels and screws, then lead the cabling
into the On-Wall Set. Next, remove the mounting ring of the D25, connect the
cabling and install the camera on the On-Wall Set. Finally, install the dome
and the outer shell.
Installation With Cavity Wall Installation Set (Accessory)
After cutting out the hole (see «Drilling Templates» ), remove the mounting ring of
the D25 and install the camera in the Cavity Wall Installation Set. Next, connect
the cabling and install the camera together with the Cavity Wall Installation Set
into the cut-out and fasten it using the winged cams. Finally, press the deco-
ration ring onto the camera and lock it in place using the toothed wrenches.
Installation With Outdoor Wall Mount (Accessory)
Remove the cover plate of the Outdoor Wall Mount. After drilling the holes
for fixtures (see «Drilling Templates» ), attach the Outdoor Wall Mount at the
designated position using dowels and screws, then lead the cabling into the
mount. Next, remove the mounting ring of the D25, connect the cabling and
click the camera into the clamps of the cover plate of the Outdoor Wall Mount.
Then attach the cover plate with the camera to the Outdoor Wall Mount. Finally,
install the dome and the outer shell.
Installation With Pole Mount and Outdoor Wall Mount
(Accessory)
Lead the cabling from the rear through the Pole Mount and attach to a pole
(using steel straps). Then attach the Outdoor Wall Mount to the Pole Mount.
The remaining installation of the D25 follows the steps under «Installation With
Outdoor Wall Mount (Accessory)» above.
Installation of the Vandalism Kit (Accessory)
Screw in the reinforced dome and set the four spacers onto the mounting
ring of the camera. Place the stainless steel outer shell onto the camera and
tighten it using the four security screws.
All camera models can use the integrated microSD card (SDXC) to record video data. In order to exchange the microSD card, please proceed as outlined in the
following instruction. For information on reliable SD cards, please see the MOBOTIX website www.mobotix.com > Support > MX Media Library > Planning
in the document MicroSD Card Whitelist for MOBOTIX Cameras .
When replacing the SD card, make sure that recording has been deactivated in the browser ( Admin Menu > Storage > Storage on External File Server / Flash
Device ; activate recording again in the same dialog after exchanging the card).
1. Remove the SD Card
If a microSD card has been installed, gently
press with your finger as indicated by the
arrow until you hear a click . Then release the
SD card. The card is protruding slightly and
can be easily removed.
Innovations - Made in Germany
The German company MOBOTIX AG is known as the leading pioneer in network camera technology and its decentralized concept has made high-resolution
video systems cost-efficient.
MOBOTIX AG • D-67722 Langmeil • Phone: +49 6302 9816-103 • Fax: +49 6302 9816-190 • sales@mobotix.com
with On-Wall Set 10°
with Vandalism Kit
Standard Delivery D25
1.1
1.2
1.9
Connections and Initial Operation of the D25
Mounting
ring
Dome
Mounting Options of the D25
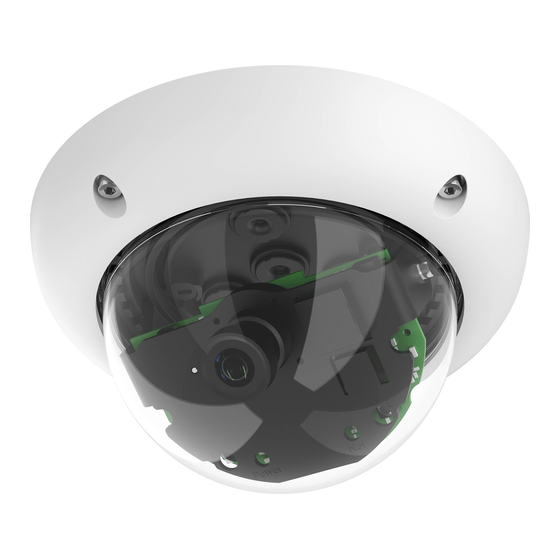
Remove the outer shell and the dome of the D25.
Inserting/Exchanging the SD Card
MOBOTIX 6MP camera for flexible use in indoor and outdoor applications,
available as complete Dome D25 (Day or Night) with lenses MX-B036 to MX-
B237. Can be extended flexibly using various sets for outdoor applications,
on-wall or flush-mount installations. Use the Vandalism Kit for surveillance at
extremely critical locations.
www.mobotix.com > Products > D25
Item
Count
1.1
1
1.2
1
1.3
1.3
1
1.4
1
1.5
1
1.6
1
1.4
1.7
1
1.8
1
1.9
1
1.10
1
1.11
4
1.5
1.12
4
1.6
1.13
4
1.7
1.14
4
1.15
4
1.8
1.16
1
1.17
2
1.18
1
Lens
LEDs
"R" key
"L" key
2. Insert the SD Card
Insert the microSD card and gently press with
your finger as indicated by the arrow until you
hear another click .
Make sure that the SD card is fully inserted.
Dome D25
Security-Vision-Systems
Part Name
Camera housing
Lens (installed)
Dome, transparent
microSD card (SDXC, SDHC pre-installed)
Ethernet cable CAT5 0.5 m/20" (pre-installed)
Allen wrench 3 mm
Torx wrench TX20
Toothed wrench
Outer shell
Mounting ring
Stainless steel washers 5.3 mm dia.
Dowels 8 mm
Stainless steel Torx screws 4.5x60 mm
Stainless steel washers 4.3 mm dia.
Stainless steel Allen screws M4x16 mm
Single-wire plug, black (MxBus)
Single-wire connector
MxBus plug with two-wire connection line
Network connection
Slot for microSD card
100 mm
4x
USB
MxBus
Dia. 5.5 mm
Advertisement
Table of Contents

Related Manuals for Mobotix D25


Summary of Contents for Mobotix D25
- Page 1 1.10 Connections and Initial Operation of the D25 You can find detailed information on the installation and connections of the D25 in the D25 Camera Manual (PDF, available on www.mobotix.com > Support > Manuals). Regarding the initial operation of the D25, please see the D25 Camera Manual in Chapter 3, «Initial Operation» .
- Page 2 The initial operation starts with connecting the power supply (see section «Network and Power Connection, Additional Cables» in the D25 Camera Manual ). The first access follows the procedure described in the same manual in the «Initial Operation of the Camera» section. All other tasks require access to the camera's user interface in the browser. Enter the camera’s IP address into the address bar of the browser.
Need help?
Do you have a question about the D25 and is the answer not in the manual?
Questions and answers