Table of Contents
Advertisement
Quick Links
Variants
D16
With Outdoor Wall Mount
With Corner and Pole Mount
• Mx6 system platform, H.264 support
• Recording on internal MicroSD card (SDXC, SDHC installed)
• Audio integrated (microphone and speaker)
• Sensor for temperature and shock detector(*) integrated
• PIR detector integrated
• Can be extended flexibly using sets for outdoor applications
• Easy installation at building corners and poles using the
Corner and Pole Mount (accessory)
• Use the Vandalism Set for surveillance at extremely critical locations
• Weatherproof and robust camera housing (IP54, IK10)
*:
with firmware version 5.0.1 and higher
2 image sensors on
(individually adjust-
Pano lens bridge
Standard Delivery D16
1.15
1.14
1.13
1.12
1.11
1.10
1.9
1.8
1.7
1.6
Connections and Initial Operation of the D16
You can find detailed information on the installation and connections of the D16 in the D15 Camera Manual (PDF, available on www.mobotix.com >
Support > Manuals).
Please note that the boot options of this camera have changed compared to its predecessor (see «Boot Options of the D16» on page 2 ). Regarding
the rest of the initial operation of the D16, please see the D15 Camera Manual in Chapter 3, «Initial Operation» .
Outer shell
LEDs/PIR
Lenses
* To suppress electromagnetic interferences, attach the enclosed hinged ferrite (item 1.7) directly behind the RJ45 connector of the camera's network
patch cable, see illustration.
Preparing the D16 for Installation
To facilitate the installation of the camera, you should complete the following tasks before actually installing the camera.
Preparatory Steps
Make sure that the condensed water outlets are pointing downwards when
1
planning the installation
.
Remove the outer shell by pressing the magnetic custom tool into the three
holes of the outer shell one by one
to loosen the shell from its seats.
3
Next, unscrew the dome
.
Insert the Individual Lens Units (1.2a)
Remove the center lock screw and the washer
Insert the lens units into the seatings
Insert the center lock screw and the washer and lightly tighten the screw
to keep the lens units 1.2a in place
so you can adjust the lens units later on.
Insert the Lens Bridge (1.2b/c)
Remove the center lock screw and the washer
Disassemble the lens bridge by removing the two Allen screws with washers
2
(Pano lens bridge 1.2b shown, similar for Fix lens bridge 1.2c ).
Insert the two brackets for the lens bridge into the seatings of the camera
3
housing
.
Insert the center lock screw and the washer and lightly tighten the screw
to keep the brackets in place
Insert the lens bridge between the brackets
with the washers and lightly tighten the screws
the two screws so you can adjust the lens bridge later on.
Connect the Sensor Cables
Remove the protective covers of the image sensor connectors
Connect the camera's sensor cables according to the color codes
doing so, avoid twisting the sensor cables as much as possible.
Press the cable into the groove of the board
are not bent sharply at the plug, but that they are running in an arc.
Press the protective covers onto the connectors until they click into place
Insert the Lenses (Lens Bridges Only)
Remove the protective covers of the lens mounts and screw in the lenses.
Lens focus will be adjusted after installing the camera and bringing it into
service (see «Initial Operation of the D16» ).
Mounting Options of the D16
Installation on Walls or Ceilings Without Accessories
After drilling the holes for fixtures (see «Drilling Template for Installation
Without Accessories» ), attach the housing of the D16 at the designated
position using dowels and screws, then connect the cabling. Once the
power supply has been established, you will adjust the lens units or bridges
(whichever applies) and the lenses' focus (see «Initial Operation of the D16» ).
Finally, you will install the dome and the outer shell.
Installation With Outdoor Wall Mount (Accessory)
Remove the cover plate of the Outdoor Wall Mount. After drilling the holes
for fixtures (see «Drilling Template for Installation Without Accessories» ),
attach the Outdoor Wall Mount at the designated position using dowels
and screws, then lead the cabling into the mount. Next, connect the cabling
and install the camera on the cover plate of the Outdoor Wall Mount using
the supplied screws. Then attach the cover plate with the camera to the
Outdoor Wall Mount.
For more information, please see the D15 Camera Manual , Section 2.4,
«Mounting the Camera with Outdoor Wall Mount» .
Installation With Corner and Pole Mount and Outdoor Wall Mount
(Accessory)
Lead the cabling from the rear through the Corner and Pole Mount and
attach it at the corner of a building or a pole (using steel straps). Then
attach the Outdoor Wall Mount to the Corner and Pole Mount.
The remaining installation of the D16 follows the steps under «Installation
With Outdoor Wall Mount (Accessory)» above.
Installation of the Vandalism Set (Accessory)
Remove the outer shell and the dome (see «Preparing the D16 for Instal-
lation» ). Screw in the reinforced dome and hold the stainless steel ring
of the Vandalism Set in position to mark the holes for drilling (the bulge
in the steel ring covers the LED/PIR dome – see red circle in figure on the
right). Drill the holes for the mounting screws (or the dowels, whichever
applies), then apply the stainless steel ring and fasten it using the supplied
security screws.
Inserting/Exchanging the SD Card
All camera models can use the integrated MicroSD card (SDHC) to record video data. In order to exchange the MicroSD card, please proceed as outlined
in the following instruction. For information on reliable SD cards, please see the MOBOTIX website www.mobotix.com > Support > MxMedia Library >
Planning in the document MicroSD Card Whitelist for MOBOTIX Cameras .
When replacing the SD card, make sure that recording has been deactivated in the browser (Admin Menu > Storage > Storage on External File Server /
Flash Device; activate recording again in the same dialog after exchanging the card).
1. Remove the SD Card
Remove the outer shell and the cable cover of
the camera. If a MicroSD card has been installed,
gently press with your finger as indicated by
the arrow until you hear a click . Then release
the SD card. The card is protruding slightly and
can be easily removed.
With Vandalism Set
and Outdoor Wall Mount
Lens units
able)
2 image sensors on
Fix lens bridge
1.1
1.2a
1.5
Camera
housing
Dome
2
. Gently lift the shell near each hole
1
.
2
.
3
. Do not overtighten the lock screw
1
.
4
.
5
, insert the two Allen screws
6
. Do not overtighten
3
. Take care that the wires
Quick Install
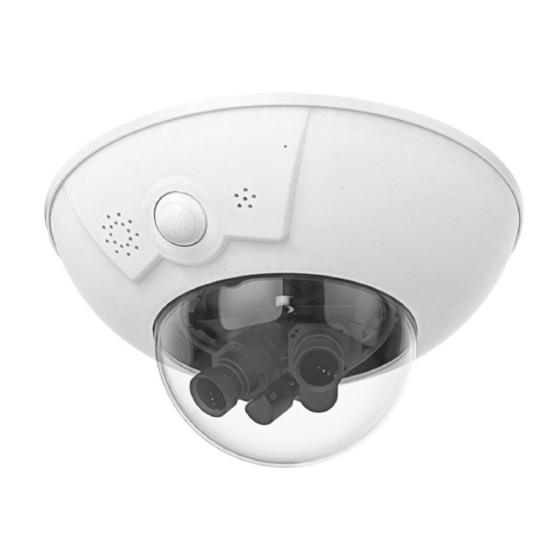
D16 DualDome
Universal 6MP Dome Camera With
Two Lenses for Ceiling, Wall and Pole
Mounting
MOBOTIX 6MP camera for flexible use in indoor and
outdoor applications, available as complete D16
DualDome (Day or Night) with lenses 6D/N/L036 to 237 and
with different lens bridge options.
More information:
www.mobotix.com > Products > Outdoor Cameras > D16
Mx-D16
32.803-005_EN_10/2017
Item
Count
1.1
1.2a
1.2b
1.2b
1.2c
1.3
1.2c
1.4
1.5
1.6
1.7
1.8
1.3
1.9
1.10
1.11
1.4
1.12
1.13
1.14
1.15
Connectors
(magnetic,
inside housing)
Dome thread
1
1
6
1
.
2
. While
4
.
2. Insert the SD Card
Insert the MicroSD card and gently press with
your finger as indicated by the arrow until you
hear another click . Make sure that the SD card
is fully inserted. Re-attach the cable cover and
the outer shell of the camera.
Part Name
1
Camera housing
Lens units with lenses (freely adjustable, to be ordered
1
separately )
Pano lens bridge (for 180° Panorama, to be ordered
1
separately , pre-installed)
Fix lens bridge (for one day and one night lens, to be
1
ordered separately , pre-installed)
1
Standard dome for D16 Body
Enlarged XL dome for D16 complete cameras (Pano and
1
Fix) and part of the delivery of the Pano/Fix lens bridges
1
Cable cover
1
Ethernet cable
1
Hinged ferrite
1
MicroSD card (SDXC, SDHC pre-installed)
1
Custom tool with magnet
1
Outer shell
3
Stainless steel washers 5.3 mm dia.
3
Dowels 8 mm
Stainless steel wood screws 4.5x60 mm with Torx head
3
TX20
1
Torx wrench TX20
1
Allen wrench 3 mm
L key
Slot for MicroSD card
1
1.2b
5
1
3
2
1.2b
Network
USB
connector (*)
2
3
3
2
1.2a
1.2b
2
4
3
4 4
1.2c
Advertisement
Table of Contents

Related Manuals for Mobotix D16


Summary of Contents for Mobotix D16
- Page 1 Support > Manuals). Please note that the boot options of this camera have changed compared to its predecessor (see «Boot Options of the D16» on page 2 ). Regarding the rest of the initial operation of the D16, please see the D15 Camera Manual in Chapter 3, «Initial Operation» .
-
Page 2: Important Notes
Vandalism Set without accessories Outdoor Wall Mount Manuals and drilling templates: www.mobotix.com > Support > Manuals > IP Camera Systems > DualDome D16 MOBOTIX AG Kaiserstrasse D-67722 Langmeil MOBOTIX, the MX logo, MxControlCenter, MxEasy, MxPEG and MxActivitySensor are trademarks of Tel.: +49 6302 9816-103...
Need help?
Do you have a question about the D16 and is the answer not in the manual?
Questions and answers