Table of Contents
Advertisement
Quick Links
Advertisement
Chapters
Table of Contents

Related Manuals for NTT docomo Foma D900i


Summary of Contents for NTT docomo Foma D900i
- Page 1 =IE? Manual ’04.5...
-
Page 2: Before Using Your Foma Terminal
• Your FOMA D900i is a valuable asset. Handle it with care and it will be your trusted partner for years to come. -
Page 3: Copyrights And Trademarks
Company names and trade names used in this manual are the trademarks or registered trademarks of their • respective companies. The FOMA D900i incorporates NetFront v3.0 for FOMA to support its internet connection and browsing • functions. NetFront v3.0 is a product of ACCESS Co., Ltd. (Copyright © 1996-2004 ACCESS Co., Ltd.) NetFront and are trademarks and registered trademarks of ACCESS Co., Ltd. -
Page 4: Structure Of The Manual
Structure of the Manual The manual for FOMA D900i consists of 2 books: “Basic” manual and “Application” manual. “Basic” (this manual) • Basic descriptions such as the FOMA terminal components, functions and charging the battery. • Basic operating procedure such as making/receiving a call or videophone call and entering characters. -
Page 5: How To Use This Manual
How to Use This Manual ■ Organization of operation descriptions Default setting or Function name [Default] 解除 Turned off Manner Mode setting when Turning All Phone Sounds Off acquiring In order not to disturb people around you in places where silence is required, you can applications set the FOMA terminal to turn off all sound. -
Page 6: Table Of Contents
Structure of the Manual ......................2 How to Use This Manual ......................3 Contents ..........................4 Features of the FOMA D900i ....................8 SAFETY PRECAUTIONS –Always follow these directions– ..........10 Notes for Overall Handling ....................20 Included Item Instructions ....................22 Introduction ・FOMA D900i Components and Functions .................. - Page 7 C o n t e n t s Using Phonebook ・Phonebooks Usable for the FOMA Terminals ................92 ・Saving Entries in the FOMA Built-in Phonebook ..........[Phonebook Entry] 94 ・Saving Entries in the FOMA Card Phonebook ....[Save FOMA Card Phonebook Entry] 99 ・Changing a Group Name ...................
- Page 8 Customizing Display and Key Settings ・Customizing the Standby Screen ..............[Set Standby Screen] 144 ・Displaying the Image Set for Phonebook during an Incoming Call ...... [Set Photo Call] 148 ・Setting the Inspiration Window ..............[Set Inspiration Window] 149 ・Setting the Start Screen Displayed When You Turned Power On ....[Wake-up Display] 152 ・Setting a Visual Partner ....................
- Page 9 C o n t e n t s Network Services DoCoMo’s Network Services ・Network Services That Can Be Used from a FOMA Terminal ............202 ・Using Voice Mail Service ................[Voice Mail Service] 203 ・Using Call Forwarding Service ............... [Call Forwarding Service] 208 ・Using Call Waiting Service ................
-
Page 10: Features Of The Foma D900I
Features of the FOMA D900i The FOMA is the name of a DoCoMo service based on the W-CDMA system approved as a world standard for third generation mobile systems (IMT-2000). A good data communication environment (384 kbps) i-mode support You can enjoy packet communication at the... - Page 11 High-quality melody playback Smooth text entry • You can download melodies from sites and • The FOMA terminal incorporates the ATOK use them as ringtones (i-melody supported) input method system for efficient (see “Application” p.44). conversion of Kanji characters. The •...
-
Page 12: Safety Precautions -Always Follow These Directions
SAFETY PRECAUTIONS –Always follow these directions– • Read the following SAFETY PRECAUTIONS to ensure that the terminal is used correctly. Also, store this manual in a convenient location for future reference. • It is essential that these precautions be observed to prevent injury to the user and third parties as well as damage to property. -
Page 13: Handing The Foma Terminal, Battery And Adapter (And Charger) (General Information)
Desktop holder: D02 Rear cover: D02 Flat AV power cable:P01 For additional details about compatible products, check with your nearest NTT DoCoMo service center. WARNING Do not use in environments exposed to combustible or explosive materials. • Using the equipment in locations exposed to flammable gases or liquids such as propane or gasoline could cause a fire or explosion. -
Page 14: Handling The Foma Terminal
SAFETY PRECAUTIONS –Always follow these directions– (continued) CAUTION Do not use or leave the components in locations exposed to direct sunlight or other hot locations such as a car exposed to the hot sun. • Doing so could cause the battery to leak, overheat, rupture or catch fire, or could damage or deform the equipment. - Page 15 WARNING Do not use the FOMA terminal while driving. • Use of the FOMA terminal in vehicles could cause unsafe driving conditions. Park the car in a safe place and then use the terminal. If you have done prohibition acts such as using the FOMA terminal while driving, you may be punished as stipulated by law.
-
Page 16: Handling The Battery
SAFETY PRECAUTIONS –Always follow these directions– (continued) CAUTION Do not bring magnetic cards, etc. near the FOMA terminal or leave between the two halves of the FOMA terminal and then attempt to fold it closed. • Magnetic data stored on bank cards, credit cards, telephone cards, and floppy disks may be corrupted or lost. - Page 17 DANGER Do not expose the battery to water. • The battery could overheat, cause electric shock or be damaged if exposed to water, pet urine or other liquids. Do not use the battery in locations where it could be exposed to liquids. Do not disassemble or alter.
-
Page 18: Handling The Adapter (And Charger)
SAFETY PRECAUTIONS –Always follow these directions– (continued) Handling the adapter (and charger) WARNING Use care to not short circuit the recharging terminal when the adapter is connected to a wall outlet or cigarette lighter socket. Do not touch the recharger terminal with your hands or fingers, or some other part of the body. •... - Page 19 WARNING The DC adapter is for use with negative ground cars. Never use them with positive ground cars. • Doing so could cause the equipment to catch fire. Be sure the power plug is free of dust. • Failure to do so could cause the equipment to catch fire. During charging, place the adapter (and charger) and desktop holder in a stable location.
-
Page 20: Using The Foma Cards
SAFETY PRECAUTIONS –Always follow these directions– (continued) Using the FOMA Card WARNING Do not place the FOMA Card in a microwave oven, pressure cooker or other heating device. • Doing so could cause the card to melt, overheat, generate smoke, resulting in failure and loss of data. -
Page 21: Using The Foma Terminal In The Vicinity Of Medical Devices
CAUTION Do not store the FOMA Card in a location exposed to direct sunlight, high temperature and high humidity. • Doing so could cause card failure. Do not store the FOMA Card in a dusty location. • Doing so could cause card failure. Use the FOMA Card only with devices designated by DoCoMo. -
Page 22: Notes For Overall Handling
NTT DoCoMo cannot be held responsible in any way for the loss of stored data. • Do not put the FOMA terminal in your back pocket and sit on it. Avoid putting the terminal in the bottom of a bag, etc. - Page 23 • Do not dispose of the battery with other regular household waste. Tape the terminals of batteries that are no longer needed and take them to an NTT DoCoMo service center. Alternately, you can also dispose of the battery in accordance with local regulations.
-
Page 24: Included Item Instructions
FOMA D900i Battery Instruction manuals “Basic” (this book) Memory Stick Duo “Application” Desktop holder CD-ROM for FOMA D900i Memory Stick Duo adapter Sample Optional products • Carrying case D02 • DC adapter D01 • Stereo earphone set P001 • In-car holder D01 •... -
Page 25: Introduction
Introduction... -
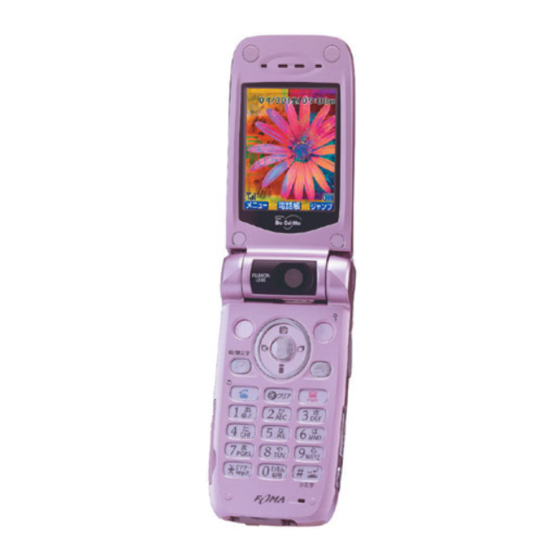
Page 26: Foma D900I Components And Functions
FOMA D900i Components and Functions Infrared port Point this port at another infrared communication- compatible device (see “Application” p.270). Earpiece Listen to conversations. Main display Displays the current FOMA terminal status such as phone numbers and icons (see p.28). Camera It is used to such as Videophone, taking still images and video clips. - Page 27 Antenna (built-in) Use care not to cover the antenna with your hand during a call so that you can use your FOMA terminal on better conditions. Speaker Emits sound such as ringtones. Inspiration window Displays icons that indicate the time or FOMA terminal status. Still images taken with the camera or image downloaded via i-mode can also be displayed (see p.30, 149).
- Page 28 FOMA D900i Components and Functions (continued) Main operations that you can perform with the Rear key and the Side keys A:Available NA:Not available Function Operation Open Closed Status of FOMA terminal Start taking still Press and hold down In standby image more than 1 second.
- Page 29 How to use Easy Selector Plus Pressing the Easy Selector Plus left ( ), center ( ) and right ( ) keys performs the operation displayed in the left, center and right of the guide bar. Example While in standby Pressing the left key ( ) displays Main Menu.
-
Page 30: Viewing The Display
Viewing the Display Voice Mail icon (see p.203) Missed Call icon (see p.64) New messages are stored at the Voice No recorded messages * Mail Service Center. * Recorded messages waiting * * Number indicates the total no of missed calls. Videophone recorded messages waiting * Mode icons Ringtone level 0 (see p.136) - Page 31 Mail icon Message R/F icon Mail reception status (see “Application” Message R/F reception status (see p.11). “Application” p.11). New mail/Message R/F icon There is a new mail/Message R/F (see “Application” p.10) PIM Lock icon, FOMA Card SMS full Alarm icon, Schedule icon Alarm is set (see p.176).
- Page 32 Viewing the Display (continued) Viewing the Inspiration window When the FOMA terminal is closed, the clock or status of the FOMA terminal appears on the Inspiration window. While the clock or icon is displayed, you can press the Rear key to toggle the clock or icon display on or off. All Lock is set New mail/Message R/F PIM Lock is set...
-
Page 33: Selecting Menus
Selecting Menus Various functions of the FOMA terminal can be selected and performed from Menus. Selecting functions from Menus Example Selecting “音量調節” from Menu Press (メニュー). Main Menu appears. • If no key is pressed for about 3 minutes, the main menu disappears automatically and the Standby screen reappears. - Page 34 Selecting Menus (continued) Setting explanation for the icon menu ON/OFF • “ON” is set by default. In standby, select “設定” “画面表示” “アイコンメニュー説明 ON/OFF” from Menu. Select “1.ON”or “2.OFF”and press (選択) ON/OFF is set. To cancel an operation after selecting a menu item •...
- Page 35 Selecting functions from submenus In a screen where appears in the guide bar, you can execute operations by selecting items from the submenu. To change the Call History list from a 3-line layout to a 1-line layout. (see p.58) Example In the Call History list, press (サブメニュー).
-
Page 36: Using A Foma Card
Using a FOMA Card Use a FOMA Card to save your phone number and other information. Insert a FOMA Card into a FOMA-compatible terminal to use the card. • For details on how to handle a FOMA Card, refer to the applicable FOMA Card instruction manual. - Page 37 If an invalid PIN Lock cancel code is entered 10 times, the FOMA terminal is automatically locked. Be sure to keep a separate record of the PIN Lock cancel code. If you forget the PIN Lock cancel code or you cannot cancel the PIN Lock status, contact NTT DoCoMo service center. You can use the...
- Page 38 Using a FOMA Card (continued) About the FOMA Card Security function A FOMA terminal has the FOMA Card Security function to protect your data and files. • When you download data or a file as follows to your FOMA terminal with your FOMA Card inserted, the FOMA Card Security function is automatically set for the downloaded data or file: When you download an image, melody, i-motion, Chara-den, or i- ppli application from an...
- Page 39 N o t e • The FOMA Card Security function is not set for data or a file copied from Memory Stick Duo or received using the infrared communication function or data forwarding, or a video clip or still image video clip shot using the built-in camera.
-
Page 40: Attaching And Removing The Battery
Do not be concerned; this is not a fault. Battery recycling The phone uses a lithium ion battery containing valuable materials that should be recycled. To protect the environment, return used batteries to an NTT DoCoMo service center, NTT DoCoMo agent or recycling center. •... -
Page 41: Recharging
Recharging When the battery charge gets low, recharge it. • The Battery Level icon shows how much charge remains in the battery. : Fully charged. : Partially charged. : Almost completely discharged. Recharge the battery. Current battery level Recharge time and length of use reference Continuous call time Continuous standby time Recharge time... - Page 42 Recharging (continued) Starting/Ending recharging and other items to note The battery can be charged regardless of whether the FOMA terminal power is on or off. However, recharging takes longer with the FOMA terminal power turned on. • When recharging is started, the Rear key turns red. A charging sound is emitted and the Battery Level icon blinks when recharging starts with the FOMA terminal turned on.
- Page 43 ■ To recharge the battery with just the AC adapter You can recharge the FOMA terminal only with the AC adapter. This is useful when recharging the battery while away from home. Unfold the power plug from 100V AC Power outlet the AC adapter and plug it Plug...
-
Page 44: Turning The Power On/Off
Power On/Off Turning the Power On/Off Turning the power on Open the FOMA terminal, press and hold down The Standby screen appears after an animation is shown (Wake-up Display). • If the key is not held down long enough, the power does not turn on. •... -
Page 45: Checking Battery Level
Battery Level Checking Battery Level You can check the current battery level. Turn on the FOMA terminal. The Battery Level icon appears. : Fully charged. : Partially charged. : Almost completely discharged. Recharge the battery. • Turning the power on/off (see p.42) Battery Level icon Appears also on the Inspiration window Using sound and display to check the battery level... -
Page 46: Confirming Your Own Phone Number
Own Number Confirming Your Own Phone Number You can display your own phone number of the FOMA Card. In standby, select “でんわ” “自局番号” from Menu. • The mail address is not displayed by default. • Your name and mail address and other information are displayed if they are saved (see p.181). -
Page 47: Setting The Date And Time
[Default] 0000/00/00 [ 日 day] --:-- Set Clock Setting the Date and Time Set the date and time. If you do not set the date and time, following functions are not available, including: • Standby screen (seasonal image, calendar) (see p.144) •... -
Page 49: Basic Operations
Basic Operations... -
Page 50: Making A Call
Making a Call Enter a phone number. • About phone numbers Calling a general Enter the area code even when you are in subscriber phone the same area code. Calling a mobile phone 090-XXXX-XXXX or 080-XXXX-XXXX Calling a PHS terminal 070-XXXX-XXXX •... - Page 51 Various methods for making a call ■ Adding a number saved in the Prefix setting to making a call When you save a number (such as “009130010” for making an international call) prefixed to a phone number using the Prefix setting (see p.129), you can make a call easily. 1 Enter a phone number.
-
Page 52: Redialing A Previously Dialed Phone Number
Redial Redialing a Previously Dialed Phone Number The FOMA terminal stores the last 30 calls you made as Redial data (Dial History). You can recall these numbers and redial them or store them as Phonebook entries. • The redial data item is not displayed if “リダイヤル表示” in the Log Display setting is off. In standby or during a call, press The Redial Data list appears. - Page 53 Registering phone numbers in Phonebook from the Redial Data list 1 Select a phone number from the Redial Data list and select “1.登録” from the submenu. The selection screen asking for the destination appears. 2 Select “1.本体電話帳” or “2.FOMAカード電話帳” and press (選択).
-
Page 54: Activating Or Deactivating Your Caller Id Before Making A Call
186/184 Activating or Deactivating Your Caller ID before Making a Call You can select whether or not to send your phone number (Caller ID) to a recipient before making a call, regardless of the Caller ID Notification setting (see p.217). •... -
Page 55: Quickly Sending Touch Tones
Pause Function Quickly Sending Touch Tones You can use Phonebook to save dial operations that let you quickly send a series of touch tones. This feature is useful for sequences of operations that you frequently perform, such as listening to messages at home phone, sending a message to DoCoMo’s pager (Pocket Bell)* or interacting with voice prompt systems. -
Page 56: Making An International Call
Quickly Sending Touch Tones (continued) Performing dial operations Select dial operations from Phonebook or Redial Data. • Searching the phonebook entry (see p.106) • Displaying Redial Data (see p.50) Press and fit the earpiece into your ear. The dialed phone rings and the answer message is played. •... - Page 57 Can be called from mobile phones and PHSs (toll free) 0120-800-000 Can be called from mobile phones and PHSs * Please confirm the phone number before you dial. • To use an international call service agency other than NTT DoCoMo, ask the agent directly.
-
Page 58: Receiving A Call
Receiving a Call When a call is received, the ringtone sounds and the Rear key flashes. • When you cannot answer a call (see p.64) When you receive a call, open the FOMA terminal. • If the call includes a Caller ID, the phone number appears. If there is no Caller ID, the reason there is no Caller ID is indicated (see p.128). - Page 59 When a beep (second call beep) is heard during a call If you have subscribed to Voice Mail Service, Call Forwarding Service or Call Waiting Service and the services are set, a call waiting beep indicates there is another incoming call. This second call can be handled as described below according to the type of services you subscribe to.
-
Page 60: Using Call History
Call History Using Call History Your FOMA terminal stores the date, time and phone number in Call History for up to the last 30 incoming calls. You can call up call history items and use them to make calls or save numbers in Phonebook. •... - Page 61 • Receiving type is indicated by the following icons: : Incoming voice call : Incoming videophone call : 64K data communication • Whether or not the call was answered is indicated by the following icons: : Answered : Not answered Normal Receive : Answered by Record Message or Videophone Record Message Mute Receive...
-
Page 62: Adjusting The Sound Volume Of The Other Party During A Call
Using Call History (continued) [Delete Call History] Deleting items from Call History Select a phone number from the Call History list and select “5.一件削除” from the submenu. • Alternatively you can press and hold down to delete log items. • To delete all items at one time, select “6.全件削除”... -
Page 63: Adjusting The Ring Volume While The Terminal Is Ringing
[Default] レベル4 Level4 Ring Volume Adjusting the Ring Volume While the Terminal is Ringing Ring Volume can be set to one of 7 levels, from level 0 to level 6. This section describes how to adjust the sound volume of the other party while the terminal is ringing. -
Page 64: Putting A Call On Hold When You Cannot Answer It Immediately
Answer Hold Putting a Call on Hold When You Cannot Answer It Immediately You can put a voice or videophone call on hold while the phone is ringing (Answer Hold). • Even during Answer Hold, the call cost will be charged to the caller. Example When a voice call is received While the terminal is ringing, select “1.応答保留”... - Page 65 When Drive Mode is set • When a call is received, the terminal neither rings nor vibrates. The call is recorded in Call History (the Missed Call icon appears). The Rear key does not flash. • The caller hears an announcement explaining that you are currently driving and unable to answer calls and then the call is ended.
-
Page 66: Checking Missed Call
Missed Call Checking Missed Call When you cannot answer an incoming call or the Record Message function answers the call, the Missed Call icon appears in the Standby screen (except when Quick Record Message is used). When the Missed Call icon appears, you can check who called by displaying Call History. - Page 67 Since data may also be lost due to a failure in your FOMA terminal, or repair or other handling procedures, it is recommended that you maintain the data in some other form. NTT DoCoMo assumes no responsibility for the loss of saved data.
- Page 68 Recording the Caller’s Message When You Cannot Answer a Call (continued) [Default] しない No Setting Record Message You can change the time until the answer message starts playing after a voice or videophone call is received. In standby, select “設定” “伝言メモ”...
- Page 69 When Record Message is set The following icons appear depending on the Record Message setting and how many recorded messages and voice memos have been made. : Set Record Message (when a recorded message or voice memo has not been recorded).
- Page 70 Recording the Caller’s Message When You Cannot Answer a Call (continued) Recording a message without sounding the ringtone • Do one of the followings after setting Record Message to “する”: Set Ring Volume to “レベル0”. • • Set the ringtone and Videophone call ringtone in the Sound setting to “サイレント”. Set 0 seconds for Record Message Shift Time.
-
Page 71: Recording A Caller's Message When You Cannot Answer An Incoming Call
Quick Record Message Recording a Caller’s Message When You Cannot Answer an Incoming Call While the terminal is ringing and you cannot answer a voice or videophone call, you can still play back an answer message and record the caller’s message with a single key press even if you have not set Record Message. -
Page 72: Recording The Caller's Message When You Cannot Answer A Call
Playing Back/Deleting Recorded Messages or Voice Memos [Voice Memo Player] Playing back a recorded message or voice memo Play back a recorded message or voice memo (In-call/Standby Voice Memo). • When “着信履歴表示” in the Log Display setting is off, the Record Message screen appears on Voice Memo Player, but you cannot play back messages. - Page 73 [Video Player] Playing back a videophone recorded message • This function is not available when PIM Lock is set. In standby, select “マルチメディア” “iモーション” from Menu. Select “4.TV電話画像” and press (選択) A Video memo during a videophone call is also saved in “4.TV電話画像”. Select a folder and press (選択) The picture list or title list appears (see “Application”...
-
Page 74: About Videophones
About Videophones Using the FOMA terminal built-in camera, the users can communicate with each other while watching the other party’s image. You can use the Videophone function with the terminals that support DoCoMo’s Videophone. • DoCoMo ’ s Videophone conforms to “3G-324M standardized by 3GPP, international standard bodies”. -
Page 75: Making A Videophone Call
Making a Videophone Call Enter a phone number. • The procedure is the same as that for entering a phone number for a voice call (see p.48). • You can select an image to be sent to the other party instead of your self image from still images or Chara-den. - Page 76 Making a Videophone Call (continued) The order of redialing when the videophone call is not connected Redialing Redialing Set Communication Set Auto Redial by Set Communication Set Auto Redial by Dialing Dialing Speed* Voice (see p.89) Speed* Voice (see p.89) First Second First Second Voice...
-
Page 77: Receiving A Videophone Call
Receiving a Videophone Call When a call is received, open your FOMA terminal. • When a videophone call is received, “TV電話着信中” appears. • If the call includes a Caller ID, the phone number appears. If there is no Caller ID, the reason there is no Caller ID is indicated (see p.128). •... - Page 78 Receiving a Videophone Call (continued) Display when a videophone call is received • When a videophone call is received in standby, an image appears on the main display and the inspiration window (when closed) according to the following priority. When a voice or videophone call is received from third parties during another voice or videophone call, Chaku-motion does not appear even if it is set: Priority order Setting...
- Page 79 N o t e • Do not cover the antenna with your hand, so your FOMA terminal will have better reception. • When talking with the hands-free function set to on, be sure to keep your FOMA terminal from your ear. If not, a loss of hearing or ear damage may occur.
-
Page 80: Useful Functions Available During Videophone Calls
Useful Functions Available during a Videophone Call [Select Sent Image] Selecting a sent image You can select a sent image during a videophone call. • Set an alternate image (see p.87). Press ) while your self image is being sent. The alternate image is sent instead of your self image. - Page 81 [Call Hold] Putting a call on hold while talking • If you preset Close Operation to “保留”, you can put a call on hold while talking by closing your FOMA terminal (see p.133). • Even during on hold, the call cost will be charged. •...
- Page 82 Useful Functions Available during Videophone Calls (continued) Select an image and press (詳細). • The following images cannot be set: ・ ・ Flash movie Still image with a size larger than 176 × 144 dots ・ ・ ・ Video/i-motion Images saved in the Secret setting folders Animation ・...
- Page 83 Storage location “マルチメディア” → “iモーション” → “TV電話画像” → “TV電話フォルダ” File name MTV_XXXX (XXXX: 4-digit number) Image size 176 × 144 dots During a videophone call, select “05.動画メモ” from the submenu. Press (撮影) or ( ) SideC Receiving images are saved as a video clip. •...
- Page 84 Useful Functions Available during Videophone Calls (continued) to select a level or setting. • The zoom ratio can be changed from 1x to 2x and 3x. • For setting (see “Application” p.212). Press (OK). [Adjust Videophone Image] Switching of image display and adjusting image quality Make selection for the display procedure of the image of other party and your self image or the quality of your self image to be sent to the other party.
- Page 85 [Enlarge Screen] [Default] 画面拡大 Enlargement Enlarging the image of the other party You can enlarge the image of the other party without changing the aspect ratio. • This setting are saved as the Change Videophone Screen setting value of in the Videophone setting.
- Page 86 Useful Functions Available during Videophone Calls (continued) [Select Dial Sending/Action Input] [Default] アクション入力 Action Input Switching between Dial Sending and Action Input during a videophone call Select whether to set Dial Sending or Action Input when the numeric key is pressed during a videophone call (when Chara-den is used).
- Page 87 [Action List] Displaying the Chara-den action list You can operate a sending Chara-den. • You can use this function when a Chara-den is set for the Alternate Image setting. • Some Chara-dens may not be displayed. • The function is only available during a videophone call. The setting is not saved. •...
-
Page 88: Changing The Videophone Call Setting
Changing the Videophone Call Setting You can set the following settings for a videophone call: Setup Description Page 発信時自画像送信 You can set whether to send your self image. ー Send Self Image 代替画像設定 You can set an image to be sent to the other party. p.87 Set Alternate Image 音声自動再発信設定... - Page 89 [Set Alternate Image] Setting images to be sent to the other party Select an image to be sent to the other party instead of your self image when Send Self Image during a videophone call is off. Sending Chara-den In standby, select “設定” “TV電話”...
- Page 90 Changing Videophone Call Setting (continued) Sending images In standby, select “設定” “TV電話” “代替画像設定” from Menu. Select for “画像優先” and press (選択). becomes ● Select “画像選択” field and press (選択). Select a type of image and press (選択). The still image appears. Select an image and press (選択).
- Page 91 [Set Auto Redial by Voice] [Default] OFF Making a call by voice when a videophone call is not connected You can redial a call by voice automatically if you call a non-videophone or if a videophone call is not connected. In standby, select “設定”...
- Page 92 Changing the Videophone Call Setting (continued) [Select Call Hold Screen] [Default] 内蔵画像 Preset image Changing the image to be sent during Call Hold When a call is on hold while speaking, the set image and “保留中 (on hold)” are sent to the other party.
- Page 93 [Change Image Size] [Default] 拡大 Enlarged Changing the size of image during a videophone call In standby, select “設定” “TV電話” “TV電話画面切替” from Menu. Select “1.標準 (Standard)” or “2.拡大 (Enlargement)” and press (選択). Change Videophone Screen is set. [Set Image Quality] [Default] 標準...
-
Page 94: Phonebooks Usable For The Foma Terminals
Phonebooks Usable for the FOMA Terminal With the FOMA D900i, you can use the FOMA Built-in Phonebook and FOMA Card Phonebook. Differences between the FOMA Built-in Phonebook and FOMA Card Phonebook Item FOMA Built-in Phonebook FOMA Card Phonebook Number of entries that can 700 max. - Page 95 You can copy the name, reading, phone number 1, mail address 1, group name, the setting of the Secret memory and the contents of bookmarks to a new phone at any NTT DoCoMo service center. Note that depending on the specifications of a new phone you may not be able to copy data stored in the FOMA terminal.
- Page 96 Phonebook Entry Saving Entries in the FOMA Built-in Phonebook • Maximum number of entries that can be saved (see p.92) • You cannot register entries when PIM Lock or Keydial Lock is set. Cancel these settings before saving data. • Pictographs saved in a name or personal memo are not displayed correctly when they are copied to the FOMA Card Phonebook or transferred to memory.
- Page 97 Entera a name. Enter a name, separating it into a family name and personal name. Enter the family name or personal name. • Up to 32 single-byte or 16 double-byte characters for the name including the family name and personal name can be entered. 1Select the “姓”...
- Page 98 Saving Entries in the FOMA Built-in Phonebook (continued) Select an icon. (General subscriber phone), (Mobile phone) or (PHS) is automatically selected in accordance with the type of phone number entered. Note that if you enter the phone number after selecting the icon, the icon may automatically change.
- Page 99 Set an image. • The following images cannot be saved: ・ ・ ・ ・ Flash images Animations Video/i-motion clips Chara-dens ・ Still images whose size is larger than 176 × 144 dots ・ Images saved to the Secret setting folder ・...
- Page 100 Saving Entries in the FOMA Built-in Phonebook (continued) Select for next to “する” or “しない” for the Secret memory registration and press (選択). The selected item changes to ● • “しない” is preset when a new entry is saved. •...
- Page 101 Save FOMA Card Phonebook Entry Saving Entries in the FOMA Card Phonebook • Maximum number of entries that can be saved (see p.92). • You cannot save entries when PIM Lock or Keydial Lock is set. Cancel these settings before attempting to save data.
- Page 102 Saving Entries in the FOMA Card Phonebook (continued) Enter a phone number. You can set only 1 phone number. You cannot set icon. 1Select the “電話番号” field and press (選択). 2Enter a telephone number. • Follow 2 of Step 5 in Saving Entries in the FOMA Built-in Phonebook (see p.95). Enter a mail address.
- Page 103 Set Group Changing a Group Name You can change a group name in Phonebook. • You can set a ringtone and color for each group saved in the FOMA Built-in Phonebook. You can also select a combination for the Group settings from preset patterns. •...
- Page 104 Changing a Group Name (continued) Select a group and press (選択). Enter a group name. 1Select the “グループ名” field and press (選択). 2Press to delete unnecessary characters and enter the group name. • Up to 21 single-byte or 10 double-byte characters can be entered. •...
- Page 105 Setting by selecting a combination from patterns Combinations for the Group settings can be made from the following 9 preset patterns. Items in selected patterns can be changed later: Mail tone Ringtone/Videophone Pattern Group Name Mail ringtone time Color ringtone (second) ステディA ジムノペディ第1番...
- Page 106 Changing a Group Name (continued) Resetting Group settings to their defaults by Group Display the Group list of the FOMA Built-in Phonebook. • Follow Steps 1 - 3 in Changing group names in the FOMA Built-in Phonebook (see p.101) Select a Group, and select “2.グループ内リセット” from the submenu. The selected Group returns to its default setting.
- Page 107 Changing Group names of the FOMA Card Phonebook The default group names are “グループ01” to “グループ10”. In standby, select “でんわ” “グループ別設定” from Menu. • Alternatively, you can access this function by selecting “設定” “プライバシー” “グループ別 設定” from Menu in standby. Enter your terminal ID number and press (選択).
-
Page 108: Making A Call Using Phonebook
Making a Call Using Phonebook You can search Phonebook by the following methods: ・Reading Search ・Column Search (see p.108) ・Memory No. Search (see p.108) ・Phone No. Search (see p.109) ・Group Search (see p.109) ・FOMA Card Group Search (see p.110) ・Secret Search (see p.114) •... - Page 109 Enter a reading. • Alternatively, you can search without entering a reading. • Singly-byte Katakana, alphanumeric characters can be entered. You can to switch entry modes (in the 5-press Method). • To move the cursor, use • If you make a mistake, use to delete the character and reenter the correct character.
- Page 110 Making a Call Using Phonebook (continued) Column Search By selecting a syllabary column from ア, カ, ワ, and others, you can search for phone numbers whose reading starts with a character included in the selected syllabary column. In standby, press (電話帳), and press (モード) repeatedly until the “行検索”...
- Page 111 Select a phone number and press • Follow Step 4 in Reading Search (see p.107) Phone No. Search You can enter part of a phone number and search for phone numbers in Phonebook that contain those numbers. In standby, press (電話帳), and press (モード) repeatedly until the “電話番号検索”...
- Page 112 Making a Call Using Phonebook (continued) Select a group and press (検索). Only the phonebook entries in the selected group appear. • Order of displayed search results (see p.107) Select a phone number and press • Follow Step 4 in Reading Search (see p.107) FOMA Card Group Search •...
-
Page 113: Confirming The Saved Contents Of Phonebook Entries
Confirming the Saved Contents of Phonebook Entries Select a party from the Phonebook Search results, and select “04.詳細表示” from the submenu. The details screen appears. The set image FOMA Built-in Phonebook Check the contents and press (OK). Check Storage Status Checking Phonebook Storage Status This function allows you to check the number of unused phonebook entries, the total number of saved phone numbers and mail addresses, and the Secret memory entries. -
Page 114: Editing Phonebook Entries
Editing Phonebook Entries • When PIM Lock or Keydial Lock is set, you cannot edit phonebook entries. Cancel the setting before correcting. • The following Phonebook entries cannot be overwritten. ・Phonebook entries stored in the Secret memory ・Phonebook entries specified for Accept Calls/Reject Calls (when Accept Calls/Reject Calls is set to “する”) Select a phonebook entry from the Phonebook Search results, and select “02.編集”... -
Page 115: Deleting Phonebook Entries
Deleting Phonebook Entries • You cannot delete an entry when PIM Lock or Keydial Lock is set: Cancel the setting before deleting. • Phone numbers specified for Accept Calls/Reject Calls cannot be deleted (when Accept Calls/Reject Calls is set to “する”) Deleting a phone number Select a phone number from the Phonebook Search results, and select “09.一件削除”... - Page 116 Secret Search Protecting Confidential Phonebook Entries This function searches for parties whose entries are saved as the Secret memory. • When calls are made to phone numbers saved as the Secret memory, the phone numbers are recorded in Redial Data. If you do not wish such numbers to be known to others, delete the redial data item.
- Page 117 Two-press Dialing Making a Call Using Simplified Keypresses By registering frequently used phone numbers in Memory numbers 000 to 009 in the FOMA Built-in Phonebook, you can dial these numbers simply by pressing the numeric key for the last digit in the Memory number and then pressing •...
-
Page 118: Saving Phonebook Entries To The Foma Card
Saving Phonebook Entries to the FOMA Card You can copy phonebook entries between the FOMA Built-in Phonebook and the FOMA Card Phonebook. • Up to 50 phonebook entries to the FOMA Card Phonebook, and up to 700 phone numbers and mail addresses to the FOMA Built-in Phonebook can be copied, respectively. - Page 119 Copying multiple Phonebook entries You can select all phonebook entries or multiple entries to copy. Example To copy all FOMA Card Phonebook entries to the FOMA Built-in Phonebook. In the Phonebook Search result screen, select “08.全件コピー” from the submenu. • To select multiple phonebook entries to copy, select “07.選択コピー” from the submenu. Select “2.本体電話帳へコピー”...
- Page 120 [Default] 解除 Turned off Manner Mode Turning All Phone Sounds Off In order not to disturb people around you in places where silence is required, you can set the FOMA terminal to turn off all sound. While in the Manner mode, the terminal vibrates to let you know when a call is received.
- Page 121 [Default] しない No Manner Mode Selection Customizing Manner Mode This function is used to customize Manner Mode. The items that can be changed and the phone operation when Manner Mode is on are followings Items that can be Default Operation in the Manner mode changed 伝言メモ...
- Page 122 Customizing Manner Mode (continued) When Manner Mode Selection is turned on ■ “伝言メモ” operation in Manner Mode Selection • When “しない” is set, Record Message does not work during the Manner mode regardless of the Record Message setting. • When “する” is set, appears in the main display during the Manner mode and Record Message operates.
-
Page 123: Using The Vibrator To Announce Incoming Calls And Alarms
[Default] OFF Vibrator Using the Vibrator to Announce Incoming Calls and Alarms In addition to the ringtone, vibration can also be used to announce incoming calls and specified alarm entries. Vibration patterns can be set for the following types of sound: Type of sound Default Description... - Page 124 Using the Vibrator to Announce Incoming Calls and Alarms (continued) Press (登録). Vibrator is set and the FOMA terminal vibrates. When Vibrator is turned on • appears on the main display and the Inspiration window. • Even if Vibrator is turned on, the terminal does not vibrate in the following cases: When the pattern in the vibrator is turned off.
-
Page 125: Advanced Operations
Advanced Operations... - Page 126 [Default] 0秒 0s Set Mute Ring Time Setting No Ringtone from a Party Not Saved in Phonebook You can set the number of seconds (Call start time) starting from when the call is received until when the ringtone starts. You can defeat nuisance calls such as malicious phone calls by setting a short period of time.
- Page 127 [Default] しない No Accept Calls Accepting Calls Only from Specified Phone Numbers By specifying parties saved in Phonebook, you can set the phone to only answer calls from selected parties while rejecting calls from other parties. • Maximum number of parties that can be specified: 20 •...
- Page 128 [Default] しない No Reject Calls Rejecting Calls from Specified Phone Numbers By specifying parties saved in Phonebook, you can set your FOMA terminal to not answer calls from selected parties. • Maximum number of parties that can be saved: 20 •...
- Page 129 [Default] しない No Reject Unstored Number Rejecting Calls from Parties Not Saved in Phonebook You can set your FOMA terminal to not receive calls from parties who are not saved in Phonebook. This function cannot be used in the following cases: •...
- Page 130 [Default] すべて着信する All reception Caller ID-based Call Block Rejecting Calls from Anonymous Callers You can select various reasons why calls are rejected. Anonymity reason Description 非通知設定 Hidden ID The caller is intentionally blocking the Caller ID. The call is from a party who cannot send Caller ID information (calls from 通知不可能...
- Page 131 Set Prefix Registering a Number to Be Added to the Beginning of a Phone Number If you register international call prefixes and other numbers (prefixes) to be added to phone numbers, you can easily make a phone call with a prefix added. •...
- Page 132 [Default] ON Noise Reduction Reducing Background Noise for Clearer Sound This function reduces background noise to make your voice to clearer. • It is recommended that you leave the Noise Reduction function turned on at all times. • This function is activated during a voice call and videophone call. In standby, select “設定”...
- Page 133 [Default] 高いアラーム音 High tone Quality Alarm Informing of Poor Reception with an Alarm Sound If signal conditions become poor and the call is about to be cut off, an alarm sound to inform you of the situation. • This function is activated during a voice call and videophone call. In standby, select “設定”...
- Page 134 Set Hold Tone Setting a Hold Tone You can set an announcement or melody played during Answer Hold or Call Hold. In standby, select “設定” “音・バイブレーター” “保留音設定” from Menu. • The default setting appears on the screen. Set a hold tone. ■...
- Page 135 [Default] 切断 End call Set Close Operation Ending a Call/Putting a Call on Hold by Closing the FOMA Terminal You can set the operation to be performed when you close the FOMA terminal during a call (end call or put on hold). In standby, select “設定”...
- Page 136 Ending a Call/Putting a Call on Hold by Closing the FOMA Terminal (continued) When “保留” is set • If you close the FOMA terminal during a call, the call is put on hold. • Call Hold is not cancelled even if you open the FOMA terminal or connect a switch-equipped earphone/microphone.
-
Page 137: Checking And Resetting Call Time And Communication Time
Checking and Resetting Call Time and Communication Time You can check the call time and communication time. You can check the last call time, communication time, accumulated (total) call, and the last reset date and time. The displayed time is a guide. •... - Page 138 Adjust Volume Adjusting the Sound Volume Such as Ringtone You can adjust a sound level of the FOMA terminal. The maximum sound volume is the same regardless of a sound type. Default Type of sound Sound adjusted (Levels available) レベル4 Level 4 •...
- Page 139 to select a sound level and press (設定). The sound level is set. • Selecting “レベル0” turns off the sound. • When is pressed at “レベル6” of “着信音量” and “アラーム音量”, the indication changes to “Step Up” and to “Step Down”. To turn off the sound ■...
- Page 140 Set Sound Changing the FOMA Terminal Ringtones The melodies preloaded by default and other downloaded melodies can be used as ringtones for your FOMA terminal. You can set video/i-motion including sound as a ringtone when you receive a voice or videophone call. In addition, you can set a tone time of a ringtone that sounds when you receive mail or Message R/F.
- Page 141 Melody list Melody name Screen display Composer (artist) パターン1〜5 Patterns 1 to 5 − − − − − − − − 電話・メロディA Phone melody A − − − − − − − − 電話・メロディB Phone melody B − − − − − − − − 電話・黒電話...
- Page 142 Changing FOMA Terminal Ringtones (continued) Changing a Chaku-motion or ringtone of a voice or videophone call Example To set “着モーション” or “着信音”. In standby, select “設定” “音・バイブレーター” “音の設定” from Menu. Set a Chaku-motion/ringtone. 1Select the “着モーション/着信音” field and press (選択). •...
- Page 143 ■ To set a ringtone 1Select the “着信音” field of the sound you want to set and press (選択). • The following icons appear before the melody name: : Pattern : Sound effect : Melody, silent : Network melody, Data exchange melody •...
- Page 144 Changing FOMA Terminal Ringtones (continued) Set a tone time. 1Select “メール鳴動時間” field and press (選択). • To set “メッセージR鳴動時間” or “メッセージF鳴動時間”, select the “メッセージR鳴動時間” field or “メッセージF鳴動時間” field, and press (選択). 2Use to enter the set time and press (確定). •...
- Page 145 Press (登録). The sound is set. N o t e • Even if alarm or Schedule is set, the alarm screen is not displayed and the alarm does not sound or the phone does not vibrate when PIM Lock is set. [Default] ON Keypad Sound Turning Off Keypad Sound...
- Page 146 [Default] デジタル時計 (大) Digital clock (large) Set Standby Screen Customizing the Standby Screen You can change the Standby screen. • The following images are provided by default: ■ Displaying the Camera image and other images (see p.145) You can display still images taken with the camera or images downloaded from a site. ■...
- Page 147 When you have set the i- ppli Standby screen α When the Standby Screen setting is changed while the i- ppli Standby screen is set, “iアプリ待受画面を解 α 除しますか?(Release i- ppli Standby screen?)” message appears. Select “はい” and press (選択) to α...
- Page 148 Customizing the Standby Screen (continued) ■ To play video/i-motion, animation or Flash movie 1Select “1.再生” from the submenu. • To adjust the sound volume of video/i-motion, use to select the sound level and press (OK). • To stop playback of video/i-motion, press ( ■...
- Page 149 N o t e • If the set image is deleted or the Secret setting is set, the Standby Screen setting returns to the default setting. • Even if you set a still image taken in the Burst mode, it is not played. •...
- Page 150 Customizing the Standby Screen (continued) Displaying the calendar • The calendar cannot be used when the date and time have not been set. In standby, select “設定” “画面・表示” “待受画面設定” “1.待受 画像設定” “5.カレンダー” from Menu. Change the digital clock display format as needed. •...
- Page 151 Set Inspiration Window Setting the Inspiration Window You can change the display of the Inspiration window. • Displaying still images taken with the camera or images downloaded via i-mode (Set Back Display) • Turning off the display of the Inspiration window when closed (Power Saver) (see p.150) •...
- Page 152 Setting the Inspiration Window (continued) Displaying the digital clock The following images are provided by default: Default In standby, select “設定” “画面・表示” “インスピレーションウィン ドウ” “1.背面画面設定” “2.デジタル時計” from Menu. to select a design. • You can use to select the clock size. Press (選択).
- Page 153 [Set Caller Information] [Default] 音声/TV電話発着信:name + phone no./ メール着信:address + subject Displaying the caller’s name or mail subject during an incoming or outgoing call You can set whether to display the caller’s name, phone number, mail subject, etc. in the Inspiration window when there is an incoming call, a call is made or mail is received.
- Page 154 [Default] ウェイクアップアニメーション Wake-up animation Wake-up Display Setting the Start Screen Displayed When You Turned Power On When the power of your FOMA is turned on, and until the Standby screen appears, you can set a video/i-motion such as a video clip taken with the camera or an i-motion video clip downloaded via i-mode that is stored in the FOMA terminal.
- Page 155 [Default] チョコボ Chocobo Set Partner Setting a Visual Partner An animation can be displayed in the main display when you receive or make a call, or send or receive mail (Visual Partner). • In addition to the preset default images, you can also display still images taken with the camera or data (i-anime or images) downloaded from sites.
- Page 156 Setting a Visual Partner (continued) N o t e • When “ユーザデータ” is set, a “設定なし” animation is displayed on the screen when no animation is set. You can check and change the set animation. • When setting “はい/いいえアニメ” of “ユーザデータ”, animations up to 240 dots wide × 132 dots high can be displayed in the animation display area of each screen.
- Page 157 Releasing user data You can release the image set for “ユーザデータ” in the Partner setting. It is possible to cancel the image on each screen one by one or all images on all screens at once. • Even when you release an image, the images saved in the FOMA terminal are not deleted. In standby, select “設定”...
- Page 158 [Default] メインディスプレイ: Level10/インスピレーションウィンドウ: Level10 Adjust Contrast Adjusting Display Contrast The LCD contrast can be adjusted when the display’s readability becomes poor due to the viewing angle or surrounding brightness. You can adjust the contrast of the main display and the Inspiration window to one of 20 levels, from level 1 to level 20. In standby, select “設定”...
- Page 159 Set Display Light Setting the Display Light and Key Light You can set the display light for the main display, Inspiration window, and keys of the FOMA terminal. In standby, select “設定” “画面・表示” “照明設定” from Menu. Set the display light for each item. 1Select an item field and press (選択).
- Page 160 Setting the Display Light and Key Light (continued) Specifiable items and display methods Item (Default) Description You can select a lighting way for the main display when the battery is not recharged with the AC/DC adaptor. • 通常照明 (高輝度) Normal light (bright): Opening the FOMA terminal or pressing any key turns on the display light very brightly for about 15 seconds and it is dimmed for about 60 seconds.
- Page 161 [Default] ON Natural Color Matrix Displaying More Natural Color The FOMA terminal provides “Natural Color Matrix” that adjusts the main display enabling more natural and beautiful colors. Turn the setting to suit your preferences. • This function does not affect the Inspiration window. In standby, select “設定”...
- Page 162 [Default] All on Set Assist Partner Displaying the Prompt after the End of Operation When Assist Partner is set, a prompt appears in the following cases to allow you to continue to save additional items: A prompt Set item Description appears When you receive a call from a party not saved in Phonebook, At the end of a...
-
Page 163: About Id Codes
If you forget your ID number or password, you will have to bring your FOMA terminal to a NTT DoCoMo service center to change the ID code or password. You must then present a valid form of identification such as a driver’s license to prove your identity. -
Page 164: Setting The Pin Codes
[Default] 0000 Change Terminal ID Changing the Terminal ID Number In standby, select “設定” “プライバシー” “暗証番号の変更” from Menu. Enter your current terminal ID number and press (選択). • The default terminal ID number is “0000”. • Entered numbers are masked with a series of “̲”. •... - Page 165 [Change PIN1 Code] [Default] 0000 Changing the PIN1 code • Before changing the PIN1 code, turn on the PIN1 Entry ON/OFF setting. In standby, select “設定” “プライバシー” “PIN1の変更” from Menu. Enter the terminal ID number and press (選択). Enter the current PIN1 code and a new PIN1 code. 1Enter the current PIN1 code and press (選択).
-
Page 166: Entering The Pin1 Code
Setting the PIN Codes (continued) Reenter the new PIN2 code and press (選択). The PIN2 code is changed. • When you could not enter the current PIN2 code correctly, repeat from Step 3. When you fail to enter the current PIN2 code 3 times, the screen for entering the PIN lock cancel code appears (see p.165). •... -
Page 167: Canceling Pin Lock
• The PIN lock cancel code is a 8-digit number that was provided at your subscription. Please keep a separate record (e.g. written copy). Be careful not to reveal it to others. If you forget the PIN lock cancel code or cannot cancel PIN Lock with it, contact a NTT DoCoMo service center. -
Page 168: About The Lock Functions
About the Lock Functions The FOMA terminal has various lock functions to prevent others from using it without permission and to prevent others from seeing or changing the personal information in Phonebook and Schedule. You can set multiple lock functions in combination. Item Description Page... - Page 169 If you fail to enter the terminal ID number 5 times in a row, the power is automatically turned off. Turn the power back on and enter the correct terminal ID number to cancel All Lock. If you forget the terminal ID number, contact a NTT DoCoMo service center.
- Page 170 [Default] Turned off PIM Lock Setting PIM Lock Setting PIM Lock disables the functions including Phonebook, Schedule, mail, and Message R/F to prevent others from viewing or falsifying the personal information. “PIM” means “Personal Information Manager”. • When Reject Unstored Number is set, you cannot set PIM Lock. •...
- Page 171 Canceling PIM Lock In standby, press (メニュー) and hold down Enter the terminal ID number and press (選択). PIM Lock is canceled. [Default] しない No (for all items) Set Restrictions Setting Keydial Lock This function makes it impossible to use the numeric keys for making calls. •...
- Page 172 Setting Keydial Lock (continued) When Restrictions are set • The following operations are restricted: Available NA Not available Operations Items set to “する Search for/ Delete Edit Dial (Yes)” phonebook Dial Redial phonebook phonebook from Call dial from entries entries entries History Phonebook...
- Page 173 [Default] OFF Self Mode Using Self Mode In the Self Mode mode, the power is on but the does not send or receive FOMA terminal signals. The functions that do not rely on communications are available (Phonebook Entry or Phonebook Search). •...
- Page 174 [Default] Turned off Key Guard Protecting Your Terminal Against Accidental Key Presses Key Guard keeps you from inadvertently activating a function should you happen to press the Side keys or Rear key when the FOMA terminal is closed. • You can use the Side keys and Rear key when the FOMA terminal is open. In standby, press and hold down (メニュー).
- Page 175 [Default] しない No Auto Power On Automatically Turning On Your FOMA Terminal The FOMA terminal can be set so that it automatically turns on at a specified time. When the specified time is reached, a tone (pattern 2) sounds for about 3 seconds and the power automatically turns on.
- Page 176 [Default] しない No Auto Power Off Automatically Turning Off Your FOMA Terminal The FOMA terminal can be set so that it automatically turns off at a specified time. • Auto Power Off cannot be set when the date and time have not been set. In standby, select “設定”...
- Page 177 Select the date for setting. 1Select the “アラーム” field and press (選択). 2Select “毎日 (Daily)”, “1回のみ (Only 1 time)”, or “曜日指定 (Day of week)” and press (選択). • To cancel an alarm time, select “なし”. Alternatively, you can select “曜日指定” and set a day of the week to “未設定”.
- Page 178 Setting the Alarm to Sound at a Specific Time (continued) When an alarm time is set • appears on the Standby screen. • When an alarm time is reached while in standby or during a call, the alarm screen is displayed and the alarm sounds or the terminal vibrates.
- Page 179 Schedule Entry Saving Schedule Entries You can save schedule entries. • You cannot save schedule entries when the date and time have not been set. • Maximum number of items that can be saved: 100 activities (There are no restrictions on the number of items that can be saved per day and the number of days that can be saved.) •...
- Page 180 Saving Schedule Entries (continued) Set the start date, start time, end date, and end time. 1Select each field and press (選択). 2Use to enter a date or time and press (確定). • Entering the date (see p.45) • Entering the time (see p.45) •...
- Page 181 Press (登録). The schedule entry is saved. When a schedule entry is saved • When you have saved a schedule entry for a certain day, appears in the Standby screen on that day. However, if the Secret setting is enabled for all schedule entries on that day, the icon does not appear. •...
- Page 182 Saving Schedule Entries (continued) Deleting saved schedule entries To delete a schedule entry Select a schedule entry in the Schedule display screen, and select “2.一件削 除” from the submenu. • Alternatively, you can press and hold down to delete the entry. Select “はい”...
- Page 183 Own Number Saving Your Own Name, Mail Address and Others • The saved name, mail address and image are displayed in the Own Number display screen. • Own Number is not displayed while PIM Lock is set. In standby, select “でんわ” “自局番号”...
- Page 184 Jump Menu Executing Frequently Used Functions Quickly Registering frequently used menu items in Jump Menu makes it easier and faster to execute the functions. • Maximum number of menu items that can be registered: 9 Registering a menu item in Jump Menu In standby, press (ジャンプ).
- Page 185 Deleting a menu item from Jump Menu In standby, press (ジャンプ). Select a menu item and select “2.一件削除” from the submenu. • Alternatively, you can press and hold down to delete it. • All jump menu items can be deleted by selecting “3.全件削除” from the submenu. Select “はい”...
- Page 186 Recording the Other Party’s Voice or Your Voice (continued) Recording an in-call voice memo During a call, press Rear ( ) The terminal beeps and recording starts. The other party’s voice is recorded. • “通話中音声メモ録音中 (Recording in-call voice memo)” is displayed on the screen. •...
- Page 187 [Default] iモード問合せ Check New Message Select Side Key Act Setting the Function to Execute When Pressing Side Key C ( ) You can set the function to execute when pressing and holding down SideC standby. In standby, select “設定” “画面・表示” “サイドボタン機能切替”...
- Page 188 Resetting Phone Settings to the Defaults (continued) Settings and items that do not return to the defaults Note that the settings and data items given below cannot be reset by this function: Example: ・Phonebook ・Call History ・Date and time ・Saved new words ・Predictive Conversion list ・Call time ・ID codes...
- Page 189 ■ “設定” “画面・表示” ■ “設定” “文字入力” Function Default Function Default デジタル時計 (Large) 定型文登録 一行表示 待受画面設定 文字入力方式切替 モード1 (かな方式) 12/24h切替:12-hour system 推測変換設定 Display format:中央表示 パートナー設定 チョコボ (Chocobo) ■ “設定” “伝言メモ” パートナーアシスト設定 ON (for all items) フォトコール設定 両画面表示 Function Default 背面画面設定:デジタル時計 (Large) しない (8秒) 伝言メモ 省電力設定:非表示モード インスピレーション 相手表示設定の音声/TV電話発着 ■...
- Page 190 [Default] ネットワーク自動検索 Network automatic search Set PLMN Setting the Carrier to Use You can set PLMN (carrier name) that provides FOMA services. • You cannot set a carrier in the Self mode. When using DoCoMo, you do not need to set this function. In standby, select “サービス”...
- Page 191 Switch-equipped Earphone/Microphone Using a Switch-equipped Earphone/Microphone (optional) A switch-equipped earphone/microphone (optional) allows you to make and receive calls simply by pressing a switch. Also, with a stereo earphone set, you can listen to melodies in stereo sound. • You can use an earphone/microphone with the following product or combination. Note, however, that some products are only available in certain regions.
- Page 192 Using a Switch-equipped Earphone/Microphone (optional) (continued) Receiving a call using the switch When you receive a call, press and hold down the switch on the earphone/microphone. The call is answered. To end the call, press and hold down the switch on the earphone/microphone. The call ends.
- Page 193 [Default] しない No/呼出秒数 Shift time: 2 sec Set Auto Answer Answering a Call Automatically with the Switch-equipped Earphone/Microphone Connected (optional) When a switch-equipped earphone/microphone is connected, you can set the terminal to answer a call automatically. • If no plug is connected to the earphone/microphone jack or during a call, a call is not auto- answered even if Auto Answer is set.
- Page 194 Help Function If You Forget the Key Sequences Descriptions of key sequences as well as operations using the Easy Selector Plus can be shown on the display. In standby, select “設定” “ヘルプ” from Menu. to select the function and press (選択).
-
Page 195: Services Available From Your Foma Terminal
Services Available from Your FOMA Terminal Service Phone number Collect Call Service (reverse charge calls) Directory Assistance Service (English speaking operators available) for general subscriber phone and DoCoMo mobile phone numbers (information and call charges are applicable) (Unlisted phone numbers cannot be given) Telegrams (telegram charges are applicable) 8 a.m. -
Page 196: About Multiaccess
About Multiaccess Your FOMA terminal can make a voice call and packet communication at the same time. It can further provide Short Message Service (SMS) at the same time. You can use a maximum of the 3 circuits shown below at the same time: Voice call 1 circuit Packet communication (i-mode, i-mode mail, packet communication... - Page 197 Sending i-mode mail during a voice call Press during a voice call. The active list appears. Compose i-mode mail. 1Select “メール” and press (選択). Mail Menu appears. 2Select “新規メール作成” and press (選択). The Compose i-mode Mail screen appears, and you can create and send i-mode mail. •...
- Page 198 About Multiaccess (continued) Making a voice call during i-mode or packet communication • To make a voice call during i-mode or packet communication, use Phonebook, Redial Data, or Call History. You cannot use the numeric keys to make a call. •...
-
Page 199: About Multitask
Performing packet communication during a voice call Dial from a PC during a voice call. Packet communication starts. • You can press , select “音声通話” or “データ通信”, and press (選択) to switch between the talking screen and the screen for packet communication. •... - Page 200 About Multitask (continued) ■ To switch between executing functions 1Press , select “電話帳登録” from the active list, and press (選択). The Phonebook Entry screen appears. • To switch to the received mail display screen, select “メール”. • Depending on the function, you cannot switch to another function without ending the executing function.
- Page 201 ■ About displayed items The following items are always displayed, even when the corresponding functions are not executing. The operation when the item is selected differs depending on whether the function is executing or not. Item When the function is not executed When the function is executed Switches to the executing mail メール...
- Page 203 Network Services...
-
Page 204: Network Services That Can Be Used From A Foma Terminal
Network Services That Can Be Used from a FOMA Terminal Monthly Service Description Subscription charge When the FOMA terminal cannot receive signals or is Charged Voice Mail Service Mandatory turned off, the caller can leave a message (see p.203). The first call can be put on hold while the second call Call Waiting Service Charged Mandatory... - Page 205 Voice Mail Service Using Voice Mail Service When your FOMA terminal cannot receive signals or is turned off, or you cannot answer a call, a caller’s message can be left at the Voice Mail Service Center. The caller will be requested to leave a message. •...
- Page 206 Using Voice Mail Service (continued) Activating Voice Mail Service You can set the ring time. In standby, select “サービス” “留守番電話” “4.サービス開始” from Menu. Select “2.開始する+設定” and press (選択). • When the ring time is already set, select “1.開始する”. Voice Mail Service is activated.
- Page 207 Setting the ring time Set the ring time before playing back an answer message when Voice Mail Service is activated. In standby, select “サービス” “留守番電話” “3.呼出時間設定 from Menu. to enter the ring time and press (設定). The ring time is set. •...
- Page 208 Using Voice Mail Service (continued) Playing a recorded message When a message is recorded, (where the number indicates the number of messages) appears in the Standby screen. • Displayed number is the number that is announced when playing back a new message (1417). Saved messages are not included in it.
- Page 209 N o t e • The incremental tone does not sound if Ring Volume is set to level 0. • You may not be able to check for messages depending on signal conditions. • Once you check for messages at the Voice Mail Service Center, messages retained after that may not be checked for a period of time.
- Page 210 Call Forwarding Service Using Call Forwarding Service When your phone cannot receive signals or is turned off, or you cannot answer a call, the call can be automatically forwarded to your office or home. • This service is available within the FOMA service areas all over Japan. •...
- Page 211 Call Forwarding Service charges No monthly charge + Call charge only ● Call charge Call Forwarding Forwarding Caller Charged to the Call Charged to the caller Service subscriber destination Forwarding Service subscriber Note1: The call charge to the forwarding destination is charged based on the distance from the area in which the location of the FOMA terminal is registered to the forwarding destination.
- Page 212 Using Call Forwarding Service (continued) Set the forwarding phone number. ■ To enter the phone number directly 1Select the “転送先電話番号” field and press (選択). 2 Enter a phone number. • Start from the area code (you can enter up to 26-digit numbers). ■...
- Page 213 Deactivating Call Forwarding Service In standby, select “サービス” “転送でんわ” “2.サービス停止” from Menu. Select “1.する” and press (選択). Call Forwarding Service is deactivated. • To cancel the operation, select “2.しない”. Checking the settings Check the setting status and forwarding phone number of Call Forwarding Service. In standby, select “サービス”...
- Page 214 Using Call Forwarding Service (continued) Select “1.登録” from the submenu. Select “1.転送先変更のみ” and press (選択). The forwarding phone number is set. • Call Forwarding Service can be activated with the changed forwarding destination, if “2.転送先変 更+開始” is selected while the service is deactivated. •...
- Page 215 Call Waiting Service Using Call Waiting Service A beep indicates that a second voice call is received while you are talking on the phone (second call beep). The first call can be put on hold while the second call is answered.
- Page 216 Using Call Waiting Service (continued) Checking the setting In standby, select “サービス” “キャッチホン” “3.設定確認” from Menu. Select “1.する” and press (選択). The setting is displayed. • To cancel the operation, select “2.しない”. Check the contents and press (OK). Main operations Putting the first call on hold and answering the second call During a call, press The first call is put on hold and the second call is answered.
- Page 217 Putting the first call on hold and calling another party During a call, enter the phone number of another party and press When the call is connected, the multiconnection screen appears. The first call is put on hold. • You can also use Phonebook, Redial Data, Call History, One-press Dialing or Two-press Dialing to make a second call.
- Page 218 Nuisance Call Blocking Service Using Nuisance Call Blocking Service Nuisance calls can automatically be rejected. Setting this service immediately after a nuisance call will play an announcement to reject the call and end the call each time you receive a call from the same phone number. •...
- Page 219 N o t e • International calls cannot be saved as rejected calls. They are not recorded in Call History. • An incoming call from the phone number saved as rejected calls does not sound the ringtone and is not recorded in Call History.
- Page 220 Notifying the Called Party of Your Phone Number (continued) Enter your network ID number and press (選択). • The network ID number is a 4-digit ID number required for using network services (see p.161). Select “1.通知する” and press (選択). Your Caller ID notification is set. •...
- Page 221 Caller ID Display Request Service Using Caller ID Display Request Service When a call is received without a Caller ID, an announcement requesting that the caller show Caller ID is played and the call ends automatically. This service allows you to prevent problems from unknown callers and thereby use your phone with confidence.
- Page 222 Using Caller ID Display Request Service (continued) Deactivating Caller ID Display Request Service In standby, select “サービス” “番号通知お願い” “2.サービス停止” from Menu. Select “1.する” and press (選択). Caller ID Display Request Service is deactivated. • To cancel the operation, select “2.しない”. Checking the setting In standby, select “サービス”...
- Page 223 Dual Network Service Using Dual Network Service This service enables subscribed FOMA to use the mova using the phone number of the FOMA terminal. Communications are enabled in the mova service area even when you are outside the FOMA service area. •...
- Page 224 English Announcement Service Switching the Announcement Language between Japanese and English You can switch between Japanese and English for an announcement played when your FOMA terminal cannot receive signals or the power is turned off. • No subscription or monthly charge is required for this service. •...
- Page 225 Checking the settings In standby, select “サービス” “英語ガイダンス” “2.設定確認” from Menu. Select “1.する” and press (選択). The settings are displayed. • To cancel the operation, select “2.しない”. Check the contents and press (OK). N o t e • No call charge is incurred for setting this service or checking the settings. Service Dial Using Service Dial You can call the DoCoMo service desk for repairs and the DoCoMo general...
- Page 226 Default: 通常着信 Normal receive Second Call Handling Selecting How a Call during Talking is Handled If you subscribe to Voice Mail Service, Call Forwarding Service, or Call Waiting Service, you can set a service to handle a call that is received during a call in advance. •...
- Page 227 Set Call Reception during Talking Setting Call Reception during Talking Activate or deactivate the action that has been set for Second Call Handling. • You cannot set Call Reception during Talking outside the service area. Try again at a location where signal conditions are better.
- Page 228 Set Remote Operation Setting Remote Operation If you set Remote Operation, you can control services such as Voice Mail Service or Call Forwarding Service from the touch tone general subscriber phone or payphone. • When you subscribe to Voice Mail Service or Call Forwarding Service, the Remote Operation setting is deactivated.
- Page 229 Additional Service Registering and Using Services When DoCoMo adds new network services, you can use them after registering in Menu. • Maximum number of services that can be registered: 40 Registering or changing a service In standby, select “サービス” “追加サービス” from Menu. •...
- Page 230 Registering and Using Services (continued) N o t e • A service cannot be registered if nothing is entered in “コード” and “サービス名 (表示文字列)”. • When the number of stored additional services is less than 40, you cannot store 30 or more service codes or response codes.
-
Page 231: Character Entry
Character Entry... -
Page 232: Basic Character Entry Procedures
Basic Character Entry Procedures The FOMA terminal provides various functions related to text entry such as saving data in Phonebook or composing mail. To facilitate these activities, convenient functions are available for entering characters, such as entering common phrases and copying and pasting text. - Page 233 Viewing the character entry screen and function of various keys • When pressed momentarily it is indicated with , and when pressed and held down it is indicated with (Easy Selector Plus) : Moves cursor up and down or left and right. : Converts Hiragana to Kanji.
- Page 234 5-press Method Entering Characters in 5-press Method Entering alphanumeric characters Single-byte or double-byte alphabetic and numeric characters and symbols such as “@” can be entered in the alphabetic mode. The numeric mode allows you to enter single-byte numeric characters. Example Entering “Jun12”...
- Page 235 To change the sequence of uppercase and lowercase display You can switch whichever of uppercase and lowercase alphabetic characters are displayed first when the numeric keys ( ) are pressed. If you want to enter all alphabetic characters in uppercase, switch to the alphabetic (uppercase) mode.
- Page 236 Entering Characters in 5-press Method (continued) Correcting characters If you enter a wrong character, delete the character and reenter the correct one. Characters are entered where the cursor is positioned. Deleting a single character Move the cursor to the character you want to delete, and N ODA N D press...
- Page 237 Use the numeric keys to enter “すずきじゅんこ”. “す”→ Press 3 times. Press to move the cursor to the right. “ず”→ Press 3 times and press “き”→ Press twice. “じ”→ Press twice and press “ゅ”→ Press 5 times (or press twice and press “ん”→...
- Page 238 Entering Characters in 5-press Method (continued) Press and select “順子”. The conversion list of “じゅんこ” appears. • Up to 8 double-byte characters are displayed for each entry in the conversion list. • Press to exit the conversion list and return to the screen displayed prior to conversion.
- Page 239 To convert to Kanji, Katakana and symbols ■ To revert to Hiragana ■ To change the range of conversion Press during conversion or selecting to change the converted area during conversion entries. conversion. すずきじゅんこ 鈴木 淳子 すずきじゅんこ 鈴木 淳子 ■ To convert to double-byte Katakana ■...
- Page 240 Entering Characters in 5-press Method (continued) To easily enter previously entered text strings (Predictive Conversion) When you enter a text string such as a word or sentence in the Kanji mode, the text strings are saved in the FOMA terminal’s memory. When you enter the same text strings the next time, they can be easily converted without entering the entire reading.
- Page 241 Entering single-byte Katakana characters Single-byte Katakana characters or symbols such as “?” can be entered in the Kana mode. In the character entry screen, press (文字) to switch to the Kana mode. Use the numeric keys to enter “スズキ”. “ス” → Press 3 times.
- Page 242 Entering Characters in 5-press Method (continued) Enter a common phrase or a symbol. ■ To enter a common phrase 1Select “01.定型文” and press (選択). • Common Phrase list (see p.264) 2Select a Common Phrase group and press (選択). • The layout of the Common Phrase list can be changed to full-size display (entire phrase shown) (see p.244).
- Page 243 Entering pictographs and emoticons Press in the character entry screen. List of pictographs appears. Pictographs and emoticons appear in this order when you press • Pressing (特殊) in the character entry screen and selecting “03.絵文字” also displays the list of pictographs. •...
- Page 244 Entering Characters in 5-press Method (continued) Select “1.マイデータ” and press (選択). • Items that are not saved cannot be selected. ■ When “2.電話帳” is selected 1Search Phonebook, select a party and press (選択). ■ When “3.シークレットメモリ” is selected 1Enter your terminal ID number and press (選択).
- Page 245 Functions available in the special mode In the special mode, the following functions are available in addition to the use of common phrases, symbols and pictographs. Page Submenu Handling method Cut text in the character entry screen and save it in the FOMA terminal’s 切り取り...
- Page 246 [Default] 5 groups (20 items for each group) Save Common Phrase Editing/Saving Common Phrases You can edit and delete the default common phrases and register frequently used sentences or phrases as new common phrases. You can reset the common phrases to their defaults even after editing them.
- Page 247 Deleting common phrases one by one Display the Common Phrase list. • Follow Steps 1 - 2 in Editing the default common phrases and saving them (see p.244). Select a common phrase, and select “2.一件削除” from the submenu. • Alternatively, you can press and hold down to delete a common phrase.
- Page 248 Copy Text Copying, Cutting and Pasting Text Text in the character entry screen can be copied or cut and pasted to a different location within the screen. Copying and pasting can also be used between the character entry screens for different functions. •...
- Page 249 Copying mail text You can copy the recipient’s mail addresses, the subject and the mail body from received mail or sent/unsent mail. • Images and melodies cannot be copied. Example Copying text from received mail Display received mail and select “12.コピー” from the submenu. •...
- Page 250 Use Character Map Code Entering Characters Using Character Map Codes Characters can be entered using 4-digit character map codes (JIS Kanji codes). This can be useful at certain times, such as when the character you want to insert does not appear even when you enter the reading.
- Page 251 Save New Word Saving Frequently Used Words Words or phrases that are not easily converted into correct Kanji characters, or frequently used long words or phrases like company names can be registered with their unique readings, making it easy to recall them when needed. •...
- Page 252 Saving Frequently Used Words (continued) Editing a saved word In standby, select “設定” “文字入力” “単語登録” from Menu. • The words are listed in the order of the Kana syllabary based on the reading. Word No./total count of saved words Select a word and press (選択).
- Page 253 2-press Method Entering Characters in 2-press Method Characters can be entered by pressing two numeric keys for each character. [Select Input Method] [Default] モード1(かな方式)Mode 1 (5-press Method) Setting 2-press Method To use 2-press Method to enter characters, you must set the input method. In standby, select “設定”...
- Page 254 Entering Characters in 2-press Method (continued) Use the numeric keys to enter “スズキ”. “ス” → Press “ス” → Press “゙” → Press “キ” → Press • If you make a mistake, use to delete the character and reenter the correct character. “半カナ大”...
-
Page 255: Appendix
Appendix... -
Page 256: Menu List
Menu List : Page in the “Application” manual Menu Page Menu Page 設定 カメラ 静止画撮影 (Still Image Photography) 時計・時刻 Clock/Time p.204 Setting Camera 動画撮影 (Video Photography) 日付時刻設定 (Set Clock) p.207 p.45 カメラ画像 (Camera Image) 自動電源ON (Auto Power On) p.224 p.173 自動電源OFF (Auto Power Off) p.246 p.174... - Page 257 Menu Page Menu Page 設定 iモード設定 i-mode Settings サービス 留守番電話 (Voice Mail Service) p.204 Setting 接続待ち時間設定 (Set Timeout) p.49 Network キャッチホン (Call Waiting Service) p.213 接続先設定 (Set Connection Host) p.50 Services 転送でんわ (Call Forwarding Service) p.209 センター接続設定 (Set Center Connection) p.56 迷惑電話ストップ...
-
Page 258: Character Map Code List
Character Map Code List The screen display may differ from characters and symbols shown in this list. Figures in the left column indicate the 1st digit to 3rd digit figures of JIS Kanji code. A figure in the top column indicates the 4th digit number of JIS Kanji code. Example To enter “ゑ”... - Page 259 1st to 3rd digit 1st to 3rd digit 1st to 3rd digit 4th digit figure of JIS Kanji code 4th digit figure of JIS Kanji code 4th digit figure of JIS Kanji code Figures of JIS Figures of JIS Figures of JIS Kanji code Kanji code Kanji code...
- Page 260 Character Map Code List (continued) 1st to 3rd digit 1st to 3rd digit 1st to 3rd digit 4th digit figure of JIS Kanji code 4th digit figure of JIS Kanji code 4th digit figure of JIS Kanji code Figures of JIS Figures of JIS Figures of JIS Kanji code...
- Page 261 1st to 3rd digit 1st to 3rd digit 1st to 3rd digit 4th digit figure of JIS Kanji code 4th digit figure of JIS Kanji code 4th digit figure of JIS Kanji code Figures of JIS Figures of JIS Figures of JIS Kanji code Kanji code Kanji code...
-
Page 262: Character Assignment Table (5-Press Method)
Character Assignment Table (5-press Method) Mode Alphabetic mode Kanji mode/Kana mode Number of presses Number of presses Numeric 9 10 11 12 13 ˜ あ い う え お ぁ ぃ ぅ ぇ ぉ a b か き く け こ... -
Page 263: Character Assignment Table (2-Press Method)
Character Assignment Table (2-press Method) Characters and numeric keys correspond differently for the uppercase mode and lowercase mode. To switch between uppercase mode and lowercase mode, press • The uppercase mode is automatically set when the input method is changed. ■... -
Page 264: List Of Symbols And Special Characters
List of Symbols and Special Characters In addition to the symbols listed in the character assignment tables, the symbols listed below can also be entered. • The screen display may differ from characters and symbols shown in the list: When using symbols and pictographs in the mail body •... - Page 265 ■ Emoticons Entry procedure (see p.241) ■ Greek characters Entry procedure (see p.237) ■ Russian characters Entry procedure (see p.237)
-
Page 266: Common Phrase List
Common Phrase List Common Phrase Common Phrase 一般 General ◯◯の件、よろしくお願い致します。 おはよう 今日、一杯どうですか?連絡下さい。 おやすみ FAX確認願います。 次の指示を待て。 おはよー!今日も一日がんばりましょう。 昨日は、とっても楽しかったです。どうもありがとう。 変更します。 連絡下さい。 延期します。 今から電話してもいいですか? 中止します。 ごめんなさい、遅れます。 ◯◯での写真送ります。 今日は◯◯の日です。早く帰って来てね。 今わかりません。 ◯◯まで迎えに来て!お願いします。 あとで連絡します。 応答 Answer ◯◯について知っている人は◯◯までに◯◯に教えて下さい。 もう少し待ってて! Thank you! いってらっしゃい。 Good! 留守電にメッセージをお願いします。 OKです。 ◯◯で待ってます。 NGです。 ただいま電話にでることができません。メールでご用件をお知らせ下さい。 いいよ。... -
Page 267: Combination During Multiaccess
Combination during Multiaccess i-mode Videophone Short Message Operation to be generated Voice call call (SMS) mail or performed i-mode Dialing Receiving Dialing Receiving Sending Receiving Sending Receiving Current status During a voice call ▲ ▲ × △ ○ ○ ○ ○... -
Page 268: Combination During Multitask
Combination during Multitask Function executed later Function currently being executed Voice call ○ ○ ○ ○ ○ ○ ○ × × × × × ○ × × × × Videophone call × × × × × × × × × × × × × × × × × Receiving mail ×... -
Page 269: Something Wrong? First Check For Problems
(see p.43). • remains on the screen even after performing the above procedures, contact an NTT DoCoMo service center (see p.270). • Check whether the protective connector cap is properly closed when charging the FOMA terminal in the desktop holder. - Page 270 0 second and the service activated? (see p.204, 210) It is informed that software needs • Software needs to be updated. Update software (see p.272). to be updated in the NTT DoCoMo web site and “ お知らせ&ヘルプ (News&Help)” in iMenu. “副画像を保存できませんでした...
- Page 271 Was the folder deleted on a different device such as your PC? (see “Application” p.303) • If the problem is not solved even after checking the above, contact an NTT DoCoMo service center (see p.270). “ メモリ不足のため現在この機能は There is not enough memory to execute the function. Please reperform 使用できません (Unable to use it after ending the function under execution.
-
Page 272: Warranty And After Sales Service
If you experience problems with your FOMA terminal Before asking for repairs, see Something Wrong? First Check for Problems in p.267. If the problem remains unsolved, contact one of the numbers below or visit an NTT DoCoMo service center: • DoCoMo Group... - Page 273 FOMA terminal. A repair, at NTT DoCoMo’s option, may include the replacement with a new terminal and in such an event it may not be possible to transfer data to the new terminal. NTT DoCoMo accept no responsibility for this.
- Page 274 * Packet communication for updating software is free of charge. If software needs to be updated, it is informed at the NTT DoCoMo web site and “お知らせ&ヘ ルプ (News&Help)” in iMenu. There are two ways to update software, to update immediately and automatically at the reserved date and time.
- Page 275 Mobile phone information (the model of the FOMA terminal, manufacturer serial number, and other information) is sent to the server for checking whether updating software is needed or not. Customer’s mobile phone information sent to NTT DoCoMo is not made public and not used for other purposes.
- Page 276 While Software Update is performing, do not remove the battery pack. Removing the battery may result in an update failure. When update failed, “書換え失敗しました (Failed in rewriting)” appears and all you can do is turning the power on and off. In such a case, contact an authorized NTT DoCoMo service center. •...
- Page 277 Select “2.予約” and press (選択). The updating date and time selection screen appears. • To cancel the operation, select “3.更新しない”. • Pressing (中止) while appears, a prompt appears asking whether to end the operation. To end the operation, select “はい” and press (選択).
- Page 278 Updating the FOMA Terminal’s Software (continued) Press (OK). Checking, changing and canceling a reserved updating date and time In standby, select “設定” “プライバシー” “ソフトウェア更新” from Menu. Enter your terminal ID number and press (選択). The reserved updating date and time appears. ■...
- Page 279 When reserved date and time of Software Update has come The FOMA terminal needs to be recharged fully and display the Standby screen at a location with good signal conditions before the reserved date and time of Software Update. At the reserved date and time, the screen on the left appears and software is updated automatically.
-
Page 280: Index
Index Change PIN2 Code …………163 Earpiece ………………………24 Character assignment table Earpiece Volume ………………60 AC adapter ……………………40 2-press Method ……………261 Easy Selector Plus ……………24 Accept Calls …………………125 5-press Method ……………260 How to use …………………27 Action Input ……………………84 Character entry ………………230 Emoticons Action List ………………………85 Change double-byte/single-byte Entering ……………………241... - Page 281 Image Quality setting …………91 Recharging ……………………39 i-mode password ……………161 Record Function while Dialing One-press Dialing ……………115 In-call Voice Memo ………………………………184 Optional products………………22 Playing back/Deleting ………70 Record Message ………………65 Own Number Recording …………………184 Playing back/Deleting ………70 Confirming……………………44 Infrared port ……………………24 Redial……………………………50 Saving ………………………181 Inspiration window ……………25 Delete Redial Data …………51...
- Page 282 Index (continued) Symbols Entering ……………………239 List …………………………262 Task key ………………………24 Terminal ID number …………161 Changing……………………162 Touch tones ……………………53 Troubleshooting ………………267 Two-press Dialing ……………115 Use Character Map Code Entering ……………………248 List …………………………256 User data ……………………154 Vibrator ………………………121 Video Memo ……………………80 Videophone ……………………72 Making ………………………73 Receiving ……………………75 Redialing ……………………74...
- Page 283 Mobile phone etiquette When using your FOMA terminal, always be considerate of your environment and those around you. 文 字 Turn the power off in the following situations の ■ 入 In prohibited areas 力 Use of mobile phones in the following places is prohibited. You must turn the power off. 方...
- Page 284 o not forget your cellular phone ... or your manners! When using your mobile phone in a public place, do not forget to show common courtesy and consideration for others around you. Sales: NTT oCoMo Group NTT oCoMo Hokkaido, Inc. NTT oCoMo Tohoku, Inc.
Need help?
Do you have a question about the Foma D900i and is the answer not in the manual?
Questions and answers