inVENTer iV12-Smart Corner Installation And Operating Instructions Manual
Ventilation system
Hide thumbs
Also See for iV12-Smart Corner:

Subscribe to Our Youtube Channel
Related Manuals for inVENTer iV12-Smart Corner


Summary of Contents for inVENTer iV12-Smart Corner
- Page 1 Corner ventilation system Installation and operating instructions...
- Page 2 Clust-Air ® are protected trademarks of inVENTer GmbH. Any other designation used in this documentation may be a trademark whose use by any third party and for the purposes of such third party may violate the rights of its holders.
-
Page 3: Table Of Contents
Speciication .......................... 55 standard delivery, accessories and spare parts ..............58 servicing and maintenance ....................63 10 Troubleshooting and disposal ..................... 65 Warranty and service ......................67 Company details ........................71 • inVENTer ® iV12-Smart ® /iV12-Smart ® Corner ventilation system... -
Page 4: User And Safety Instructions
® Read all the instructions on installation, operation and maintenance of the inVENTer iV12-Smart ventilation system provided in this section. Also observe any safety instructions that precede the operating instructions described. Before working on the equipment/system, read the safety instructions carefully. Failure to observe safety instructions may cause personal injury and/or material losses. -
Page 5: Intended Use
[Germany] or local equivalent. Only use the equipment/system for the applications described in this documentation and only in combination with the components recommended, approved and speciied by inVENTer GmbH in this documentation. Changes and modiications to the equipment/system are not permitted. -
Page 6: System Overview
One ventilation unit works in supply air mode and the other works in exhaust air mode. After 70 seconds, the fan changes its rotational direction. The inVENTer iV12-Smart ventilation unit is controlled via one of the following inVENTer system controllers: • ZR8 •... -
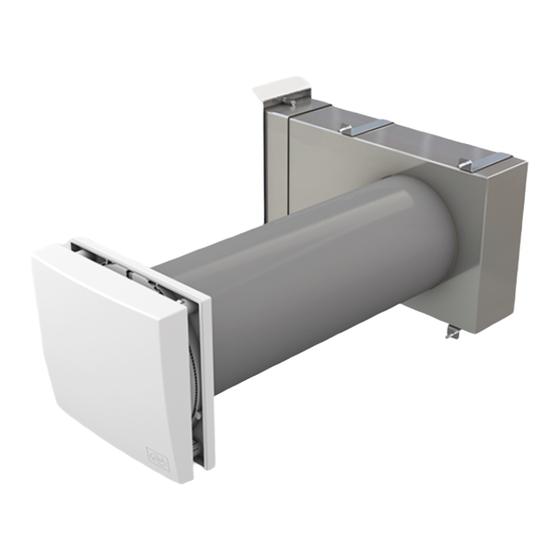
Page 7: Layout
8 Weather protection hood 11 Insulation base plate (l.h.) / corner lat tube (r.h.) 12 Masonry Wall sleeve Fig. 2: Wall sleeve 1 Controller cable recess 2 Fixing element • inVENTer ® iV12-Smart ® /iV12-Smart ® Corner ventilation system Installation and operating instructions... - Page 8 Inner cover R-D290 Fig. 4: Inner covers 1 Panel of inner cover 2 Spacer 3 Base plate of inner cover 4 Dust ilter (pollen ilter optional) • inVENTer ® iV12-Smart ® /iV12-Smart ® Corner ventilation system Installation and operating instructions...
- Page 9 1 Fixing element 5 Rigid foam insert 2 Flat tube sliding sleeve 6 Wall sleeve opening 3 Flat tube 7 Wall mounting bracket 4 Sound insulation insert • inVENTer ® iV12-Smart ® /iV12-Smart ® Corner ventilation system Installation and operating instructions...
-
Page 10: Function
2 Drip rail function The inVENTer iV12-Smart ventilation system is designed for the ventilation of living areas and bedrooms in houses and apartment blocks, hotels and B&Bs, rooms in public facilities and work spaces in ofices. It is suitable for installation in new builds and for retroitting in existing buildings. -
Page 11: Control Elements
2 Control unit cover 4 Ventilation slots ® The ZR8 controller is an electronic unit for controlling up to two inVENTer iV12-Smart ventilation units. What sets it apart is its easy installation and simple operating concept. It allows control of the inVENTer iV12-Smart ventilation system in three modes: •... - Page 12 4 Ventilation slots 2 Control unit cover 5 Blanking cover 3 Rotary button The ZR10-D controller is an electronic unit for controlling up to four inVENTer ® iV12-Smart ventilation units. In terms of operation and functionality, it corresponds with the ZR8 controller.
- Page 13 It comprises a programming unit and up to four Clust-Air ® modules, which can each be connected to up to four inVENTer ® iV12-Smart ventilation units. As a result, it provides separate ventilation for up to four different areas (zones) within a residential unit.
-
Page 14: Preparations Prior To Installation
Corner 500 lat tube – Embrasure lattice 281.5 – Inner cover V-220x200 (square) – Inner cover R-D290 (round) – – With insulation, interior plaster/exterior render Open • inVENTer ® iV12-Smart ® /iV12-Smart ® Corner ventilation system Installation and operating instructions... -
Page 15: Dimensioned Drawings
3 Bottom edge of embrasure (lintel) Minimum distance to adjacent components on inner wall Pay attention to insulation thickness and any roller blinds Minimum distance to adjacent components on exterior wall See Fig. 25 for installation conditions • inVENTer ® iV12-Smart ® /iV12-Smart ®... - Page 16 Fig. 14: Dimensioned drawing for corner lat tube 1 Fixing element 4 Rigid foam insert 2 Wall sleeve opening 5 Wall mounting bracket 3 Sound insulation insert • inVENTer ® iV12-Smart ® /iV12-Smart ® Corner ventilation system Installation and operating instructions...
- Page 17 28.1 28,1 Fig. 16: Dimensioned drawing for embrasure lattice 1 Top drip rail 4 Through hole 2 Louvres 5 Condensate drain 3 Bottom drip rail • inVENTer ® iV12-Smart ® /iV12-Smart ® Corner ventilation system Installation and operating instructions...
- Page 18 Inner cover V-220x200 Inner cover R-D290 Fig. 17: Dimensioned drawing for inner cover 1 Panel of inner cover 2 Base plate of inner cover • inVENTer ® iV12-Smart ® /iV12-Smart ® Corner ventilation system Installation and operating instructions...
-
Page 19: Electrical Connections
• In supply air mode, the green plug is rotated and the locking screws are pointing down. The LED is on. Plug connection assignment Fig. 19: Plug connection assignment colour sequence 1 White round cable Green round cable Brown round cable • inVENTer ® iV12-Smart ® /iV12-Smart ® Corner ventilation system Installation and operating instructions... -
Page 20: Assembly And Installation
In addition to the complete set, a preparation set and a completion set are also available for the inVENTer iV12-Smart. Until completion, the wall opening must be sealed inside and outside on site. Preparation sets... -
Page 21: Completion Set
A similar situation occurs when installing windows and doors, as the installation must be RAL-compliant and is regulated by standards. This procedure must also be applied to inVENTer ® ventilation units. In addition to the load-bearing and insulating characteristics of the... -
Page 22: Creating The Wall Opening/Plaster Groove
► Inner wall: Ensure wall opening has minimum distance of ≥ 250 mm (Corner: 155 mm) to neighbouring parts. ► Exterior wall: Ensure wall opening has minimum distance of ≥ 450 mm to neighbouring parts. • inVENTer ® iV12-Smart ®... -
Page 23: 5.5 Laying The Controller Cable
Wall opening is ready. Plaster or wall groove has been milled. ► Lay controller cable, 3-wire, (2). ► Ensure that the cable end (1) protrudes approx. 500 mm inside the room. • inVENTer ® iV12-Smart ® /iV12-Smart ® Corner ventilation system... -
Page 24: Fitting The Wall Sleeve
Do not insert the wall sleeve too far into the wall opening. Otherwise the base plate's inner cover cannot be installed correctly. Note the thickness of the interior plaster when inserting the wall sleeve. • inVENTer ® iV12-Smart ® /iV12-Smart ®... - Page 25 ► Before illing the gap with foam, insert protective discs. noTe Deformation of the wall sleeve. Thermal accumulator cannot be installed! ► Insert thermal accumulator or suitable material before foaming the free space. • inVENTer ® iV12-Smart ® /iV12-Smart ®...
- Page 26 ► After completion of the external wall, trim wall sleeve (13) with 10 mm protruding up from the external wall. Wall sleeve is itted. Ö Ö • inVENTer ® iV12-Smart ® /iV12-Smart ® Corner ventilation system Installation and operating instructions...
- Page 27 ► Trim wall sleeve (3) with 30 mm protruding up from the masonry (exterior wall). Wall sleeve is itted. Ö Ö • inVENTer ® iV12-Smart ® /iV12-Smart ® Corner ventilation system Installation and operating instructions...
-
Page 28: Fitting The Weather Protection Hood
Base plate WSH-Smart Base plate WSH-09 Fig. 24: Base plate sealing tape for weather protection hoods 1 Base plate for weather protection hood 2 Sealing tape for the weather protection hood base plate • inVENTer ® iV12-Smart ® /iV12-Smart ®... - Page 29 (5). ► Ensure that the sealing tape (4) is affixed on the external wall side around the opening of the wall sleeve (5). • inVENTer ® iV12-Smart ® /iV12-Smart ®...
- Page 30 ► Secure weather protection hood cover (16) to weather protection hood base plate using top and bottom screws (13, 15). The weather protection hood WSH-Smart is itted. Ö Ö • inVENTer ® iV12-Smart ® /iV12-Smart ® Corner ventilation system Installation and operating instructions...
- Page 31 (5). ► Ensure that the sealing tape (4) is affixed on the external wall side around the opening of the wall sleeve (5). • inVENTer ® iV12-Smart ® /iV12-Smart ®...
- Page 32 ► after attaching the cover to the base plate, seal the joints between the weather protec- tion hood cover and facade using non-shrink external sealing compound on both sides and around the top edge. • inVENTer ® iV12-Smart ® /iV12-Smart ®...
- Page 33 (16) and front with permanently elastic external sealant at the sides and top. ► The bottom joint should not be sealed. The weather protection hood WSH-09 is itted. Ö Ö • inVENTer ® iV12-Smart ® /iV12-Smart ® Corner ventilation system...
-
Page 34: Installing The Corner Lat Tube
► Afix sealing tape around the outer edge of the wall sleeve. Remove the protective discs from the wall sleeve on the interior and exterior wall side before installing the corner lat tube. Otherwise no airlow is possible. • inVENTer ® iV12-Smart ®... - Page 35 ► Fit lat tube (9) with wall installation opening on protruding wall sleeve (8). ► Align lat tube (9) with a fall of 1 – 2° to the window embrasure. • inVENTer ® iV12-Smart ® /iV12-Smart ® Corner ventilation system...
- Page 36 Render deposits may cause a reduced air low rate. ► Apply exterior render to insulation. ► Render over sliding sleeve (13) with 5 mm protrusion. The corner lat tube is installed. Ö Ö • inVENTer ® iV12-Smart ® /iV12-Smart ® Corner ventilation system Installation and operating instructions...
-
Page 37: Installing The Embrasure Lattice
Fig. 26: Hole pattern for embrasure lattice 1 Through hole Ø 5 mm embrasure lattice sealing tape Fig. 27: Sealing tape on embrasure lattice 1 Back of embrasure lattice 2 Sealing tape • inVENTer ® iV12-Smart ® /iV12-Smart ® Corner ventilation system... - Page 38 ► Ensure that louvres (9) of embrasure lattice deflect air flow away from window area. ► Bend top drip rail (10) down. Ö Ö Embrasure lattice is installed. • inVENTer ® iV12-Smart ® /iV12-Smart ® Corner ventilation system Installation and operating instructions...
-
Page 39: Installing The Thermal Accumulator
► Insert felt strip (3) up to thermal accumulator. CaUTion incorrect alignment of the fan module. Protection against accidental contact is missing! ► Protection guard for the fan must face towards the inside of the room. • inVENTer ® iV12-Smart ® /iV12-Smart ®... - Page 40 Observe the alignment of the plug. The running direction depends on the plug's alignment. ► Exhaust air mode: locking screws at green plug pointing up. ► Supply air mode: locking screws at green plug pointing down. • inVENTer ® iV12-Smart ®...
-
Page 41: Starting The Ventilation System
► Check voltage. Ö Ö Voltage is present. ► Set ventilation operating mode. (See installation and operating instructions for the controller) Ö Ö Ventilation operating mode is set. • inVENTer ® iV12-Smart ® /iV12-Smart ® Corner ventilation system Installation and operating instructions... -
Page 42: Fitting An Inner Cover
► Mount inner cover base plate (1) centrally to the wall sleeve (2) on internal wall. ► Insert screws (4) loose into the ixing elements (3). ► Align inner cover base plate (6) using a spirit level (5). • inVENTer ® iV12-Smart ® /iV12-Smart ® Corner ventilation system... - Page 43 ► Ensure that all spacers (10) click into place. ► Slide inner cover panel (14) on to spacers (13). 0 14 1 0 13 1 Inner cover V-220x200 is itted. Ö Ö • inVENTer ® iV12-Smart ® /iV12-Smart ® Corner ventilation system Installation and operating instructions...
- Page 44 ► Fit inner cover base plate (2) so that it covers wall sleeve ixings (1). ► Ensure that the inVENTer (3) inscription on the inner cover base plate is at the bottom. ► Secure inner cover base plate (4) to ixings (5) using screws (6) (Allen key supplied).
-
Page 45: Operation
Inner cover is closed. ► Carefully pull inner cover panel (1) forward. ► Ensure that all spacers click into place. Inner cover V-220x200 is open. Ö Ö • inVENTer ® iV12-Smart ® /iV12-Smart ® Corner ventilation system Installation and operating instructions... - Page 46 Inner cover R-D290 is closed. opening the inner cover r-D290 Requirements Inner cover is closed. ► Rotate inner cover panel (1) anti-clockwise. Ö Ö Inner cover R-D290 is open. • inVENTer ® iV12-Smart ® /iV12-Smart ® Corner ventilation system Installation and operating instructions...
-
Page 47: Replacing The Dust Ilter
► Remove dust ilter (3) from inner cover base plate (5) on lug (4). ► Fit new dust ilter (7) on inner cover base plate (6). ► Fit cleaned dust filter (7) on inner cover base plate (6). • inVENTer ® iV12-Smart ® /iV12-Smart ® Corner ventilation system... - Page 48 Requirements Fan is off. Inner cover is open. ► Unclip inner cover panel (1) at bottom and pull forward. ► Remove inner cover panel (1) by lifting it up. • inVENTer ® iV12-Smart ® /iV12-Smart ® Corner ventilation system Installation and operating instructions...
- Page 49 (4). ► Fit inner cover panel (7) at top on spacers (6). ► Click inner cover panel (7) into place at bottom. Dust ilter has been changed. Ö Ö • inVENTer ® iV12-Smart ® /iV12-Smart ® Corner ventilation system...
-
Page 50: Installing/Removing The Thermal Accumulator
(3) on lug (4). Incorrect fan running direction! Observe the alignment of the plug. The running direction de- pends on the plug's alignment. Mark alignment of green controller plug. ► Pull controller plug (5). • inVENTer ® iV12-Smart ® /iV12-Smart ®... - Page 51 Thermal accumulator iV12-smart and inner cover r-D290 Requirements Fan is off. ► Unclip inner cover panel (1) at bottom and pull forward. ► Remove inner cover panel (1) by lifting it up. • inVENTer ® iV12-Smart ® /iV12-Smart ® Corner ventilation system...
- Page 52 ► Remove inner cover base plate (5). Incorrect fan running direction! Observe the alignment of the plug. The running direction depends on the plug's alignment. Mark alignment of green controller plug. ► Pull controller plug (6). • inVENTer ® iV12-Smart ® /iV12-Smart ®...
- Page 53 ► Supply air mode: locking screws at green plug pointing down. Requirements Thermal accumulator has been removed. ► Install thermal accumulator in reverse order. Ö Ö Thermal accumulator iV12-Smart is installed. • inVENTer ® iV12-Smart ® /iV12-Smart ® Corner ventilation system Installation and operating instructions...
-
Page 54: Cleaning The Thermal Accumulator
► Clean thermal accumulator (1) under warm running water. ► Allow water to drain. ► Wait until the thermal accumulator is dry. Ö Ö Thermal accumulator is cleaned. • inVENTer ® iV12-Smart ® /iV12-Smart ® Corner ventilation system Installation and operating instructions... -
Page 55: Speciication
Length / diameter 495 mm / 160 mm Weight 0.820 kg Wall sleeve 745 Characteristics Value Length / diameter 745 mm / 160 mm Weight 1.230 kg • inVENTer ® iV12-Smart ® /iV12-Smart ® Corner ventilation system Installation and operating instructions... - Page 56 Width / height / depth 279 mm / 313 mm / 23 ... 88 mm Weight 1.260 kg Colour White - RAL 9016/ Grey - RAL 9006/ Nord - RAL 7011 • inVENTer ® iV12-Smart ® /iV12-Smart ® Corner ventilation system...
- Page 57 Diameter / depth - open (closed) 290 mm / 70 mm (50 mm) Filter channel diameter 240 mm Weight 0.600 kg Colour White - RAL 9010 • inVENTer ® iV12-Smart ® /iV12-Smart ® Corner ventilation system Installation and operating instructions...
-
Page 58: Standard Delivery, Accessories And Spare Parts
• Wall sleeve 495/745 with protective discs and mounting wedges • Weather protection hood (white, grey, Nord) • Thermal accumulator iV12-Smart • Inner cover (square, round) Component Part number iV12-Smart complete set 1001-0135 • inVENTer ® iV12-Smart ® /iV12-Smart ® Corner ventilation system Installation and operating instructions... - Page 59 DeliVery, aCCessories anD sPare ParTs standard delivery iV12-smart Corner Preparation set • Wall sleeve 495/745 with protective discs and mounting wedges • Corner lat tube (400/500) • Embrasure lattice (white, grey, Nord) • 2K itting foam (optional) • Installation and operating instructions...
- Page 60 Weather protection hood-Smart, Nord - RAL 7011 1508-0069 Weather protection hood-09, white - RAL 9016 1508-0012 Weather protection hood-09, grey - RAL 9006 1508-0064 Weather protection hood-09, Nord - RAL 7011 1508-0027 • inVENTer ® iV12-Smart ® /iV12-Smart ® Corner ventilation system Installation and operating instructions...
- Page 61 Pollen ilter for inner cover R-D290 (pack of 2) 1004-0090 Micro ilter for inner cover R-D290 (pack of 2) 1004-0065 Wall plug set for insulation 1004-0067 2K itting foam 1004-0050 • inVENTer ® iV12-Smart ® /iV12-Smart ® Corner ventilation system Installation and operating instructions...
- Page 62 Base plate IB-R-D290, white 2003-0026 Base plate IB-R-D290, white sound buffer 2003-0031 Panel IB-V-220x200 2003-0219 Panel IB-R-D290, white 2003-0027 Accessories kit IB-V-220x200 2005-0054 Accessories kit IB-R-D290 2005-0059 • inVENTer ® iV12-Smart ® /iV12-Smart ® Corner ventilation system Installation and operating instructions...
-
Page 63: Servicing And Maintenance
The inVENTer iV12-Smart ventilation system is virtually maintenance-free. In section 9: Servicing and maintenance ‒ Maintenance schedule, you will ind a table listing all recommended maintenance steps. CaUTion rotating parts on thermal accumulator assembly. - Page 64 The listed maintenance activities and intervals are recommendations of the inVENTer GmbH. As required your personal maintenance schedule may deviate. frequency assembly maintenance step Pollen ilter Replace pollen ilter. Monthly Monthly Inner cover Panel Clean surface of cover with a damp cloth.
-
Page 65: Troubleshooting And Disposal
Installation error Check controller plug. The plug must be properly seated in the box. Controller works in ventilation Switch on heat recovery mode at mode. controller. • inVENTer ® iV12-Smart ® /iV12-Smart ® Corner ventilation system Installation and operating instructions... - Page 66 Waste metal recycling Square inner cover PC / PP Recycling centre Thermal accumulator Ceramic Domestic waste Dust ilter TPU / PES Domestic waste Pollen ilter Domestic waste • inVENTer ® iV12-Smart ® /iV12-Smart ® Corner ventilation system Installation and operating instructions...
-
Page 67: Warranty And Service
• When using any complementary part or accessory not approved by the system's manufacturer. • If modiications and/or changes are made to the inVENTer iV12-Smart ventilation system. • If using spare parts that are not original spare parts from the manufacturer of the inVENTer iV12-Smart ventilation system. - Page 68 • inVENTer ® iV12-Smart ® /iV12-Smart ® Corner ventilation system Installation and operating instructions...
- Page 69 • inVENTer ® iV12-Smart ® /iV12-Smart ® Corner ventilation system Installation and operating instructions...
- Page 70 • inVENTer ® iV12-Smart ® /iV12-Smart ® Corner ventilation system Installation and operating instructions...
-
Page 71: Company Details
INTERNET: WWW.INVENTER.EU MANAGING DIRECTOR: ANNETT WETTIG VAT ID NO.: DE 815494982 JENA DISTRICT COURT, COMPANy REG. NO. 510380 PICTURE CREDITS: © INVENTER GMBH 2015 CONTENT COPyRIGHT: © INVENTER GMBH 2015 SUBJECT TO TECHNICAL MODIFICATIONS. ALL INFORMATION PROVIDED "AS IS". NO LIABILITy ACCEPTED FOR PRINTING ERRORS. - Page 72 GmbH Ortsstraße 4a D-07751 Löberschütz Tel.: +49 (0) 36427 211-0 Fax: +49 (0) 36427 211-113 E-Mail: info@inventer.de Version 12/2015 Subject to technical changes Document no. 7002-0028 www.inventer.eu © inVENTer GmbH 2015...
Need help?
Do you have a question about the iV12-Smart Corner and is the answer not in the manual?
Questions and answers