inVENTer iV-Twin+ Installation And Operating Instructions Manual
Hide thumbs
Also See for iV-Twin+:
- Installation instructions manual (36 pages) ,
- Installation instructions manual (22 pages)
Table of Contents
Advertisement
Quick Links
Advertisement
Table of Contents

Subscribe to Our Youtube Channel
Related Manuals for inVENTer iV-Twin+


Summary of Contents for inVENTer iV-Twin+
- Page 1 iV-Twin+ Installation and Operating Instructions...
-
Page 2: Table Of Contents
The copyright of this document remains with the manufacturer. Mount the external closure ....................23 Rights to all content and images: © inVENTer GmbH 2014-19. Insert heat accumulator plug-in unit ................. 25 Connect the reversing fan to the controller and check its function........27 All trademarks used in this documentation are the property of their Mount inner cover ...................... -
Page 3: User And Safety Instructions
They are controlled by a controller of the inVENTer system. A signal word in front of the text indicates the hazard level. When multiple hazard levels occur, the safety information for the highest level is always used. - Page 4 USER AND SAFETY INSTRUCTIONS USER AND SAFETY INSTRUCTIONS • NOTE: Observe the specified minimum distances on both sides of the wall and on the front plastic surfaces. to avoid mixing different types of air and to ensure access to the unit and its components. A • NOTE: Never use the device without a filter and inner cover. • NOTE: Remove/avoid obstructions that could prevent access to or removal of components of minimum distance of 1.2 m must be maintained between adjacent air openings. (, page 12 et seq.).
-
Page 5: System Overview
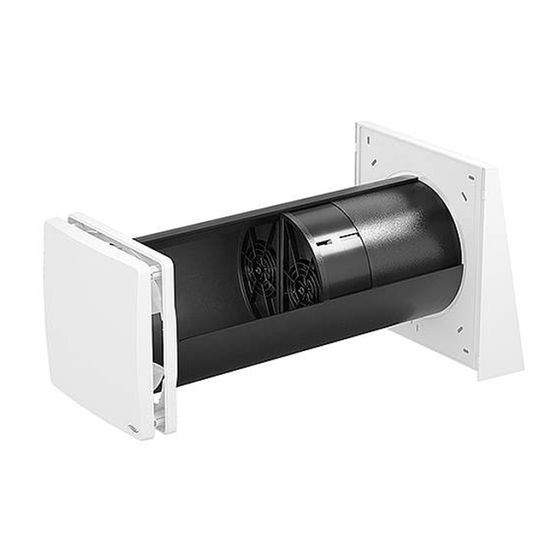
Both versions of the wall sleeve and the separating element can be shortened by the installer. 3 Cover weather protection hood 10 Dust filter G3 (2 x) 11 Half-cylinder fan unit with reversing fan The ventilation unit is controlled by one of the following controllers of the inVENTer system: Mini-Xenion (2 x) Wall sleeve • sMove • MZ-Home... -
Page 6: Features
If the temperature at the fan falls below + 5 °C, both reversing fans are automatically switched to exhaust air operation for 4 cycles. This reheats the heat accumulator and prevents The ventilation unit is operated via a controller of the inVENTer system. Depending on the the interior from cooling down as a result of the cold supply air flowing in. During this phase, the controller, you can select the various operating modes and functions in which the ventilation operating mode set on the controller is ineffective. The controller then switches the ventilation... -
Page 7: Control Elements
SYSTEM OVERVIEW INSTALLATION PREPARATION Installation preparation Control elements sMove controller Installation location The sMove controller is an electronic control unit for controlling up to four iV-Twin+ ventilation units. It is characterised by its timeless and flat • The installation location can be derived from the positioning proposal of the ventilation design, simple installation and a simple operating concept by touch. planning. -
Page 8: Dimensions
INSTALLATION PREPARATION INSTALLATION PREPARATION Position of the wall opening Sectional drawings Sectional drawing ventilation unit iV-Twin+ ≥ 250 ≥ 250 Ø Position wall opening Position wall installation system Simplex Figure 4: Dimension drawing of wall opening iV-Twin+ (interior view) ≥ 270 1 Wall opening new building (Fig. -
Page 9: Components Dimensional Drawings
INSTALLATION PREPARATION INSTALLATION AND ASSEMBLY Installation and assembly Components dimensional drawings Inner cover Flair Twin+ To avoid installation errors, read the chapter carefully before installation. The ventilation system A - A must be installed and connected by qualified personnel. Checking the scope of delivery On receipt, check the delivery for completeness and transport damage on the basis of the delivery note. -
Page 10: Create Wall Opening
INSTALLATION AND ASSEMBLY INSTALLATION AND ASSEMBLY Create wall opening Use the Simplex wall installation system. Prerequisite: CAUTION The construction project is in the shell construction Falling masonry when creating the wall opening phase. leads to injury to body parts and/or damage to objects! ►... -
Page 11: Mount The Wall Sleeve
INSTALLATION AND ASSEMBLY INSTALLATION AND ASSEMBLY Mount the wall sleeve NOTE: Install the fan BUS only in a de-energized state. Before connecting the cable to the control unit (operating unit sMove or Clust-Air module CAM17), interrupt the power supply to the controller. Measuring tape, angle grinder, spirit level, non-pressing 2-component mounting foam, Do not connect the cable to the control unit unless it is not live. -
Page 12: Mount The External Closure
INSTALLATION AND ASSEMBLY INSTALLATION AND ASSEMBLY Mount the external closure NOTE: Accumulation of condensation water in the wall sleeve. Damage to the exterior wall and masonry as NOTE well as the building material! 1 – 2° • Fix the wall installation sleeve with a slope Mounting on unfinished outer wall of 1 –... -
Page 13: Insert Heat Accumulator Plug-In Unit
INSTALLATION AND ASSEMBLY INSTALLATION AND ASSEMBLY Insert heat accumulator plug-in unit TIP: Do not apply the sealing tape until directly before mounting the base plate. This will prevent excessive swelling of the sealing tape and facilitates assembly. Insert air volume flow separation NOTE: ► Attach the sealing tape, 9 mm, on the outside wall and circumferentially along the guide on the base If the air volume flow separation is not or incorrectly positioned in the wall sleeve, it is plate. -
Page 14: Connect The Reversing Fan To The Controller And Check Its Function
INSTALLATION AND ASSEMBLY INSTALLATION AND ASSEMBLY Connect the reversing fan to the controller and check its function. Insert the heat accumulator NOTE NOTE Do not store or stack the heat accumulators outside the wall sleeve, Incorrect electrical connection will damage the fan motor! This will damage the ceramic of the heat accumulator! •... -
Page 15: Mount Inner Cover
You have closed/opened the inner cover. that the position arrows on the back of the cover point upwards. Check: The inVENTer logo is at the bottom right. Ensure that the separator is inserted into the inner cover holder. ► Press the latching lugs on the spacers inwards. -
Page 16: Remove The Cover Of The Inner Cover
Cleaning recommendations the inner cover inwards. ► Pull the inner cover cover forward. The measures and intervals listed here are recommendations by inVENTer GmbH to maintain Make sure that all spacers disengage. 4 x CLICK the functionality and performance of the iV-Twin+ ventilation system. -
Page 17: Clean The Fan Unit And Dust Filter
CLEANING AND MAINTENANCE CLEANING AND MAINTENANCE Clean the fan unit and dust filter TIP: inVENTer Class G3 dust filters are very durable and can be washed several times. ► Clean both dust filters under running hot water. ® ► Wait until the dust filters are completely clean and We recommend that you clean the dust filters regularly and replace worn filters. For special dry. requirements, pollen and activated carbon filters are available as accessories. Please refer to the filter's instructions for use for the respective installation. ► If the filter is defective, dispose of it. Prerequisite: The ventilation unit is disconnected from the power supply. -
Page 18: Cleaning The Heat Accumulator
► Place the cover on the four spacers. Make sure that the position arrows on the back of the cover Install fan units and heat accumulators point upwards. Check: The inVENTer logo is at the bottom right. Ensure that the separator is inserted into the inner Prerequisite: cover holder. -
Page 19: Energy Label Iv-Twin+ According To Erp Directive, Regulation 1254/2014
TECHNICAL SPECIFICATIONS TECHNICAL SPECIFICATIONS Technical Specifications Energy label iV-Twin+ according to ErP directive, regulation 1254/2014 You will find the following information from the product data sheet on the energy label: General Specifications • Energy efficiency class (SEC class) • Sound power level L Feature Parameter • Maximum air volume flow (supply air) Operating temperature [°C] -20 – 50 Without aggressive gases, dusts and Exhaust air/external air oils Air volume flow in reversing operation [m³/h] 5 –... - Page 20 Product data sheet iV-Twin+ according to VO 1254/2014 EU of July 11, 2014 Product data sheet iV-Twin+ according to VO 1254/2014 EU of July 11, 2014 Description Parameters Description Parameters Vendor inVENTer GmbH Vendor inVENTer GmbH Model ID iV-Twin+ Model ID iV-Twin+ cold -90.439...
-
Page 21: Scope Of Delivery
SCOPE OF DELIVERY ACCESSORIES AND SPARE PARTS Scope of delivery Component Product Number Standard components Round cable LiYY-O 3x0,75 (33m) 1004-0020 All standard components are also available as spare parts. Mounting wedge set (block with 16 wedges) 3009-0012 Styrofoam disk R-D196x30 (for wall sleeve) 3007-0088 Component Product Number... -
Page 22: Troubleshooting And Disposal
TROUBLESHOOTING AND DISPOSAL TROUBLESHOOTING AND DISPOSAL Troubleshooting and Disposal Fault Possible cause Correction Troubleshooting Check the position of the plug on the Supply air cold Installation error. controller. The plug must be firmly fixed in the connector housing. Fault Possible cause Correction Disassembly No electrical voltage. Check fuse. Disassemble the ventilation unit in reverse order. -
Page 23: Attachment 1: Cleaning Protocol
The heat accumulator has a 30 year warranty on the ceramic of the heat accumulator. This covers a premature product wear. Information on the warranty conditions can be found at www.inventer.de/garantie Service Complaints On receipt, check the delivery for completeness and transport damage on the basis of the delivery note. - Page 24 Cleaning / Inspection Activity: Inspection (I), Cleaning (C), Replacement (R) RIGHTS TO ALL CONTENT / PICTURE CREDITS: Component Name / Scope Activity © INVENTER GMBH 2014-19 Inner cover: Clean / Filter: Check, clean if necessary or Inner cover / filter replace if defective (depends on filter type) SUBJECT TO TECHNICAL CHANGES WITHOUT NOTICE.
- Page 25 GmbH Ortsstraße 4a D-07751 Löberschütz +49 (0) 36427 211-0 +49 (0) 36427 211-113 info@inventer.de Version 07/2019 Subject to technical changes without notice. Product Number 5004-0004 www.inventer.de © inVENTer GmbH 2014-19...
Need help?
Do you have a question about the iV-Twin+ and is the answer not in the manual?
Questions and answers