inVENTer iV-Smart+ Installation Instructions Manual
Hide thumbs
Also See for iV-Smart+:
- User manual (60 pages) ,
- Installation instructions manual (36 pages) ,
- Maintenance manual (2 pages)
Table of Contents
Advertisement
Quick Links
Advertisement
Table of Contents

Related Manuals for inVENTer iV-Smart+


Summary of Contents for inVENTer iV-Smart+
- Page 1 Installation instructions iV-Smart+ www.inventer.de...
- Page 2 ® inVENTer GmbH. The copyright to this document remains with the manufacturer. Rights to all content and images: © inVENTer GmbH 2021. All trademarks used in this document are the property of their respective manufacturers and are hereby acknowledged. Disclaimer This documentation represents an translation the original installation instructions.
-
Page 3: Table Of Contents
TABLE OF CONTENTS Table of contents User and safety instructions ....................4 User information ......................4 Safety instructions ......................5 System overview: iV-Smart+ ventilation unit ................ 8 Construction ........................10 Function ......................... 11 Control elements ......................12 Preparing for installation ......................13 Installation position...................... -
Page 4: User And Safety Instructions
USER AND SAFETY INSTRUCTIONS User and safety instructions Thank you for purchasing this high quality product from inVENTer! This section provides an overview of the basic safety precautions for safe and proper operation of your ventilation unit. User information Safety and warning instructions The safety and warning instructions in these installation instructions have a uniform structure and are marked with a symbol on the left side of the instruction. -
Page 5: Safety Instructions
The installation instructions are part of your iV-Smart+ ventilation unit and must be available at all times (see www.inventer.de/downloads). When handing the system to a third party, the informa- tion regarding access to the installation instructions must be handed over also. - Page 6 USER AND SAFETY INSTRUCTIONS • NOTICE: Do not install the unit near indoor air thermostats or in the immediate vicinity of / above sensitive pictures or furniture. • NOTICE: Observe the specified minimum clearances on both sides of the wall and frontally to prevent unintentional mixing of different air flows and to ensure access to the unit and its components.
- Page 7 USER AND SAFETY INSTRUCTIONS Improper use Any use that is not mentioned in the intended use section, is considered to be improper. Especially do not install / operate the unit in areas which the following may occur: • Environment containing strong oils or lubricants. •...
-
Page 8: System Overview: Iv-Smart+ Ventilation Unit
The operating instructions for the controller are not part of this documentation. In connection with the inVENTer Connect controller platform, it is mandatory to use the Connect inner cover. "Flex weather protection hood" external termination available in stainless steel or optionally in aluminium [increased salt resistance]. - Page 9 • Sylt variant: iV-Smart+ Sylt variants (in the further text "Sylt variant") with driving rain-proof outer cover for installation in rooms below ground level (white/beige/grey/dark grey). • Top variant: Ventilation units iV-Smart+Top (in the further text "Top variant") for integrating the external termination into the roof slope (red/black).
-
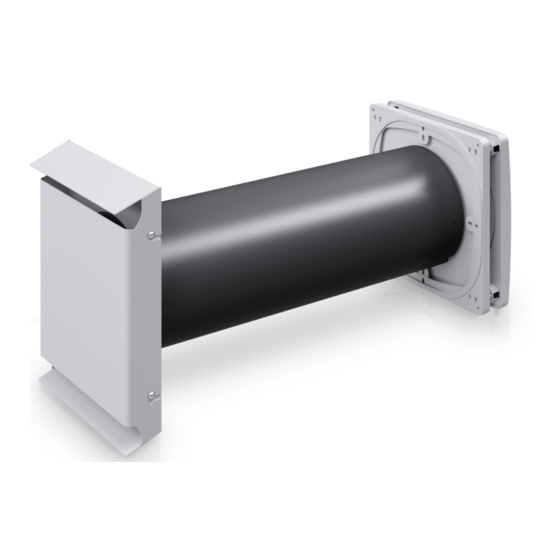
Page 10: Construction
SYSTEM OVERVIEW: IV-SMART+ VENTILATION UNIT Construction Standard variant Smart Flex Figure 1: Overview of the iV-Smart+ standard variant ventilation unit Components External termination: Thermal accumulator insert Smart | Flex weather protection hood (thermal accumulator and inVENTron) 1 Weather protection hood base plate 6 Thermal accumulator with insulation 2 Weather protection hood cover 7 Thermal accumulator handle... -
Page 11: Function
SYSTEM OVERVIEW: IV-SMART+ VENTILATION UNIT Function The iV-Smart+ ventilation units are used to provide ventilation for living rooms and bedrooms. An integrated ceramic thermal accumulator ensures optimum heat recovery. The iV-Smart+ ventilation unit is a ventilation unit with simple airflow and works according to the principle of heat recovery by changing the direction of the fan. -
Page 12: Control Elements
SYSTEM OVERVIEW: IV-SMART+ VENTILATION UNIT Control elements The ventilation unit is operated via an inVENTer system controller. Depending on the controller, different operating modes and functions can be set. inVENTer Connect Designation sMove MZ-Home (Easy Connect e16) Number of controll- Max. -
Page 13: Preparing For Installation
PREPARING FOR INSTALLATION Preparing for installation Installation position • The installation location can be derived from the position suggested by the ventilation planning. The exact positioning of the individual units and control units must be checked on site and, if necessary, adjusted. -
Page 14: Position Of The Wall Opening
PREPARING FOR INSTALLATION Position of the wall opening For the positioning of the wall sleeve of other variants of your ventilation unit ,see the installation instructions for your specific external termination. Standard ventilation unit variant [Smart weather protection hood] ≥ 250 ≥... -
Page 15: Sectional Drawing Of The Ventilation Unit
PREPARING FOR INSTALLATION Sectional drawing of the ventilation unit For sectional drawings of other variants of your ventilation unit, see the installation instructions for your specific external termination. Sectional drawing of the iV-Smart+ standard variant ventilation unit 1 – 2° ≥... -
Page 16: Dimensional Drawings Of Components
PREPARING FOR INSTALLATION Dimensional drawings of components Smart weather protection hood Ø Smart weather protection hood cover Smart weather protection hood base plate Figure 4: Dimensional drawing of Smart weather protection hood 1 Weather protection hood base plate 4 Panel fixing screws (4x) 2 Mounting hole exterior wall 5 Weather protection hood panel 3 Drip rail... -
Page 17: Dimensions
PREPARING FOR INSTALLATION Flair inner cover A - A □ 233 Figure 6: Dimensional drawing of Flair V-233x233 inner cover 1 Inner cover panel 4 Inner cover base plate 2 Sound insulation insert (optional) 5 Spacer (4 x) 3 Retaining plate IB V-233x233 6 Interior wall fixing borehole Dimensions Depth/length... -
Page 18: Installation And Assembly
INSTALLATION AND ASSEMBLY Installation and assembly Read the section carefully before installation to avoid installation errors. The installation and connection of the ventilation unit must be carried out by qualified personnel. Check the scope of supply Check the delivery for completeness and transport damage upon receipt using the delivery note. Report missing items immediately. -
Page 19: Create Wall Opening
INSTALLATION AND ASSEMBLY Create wall opening CAUTION Falling masonry when creating the wall opening can lead to physical injuries and /or damage to property! • Install protection against falling masonry on building exterior. • Remove objects from the immediate vicinity of the building's exterior. In new buildings we recommend the use of the optional Simplex D160 wall installation system, D180 wall block, or Woodplex for timber post and beam construction. -
Page 20: Laying The Cables To The Wall Opening Of The Ventilation Unit
6 – 16 V DC, MZ-Home Clust-Air module CAM17 unit communication e. g.: LiYY 3x0.75 mm² in the ventilation zone Installation cable inVENTer Connect inner cover House distribution, 230 V AC, Connect operating voltage ventilation (Connect inner sub-distribution e. - Page 21 The corresponding connection diagrams and assembly steps for installing the controller are not part of this documentation! They can be found in the installation instructions for the respective control unit. (sMove, MZ-Home, inVENTer Connect controller platform). 6 – 16 V DC...
-
Page 22: Installing The Wall Sleeve
INSTALLATION AND ASSEMBLY Installing the wall sleeve Measuring tape, angle grinder, spirit level, non-pressing 2K polyurethane foam, cutter, mounting wedge set and styrofoam discs Requirements: • The wall opening Ø 180 mm is finished. • The cables to the wall opening of the ventilation unit have been laid. - Page 23 INSTALLATION AND ASSEMBLY ► Remove the styrofoam discs from the wall sleeve. ► Insert the wall sleeve into the wall opening so it is flush with the interior wall. Note the thickness of the plaster. The recess for the connection cables is located on the interior wall side and near the cables laid to the wall opening.
- Page 24 INSTALLATION AND ASSEMBLY NOTICE: Interruption of the thermal insulation composite system. Damage to the building structure! • During installation, replace the wall structure as far as the wall sleeve and if necessary guide the housing (flush-mount- ed inner covers) towards it. •...
-
Page 25: Installing The External Termination Of The Standard Ventilation Unit Variant
INSTALLATION AND ASSEMBLY Installing the external termination of the standard ventilation unit variant The assembly of the external termination variants is not part of this documentation! It can be found in the installation instructions for the respective external termination. NOTICE Installing on an unfinished exterior wall leads to damage to the exterior wall! •... - Page 26 INSTALLATION AND ASSEMBLY NOTICE: Damage to masonry/exterior wall due to incorrectly aligned drip edges! • Make sure that the slopes of both drip edges are directed towards the floor. ► Slide the base plate onto the projecting wall sleeve. Alignment of the drip edges: the slope leads to the ground.
- Page 27 INSTALLATION AND ASSEMBLY ► Hook the panel of the weather protection hood from the front into the side screws (blue arrows) of the base plate. The washers are located between the panel and the screw. ► Engage the panel downwards. ►...
- Page 28 INSTALLATION AND ASSEMBLY Installing the Flex weather protection hood Spirit level, pen, power drill with Ø 8mm drill bit, cordless screwdriver, rawl plugs (wall- plugs for insulation for insulated exterior walls), permanently elastic external sealant, sealing tape, screws Requirements: • The exterior wall is completed and even. •...
- Page 29 INSTALLATION AND ASSEMBLY ► Insert the rawl plugs into the boreholes. ► Screw the weather protection hood base plate into the rawl plugs using 4 screws and washers. TIP: When attaching the base plate to exterior walls with insulation or when using the wall installation block/Simplex wall installation system, use wallplugs for insulation for fixing purposes.
-
Page 30: Inserting The Thermal Accumulator Insert
INSTALLATION AND ASSEMBLY Inserting the thermal accumulator insert NOTICE Do not store/stack the thermal accumulator insert outside the wall sleeve as doing so will damage the thermal accumulator's ceramic. • Insert the thermal accumulator immediately after removing it from the packaging. Requirements: •... -
Page 31: Electrical Connection Of The Reversible Fan
INSTALLATION AND ASSEMBLY Electrical connection of the reversible fan The function of the iV-Smart+ ventilation system requires the simultaneous operation of two iV-Smart+ ventilation units in push-pull mode. This section therefore describes the connection of a pair of units, not a single unit. NOTICE Incorrect electrical connection will damage the fan motor! •... - Page 32 INSTALLATION AND ASSEMBLY In paired operation, one reversible fan starts in extract air mode, the other in supply air mode. This start direction is determined by the different connection sequence of the three fan BUS cables III (–) in the plug-in connector. IV (+) ►...
-
Page 33: Check Function And Complete Fan Installation
INSTALLATION AND ASSEMBLY Check function and complete fan installation ► Set ventilation operating mode (DL) on the connected controller. (see the controller's installation and operating instructions) ► Make sure that all reversible fans rotate in the direction appropriate to their connections. Start direction extract air mode: Start direction supply air mode: CW (–) -
Page 34: Installing The Inner Cover
INSTALLATION AND ASSEMBLY Installing the inner cover The assembly of any interior termination variants is not part of this documentation! It can be found in the separate installation instructions for the respective inner cover/the Connect controller platform. Spirit level, pencil, drill with 6 mm bit, cordless screwdriver, rawl plugs Requirements: •... - Page 35 ► Place the panel on the four spacers. The position arrows on the back of the inner cover panel point upwards. Check: The inVENTer logo is located at the bottom right. 4 x CLICK ► Press the locking lugs inwards on the spacers.
-
Page 36: Technical Data
TECHNICAL DATA Technical data General specifications Feature Value Operating range [°C] -20 – 50 Free from aggressive gases, dust and Extract air/outdoor air oils Flow rate in reversed mode [m³/h] 8.5 – 29 Extract airflow [m³/h] (EN 13141-8) 17 – 58 14 - 37 [with IB Flair incl. -
Page 37: Iv-Smart+ Energy Label According To Erp Directive, Regulation 1254/2014
TECHNICAL DATA iV-Smart+ energy label according to ErP Directive, Regulation 1254/2014 On the energy label you will find the following information from the product data sheet: • Energy efficiency class (SEC class) • Sound power level L • Maximum air flow (supply air) iV-Smart+;... -
Page 38: Specifications According To Erp Directive, Regulation 1254/2014
Specifications according to ErP Directive, Regulation 1254/2014 iV-Smart+ ventilation unit, demand-controlled: iV-Smart+ product data sheet according to EU Ordinance 1254/2014 dated 11 July 2014 Description Values Supplier inVENTer GmbH iV-Smart+, iV-Smart+ Corner, Model identifier iV-Smart+ Nordic iV-Smart+ Sylt, iV-Smart+ Top Cold -88.068... - Page 39 TECHNICAL DATA iV-Smart+ ventilation unit, manually controlled: iV-Smart+ product data sheet according to EU Ordinance 1254/2014 dated 11 July 2014 Description Values Supplier inVENTer GmbH iV-Smart+, iV-Smart+ Corner, Model identifier iV-Smart+ Nordic iV-Smart+ Sylt, iV-Smart+ Top Cold -82.062 SEC class / Specific Energy Con- Average -39.422...
-
Page 40: Scope Of Supply
SCOPE OF SUPPLY Scope of supply Standard components All standard components are also available as spare parts. Further accessories and spare parts can be found in the separate accessories overview. Contact your local distributor to order components for your ventilation system. Component Item number iV-Smart+... -
Page 41: Troubleshooting And Disposal
TROUBLESHOOTING AND DISPOSAL Troubleshooting and disposal Troubleshooting Fault Possible cause Remedy No electrical power. Check fuse. Check wiring for correct polarity. Installation error. Check all connectors for correct fit. Check the use of wire ferrules. Fan failure Fan defective. Replace fan. Controller/power supply Switching controller/power supply. -
Page 42: Warranty And Guarantee
Manufacturer guarantee inVENTer GmbH provides a five-year warranty for all electrical components and the wall sleeve, as well as a 30-year warranty on the ceramic component of the thermal accumulator. This covers premature product wear. - Page 43 WARRANTY AND GUARANTEE NOTES iV-Smart+ ventilation unit | Installation instructions...
- Page 44 GmbH Ortsstraße 4a D-07751 Löberschütz Germany www.inventer.de Subject to modifications. We accept no liability for printing errors. Item number: 5001-0038 Version: 1.1 – 07/2021...
Need help?
Do you have a question about the iV-Smart+ and is the answer not in the manual?
Questions and answers