Table of Contents
Advertisement
Advertisement
Table of Contents
Troubleshooting

Related Manuals for Verathon BLADDERSCAN PRIME


Summary of Contents for Verathon BLADDERSCAN PRIME
- Page 1 BLADDERSCAN PRIME OPERATIONS & MAINTENANCE MANUAL BLADDERSCAN ®...
- Page 2 0900‑4510‑06‑60...
- Page 3 BLADDERSCAN PRIME OPERATIONS & MAINTENANCE MANUAL Effective: December 14, 2016 Caution: Federal (United States) law restricts this device to sale by or on the order of a physician.
- Page 4 0123 Copyright © 2016 Verathon, Inc. All rights reserved. BladderScan, the BladderScan symbol, Verathon, the Verathon Torch symbol, and NeuralHarmonics are trademarks of Verathon Inc. All other brand and product names are trademarks or registered trademarks of their respective owners.
-
Page 5: Table Of Contents
TABLE OF CONTENTS IMPORTANT INFORMATION .............................1 OVERVIEW ................................1 Product Description ..............................1 Statement of Intended Use .............................1 Notice to All Users ..............................1 Statement of Prescription ............................1 Essential Performance ............................1 SAFETY INFORMATION ............................2 Ultrasound Energy Safety ............................2 Contraindications ..............................2 Cautions & Warnings ..............................2 INTRODUCTION ................................7 SYSTEM OVERVIEW ..............................7 Components &... - Page 6 SETTING UP................................16 ASSEMBLING THE INSTRUMENT ........................16 Procedure 1. Perform the Initial Inspection .....................16 Procedure 2. Charge the Battery ........................17 Procedure 3. Attach the Probe to the Console ....................19 Procedure 4. Attach the Console Base or Printer ...................20 Procedure 5. Attach the Instrument to the Mobile Cart (Optional) ..............21 Procedure 6.
- Page 7 MAINTENANCE & SAFETY ............................55 REGULAR INSPECTIONS ...........................55 SYSTEM SOFTWARE ............................55 DEVICE DISPOSAL ...............................55 MAINTENANCE ..............................56 Procedure 1. Load Thermal Paper into the Printer ..................56 Procedure 2. Run a Self‑Test ..........................58 Procedure 3. Update the Software ........................59 Procedure 4. Calibrate the Instrument ......................60 Procedure 5.
- Page 8 WARRANTY ................................74 ORIGINAL FIRST YEAR TOTAL CUSTOMER CARE WARRANTY ...............74 PREMIUM TOTAL CUSTOMER CARE WARRANTY ..................75 DISCLAIMER OF ADDITIONAL WARRANTIES ....................75 PRODUCT SPECIFICATIONS ..........................76 SYSTEM SPECIFICATIONS ..........................76 COMPONENT SPECIFICATIONS ........................79 ELECTROMAGNETIC COMPATIBILITY ......................82 GLOSSARY .................................86...
-
Page 9: Important Information
Stored exams can be accessed at any time using the console display. STATEMENT OF INTENDED USE The BladderScan Prime system is an ultrasound device intended to be used for measuring the urine volume in the bladder noninvasively. NOTICE TO ALL USERS The BladderScan Prime system should be used only by individuals who have been trained and authorized by a physician or the institution providing patient care. -
Page 10: Safety Information
For more information on ALARA, please refer to the American Institute of Ultrasound in Medicine publication, Medical Ultrasound Safety. The ultrasound output power of the BladderScan Prime system is not user adjustable and is limited to the minimum level necessary for effective performance. For more information about acoustic output levels, see Product Specifications chapter on page 76. - Page 11 CAUTION To maintain electromagnetic interference (EMI) within certified limits, the system must be used with the cables, components, and accessories specified or supplied by Verathon . For ® additional information, see the Components & Accessories Component Specifications sections. The use of accessories and/or cables other than those specified or supplied may result in increased emissions and/or decreased immunity of the system.
- Page 12 WARNINGS WARNING Do not use the system on: • Fetal patients. • Pregnant patients. • Patients with open skin or wounds in the suprapubic region. • Patients with ascites. WARNING Be aware of the following conditions that can affect ultrasound transmission: •...
- Page 13 WARNING Availability of cleaning and disinfection products varies by country, and Verathon is unable to test products in every market. For more information, please contact Verathon Customer Care or your local representative. For contact information, visit verathon.com/support.
- Page 14 The battery charger, power adapter, and power cables are not intended for patient contact. Ensure 2 m (6 ft) are maintained between the patient and these components. WARNING Never use the BladderScan Prime system to display the image of biological features other than the bladder. WARNING...
-
Page 15: Introduction
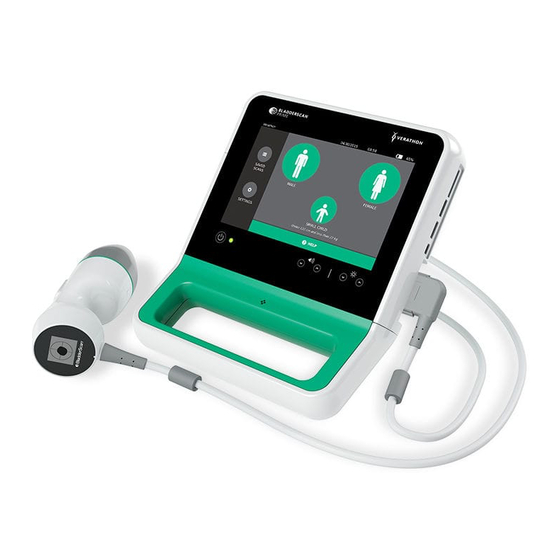
Figure 1. BladderScan Prime System The BladderScan Prime system includes an onboard tutorial as well as integrated help screens. Scanning is available in a variety of modes that are suited for different patient anatomies: male, female, and small child. In addition, the console features a variety of customizable settings and a saved scans function that allows you to recall, print, or transfer saved exams. -
Page 16: Components & Accessories
COMPONENTS & ACCESSORIES Table 1. Included System Components & Accessories INCLUDED SYSTEM COMPONENTS & ACCESSORIES Console Probe Battery Console base Battery charger Power adapter In‑service USB Media storage USB flash drive flash drive Power cord Port cover Media storage SD card Note: Plug may vary by region... - Page 17 Printer Mobile Cart Thermal Paper Additionally, quick reference materials and ultrasound gel may be available for order in your region. For more information, contact Verathon Customer Care or your local representative or visit verathon.com/support. ® Operations & Maintenance Manual: Introduction...
-
Page 18: System Features
SYSTEM FEATURES CONSOLE FEATURES The BladderScan Prime console’s primary feature is a touch‑screen display that allows you to perform scans, manage scan results, and customize settings. The console also provides controls for adjusting brightness and volume and activating the system or putting it in standby mode. A rechargeable battery is inserted into one side of the console, and the other side features a selection of ports for connecting system components and accessories such as external, removable media storage devices. -
Page 19: Probe Features
PROBE FEATURES The probe contacts the patient and transmits and receives ultrasound waves, automatically moving its internal transducer 360º to scan twelve planes to produce a three‑dimensional image of the bladder. The probe is attached to the console by a cable. After a scan, the probe displays bladder volume and targeting. Figure 3. -
Page 20: Battery & Battery Charger Features
BATTERY & BATTERY CHARGER FEATURES The BladderScan Prime system is powered by a lithium‑ion battery. The battery charger provided with the system can charge one or two batteries. Removing a discharged battery from the system and replacing it with a fresh battery does not erase any saved exams or system settings. -
Page 21: System Icons
SYSTEM ICONS CONSOLE TOUCH‑SCREEN ICONS The console touch‑screen displays the interface that controls the BladderScan Prime system. The following icons may appear on the screen, and you may tap them to complete the function associated with the icon. Table 5. - Page 22 ICON FUNCTION Help—Start the onboard tutorial or display screen‑sensitive help text. Print—Print the scan, self‑test, or savings calculation results. Note: This function is only available if you have attached the optional printer. Done—On the Results screen, save the scan result with the largest volume and return to the Home screen.
-
Page 23: Console Battery Level Icons
CONSOLE BATTERY LEVEL ICONS The battery level icon is displayed in the Status bar at the top of the touch‑screen. The icon and the percentage value next to the icon indicate the remaining battery power. For information about charging the battery, see the procedure Charge the Battery on page 17. -
Page 24: Setting Up
2. Remove the contents and verify that you have received the appropriate components for your system. 3. Inspect the components for damage. 4. If any of the components are missing or damaged, notify the carrier and Verathon Customer Care or your local representative. -
Page 25: Procedure 2. Charge The Battery
When the BladderScan Prime system is in standby mode, it draws some power from the battery. If you do not plan to use the instrument, remove the battery to prevent it from discharging. When batteries are not in use, they should be stored in the battery charger so they remain fully charged. - Page 26 5. Insert one or two batteries into the recesses in the battery charger. It is recommended that you charge both batteries when setting up the BladderScan Prime system for the first time. 6. Allow the battery to fully charge. The indicator lights on the battery charger indicate the status: •...
-
Page 27: Procedure 3. Attach The Probe To The Console
PROCEDURE 3. ATTACH THE PROBE TO THE CONSOLE Once the probe is attached to the console, it can remain attached between uses. 1. Locate the port on the side of the console. 2. Align the probe cable connector with the port on the console. 3. -
Page 28: Procedure 4. Attach The Console Base Or Printer
PROCEDURE 4. ATTACH THE CONSOLE BASE OR PRINTER A console base is included with the system. An optional printer is also available for order. Verathon ® recommends that you attach either the console base or the printer, as it provides support for the console and protection to the contacts on the back of the console. -
Page 29: Procedure 5. Attach The Instrument To The Mobile Cart (Optional)
PROCEDURE 5. ATTACH THE INSTRUMENT TO THE MOBILE CART (OPTIONAL) The BladderScan Prime system is portable and can be carried or attached to a mobile cart. Installing the system on the optional mobile cart will allow you to move the system, along with related accessories, to the patient examining area or bedside, as necessary. - Page 30 3. Using the orientation shown in the following images, screw the quick‑release locking plate to the back panel of the console. Quick‑release locking plate 4. Seat the locking plate of the console on the quick‑release mount. When properly situated, the console sits securely on the mount, and the quick‑release lever automatically snaps into the locked (down) position.
- Page 31 6. Adjust the locking pin to the locked (down) position. This secures the quick‑release lever in the locked position. Locking pin in locked position ADJUST THE MONITOR ANGLE Before you start using the console, adjust the angle for optimal viewing. The ideal angle minimizes glare and maximizes visibility.
-
Page 32: Procedure 6. Install The Port Cover (Optional)
PROCEDURE 6. INSTALL THE PORT COVER (OPTIONAL) The BladderScan Prime console features a series of ports that allow you to connect external media storage devices, such as SD cards or USB flash drives. If these ports will not be used at your facility, you can hide them by attaching the port cover included with your system. -
Page 33: Procedure 7. Insert A Battery
6. If you are completing the initial setup, it is recommended that you continue to the following section in order to customize the system settings. If you do not want to use the BladderScan Prime system immediately, wait for startup to complete and then press the Standby button to place the system in standby mode. -
Page 34: Configuring Settings
CONFIGURING SETTINGS The BladderScan Prime system is configured with default settings that are appropriate for many users. This section contains instructions for modifying the defaults for your facility’s needs. PROCEDURE 1. CONFIGURE GENERAL SETTINGS This procedure helps you configure your regional and facility preferences, such as the name of your facility, the language in which your system operates, and your formatting preferences for the time, date, currency, and numbers. - Page 35 4. Tap Date, Time and Currency Format. The Date, Time and Currency screen appears. 5. In the Time field, tap the hour or minutes, vertically swipe to view a value, and then tap the value to select it. 6. In the Time field, tap the time format. The time format scrolls through AM, PM, and 24‑hour displays. If you select a new time format, the hours and minutes values are updated as necessary.
-
Page 36: Procedure 2. Configure Exam Settings
PROCEDURE 2. CONFIGURE EXAM SETTINGS The BladderScan Prime system is configured with default exam settings. Configurable settings include: • Enable live imaging pre‑scan • Display bladder outline on B‑mode images • Show the small child option on the Home screen •... -
Page 37: Procedure 3. Customize Cost Savings Calculations
PROCEDURE 3. CUSTOMIZE COST SAVINGS CALCULATIONS The BladderScan Prime system provides default values for calculating the cost savings that result from scanning rather than catheterizing patients. The default settings can be customized to reflect the rates and costs at your facility. To change the currency used for cost savings calculations, see... - Page 38 3. Tap a field to update, and then enter new values. Numeric fields accept decimal input but round to the nearest whole number. • UTI Rate—Select the rate of urinary tract infections (UTIs) resulting from catheterizations. • UTI Cost—Select the cost per UTI at your facility. •...
-
Page 39: Procedure 4. Configure Printed Report Settings
PROCEDURE 4. CONFIGURE PRINTED REPORT SETTINGS If a printer is attached to the BladderScan Prime console, you can print scan results. Reports are printed vertically, like a receipt. Scan reports are made up of a number of sections. Some of the sections are optional. -
Page 40: Procedure 5. Configure Calibration Settings
PROCEDURE 5. CONFIGURE CALIBRATION SETTINGS Verathon recommends that you calibrate the probe every 12 months. By default, the BladderScan Prime ® system reminds you before calibration is due. You can change how early the configuration message is displayed and suppress the configuration reminder entirely. -
Page 41: Using The Instrument
USING THE INSTRUMENT WARNING Do not use the system on: • Fetal patients. • Pregnant patients. • Patients with open skin or wounds in the suprapubic region. • Patients with ascites. WARNING Be aware of the following conditions that can affect ultrasound transmission: •... -
Page 42: Measuring Bladder Volume
The following section explains how to perform a scan, as follows: Start the System Prepare for the Exam Input Patient Information or Operator ID (Optional) Measure Bladder Volume Review Exam Results Print, Save, or Exit an Exam View Cost Savings After the exam has been saved, you can manage saved exam results as follows: Recall a Saved Exam Delete a Saved Exam... -
Page 43: Procedure 2. Prepare For The Exam
PROCEDURE 2. PREPARE FOR THE EXAM 1. Ensure you are familiar with the instrument touch‑screens and probe displays. For more information about the components and user interface, see the Introduction chapter on page 7. 2. Check the instrument battery icon to ensure the battery has sufficient power. Note: If the battery icon is 20% full or less, replace the battery with a fully charged battery before proceeding. -
Page 44: Procedure 3. Input Patient Information Or Operator Id (Optional)
• Date of birth • Last name Once entered, the Patient ID displays on appropriate BladderScan Prime screens. Patient information can also be printed on reports. The Operator ID may also be updated at this time. The Patient ID and Operator ID fields are displayed at the top of many screens. -
Page 45: Procedure 4. Measure Bladder Volume
Use one of the following options to measure bladder volume: • Option 1: Pre‑Scan Disabled • Option 2: Pre‑Scan Enabled By default, the BladderScan Prime system has pre‑scan disabled. To enable pre‑scan, see Configure Exam Settings on page 28. OPTION 1. PRE‑SCAN DISABLED 1. - Page 46 4. Gently press the probe onto the lower abdomen through the gel. The probe cable should be oriented at 90 degrees to the sagittal plane of the patient. Sagittal plane 90° Probe cable 5. If you are scanning an obese patient, lift as much abdominal adipose tissue out of the way of the instrument as possible.
- Page 47 OPTION 2. PRE‑SCAN ENABLED You can locate the bladder with or without a bladder outline to assist with aiming. By default, the BladderScan Prime system has the bladder outline display turned on. To disable the bladder outline, see Configure Exam Settings on page 28.
- Page 48 4. Gently press the probe onto the lower abdomen through the gel. The probe cable should be oriented at 90 degrees to the sagittal plane of the patient. Sagittal plane 90° Probe cable 5. If you are scanning an obese patient, lift as much abdominal adipose tissue out of the way of the instrument as possible.
-
Page 49: Procedure 5. Review Exam Results
PROCEDURE 5. REVIEW EXAM RESULTS This section describes the procedures that can occur after the scan. Perform the procedures that are applicable for your installation. The accuracy range for the instrument is determined by using the following calculation: ± (15% ± 15 mL). For example, if the volume measurement is 250 mL, the accuracy range is calculated as follows: 250 mL ×... - Page 50 VIEW B‑MODE IMAGES 4. If you want to view B‑mode images, tap the B‑mode icon. Dual‑pane B‑mode images of the scan appear. In the top‑left corner of each of the B‑mode images, the line through the human figure icon indicates the currently displayed plane.
-
Page 51: Procedure 6. Print, Save, Or Exit An Exam
PROCEDURE 6. PRINT, SAVE, OR EXIT AN EXAM 1. If you want to record patient information, tap Patient ID and then add patient information using the virtual keyboard. Once an exam is saved, you cannot add patient information. 2. If you want to print the exam results, tap Print. Note: You can customize the information to be printed. -
Page 52: Procedure 7. View Cost Savings
PROCEDURE 7. VIEW COST SAVINGS The BladderScan Prime system calculates and displays information related to cost savings, catheterizations avoided, and UTIs avoided. The Savings Calculations screen lists the number of exams, catheterizations avoided, UTIs avoided, and savings. The default settings can be customized to reflect the rates and costs at your facility. For more information on... -
Page 53: Managing Saved Exams
If a USB drive or SD card is attached, the BladderScan Prime system stores saved exams on the USB drive or SD card. If an attached USB drive or SD card runs out of storage space, the system allows you to switch drives or cards. -
Page 54: Procedure 2. Delete A Saved Exam
2. If you want to sort exams using a different value, tap a sortable field header. The field headers let you sort the exam list using the following fields. The columns may be sorted in ascending or descending order. The currently selected sorting field is highlighted in white, and an arrow icon indicating the direction of the sort is shown next to the column label. -
Page 55: Procedure 3. Export Saved Exams
By default, saved scans are retained in the BladderScan Prime system’s internal storage. When you insert a USB drive or SD card into the BladderScan Prime console, the system immediately begins viewing the new media for saved scans. If no scans have previously been saved to the external media, the Saved Scans screen appears blank. -
Page 56: Cleaning & Disinfecting
WARNING Availability of cleaning and disinfection products varies by country, and Verathon is unable to test products in every market. For more information, please contact Verathon Customer Care or your local representative. For contact information, visit verathon.com/support. - Page 57 Cleaning and disinfecting the BladderScan Prime system is an important part of using and maintaining the system. Prior to each use, ensure all system components have been cleaned and disinfected according to the guidance provided in Table The following table describes the risk assessment for each system component, including the Spaulding’s/CDC classification for the minimum required disinfection level.
-
Page 58: Procedure 1. Clean & Disinfect The System
Cleaning is critical to ensuring the component is ready for disinfection. Failure to properly clean the device could result in a contaminated instrument after completing the disinfection procedure. Use this procedure in order to clean the BladderScan Prime probe, probe cable, or console. Review the information in the Best Practices Compatibility &... - Page 59 CLEAN THE PROBE CABLE & PROBE DISPLAY 6. Using a new Metrex CaviWipes,™ wipe the entire probe cable and probe display until all visible ® contaminants are removed. CLEAN THE PROBE 7. Later in this procedure, you will use cold, running water. Position the console near the sink so the probe can reach the water later when needed, but ensure the console is far enough away to stay dry.
- Page 60 12. Using cold, running water, rinse the lower portion of the probe for 1 minute. While rinsing, use the brush to scrub the button, dome gasket, and label recess. 13. Using a new Metrex CaviWipes,™ wipe the probe from the display toward the dome for at least ®...
- Page 61 16. Continue to the following section, Disinfect the Probe. Low‑level disinfection of the probe dome is required between uses. DISINFECT THE PROBE Low‑level disinfection of the probe dome (the gray area at the end of the probe) is required between uses. Table 10.
- Page 62 19. Allow the probe to air dry. Note: If you are using a cart, place the probe into the cart with the dome facing upwards. This helps prevent the disinfected probe dome from coming in contact with the cart. Cleaning and disinfection is complete. The system is ready for use on a patient.
-
Page 63: Maintenance & Safety
Verathon Customer Care or your local representative. SYSTEM SOFTWARE Verathon may release software upgrades for the BladderScan Prime system. Software upgrades are supplied directly by Verathon or an authorized representative. For information about how to upgrade the device software, see Update the Software on page 59. -
Page 64: Maintenance
MAINTENANCE The following procedures explain how to load printer paper, test and calibrate the BladderScan Prime instrument, and update system software. PROCEDURE 1. LOAD THERMAL PAPER INTO THE PRINTER WARNING To avoid the risk of injury, when the printer door is open: •... - Page 65 4. Place a roll of Verathon thermal paper (part 0800‑0319) inside the door as shown so that the loose end ® of the paper exits on the top of the roll, on the side closest to the console. 5. Hold the paper end so that the it will protrude from the top of the printer, and then close the printer door.
-
Page 66: Procedure 2. Run A Self-Test
3. To run a new self‑test, tap Perform Self‑Test. The instrument completes the self‑test and prints the results automatically. 4. Scroll through the on‑screen test results by vertically swiping with your finger on the touch‑screen. 5. If the screen indicates any failed tests or abnormal results, contact Verathon Customer Care or your ®... -
Page 67: Procedure 3. Update The Software
PROCEDURE 3. UPDATE THE SOFTWARE From time to time, you may receive software updates for your BladderScan Prime system. Use the following procedure to install updated software. Note: Although the update process preserves system settings, it clears saved exams. Before proceeding,... -
Page 68: Procedure 4. Calibrate The Instrument
62. To perform this procedure, you must have a calibration tank designed for the BladderScan Prime instrument. For more information, contact Verathon Customer Care or your local representative. 1. Place the calibration tank on a flat, non‑reflective surface, and then remove the lid. - Page 69 • Minimize the amount of air bubbles in the water and on the target. • Verify that the probe is seated properly in the calibration lid. 13. Tap Calibrate to begin recalibration. If repeat calibration failures occur, contact Verathon ®...
-
Page 70: Procedure 5. Test The Probe
PROCEDURE 5. TEST THE PROBE The BladderScan Prime system includes the CaliScan™ feature, which tests the probe’s mechanical components and transducer function. It is recommended that you perform a CaliScan test as part of a regular maintenance schedule, after the probe has been accidentally dropped, or when the probe has been in storage for an extended amount of time. -
Page 71: Help & Troubleshooting
HELP & TROUBLESHOOTING HELP RESOURCES PROCEDURE 1. WATCH THE ONBOARD TUTORIAL The BladderScan Prime system includes an onboard tutorial. It is recommended that you watch the tutorial prior to using the system. Use the tutorial to: • Use the console scanning‑related screens •... -
Page 72: Device Repair
DEVICE REPAIR The BladderScan Prime system components are not user‑serviceable. Verathon does not make available any circuit diagrams, component parts lists, descriptions, or other information that would be required for repairing the device and related accessories. All service must be performed by a qualified technician. -
Page 73: Troubleshooting Procedures
2. Press the Standby button again to activate the BladderScan Prime system. Allow sufficient time for the instrument to activate. 3. If the message still appears, replace the battery according to the instructions in the procedure... -
Page 74: Procedure 3. Troubleshoot Probe Aiming Issues
PROCEDURE 3. TROUBLESHOOT PROBE AIMING ISSUES If a scan or aiming during pre‑scan is unsuccessful or “off‑target” and moving the probe in the expected direction of the bladder moves the bladder further off‑target, use this procedure in order to troubleshoot the issue. -
Page 75: Procedure 4. Restore Factory Defaults
1. On the Home screen, tap Settings. 2. Tap Admin, and then tap Restore Defaults. 3. If you want to restore the system defaults, tap Yes. The BladderScan Prime instrument restores factory settings, and then restarts. Operations & Maintenance Manual: Help & Troubleshooting... -
Page 76: Procedure 5. Troubleshoot Printer Power Issues
PROCEDURE 5. TROUBLESHOOT PRINTER POWER ISSUES WARNING To avoid the risk of injury, when the printer door is open: • Do not touch the printer mechanism or print head, which may be hot from recent printing. • Do not touch the surface of the paper cutter. IMPORTANT To avoid damaging the equipment, remove the battery prior to connecting or disconnecting the printer or console base. - Page 77 4. Using a screwdriver with a Phillips bit, unscrew the two screws securing the printer to the console. Stop unscrewing when you encounter resistance; the screws are not designed to be completely removed from the printer. 5. Lift the printer away from the console. 6.
-
Page 78: Procedure 6. Troubleshoot Irregular Printouts
10. If you would like to reattach the console to a mobile stand, complete the procedure Attach the Instrument to the Mobile Cart (Optional) on page 21. 11. If the printer continues to be unresponsive, contact Verathon Customer Care. ® PROCEDURE 6. TROUBLESHOOT IRREGULAR PRINTOUTS... - Page 79 8. Load the thermal paper and close the printer door according to the instructions in the procedure Load Thermal Paper into the Printer on page 56. 9. If the printer continues to produce irregular printouts, contact Verathon Customer Care. ® Operations & Maintenance Manual: Help & Troubleshooting...
-
Page 80: Procedure 7. Clear A Paper Jam
6. If the paper on the outside of the printer is ripped or torn, tear it off, pulling to one side to aid in cutting. 7. If you cannot release the paper jam or the printer continues to jam, please contact Verathon ®... -
Page 81: Procedure 8. Replace The Printer Drive Roller
6. Load the thermal paper and close the printer door according to the instructions in the procedure Load Thermal Paper into the Printer on page 56. 7. If the printer continues to malfunction, contact Verathon Customer Care. ® Operations & Maintenance Manual: Help & Troubleshooting... -
Page 82: Warranty
® for one (1) year from the date of shipment from Verathon and applies only to the original purchaser of the system. The terms of this warranty are subject to the Terms and Conditions of Sale or any other contractual document between the parties. -
Page 83: Premium Total Customer Care Warranty
The information, descriptions, recommendations, and safety notations in this manual are based upon Verathon experience and judgment. The contents of this manual should not be considered to be all‑inclusive or to cover all contingencies. -
Page 84: Product Specifications
PRODUCT SPECIFICATIONS SYSTEM SPECIFICATIONS OVERALL SYSTEM SPECIFICATIONS Table 11. General System Specifications ITEM SPECIFICATION General Specifications Classification Internally powered, Type BF Console 7 years Probe 7 years Expected product life Printer 7 years Battery charger 7 years Console IPX0 Probe IPX4 Ingress protection (IP) Printer... - Page 85 Table 12. Ultrasound Acoustic Output Parameters (IEC Standard) NON‑SCAN INDEX LABEL NON‒ SCAN SCAN APRT APRT ≤1 cm² >1 cm² Maximum index value 0.406 0.0028 — — — (MPa) 0.680 (mW) 0.624 — — † min of [P ), I (mW) —...
- Page 86 30 mL in male or female scanning modes or below 15 mL in small child mode. While the upper threshold of the accuracy range is 999 mL, the system is capable of detecting and displaying bladder volumes above 999 mL. Verathon cannot guarantee the accuracy of measurements outside of the stated specifications.
-
Page 87: Component Specifications
259 mm (10.20 in) Weight 1770 g (3.90 lbs) Display 1280 x 800 pixels Electrical Specifications Input Verathon Supplied Battery, 11.7 V DC Output USB Ports, 5 V DC at 100 mA maximum from each port Insulation Type BF PROBE SPECIFICATIONS Table 16. - Page 88 48 mm (1.89 in), or 384 dots/line BATTERY SPECIFICATIONS The BladderScan Prime system is provided with two lithium‑ion batteries. A battery symbol on the touch‑screen display is always present, indicating how much power remains and when the battery needs to be changed.
- Page 89 BATTERY CHARGER SPECIFICATIONS Table 19. Battery Charger Specifications SPECIFICATION DESCRIPTION General Specifications Height 58 mm (2.30 in) Width 124 mm (4.89 in) Depth 175 mm (6.89 in) Weight 385 g (0.85 lbs) Electrical Specifications Input voltage 24 V DC Input frequency Input current 2.5 A Input connection...
-
Page 90: Electromagnetic Compatibility
Guidance and Manufacturer’s Declaration—Electromagnetic Emissions The BladderScan Prime system is intended for use in the electromagnetic environment specified below. The customer or the user of the BladderScan Prime system should assure that it is used in such an environment. EMISSIONS TEST COMPLIANCE ELECTROMAGNETIC ENVIRONMENT –... - Page 91 Guidance and Manufacturer’s Declaration —Electromagnetic Immunity The BladderScan Prime system is intended for use in the electromagnetic environment specified below. The customer or the user of the BladderScan Prime system should assure that it is used in such an environment. COMPLIANCE ELECTROMAGNETIC ENVIRONMENT –...
- Page 92 Guidance and Manufacturer’s Declaration —Electromagnetic Immunity The BladderScan Prime system is intended for use in the electromagnetic environment specified below. The customer or the user of the BladderScan Prime system should assure that it is used in such an environment. COMPLIANCE ELECTROMAGNETIC ENVIRONMENT –...
- Page 93 The BladderScan Prime system is intended for use in an electromagnetic environment in which radiated RF disturbances are controlled. The customer or the user of the BladderScan Prime system can help prevent electromagnetic interference by maintaining a minimum distance between portable and mobile RF communications equipment (transmitters) and the BladderScan Prime system as recommended below, according to the maximum output power of the communications equipment.
-
Page 94: Glossary
GLOSSARY The following table provides definitions for specialized terms used in this manual or on the product itself. For a full list of caution, warning, and informational symbols used on this and other Verathon products, please ® refer to the Verathon Symbol Directory at verathon.com/symbols. - Page 95 TERM DEFINITION Short circuit protection Underwriters Laboratories Urinary tract infection Volt Watt Watt hour WEEE Waste Electrical and Electronic Equipment Operations & Maintenance Manual: Glossary...
Need help?
Do you have a question about the BLADDERSCAN PRIME and is the answer not in the manual?
Questions and answers
What do I clean it with in the hospital settings in between patients