Table of Contents
Advertisement
Quick Links
Advertisement
Table of Contents

Related Manuals for Verathon BLADDERSCAN BVM 9500


Summary of Contents for Verathon BLADDERSCAN BVM 9500
- Page 1 BLADDERSCAN BVM 9500 Operations & Maintenance Manual...
- Page 2 0900‑1596‑06‑60...
- Page 3 BLADDERSCAN BVM 9500 Operations & Maintenance Manual Effective: February 23, 2016 Caution: Federal (United States) law restricts this device to sale by or on the order of a physician.
- Page 4 0123 Copyright 2009, 2016 Verathon Inc. All rights reserved. No part of this manual may be copied or transmitted by any method without the express written consent of Verathon Inc. Verathon, the Verathon torch symbol, BladderScan, the BladderScan symbol, ScanPoint, and NeuralHarmonics are trademarks or registered trademarks, and Total Reliability Plan is a service mark of Verathon Inc.
-
Page 5: Table Of Contents
TABLE OF CONTENTS IMPORTANT INFORMATION ..........................1 Overview ................................1 Product Description ............................1 Notice to All Users ............................1 Statement of Prescription ..........................2 Statement of Intended Use ..........................2 Safety Information ..............................2 Safety & Performance Summary ........................2 Biological Safety ..............................2 Contraindications .............................2 Cautions & Warnings ............................2 INTRODUCTION ..............................5 Parts &... - Page 6 SETTING UP .................................31 Procedure 1. Unpack the Box & Check the Components ................31 Procedure 2. Charge the Batteries ......................32 Procedure 3. Install a Battery Pack in the Console ..................32 Procedure 4. Enter the Clinic Name ......................33 Procedure 5. Set the Date & Time ......................35 Procedure 6.
- Page 7 TROUBLESHOOTING ............................56 Help Resources ..............................56 Icons on the BladderScan Console ........................57 Diagnosing Problems ............................57 Instrument Does Not Turn On ........................57 Printer Problems.............................58 Factory Reset ..............................59 Procedure 1. Restore Factory Configuration ....................59 WARRANTY.................................60 Disclaimer of Additional Warranties ........................60 PRODUCT SPECIFICATIONS ..........................61 Instrument Specifications ..........................
-
Page 9: Important Information
LCD screen. BladderScan BVM 9500 measurements can be printed via an onboard printer or transmitted using HIPAA‑compliant ScanPoint image management technology for storage and archiving on Verathon servers. ® ®... -
Page 10: Statement Of Prescription
STATEMENT OF PRESCRIPTION Caution: Federal (United States) law restricts this device to sale by or on the order of a physician. STATEMENT OF INTENDED USE The BladderScan BVM 9500 is intended to project ultrasound energy through the lower abdomen to obtain an image of the bladder and measure urinary bladder volume and bladder wall mass noninvasively. - Page 11 When the BladderScan BVM 9500 has reached the end of its useful service life, return the device, charging cradle, and related accessories to a Verathon ® Service Center for proper disposal.
- Page 12 WARNING Risk of inaccurate measurements/results. When using the BladderScan BVM 9500 be aware of the following conditions which can affect ultrasound transmission and the accuracy of exam results. • Use care when scanning patients who have had supra‑pubic or pelvic surgery. Scar tissue, surgical incisions, sutures, and staples can affect ultrasound transmission and accuracy.
-
Page 13: Introduction
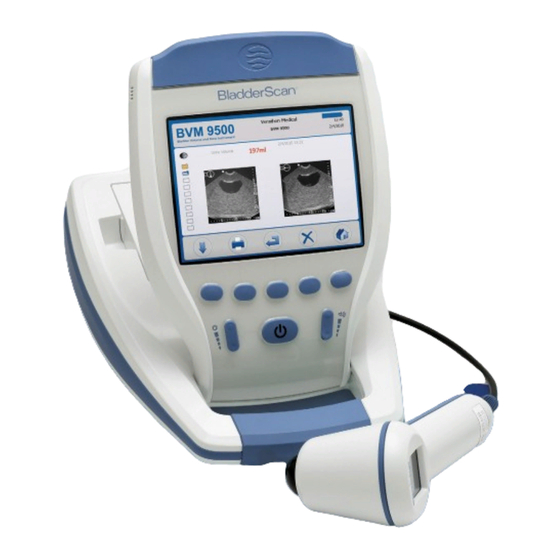
INTRODUCTION PARTS & FEATURES The BladderScan BVM 9500 has two main components: the console and the probe. The console and probe are linked by a detachable cable. The BladderScan BVM 9500 controls and indicators are illustrated in Figure 1. Figure 1. BladderScan BVM 9500 Controls and Indicators Console Battery Status Indicator Main Display... -
Page 14: Probe Components
PROBE COMPONENTS The probe transmits and receives ultrasound waves, automatically moving its internal probe 360º to scan 24 different planes to produce a three‑dimensional image of the bladder. The probe is attached to the console by a cable. The probe has three main features: Table 1. -
Page 15: Battery Charger/Wireless Hub
BATTERY CHARGER/WIRELESS HUB The BladderScan BVM 9500 is powered by a Lithium‑ion (Li‑Ion) battery. The battery charger provided with the system can charge two batteries while simultaneously functioning as the wireless hub linking the BVM 9500 to the ScanPoint host computer. A battery icon on the instrument display is always present, ®... -
Page 16: Components & Accessories
COMPONENTS & ACCESSORIES Table 4. Components & Accessories DESCRIPTION BVM 9500 console BVM 9500 probe Battery charger/wireless hub Lithium‑ion battery (2 provided) Thermal Paper Roll for the printer BladderScan BVM 9500 Medical Cart (optional) ScanPoint ® with QuickPrint user documentation (optional) Calibration Kit (optional—requires ScanPoint with QuickPrint software. Includes Calibration Container, Calibration Target, etc.) Acoustic Coupling Gel, 0.25 liter (optional) Universal Accessory Basket for Medical Cart (optional) -
Page 17: Icons & Buttons
ICONS & BUTTONS This section describes BladderScan BVM 9500 displays and button functions. The console display presents information that varies depending on the current instrument function. The functions of the five buttons below the display vary according to current instrument mode and function. Button functions are indicated by icons in the display footer, immediately above the each button. - Page 18 SCREEN/MODE ACTIVE BUTTONS Power, Scan: opens Aim/Scan screen: Results Screen (1) Record: press to record voice annotation, press Stop to end voice Appears when the operator annotation, (2) Print: print to onboard printer, (3) Play: press to play voice releases the SCAN button annotation;...
- Page 19 SCREEN/MODE ACTIVE BUTTONS Power, (1) Select next setting in list, (2) Select previous setting in list, (3) Select next option/Enter, (4) Select previous option, (5) Home (return to Home screen). Preferences list and options: Languages: English (default), Chinese Simplified, Chinese Traditional, Czech, General Preferences Danish, Dutch, Finnish, French, German, Greek, Hungarian, Italian, Japanese, Screen Korean, Norwegian, Portuguese, Spanish, Swedish, Turkish.
-
Page 20: Display Screens
DISPLAY SCREENS HOME SCREEN The Home screen appears when the BVM 9500 is first powered on. The Home screen serves as a starting point for all of the instrument functions. Press the button to toggle between Male and Female modes. The Bladder Volume Mode home screen displays: •... - Page 21 Table 6. Home Screen Buttons BUTTON FUNCTION Press to toggle between two possible scan options: Take a bladder volume measurement of a female patient who has not had a hysterectomy. (When the female icon is illuminated, the BVM 9500 will assume the patient has a uterus.) Take a bladder volume measurement of a male patient, or a female patient who has had a hysterectomy.
- Page 22 SCAN SCREEN The Scan screen (Figure 4) appears and displays a progressively updating image of the bladder outline. When the ultrasound measurement is complete, the Results screen opens automatically. The five buttons below the display do not function during the scan. Figure 4.
- Page 23 RESULTS SCREEN The Results screen (Figure 5) appears automatically when a scan is complete. The Results screen displays the bladder outline, the calculated bladder volume and the ultrasound‑estimated bladder weight (UEBW). Figure 5. Results Screen Figure 5, a standard deviation value indicating the UEBW measurement confidence is displayed as a +/‑ range.
- Page 24 Table 7. Interpreting Results Screen UEBW Measurement Data AIMING UEBW ARROW RECOMMENDED ACTION MEASUREMENT PRESENT? SYMBOL Accept UEBW measurement Adjust probe pressure and/or probe angle and scan again. Depending on ≈ patient anatomy, it may not be possible to get an = sign. >...
- Page 25 REVIEW SCREEN The Review screens (Figure 7 Figure 8) open when you select a saved exam (blue folder icon) to review. The displays shows the ultrasound images associated with the selected exam. A green open‑folder icon indicates which exam is being viewed. While reviewing saved exams, the buttons below the display allow you to print, replay, or delete exam data Figure 7.
- Page 26 Select the Return button on Review Screen 1 to view Review Screen 2 with bladder wall images (Figure Figure 8. Review Screen 2 Table 10. Review Screen 2 Buttons BUTTON FUNCTION Press to select the next exam in the list. Press to print the results for the currently selected exam on the onboard printer.
- Page 27 TUTORIAL SCREEN To open the Tutorial Screen (Figure 9) press the button from the Home screen. The Tutorial screen presents a menu of training modules. To select a title, press either the button until the desired title is highlighted (red).
- Page 28 VIDEO VIEWING SCREEN The Video Viewing screen (Figure 10) is activated by pushing the button on the Tutorial screen (Figure Note: The scan button is disabled during video playback. Figure 10. Video Viewing Screen SETTINGS SCREEN To open the Settings screen (Figure 11), push the button on the Home screen.
- Page 29 Figure 11. Settings Screen Start Menu Table 12. Settings Screen Buttons BUTTON FUNCTION Next: Press to select the next setting in the list. Previous: Press to select the previous setting in the list. Enter: Press to select the highlighted setting. No function.
- Page 30 ALPHA‑NUMERIC SCREEN This screen allows you to select the appropriate alpha‑numeric characters for entering your health care institution’s name. Figure 12. Alpha‑Numeric Screen Table 13. Alpha‑Numeric Screen Buttons BUTTON FUNCTION Press to move down in the grid. Press to move to the right in the grid. Press to add the highlighted character to the name.
- Page 31 DATE & TIME SCREEN This screen allows you to adjust the date and time. If the time display is set to show a 24‑hour clock, the hour units are 0 ‑ 23. If the clock is set to show a 12‑hour clock, the hour units are 1 AM ‑ 12 AM and 1 PM ‑ 12 PM.
- Page 32 Table 14. Date & Time Screen Buttons BUTTON FUNCTION Move forward one changeable unit (e.g. hours, minutes, AM/PM, etc.). Press to move back one changeable unit. Press to add and/or toggle digits as appropriate (hours, minutes, AM/PM, months, day, years). Press and hold the button to move through options more quickly.
- Page 33 GENERAL PREFERENCES SCREEN This screen displays a list of available settings and their current values. Available settings: • Language: English (default), Chinese Traditional, Czech, Danish, Dutch, Finnish, French, German, Greek, Italian, Hungarian, Japanese, Korean, Norwegian, Portuguese (European), Spanish, Swedish, Turkish. •...
- Page 34 Table 15. General Preferences Screen Buttons BUTTON FUNCTION Previous: Press to select the previous setting in the list. Next: Press to select the next setting in the list. For settings with a list of options, press to select the next option. For settings with a list of options, press to select the previous option.
- Page 35 SAVINGS PREFERENCES SCREEN To open the Savings Preferences screen, select Savings Preferences from the Settings Screen (Figure 11). Use this screen to enter base values used to calculate the savings to your organization from using the BladderScan BVM 9500 rather than catheterization. Preferences lists and options: •...
- Page 36 Table 16. Savings Preferences Screen Buttons BUTTON FUNCTION Previous: Press to select the previous setting in the list. Next: Press to select the next setting in the list. For settings with a list of options, press to select the next option. Press and hold to move through options more quickly.
-
Page 37: Sleep Mode
SCANPOINT SCREEN Note: Only available if optional ScanPoint software is installed on a PC. ® To open the ScanPoint screen, press from the Home screen. The ScanPoint screens display information about the status of the link between the BladderScan instrument and the ScanPoint host computer (Figure 18). -
Page 38: Memory Optimization During Power Down
MEMORY OPTIMIZATION DURING POWER DOWN When the power is turned off, the BladderScan BVM 9500 may begin an internal process of memory optimization. This process takes several minutes. When complete, the device will shut down. An alert appears on the display during the memory optimization process (Figure 21). -
Page 39: Setting Up
Set the shipping container right side up and carefully open the top flaps (do not insert anything sharp through the top of the box). Remove the contents and verify that you have received everything listed below. If anything is missing or damaged, notify your local representative or Verathon Customer Care. -
Page 40: Procedure 2. Charge The Batteries
PROCEdURE 2. CHARGE THE BATTERIES Two Lithium‑ion batteries are included with the BladderScan BVM 9500. One battery can be recharged in the battery charger/wireless hub while the other is installed in the BladderScan instrument. This ensures that there is no instrument downtime. The charger will bring the batteries to a full charge within 6 hours or less. Note: Before using the BladderScan BVM 9500 for the first time, you will need to charge both batteries.: 1. -
Page 41: Procedure 4. Enter The Clinic Name
PROCEdURE 4. ENTER THE CLINIC NAME You can customize your BladderScan BVM 9500 by entering your facility’s name and current date and time. This information will subsequently be included on BladderScan displays and all printouts of exam results. ® Note: Use of extended‑Latin and/or non‑Latin characters: The following instructions explain how to enter a facility name that uses only standard Latin characters. - Page 42 4. On the Alpha‑Numeric screen (Figure 24), use the buttons to move to the desired character. ‑ When the desired character is highlighted (red), press the button to add it to your text. Use the button to delete characters. •...
-
Page 43: Procedure 5. Set The Date & Time
PROCEdURE 5. SET THE dATE & TIME The clock can hold the current time and date setting for up to five minutes after the battery is removed. Time and date settings will be lost if the battery is removed from the instrument for longer than five minutes. 1. -
Page 44: Procedure 6. Load A Roll Of Thermal Paper
SETTING GENERAL PREFERENCES & SAVINGS PREFERENCES Note: See page 24 for information about setting General Preferences, Savings Preferences, and Self‑Test Options. General Preferences, Savings Preferences, and Self‑Test Options can be accessed from the Settings screen. General preferences include options for: Language, Date Format, Time Format, Calibration Warning, Print Report Type, Print UEBW and Manual Wall Thickness Mode. -
Page 45: Procedure 7. Assemble The Medical Cart (Optional)
PROCEdURE 7. ASSEMBLE THE MEdICAL CART (OPTIONAL) The system is completely portable and can be easily moved and positioned for convenient use. Installing the system on the optional mobile cart will allow you to move the BladderScan, along with related accessories, to the patient examining area or bedside. - Page 46 PERMANENTLY ATTACH THE POST TO THE WHEELEd BASE (OPTIONAL) 5. Place the wheeled cart base on a level floor. 6. Open the two tubes of Loctite 680 supplied with the cart by snapping off the tips of the tubes. ® 7.
-
Page 47: Procedure 8. Install The Scanpoint With Quickprint Software (Optional)
Figure 31. Attaching the BVM 9500 to the Medical Cart BVM 9500 Tray Assembly (Item 1) Fluted Knob (Item 5) Bracket and Post (Item 2) PROCEdURE 8. INSTALL THE SCANPOINT WITH QUICKPRINT SOFTWARE (OPTIONAL) Optional ScanPoint with QuickPrint software is designed to mesh seamlessly with your BladderScan devices. ®... -
Page 48: Using The Instrument
• Make sure you are familiar with the parts of the BladderScan instrument (see the Introduction chapter on page 5). • If you are a new BladderScan instrument user, Verathon recommends that you perform your first ® exam on a patient with a moderately full bladder, rather than initially attempting to locate and scan a nearly empty bladder. -
Page 49: Procedure 2. Measure Bladder Volume & Uebw
PROCEdURE 2. MEASURE BLAddER VOLUME & UEBW 1. Turn on the BladderScan BVM 9500. Turn on the instrument by pressing the On/Off button. On/Off button 2. Select the exam mode. Scanning mode button • Press the Mode button repeatedly to toggle between male and female modes. •... - Page 50 4. Aim toward the bladder. Standing at the patient’s right side, place the probe on the gel and aim it toward the expected location of the bladder. For most patients, this means angling the probe slightly toward the patient’s coccyx (tail bone) so the scan clears the pubic bone.
- Page 51 Re‑aiming If the scan is significantly “off‑target”, the image on the console screen will show that the bladder is not centered in the crosshairs, and there will be a red arrow pointing in the direction for re‑aiming. The probe will show an arrow indicating the direction to move the scan head (black tip) of the probe to be “on target.”...
- Page 52 Table 17. Interpreting Results Screen UEBW Measurement Data AIMING UEBW ARROW RECOMMENDED ACTION MEASUREMENT PRESENT? SYMBOL Accept UEBW measurement Adjust probe pressure and/or probe angle and scan ≈ again. Depending on patient anatomy, it may not be possible to get an = sign. >...
- Page 53 If the bladder volume is greater than 999 mL, the display shows > 999 mL. Manual Measurement 7. Manual Measurement of Bladder Wall Thickness (Optional) To make a manual measurement of Bladder Wall Thickness, please select the Manual Measurement function on the Results screen and follow the process below. If a manual measurement is not desired, please skip to "8.
- Page 54 Figure 33. Scan Plane 10 ‑ Bladder Wall Image Note that Figure 34 has image dimensions of 4.5 x 5.75 cm, which allows for more accurate placement of the cursors for taking a manual measurement. To take a manual measurement of bladder wall thickness, please select the button.
- Page 55 Figure 34. Scan Plane 10 ‑ Magnified Image Use the Axis Select icon to select either the “Up‑Down” or “Left‑Right” axis of movement for the highlighted cursor. Move the highlighted cursor to the edge of the bladder wall. Select the second cursor using the Cursor Select icon. Move the second cursor on to the opposite edge of the bladder wall.
- Page 56 8. Save, review, and print exam results. To save the exam you must voice annotate it. To annotate, press and release the Record button on the console. When you see the Record button icon change to a Stop button icon, record the patient information by speaking into the probe microphone. When the hourglass icon disappears, press the Listen button to replay the annotation.
-
Page 57: Procedure 3. Record A Voice Annotation
9. Finish the exam. Once you have completed the scan, wipe the ultrasound gel off the patient and the probe. For ScanPoint subscribers, logging onto ScanPoint automatically transfers and saves your annotated exams ® to your Windows computer. ® AddITIONAL SCANNING TIPS Note: When measuring bladder volume and/or UEBW and bladder wall thickness with the BladderScan BVM 9500, it is VERY IMPORTANT to hold the device steady while scanning. -
Page 58: Procedure 4. Delete A Saved Exam
2. The microphone is located just above the aiming display on the probe. Hold the microphone approximately 15 cm (6 in) from your mouth when you are recording the annotation and speak clearly. Be sure to include all relevant exam information, including the patient’s ID and the name of the person performing the exam. -
Page 59: Procedure 5. Print An Exam
Figure 39. Exam Results Printout Using the Onboard Printer Note: If the facility name, date, and time have not been set, those lines will be skipped on the printout. The BVM 9500 prints on thermal paper, which fades over time. For maximum storage life, Verathon ®... -
Page 60: Histogram Of Cost Savings
HISTOGRAM OF COST SAVINGS Each volume measurement from a completed scanning procedure is stored in the memory of the BladderScan BVM 9500 in one of eleven volume ranges (each with a 100 mL increment). This data is analyzed and can be displayed on the BVM 9500 at any time. The cost savings screen lists: Date Started, Number of Scans, Catheterizations Avoided, UTI Avoided, Savings. -
Page 61: Cleaning & Maintenance
Wipe the instrument with the dampened cloth. 4. To remove all traces of disinfectant solution, wipe the instrument with a clean soft cloth dampened in sterile water or cleaning solution. Verathon recommends wiping the device three separate times to ®... -
Page 62: Procedure 2. Regular Inspections & Maintenance
Service Center once a year. Certification service includes comprehensive inspection and testing of the instrument to ensure accurate performance in clinical use. For more information, contact Verathon Customer Care or your local representative. -
Page 63: Procedure 4. Calibrate The Instrument
The BladderScan BVM 9500 console, probe, and battery charger/wireless hub are completely sealed. There are no user‑serviceable components. Verathon does not make available any type of circuit diagrams, component parts lists, descriptions, or other information that would be required for repairing the device and related accessories. -
Page 64: Troubleshooting
You can obtain the latest version of this manual by visiting verathon.com/product‑documentation or contact Verathon Customer Care or your local representative. TRAINING MOdULES Training modules are installed on the instrument. You can refer to these modules by pressing the button at the Home screen. -
Page 65: Icons On The Bladderscan Console
ICONS ON THE BLADDERSCAN CONSOLE Table 18. BladderScan Icons SYMBOL MEANING á (Solid arrow) The bladder is contained within the image cone (cone‑shaped area in which the probe transmits ultrasound waves), but not centered. You may be able to obtain a more accurate measurement by re‑aiming the probe in the direction indicated by the arrow. -
Page 66: Printer Problems
PRINTER PROBLEMS NO PAPER The BladderScan BVM 9500 senses the presence of paper and automatically displays this image when the printer is out of paper (Figure 41). Figure 41. Printer Out of Paper Screen For instructions on loading paper, please refer to the section in this manual titled Load a Roll of Thermal Paper beginning on page 36. -
Page 67: Factory Reset
FACTORY RESET PROCEdURE 1. RESTORE FACTORY CONFIGURATION IMPORTANT Only use this process to restore the factory set configuration. Do not use this reset process for any other issue. In very rare instances, your instrument may experience a configuration file error. If a configuration file error occurs, the instrument will lose its factory set configuration and return to its default configuration as a BVI 9400 instrument, meaning it will display a BVI 9400 Home screen. -
Page 68: Warranty
® it is covered by the Premium Warranty. Pursuant to this warranty, a service center authorized by Verathon will repair or replace units that prove to be defective during the warranty period. This warranty does not apply if the unit was misused or modified by anyone other than a service center authorized by Verathon. -
Page 69: Product Specifications
Table 19. General Specifications ITEM SPECIFICATION Input Lithium‑ion battery pack. Verathon P/N 0400‑0066. Output No load to full load at rated voltage. Refer to unit label. Insulation The power supply is Class I with basic insulation to each terminal. Transient Overvoltage:... -
Page 70: Accuracy Specifications
, scanning a tissue‑equivalent phantom. ® Table 21. Accuracy Specifications SPECIFICATION DESCRIPTION Bladder volume accuracy ± 15%, ± 15 mL (on a Verathon tissue‑equivalent phantom) Bladder volume range 0 ‑ 999 mL ± 10%, ± 3 g UEBW accuracy (on a Verathon tissue‑equivalent phantom) UEBW range 20 ‑... -
Page 71: Battery Charger/Wireless Hub Specifications
BATTERY CHARGER/WIRELESS HUB SPECIFICATIONS The battery charger/wireless hub is powered from a standard wall outlet (adaptable to international power standards). The battery charger/wireless hub can charge two batteries simultaneously. Operating Conditions The following are proper operating conditions for the battery charger/wireless hub: Table 24. -
Page 72: Battery Specifications
If such interference is suspected, separate the two devices as much as possible, or discontinue simultaneous operation, if practical, and contact Verathon ® BladderScan BVM 9500 will operate normally in the proximity of other potential interference sources, and has demonstrated immunity at a field strength of 3 V/m (per EN/IEC 60601‑1‑2, 36.202.2.1). -
Page 73: Symbol Directory
SYMBOL DIRECTORY The following table explains the industry symbols used to indicate the BladderScan system compliance with international and national standards and regulations. Table 27. Symbol Directory SYMBOL MEANING WEEE—Subject to waste electrical and electronic equipment regulations Class II equipment Type BF applied part CE—Marked in accordance with the Medical Device Directive (MDD) CSA—Canadian Standards Association mark of certification to applicable standards... -
Page 74: Glossary
GLOSSARY TERM MEANING Ultrasound image showing the bladder on a white field with blue crosshairs, the Aiming display Aiming Display shows the location of the bladder within the ultrasound cone radiating from the probe. Also referred to as C‑Mode Ultrasound images showing an abdominal cross‑section with the bladder shown as B‑Mode a dark circle. - Page 75 Located on the underside of the BladderScan probe, this button is used to initiate Scan button the measurement. ScanPoint image The software and online service provided by Verathon that prints exam results, ® ® management maintains patient records, displays ultrasound images from exams, downloads technology software updates, and calibrates the BladderScan instrument.
Need help?
Do you have a question about the BLADDERSCAN BVM 9500 and is the answer not in the manual?
Questions and answers