Table of Contents
Advertisement
Advertisement
Table of Contents
Troubleshooting

Related Manuals for Verathon BladderScan BVI 6100


Summary of Contents for Verathon BladderScan BVI 6100
- Page 1 BLADDERSCAN BVI 6100 Operations & Maintenance Manual...
- Page 2 0900‑4830 REV‑03...
- Page 3 BLADDERSCAN BVI 6100 Operations & Maintenance Manual Effective: September 13, 2019 Caution: Federal (United States) law restricts this device to sale by or on the order of a physician. 0900‑4830 REV‑03...
- Page 4 0123 Copyright 2019 Verathon Inc. All rights reserved. No part of this manual may be copied or transmitted by any method without the express written consent of Verathon Inc. Verathon, the Verathon torch symbol, BladderScan, the BladderScan symbol, Scan Point, and V...
-
Page 5: Table Of Contents
TABLE OF CONTENTS IMPORTANT INFORMATION ..........................1 Overview ................................1 Product Description ............................1 Statement of Intended Use ..........................1 Essential Performance ............................1 Environments of Intended Use .........................1 Notice to All Users ............................1 Safety Information ..............................2 Ultrasound Energy Safety ..........................2 Contraindications .............................2 Warnings & Cautions ............................2 INTRODUCTION ..............................7 System Overview ..............................7 BladderScan BVI 6100 ............................7... - Page 6 MEASURING BLADDER VOLUME ........................15 Performing Scans .............................. 15 Procedure 1. Prepare for the Exam ......................15 Procedure 2. Measure Bladder Volume ..................... 16 Scanning Tips..............................19 CLEANING & DISINFECTING ..........................21 Procedure 1. Clean & Disinfect the Device ....................22 MAINTENANCE & TROUBLESHOOTING ......................23 Regular Inspections ............................23 Calibrating the Device ............................23 Procedure 1.
-
Page 7: Important Information
IMPORTANT INFORMATION OVERVIEW PRODUCT DESCRIPTION The BladderScan BVI 6100 bladder volume instrument is a wireless, battery‑powered, ultrasound device that provides a noninvasive measurement of urinary bladder volume. During each scan, the device employs patented V technology to create a three‑dimensional image mode of the bladder, which automatically calculates and displays measurements based upon this image. -
Page 8: Safety Information
WARNING Availability of cleaning, disinfection, and sterilization products varies by country, and Verathon is unable to test products in every market. For more information, please contact Verathon Customer Care or your local representative. For contact information, visit verathon.com/support. WARNING Cleaning is critical to ensuring the component is ready for disinfection. - Page 9 WARNING To reduce the risk of electric shock, use only the accessories and peripherals recommended by Verathon. WARNING The docking station, charging cradle, power adapter, and power cords are not intended for patient contact. Ensure 2 m (6 ft) is maintained between the patient and these components.
- Page 10 30cm (12inches) of any part of the BladderScan BVI 6100 system, including cables that Verathon specifies or provides for use with the system. If this distance is not maintained, performance of the system may be degraded and image display may be compromised.
- Page 11 WARNING Be aware of the following conditions that can affect ultrasound transmission: • Catheterization—A catheter in the patient’s bladder may affect the accuracy of the bladder volume measurement in two ways: 1) by introducing air into the bladder that may block the ultrasound signal, and 2) by having the catheter‑retaining balloon interfere with the volume measurement.
- Page 12 EN/IEC 60601‑1. If you need assistance, contact your biomedical staff, local representative, or Verathon Customer Care. CAUTION Failure to follow these instructions may cause device damage not covered by the warranty: •...
-
Page 13: Introduction
Note: Plan availability and conditions may differ depending on your location. For more information about terms and availability, contact Verathon Customer Care or your local representative. Scan Point Local Client (LC) is a stand‑alone, non‑networked version of the software. It is available for use with this device. -
Page 14: System Components & Accessories
Scan Point with QuickPrint is a network‑based version of the application. Archived patient data is stored securely on HIPAA‑compliant, Verathon‑maintained servers. Users can access records from any Internet‑enabled, Windows‑based PC. Scan Point with QuickPrint allows users to maintain the most recent software for their devices, to calibrate their devices themselves without having to send them in for service, and also enables remote diagnostics and troubleshooting by Verathon service technicians. -
Page 15: Optional Components & Accessories
OPTIONAL COMPONENTS & ACCESSORIES The following optional items are available to enhance the capabilities of your device. Please contact Verathon Customer Care or your local representative for more information on any of the following Verathon products. Table 2. Optional Components and Accessories... -
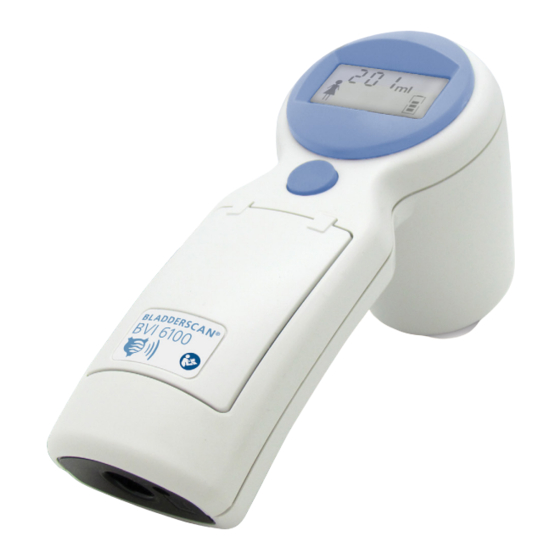
Page 16: Buttons, Parts, & Icons
BUTTONS, PARTS, & ICONS BUTTONS & PARTS Figure 1. Buttons and Parts Display Scanhead Top button Activation button Scan button Handle Infrared window Table 3. Buttons and Parts PART PURPOSE Scan button Press to take a scan. The scanhead transmits and receives ultrasound waves, automatically moving its Scanhead internal transducer 360º... -
Page 17: Screen Icons
SCREEN ICONS The following icons may appear on the display. Table 4. Display icons ICON MEANING Battery power level. Female gender option is selected. Select this option only for women who have not had a hysterectomy. Deselect for all others, male or female. Bladder imaging in progress. - Page 18 BATTERY ICON The battery icon is located in the lower‑right corner of the display and indicates the power level of the battery. The device can be charged at any time, but if the battery is completely discharged, it must be recharged before use.
-
Page 19: Setting Up
1. Verify that you have received the appropriate components for your system by referring to System Components & Accessories. 2. Inspect the components for damage. 3. If any of the components are missing or damaged, notify the carrier and Verathon Customer Care or your local representative. PROCEdURE 2. CHARGE THE dEVICE Please read the Warnings &... -
Page 20: Procedure 3. Activate The Device (Optional)
2. Place the device in the charging cradle or docking station until the “full battery” icon is displayed. Note: When you are not using your device, Verathon recommends that you store it in the charging cradle in order to ensure that your device is always sufficiently charged. The charging cradle cannot overcharge the battery. -
Page 21: Measuring Bladder Volume
Introduction chapter. If you are a new BladderScan device user, Verathon recommends that you perform your first exam on a patient with a moderately full bladder rather than a nearly empty bladder. A nearly empty bladder can be more difficult to locate. -
Page 22: Procedure 2. Measure Bladder Volume
PROCEdURE 2. MEASURE BLAddER VOLUME To ensure the highest degree of accuracy, Verathon recommends that you scan the patient’s bladder at least three times per exam, in order to ensure the repeatability of your measurements. Repeatability refers to your ability to center the bladder during each measurement, not your ability to obtain exactly the same bladder volume measurement each time. - Page 23 4. Place an ample quantity of ultrasound gel, with as few air bubbles as possible, midline on the patient’s abdomen, approximately 3 cm (1 in) above the pubic bone. 5. Standing at the patient’s right side, gently press the scanhead onto the lower abdomen through the gel. The device’s handle should be oriented at 90 degrees to the sagittal plane of the patient.
- Page 24 If a solid arrow is displayed, then the bladder was mostly inside the ultrasound field of view. The results are satisfactory, but in order to ensure accuracy, Verathon recommends that you re‑aim in the direction of the arrow and perform the scan again.
-
Page 25: Scanning Tips
SCANNING TIPS IMPORTANT Hold the device steady while scanning. Movement will result in an inaccurate reading. Applying too much pressure when scanning will lead to a “greater than” symbol (>) preceding the bladder volume measurement. Apply less pressure and re‑scan. Volume reading will be affected by: •... - Page 26 The following table illustrates typical scanning scenarios and corresponding bladder volume information that may appear on the display. Table 6. Typical scanning scenarios and displays SCANNING SCENARIO EXAMPLE DISPLAY DESCRIPTION In an optimal scan, the bladder is entirely contained Optimal scan within the ultrasound field of view.
-
Page 27: Cleaning & Disinfecting
CLEANING & DISINFECTING Please read the Warnings & Cautions section before performing the following tasks. Cleaning and disinfecting this device is an important part of using and maintaining it. Prior to each use, ensure the device has been cleaned and disinfected according to the following procedures. Remove the device from the docking station or charging cradle to clean and disinfect it. -
Page 28: Procedure 1. Clean & Disinfect The Device
10. If rinsing or removal of the disinfectant solution from the device is required by the disinfectant manufacturer’s instructions, wipe the device with a clean soft cloth dampened in sterile water. Verathon recommends wiping the device three separate times to remove all residual disinfectant. -
Page 29: Maintenance & Troubleshooting
If you have the calibration kit and Scan Point with QuickPrint, you can easily and quickly calibrate your own device. You may also send your device to an authorized Verathon Service Center. If you are not using Scan Point with QuickPrint, you must send your device in to an authorized Verathon Service Center for calibration. - Page 30 3. Using the notches to position the spiral‑shaped target correctly, place the target in the tank base. 4. Replace the tank lid on the tank base. Ensure that the opening for the scanhead is directly above the spiral target. 5. On the computer, double‑click the Scan Point QuickPrint icon. Scan Point with QuickPrint opens. 6.
- Page 31 7. In Scan Point, select the device, verify that the serial number matches the device you are calibrating, and then click the calibration tank icon. 8. In the Calibrate Instrument window, click the Calibrate button. Scan Point prepares the device for calibration. 9.
- Page 32 10. On the device, press the top button. The device begins to scan the calibration tank. Note: Do not remove the device from the calibration tank while scanning is in progress. Top Button 11. When the calibration scan is complete, four arrows appear on the display, and the device plays a melody. 12.
-
Page 33: Warranty
If the calibration scan was not successful, then you are prompted to rescan the calibration tank. Ensure that the tank has sufficient water and the target is properly positioned, and then repeat Step 9 through Step 12. After three unsuccessful calibration attempts, you will need to contact Verathon Customer Care in order to continue. -
Page 34: Device Repair Or Replacement
Verathon does not make available any type of circuit diagrams, component parts lists, descriptions, or other information that would be required for repairing the device and related accessories. For additional information or to request service or repairs, contact Verathon Customer Care or your local representative. For contact information, please visit verathon.com/support. -
Page 35: Troubleshooting
FREQUENTLY ASKED QUESTIONS If you are encountering issues when operating your device, review this list of common questions. If you do not find a solution here, contact Verathon Customer Care or your local representative. For contact information, see verathon.com/support. WHY WON’T MY dEVICE TURN ON? This problem is usually caused by an unresponsive or discharged battery. -
Page 36: Help Resources
Scanning Tips. HELP RESOURCES Verathon provides an extensive array of customer service resources, described in the table below. You may obtain copies of this manual, quick reference cards, and clinical studies by visiting the Verathon Web site at verathon.com or by contacting your local representative. To obtain contact information, see verathon.com/support. -
Page 37: Product Specifications
GENERAL SPECIFICATIONS Bladder volume range: 0–999 mL The following accuracy specification assumes usage per instructions, scanning a Verathon tissue equivalent phantom: Bladder Volume: ± (15% + 15 mL) Accuracy: Example for a scanned volume of 160 mL: 160 mL × 15% = 24 mL 24 mL + 15 mL = 39 mL 160 mL ±... - Page 38 Table 9. Ultrasound Acoustic Output Parameters (IEC Standard) INDEX LABEL BELOW BELOW SURFACE SURFACE SURFACE SURFACE Maximum index value 0.251 0.00142 — — — Index component value 0.00142 0.00142 — — at Z (MPa) 0.470 r,α (mW) 0.331 — — —...
-
Page 39: Charging Cradle Specifications
CHARGING CRADLE SPECIFICATIONS The charging cradle is tested to applicable IEC 60601‑1 requirements, but it is not intended for direct patient contact. It is designed to operate within the specifications and environmental conditions identified in the following table. Table 11. Charging Cradle Specifications GENERAL SPECIFICATIONS Input Voltage 90–264 VAC RMS... -
Page 40: Electromagnetic Immunity
Table 12. Guidance and Manufacturer’s Declaration—Electromagnetic Emissions The system is intended for use in the electromagnetic environment specified below. The customer or the user of the system should ensure that it is used in such an environment. EMISSIONS TEST COMPLIANCE ELECTROMAGNETIC ENVIRONMENT –... - Page 41 Table 13. Guidance and Manufacturer’s Declaration —Electromagnetic Immunity The system is intended for use in the electromagnetic environment specified below. The customer or the user of the system should ensure that it is used in such an environment. COMPLIANCE ELECTROMAGNETIC ENVIRONMENT IMMUNITY TESTS IEC 60601 TEST LEVEL LEVEL...
-
Page 42: Accessory Conformance To Standards
ACCESSORY CONFORMANCE TO STANDARDS To maintain electromagnetic interference (EMI) within certified limits, the system must be used with the cords, components, and accessories specified or supplied by Verathon. For additional information, see System Components & Accessories Component Specifications sections. The use of accessories or cords other than those specified or supplied may result in increased emissions or decreased immunity of the system. -
Page 43: Glossary
The following table provides definitions for specialized terms used in this manual or on the product itself. For a full list of caution, warning, and informational symbols used on this and other Verathon products, please refer to the Verathon Symbol Directory at verathon.com/symbols.
Need help?
Do you have a question about the BladderScan BVI 6100 and is the answer not in the manual?
Questions and answers