
Related Manuals for Nonin LifeSense LS1-9R


Summary of Contents for Nonin LifeSense LS1-9R
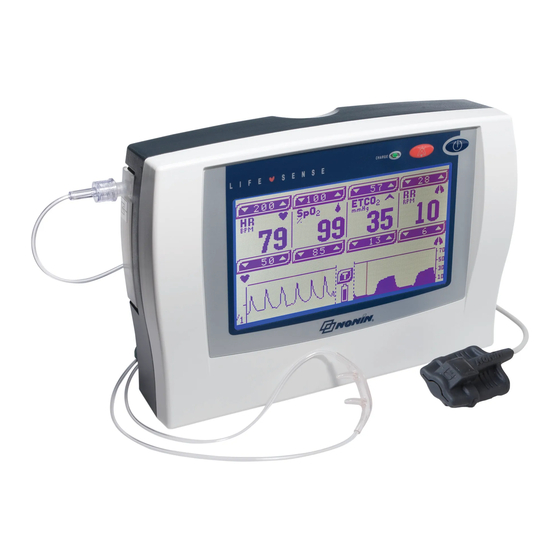
- Page 1 Operator’s Manual LifeSense LS1-9R ® Vital Signs Monitor Capnography/Pulse Oximeter English...
- Page 2 Consult Instructions for Use. Nonin makes no claim for use of the product other than those uses specified herein and disclaims any liability resulting from other uses. Observe all warnings, cautions, and notes. Unauthorized use, copying, or distribution of this manual is prohibited without written consent from Nonin Medical, Inc.
-
Page 3: Table Of Contents
Contents Indications for Use ..................1 Warnings ........................ 1 Cautions ......................... 2 Guide to Symbols ..................5 Introduction....................6 About LifeSense ..................... 6 About Capnometry....................6 About Pulse Oximetry..................... 6 Operator Requirements ..................7 Displays and Controls................... 8 Monitor Front View ....................8 Monitor Rear View .................... - Page 4 Contents (Continued) EtCO Limits ..................... 24 Changing Settings ....................24 Alarms ........................25 Alarm Function....................25 Alarm Silence....................25 High Priority Alarm.................... 26 Low Priority Alarm..................... 27 Disable Alarms....................27 Maintenance and Inspection ...............28 Battery Operation ....................28 Charging the Battery..................28 Checking Battery Capacity ................
- Page 5 Figures Figure 1. Start-up Screens ..................8 Figure 2. Operating Screen ..................10 Figure 3. Trend Screen .................... 13 Figure 4. Rear View of Monitor................. 14 Figure 5. Right Side of Monitor................. 15 Figure 6. Replacing the Moisture Trap/Filter ............20...
- Page 6 Tables Table 1. Start-up Screen Icons and Display Descriptions......... 9 Table 2. Device and Operating Screen Icons and Display Descriptions....10 Table 3. Trend Screen Icons and Display Descriptions .......... 13 Table 4. Rear View Features and Descriptions ............14 Table 5.
-
Page 7: Indications For Use
To avoid patient injury, use only Nonin-branded PureLight pulse oximeter sensors. These sensors are manufactured to meet the accuracy specifications of Nonin pulse oximeters. Using other manufacturers’ sensors can result in improper pulse oximeter performance. Only use power supplies that either are supplied with LifeSense or specified by Nonin (see “Accessories”). -
Page 8: Cautions
Warnings (Continued) LifeSense displays a BATT LOW message when it has approximately 20 minutes of use remaining before it shuts itself off. EtCO value will be diluted when used in combination with supplemental oxygen. To get a true EtCO reading it is recommended that the supplemental oxygen is disconnected for a few seconds. - Page 9 Before each use, it is the operator’s responsibility to verify that the alarm limits are appropriate for the patient being monitored. Always clean the Nonin PureLight reusable sensor after each patient use. Before cleaning, unplug it from the monitor. The patient’s nasal passage may dry out if continuous monitoring is required. Check patient on a regular basis for nasal comfort.
- Page 10 Cautions (Continued) This device is designed to determine the percentage of arterial oxygen saturation of functional hemoglobin. Factors that may degrade pulse oximeter performance or affect the accuracy of the measurement include the following: - excessive ambient light - inadequate signal - excessive motion - venous pulsations - electrosurgical interference...
-
Page 11: Guide To Symbols
O l O l Serial interface for use with either TrendSense™ data memory module or NC1, Nurse Call Accessory. NONIN SpO 2 Input used for connecting a Nonin-branded PureLight SpO sensor. Indoor use only Class II, double insulated Date of manufacture... -
Page 12: Introduction
Nonin-branded PureLight finger clip sensor, provided with the system. Use only those accessories and replacement parts recommended by Nonin. Refer to the “Accessories” section for more information. LifeSense has visual and audible alarms when limit readings are outside the predefined limits. -
Page 13: Operator Requirements
Operator Requirements The LifeSense monitor is easy to operate. Each operator should read this manual before using the monitor. LifeSense should only be operated by licensed practitioners. -
Page 14: Displays And Controls
Displays and Controls A standard LifeSense set-up consists of a monitor, single-use disposable moisture trap with filters, Nonin-branded PureLight finger clip sensor (Model 8000AA), nasal cannula, and power supply. See “Accessories” for information on optional accessories. All operator settings are adjusted using the touch panel display on the monitor. -
Page 15: Table 1. Start-Up Screen Icons And Display Descriptions
Table 1: Start-up Screen Icons and Display Descriptions Name Description Audible Alarm Pressing this icon turns the audible alarms off. Disable It disables the audible alarms by setting all lower limits to 0. Audible Alarm Pressing this icon turns the audible alarms on. Enable Default if no icon is chosen. -
Page 16: Figure 2. Operating Screen
Figure 2: Operating Screen Table 2: Device and Operating Screen Icons and Display Descriptions Name Description LCD Display The LCD monitor displays parameters, graphs, menus, and other information. It is also a touch panel from which all the operator-defined settings are made. Limit Settings The upper figures represent the highest value set by the operator. - Page 17 Table 2: Device and Operating Screen Icons and Display Descriptions (Continued) Name Description Charge Indicator This indicator is green whenever the power supply is connected and the battery is charging. NOTE: When the external power supply is disconnected, the device automatically switches to battery power without loss of functionality Audible Alarm Audible alarms alert the operator when readings are outside...
- Page 18 Table 2: Device and Operating Screen Icons and Display Descriptions (Continued) Name Description Displays the respiratory rate in breaths per minute. The value is the mean of four breaths. Status Text Shows alarm messages for the pulse oximeter and battery. See “Alarms”...
-
Page 19: Figure 3. Trend Screen
Figure 3: Trend Screen Table 3: Trend Screen Icons and Display Descriptions Name Description Trend HR Displays a trend graph of the pulse rate. This scale is fixed and cannot be changed. Trend SpO Displays a trend graph of the SpO values. -
Page 20: Monitor Rear View
Monitor Rear View The moisture trap, filter, and equipment label are located on the back of the LifeSense (figure 4). Names and descriptions of each component are listed in table 4. Figure 4: Rear View of Monitor Table 4: Rear View Features and Descriptions Name Description Single-Use,... -
Page 21: Monitor Right Side View
• TrendSense, to transfer data to a PC. • NC1, Nurse Call Accessory, to add nurse call functionality. DC Input Used to connect the power supply to the monitor. Only use Nonin- specified power supplies. Connector Used to connect the PureLight pulse oximeter sensor to the monitor. -
Page 22: Using The Lifesense Monitor
Using the LifeSense Monitor After unpacking the monitor and accessories, LifeSense is ready for use. Ensure the LifeSense battery is fully charged by viewing the status of the battery indicator on the display panel after the power supply is connected to the monitor and the power outlet. CAUTION: To prevent damage to the monitor, operate and store the monitor in an upright position. -
Page 23: Mounting
1.5 meters (5 feet) and do not exceed a total of 2 kilograms (4.5 pounds) of equipment on the pole. Contact Nonin Customer Support to order a mounting bracket and adjustable mounting clamp. CAUTION: Secure LifeSense with mounting bracket if used in transport vehicles. -
Page 24: Sample Line
The following instructions refer to the sample line supplied in the LifeSense standard kit. Other sample lines have separate instructions included in their packaging. WARNING: Use only Nonin-recommended accessories and replacement parts. CAUTION: The sample line is a single-use, disposable component. Use a new sample line for each patient. -
Page 25: Nafion Tubing
The Nafion tubing is a single-use disposable component designed to be placed between the moisture trap and the nasal cannula or sampling tubing to remove water vapor. It is intended for use only with Nonin’s LifeSense and RespSense monitors. CAUTION: Water or other liquid in the sampling tube may cause erroneous CO readings. -
Page 26: Trend Screen
Use only Nonin-branded PureLight pulse oximeter sensors (see “Accessories”). These sensors are manufactured to meet the accuracy specifications of Nonin pulse oximeters. Using other manufacturers’ sensors can result in improper pulse oximeter performance. -
Page 27: Connect The Patient
Disposable Moisture Trap and Filters” for instructions on how to handle and maintain the moisture trap and filter. Connect the sample line to the adjacent connector on the monitor's side and secure it by turning the Luer lock connector clockwise. Only use sample lines recommended by Nonin (see “Accessories”). Connect the Patient Apply the pulse oximeter sensor to the patient, as described in “Applying the Sensor,”... -
Page 28: Check The Alarm Limits
Check the Alarm Limits Adjust alarm limits for each patient. If appropriate, use the factory default settings that are programmed at start-up. All settings are adjusted using the touch panel display. Refer to “Settings and Alarms” for instructions on how to change alarm limits. The audible alarm function activates approximately 2 minutes after start up, unless activated by the operator before then. -
Page 29: Settings And Alarms
Settings and Alarms Touch Panel Display All adjustments and settings are made using the LifeSense touch panel display. Each specific parameter is adjusted by using the up/down arrows on the display bar Factory Default Settings LifeSense recalls and displays the factory default settings (table 6) upon start-up. At the start-up screen, the operator can select from two different default settings (only if alarms are activated on the first start-up screen). -
Page 30: Alarm Limits
Alarm Limits All parameters have built in limits that cannot be exceeded. Pulse Limits – Upper limit: 255 BPM – Lower limit: 0 BPM Limits – Upper limit: 100 % – Lower limit: 0 % Respiration Limits – Upper limit: 99 RPM –... -
Page 31: Alarms
The upper alarm limit is always located above the displayed value, and the lower limit is always located below the displayed value. Decreases upper limit→ ← Increases upper limit Decreases lower limit → ← Increases lower limit CAUTION: Set or adjust only one parameter at a time. NOTE: The monitor will always reset the alarm limits to the factory default settings once it is turned off and turned on again. -
Page 32: High Priority Alarm
• If audible alarms are active, pressing this button temporarily disables all of the active audible alarms in one or more categories for 2 minutes. Alarms will reactivate if the operator presses the Audible Alarm Pause/Resume button again during those 2 minutes or if an alarm from a different category begins. -
Page 33: Low Priority Alarm
Low Priority Alarm A low priority alarm indicates that an equipment fault has occurred and the device is unable to provide a measurement value. See table 8 for parameters, fault messages, and possible cause. Low priority alarms are both audible and visual: •... -
Page 34: Maintenance And Inspection
To check the battery’s capacity, time how long a fully charged battery is able to power the device. When a fully charged battery only provides approximately 4 hours of operation, it needs to be replaced. Contact Nonin Technical Service for battery replacement. Battery Message LifeSense displays BATT LOW when the battery is almost depleted. -
Page 35: Battery Care
Battery Care The battery, made of Lithium Ion (Li-Ion) rechargeable cells, is integral to the device and cannot be replaced by anyone other Nonin Technical Service. The life expectancy of the battery is approximately 1 year. For optimal performance, the battery should be replaced once per year to limit the amount of Li build up if the battery is charged in a cold environment. -
Page 36: Recommended Inspections And Functional Check
2. Turn the monitor ON by pressing the ON/OFF button. 3. While the Nonin logo displays, press and hold the Audible Alarm Pause/Resume button. After approximately 15 seconds, the message HOLD ALARM PAUSE BUTTON AND PRESS POWER TO CALIBRATE displays on the monitor. Do not release the Audible Alarm Pause/Resume button. - Page 37 WARNING: Never allow liquids to enter into or to be spilled onto the monitor. If liquid has penetrated into the monitor it must be checked by Nonin Technical Service. CAUTION: Be careful not to drop LifeSense on the floor or strike it against hard surfaces.
-
Page 38: Troubleshooting
The fault conditions are either operator- or system-generated. The table below lists common messages, descriptions, and advice on actions to take. If the problem persists, contact Nonin Technical Service. Message Description... -
Page 39: Troubleshooting
Recharge the monitor with the occurred, possibly due to power supply. interference or loss of power. If the problem persists, contact Nonin Technical Service. Low EtCO alarm All alarms for low EtCO require the Check patient status. -
Page 40: Accessories
The following list of accessories can be ordered from Nonin or your distributor. Nonin may update the accessories list at any time. It is the purchaser’s responsibility to always ask for the current list, by model number, when ordering accessories. -
Page 41: Pulse Oximeter Accessories
Pulse Oximeter Accessories Model Number Description PureLight Finger Clip Sensor, Reusable For spot-checking and short-term monitoring. Minimizes motion artifact. Comfortable, self-aligning grip. Durable and easy to clean. 8000AA Adults (>30 kg; >66 lb) 8000AP Pediatric / Infants (10 – 40 kg; 22 – 88 lb) PureLight Reusable Soft Sensor for Fingers / Toes Quick and easy spot-checking and continuous monitoring. -
Page 42: Capnography Accessories
Capnography Accessories Item Description Nasal CO Sample Line Single-use, disposable, universal sample line with male luer lock connectors at both ends. 2.1 m. Adult Pediatric Infant Oxygen Delivery CO Single-use, disposable O delivery sample line with male luer lock Sampling Nasal Cannula connector. -
Page 43: Technical Information
Rated supply voltages or voltage ranges for the power supply 100 – 240 VAC 50 – 60 Hz Input voltage to LifeSense from the power supply 12 VDC, 720mA WARNING: Only use power supplies that either are supplied with LifeSense or specified by Nonin (see “Accessories”). -
Page 44: System Specifications
System Specifications Power Data Power Supply: 100 – 240 VAC 50 – 60 Hz Power Consumption: 3.6 W with battery operation 9 W with power supply Input: 12 VDC, 720 mA Battery Data Type: Lithium Ion (Li-Ion) internal battery, non-field replaceable, rechargeable Battery Capacity: Approximately 8 hours Charging Time: Approximately 17 hours, or 2 hours for each hour of use... -
Page 45: Pulse Oximeter Specifications
Red: 660 nanometers @ 0.8 mW max. average Infrared: 910 nanometers @ 1.2 mW max. average Accuracy – Sensors Declared accuracy data for compatible sensors can be found in Nonin’s Sensor Accuracy document. *This information is especially useful for clinicians performing photodynamic therapy. Accuracy Testing... -
Page 46: Capnography Specifications
Capnography Specifications Respiration Range: 3 to 60 respirations/minute Update Frequency: Once every breath (No Breath alarm after 25 seconds) Respiration Accuracy: 3 to 50 respirations/minute ±2 51 to 60 respirations/minute ±3 EtCO Range: 0 to 9.9 kPa or 0 to 99 mmHg EtCO Accuracy: ±0.2 kPa / ±2 mmHg +8% of reading†... -
Page 47: Manufacturer's Declaration
Manufacturer’s Declaration See the following tables for specific information regarding this device’s compliance to IEC 60601- 1-2. Table 9: Electromagnetic Emissions Emissions Test Compliance Electromagnetic Environment—Guidance This device is intended for use in the electromagnetic environment specified below. The user of this device should ensure that it is used in such an environment. -
Page 48: Table 10. Electromagnetic Immunity
Table 10: Electromagnetic Immunity Electromagnetic Immunity Test IEC 60601 Test Level Compliance Level Environment—Guidance This device is intended for use in the electromagnetic environment specified below. The user of this device should ensure that it is used in such an environment. Electrostatic Discharge ±6 kV contact ±6 kV contact... -
Page 49: Table 11. Guidance And Manufacturer's Declaration-Electromagnetic Immunity
Table 11: Guidance and Manufacturer’s Declaration—Electromagnetic Immunity IEC 60601 Immunity Test Compliance Level Electromagnetic Environment—Guidance Test Level This device is intended for use in the electromagnetic environment specified below. The user of this device should ensure that it is used in such an environment. Portable and mobile RF communications equipment should be used no closer to any part of the device, including cables, than the recommended separation distance calculated from the equation applicable to the frequency of the transmitter. -
Page 50: Table 12. Recommended Separation Distances
Table 12: Recommended Separation Distances This device is intended for use in an electromagnetic environment in which radiated RF disturbances are controlled. Customers or users of this device can help prevent electromagnetic interference by maintaining a minimum distance between portable and mobile RF communication equipment (transmitters) and the device as recommended below, according to maximum output power of the communications equipment. -
Page 51: Pulse Oximeter Response Time
Pulse Oximeter Response Time If the signal from the sensor is inadequate, the last measured SpO and pulse rate values freeze for 10 seconds and are then replaced with dashes. Values Average Latency Standard/Fast Averaged SpO 4 beat exponential 2 beats Pulse Rate Values Average Latency... -
Page 52: Service, Support, And Warranty
Nonin shall repair or replace any LifeSense found to be defective in accordance with this warranty, free of charge, for which Nonin has been notified by the purchaser by serial number that there is a defect, provided said notification occurs within the applicable warranty period. This warranty shall be the sole and exclusive remedy by the purchaser hereunder for any LifeSense delivered to the purchaser which is found to be defective in any manner, whether such remedies be in contract, tort, or by law.
Need help?
Do you have a question about the LifeSense LS1-9R and is the answer not in the manual?
Questions and answers