Nonin 2120 Operator's Manual
Pulse oximeter and nibp monitor
Hide thumbs
Also See for 2120:
- Operator's manual (47 pages) ,
- Operator's manual (59 pages) ,
- Operator's manual (41 pages)

Subscribe to Our Youtube Channel
Related Manuals for Nonin 2120


Summary of Contents for Nonin 2120
- Page 1 Operator’s Manual Model 2120 Model 2120 Pulse Oximeter and NIBP Monitor English 0123...
-
Page 3: Declaration Of Conformity
Declaration of Conformity Manufacturer: Nonin Medical, Inc. Address: 2605 Fernbrook Lane North Plymouth, Minnesota 55447-4755 Model Number: 2120 We herewith declare that the above-mentioned pulse oximeter and blood pressure monitor are classified as Class IIb (using Rule 10) and comply with EC Directive No. - Page 4 Pressure Monitor. The information in this manual has been checked carefully and is believed to be accurate. In the interest of continued product development, NONIN reserves the right to make changes and improvements to this manual and the products it describes at any time, without notice or obligation.
-
Page 5: Table Of Contents
NIBP Features ..........5-4 System Features ..........5-6 Advanced Features .......... 5-11 Using the Model 2120 ........6-1 Unpacking the Model 2120 ......6-2 Installing the Batteries ........6-3 Activating the Model 2120 ......6-5 Verifying Model 2120 Operation ....6-5 Using the Pulse Oximeter ...... - Page 6 Using the Model 2120 with nVision™ Software ........8-3 Real-Time Patient Data Output ....8-4 Care and Maintenance ........9-1 Cleaning the Model 2120 ....... 9-2 Cleaning the Blood Pressure Arm Cuff ..9-2 Storage .............. 9-2 Theory of Operation ........10-1 Pulse Oximetry ..........
-
Page 7: About This Manual
Chapter 1 About this Manual This manual describes the functions and explains the proper use of the NONIN Model 2120 Pulse Oximeter and Noninvasive Blood Pressure (NIBP) Monitor. There are many ways to find information in this manual. • The Table of Contents at the front of the manual can be used to find specific chapters and sections. -
Page 9: Guide To Symbols
Chapter 2 Guide to Symbols The following table describes the symbols that are found on the Model 2120. For more specific information about these symbols, refer to Chapter 5, “Description and Features.” Symbol Description/Function Main Alarm LED %SpO %SpO Display... - Page 10 Guide to Symbols Symbol Description/Function Alarm Silence LED Time LED Month LED Day LED Year LED Pulse Volume LED Alarm Volume LED Auto NIBP Mode LED AC Power Adapter LED...
- Page 11 Symbol Description/Function Battery LED ON/STANDBY button NIBP button Auto NIBP Cycle Time button NIBP History Review button Initial Cuff Pressure button mmHg Time/Date button Volume button...
- Page 12 Guide to Symbols Symbol Description/Function Alarm Silence button Limits button Plus button Minus button Attention: See Instructions for Use or related materials. Type BF Applied Part: Defibrillator Proof (Patient isolation from electrical shock). Applies to both pulse oximeter and NIBP. UL Mark for Canada and the United States with respect to electric shock, fire, and mechanical hazards only in accordance with UL...
-
Page 13: Intended Use
Chapter 3 Intended Use This chapter describes the intended use of the NONIN Model 2120 Pulse Oximeter and Noninvasive Blood Pressure (NIBP) Monitor. Chapter Contents Page Indications for Use .............. 3-2 Pulse Oximeter Intended Use ..........3-2 Blood Pressure Monitor Intended Use ........ 3-2... -
Page 14: Indications For Use
The blood pressure monitor is not intended for use with neonates. It is intended for attended care and may be used for spot-checking. The Model 2120 should be used for patients with arm circumferences of 18-42 cm. -
Page 15: Precautions For Use
Chapter 4 Precautions for Use This section describes the contraindications, warnings, and cautions that are important for the Model 2120 Pulse Oximeter and NIBP Monitor. Read and follow all safety instructions in this chapter before using the Model 2120. - Page 16 Precautions for Use CONTRAINDICATIONS Do not use the Model 2120 in a magnetic resonance imag- ing (MRI) environment. Do not use the blood pressure module of the Model 2120 on neonatal patients.
- Page 17 WARNINGS The Model 2120 is intended only as an adjunct in patient assessment. It must be used in conjunction with other methods of assessing clinical signs and symptoms. This equipment is intended for use in the presence of elec- trosurgery; however, its general operation might be affected by the use of an electrosurgical unit (ESU).
- Page 18 Ensure that the blood pressure cuff is sized and placed correctly for each patient. Ensure that all Model 2120 users know how to manually remove the blood pressure cuff in case it fails to deflate. The safety and effectiveness of the Model 2120 NIBP function in pregnant women have not been established.
- Page 19 Before using any sensor or NIBP cuff, carefully read the Directions for Use. Do not, under any circumstances, perform any testing or maintenance on the Model 2120 while it is being used to monitor a patient. This equipment complies with International Standard EN 60601-1-2:1993 for electromagnetic compatibility for med- ical electrical equipment and/or systems.
- Page 20 Follow local governing ordinances and recycling instruc- tions regarding disposal or recycling of the device and device components, including batteries. Do not immerse the Model 2120 or NONIN sensors in water or any other liquids. Do not place liquids on top of the Model 2120.
- Page 21 The Model 2120 might not work on all patients. Check to ensure that the proper cuff size is used. If you are unable to achieve stable readings, discontinue use.
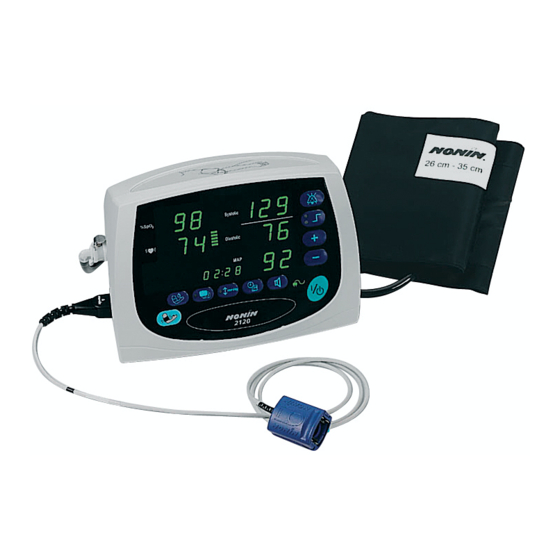
- Page 23 Chapter 5 Description and Features The Model 2120 contains 11 keypad buttons, 25 LED components, and 8 dipswitches—three of which are currently used. This chapter describes those features of the Model 2120. Chapter Contents Page Pulse Oximeter Features ........... 5-2 %SpO2 Display ..........5-2 Pulse Rate Display ..........
-
Page 24: Description And Features
%SpO Display Numeric light-emitting diodes (LEDs) on the upper left-hand corner of the Model 2120 display blood oxygen saturation in percent (indicated by the %SpO icon). Oxygen saturation is calculated using the methods outlined in Chapter 10, “Theory of Operation.”... -
Page 25: Pulse Oximeter Sensor Led
Plus (+) and Minus (—) buttons on the front panel. The highest volume is 15, and the lowest volume is 0. The default volume level is 8. The Model 2120 beeps while pulse volume is being changed, showing the volume progression as it is adjusted. -
Page 26: Nibp Features
MAP (Mean Arterial Pressure) Display The MAP display is a 3-digit LED display near the middle right-hand side of the Model 2120. The MAP number displayed is a calculated value in mmHg, based on measurements of systolic and diastolic pressure:... -
Page 27: Nibp History Review Button
The cycle time can be adjusted using the Plus (+) and Minus (—) buttons. Keypad Round LED Indicators Keypad round LED indicators display whether or not the Model 2120 is functioning in certain modes (NIBP History Display mode or Initial Cuff Pressure Display/ mmHg Modify mode). -
Page 28: System Features
In addition, this LED—when lit solid—indicates that the battery capacity is being displayed. This LED does not indicate that the Model 2120 is running on battery power. AC Power Adapter LED This green LED indicates whether or not the AC adapter is connected to the unit. -
Page 29: On/Standby Button
STANDBY modes. Pressing this button once turns on the Model 2120. Pressing and holding this button for at least 1 second signals the Model 2120 to shut down. Momentarily pressing this button while the unit is on displays the battery capacity percentage, in 10% increments, for four seconds in green. -
Page 30: Plus Button
This button is also used to scroll through the NIBP history. Pressing this button alone, when the Model 2120 is not in any program mode, adjusts the intensity of the LED displays. -
Page 31: Time/Date Button
Time/Date Button This button displays the time and date. In US mode, pressing the button toggles the user through the year, month, day, hour, and minute, which can be set using the Plus (+) and Minus (—) buttons. In International mode (Dipswitch 3 in the On [up] position), pressing the button toggles the user through the year, day, month, hour, and minute. -
Page 32: Time Led
(non-blinking). There is a four-digit numeric LED display on the Model 2120 as well. It is a single color (green) LED used primarily to display date and time information, adjust volumes, adjust the auto NIBP cycle time, and set the initial NIBP cuff pressure. -
Page 33: Advanced Features
This section describes the advanced features—both key combinations and dipswitch options—available on the Model 2120. Key Combinations The Model 2120 provides two advanced features that are available by using multiple key combinations. The unit must be in Standby mode before using either of the advanced features. -
Page 34: Model 2120 Dipswitches
(down) position is toward the bottom of the unit. The dipswitches are located under the green battery cover on the rear of the unit. A small Phillips screwdriver must be used to remove the battery cover. The default for all Model 2120 dipswitches is the Off (down) position. Switch Function Switch 1 On—Calibration Mode... - Page 35 NIBP Cuff Selection ........... 6-8 NIBP Cuff Placement ......... 6-8 Automatic and Demand NIBP Measurements ....6-13 Calibrating Blood Pressure on the Model 2120 ....6-14 WARNING! Read this entire manual carefully before using the Model 2120 Pulse Oximeter and NIBP Monitor.
-
Page 36: Using The Model 2120
Contact the carrier immediately if the shipping carton for the Model 2120 is damaged. Carefully unpack the instrument and its accessories. Confirm that the items listed below are packed with the Model 2120 Pulse Oximeter and NIBP Monitor. The Model 2120 shipment includes the following: •... -
Page 37: Installing The Batteries
Installing the Batteries A rechargeable battery pack powers the Model 2120 for a minimum of five hours of continuous operation under normal operating conditions. Plugging in the AC adapter recharges the batteries. The batteries will be completely recharged when the unit has been plugged in and not used for approximately four hours. - Page 38 Perform a startup self-test on the Model 2120. If the unit does not turn on, plug in the AC adapter to charge the new battery pack. If the Model 2120 still does not turn on, reinsert the batteries or see Troubleshooting on page 15-1.
-
Page 39: Activating The Model 2120
Verifying Model 2120 Operation When the unit is first turned on, the Model 2120 performs a brief startup (initialization) sequence. Verify that all LEDs illuminate and the unit beeps three times during the first phase of the startup sequence (See below). -
Page 40: Using The Pulse Oximeter
Using the Model 2120 Using the Pulse Oximeter In order to verify that the Model 2120 is functioning properly, it is important to monitor SpO , pulse rate, and blood pressure readings. Use the following procedure to verify that the pulse oximeter sensor is functioning properly. -
Page 41: Taking Blood Pressure Measurements
If inaccurate blood pressure measurements are suspected, ensure that the arm cuff is positioned properly and that the Model 2120 has been properly calibrated. -
Page 42: Nibp Cuff Selection
In order to guarantee accurate readings, the appropriate cuff size must be selected for each patient. CAUTION! Use only Nonin-supplied blood pressure cuffs and hoses with the Model 2120. Using other cuffs might result in inaccurate readings or inability to operate the Model 2120. Small Adult BP Cuff... - Page 43 Figure 6.4 Proper Cuff Placement.
- Page 44 Plugging in the oximeter sensor at any time will enable the oximeter. Ensure that the Model 2120 is on and functioning properly. Connect the blood pressure arm cuff and finger clip sensor to the Model 2120.
- Page 45 Carefully place the blood pressure arm cuff around the patient’s bicep. The patient should sit in a relaxed position, with feet flat on the floor. IMPORTANT! Proper cuff placement is critical for accurate blood pressure readings and patient safety. Figure 6.6 Proper arm cuff placement. NOTE: If the cuff does not fit properly, a larger or smaller arm cuff might be required.
- Page 46 NIBP will illuminate. NOTE: If the finger clip sensor is not worn while blood pressure is measured, the Model 2120 will display heart rate information as measured from the blood pressure arm cuff; however, no %SpO2 data will be displayed.
-
Page 47: Automatic And Demand Nibp Measurements
Demand NIBP measurements are single-time measurements taken by pressing the NIBP button on the Model 2120. They are useful for individual readings and when long-term spot-checking is unnecessary. 6-13... -
Page 48: Calibrating Blood Pressure On The Model 2120
Using the tip of a screwdriver or other similar device, place Dipswitch 1 in the “on” (up) position. Turn on the Model 2120. A CAL message is displayed in the Systolic display window, acknowledging that the Model 2120 is in Calibration mode. - Page 49 Chapter 7 Alarms and Limits This chapter describes the alarms, limits, and error codes associated with the use of the Model 2120. Chapter Contents Page Alarms ..................7-2 High Priority Alarms ............7-2 Medium Priority Alarms ........... 7-2 Informational Tones ............7-2 Error Codes ...............
-
Page 50: Alarms And Limits
Alarms and Limits Alarms The Model 2120 provides a variety of audible and visual alarms, which are either high or medium priority. It also provides informational tones. NOTE: Audible alarms can be silenced temporarily. Pressing the Alarm Silence button silences the audible alarms for two minutes. -
Page 51: Error Codes
Error Codes The Model 2120 provides users with various error codes to indicate potential problems with the unit. The following table describes the error codes present on the Model 2120. Error Codes NIBP Module, User Cancelled: The NIBP module was cancelled from taking a blood pressure reading. - Page 52 Alarms and Limits Error Codes NIBP Module, ADC Hardware Failure NIBP Module, Pressure Calibration Failed: Module was unable to reset its pressure calibration data. Undefined NIBP Error NIBP Module, No Communication: There is no data from the NIBP module. Sound Error: Channel 1 Failure Sound Error: Channel 2 Failure Sound Error: Both Channels Failure Sound Error: Amplifier Failure...
- Page 53 SPI communication from the sound module to the display board microcontroller. SCI Communication Error: There is an SCI communication problem. There were too many overrun, checksum, and/or sync errors. External Memory Failure: The external (patient data) memory failed test. mmHg Figure 7.1 An example of an error code on the Model 2120.
-
Page 54: Alarm Summary
The following table provides information regarding Model 2120 default and programmable settings. If values for any alarm description are met or exceeded, the Model 2120 will go into a corresponding Alarm mode. To adjust alarm settings, press the Limits button until the alarm limit you... - Page 55 Alarm Adjustment Default Priority Description Range MAP Upper Alarm Off, 70 to 200 by 5 High Limit mmHg mmHg MAP Lower Alarm Off, 25 to 125 by 5 High Limit mmHg mmHg...
-
Page 56: Setting And Changing Alarm Limits
Setting or Changing SpO2 Upper Alarm Limit Use the following procedure to set or change the SpO2 upper alarm limit. Ensure that the Model 2120 is on and functioning properly. Press the Limits button. The upper amber LED is illuminated on... -
Page 57: Setting Or Changing Pulse Upper Alarm Limit
Setting or Changing Pulse Upper Alarm Limit Use the following procedure to set or change the pulse upper alarm limit. Ensure that the Model 2120 is on and functioning properly. Press the Limits button three times. The upper amber LED is illuminated on the Limits button, and 200 (if the default value) is displayed in the Pulse Rate display. -
Page 58: Setting Or Changing Systolic Upper Alarm Limit
Use the following procedure to set or change the systolic upper alarm limit. Ensure that the Model 2120 is on and functioning properly. Press the Limits button five times. The upper amber LED is illuminated on the Limits button, and 200 (if the default value) is displayed in the Systolic display. -
Page 59: Setting Or Changing Diastolic Upper Alarm Limit
Use the following procedure to set or change the diastolic upper alarm limit. Ensure that the Model 2120 is on and functioning properly. Press the Limits button seven times. The upper amber LED is illuminated on the Limits button, and 120 (if the default value) is displayed in the Diastolic display. -
Page 60: Setting Or Changing Map Upper Alarm Limit
Setting or Changing MAP Upper Alarm Limit Use the following procedure to set or change the MAP upper alarm limit. Ensure that the Model 2120 is on and functioning properly. Press the Limits button nine times. The upper amber LED is illuminated on the Limits button, and 100 (if the default value) is displayed in the MAP display. -
Page 61: Setting And Changing Alarm And Pulse Volume
Setting or Changing Alarm Volume Use the following procedure to set or change the alarm volume. Ensure that the Model 2120 is on and functioning properly. Press the Volume button. The Alarm Volume LED illuminates and 08 (if the default value) appears on the display screen. -
Page 62: Silencing Alarms
Alarms and Limits Silencing Alarms This section describes how to silence audible alarms on the Model 2120. NOTE: All alarms can be silenced for two minutes by pressing the Alarm Silence button. Visual alarm indicators cannot be turned off. All dipswitches for the Model 2120 are located under the green back cover on the rear of the unit. -
Page 63: Setting And Changing Nibp Settings
Use the following procedure to set or change the automatic NIBP cycle time. Ensure that the Model 2120 is on and functioning properly. Press the Automatic NIBP Cycle Time button. The Auto NIBP LED illuminates and OFF (if the default value) appears on the display screen. -
Page 65: Communication
Chapter 8 Communication This chapter describes the communication capabilities of the NONIN Model 2120 Pulse Oximeter and NIBP Monitor. Chapter Contents Page Memory Features .............. 8-2 Using the Model 2120 with nVision™ Software ....8-3 Real-Time Patient Data Output ........8-4... -
Page 66: Memory Features
C o m m u n i c a t i o n Memory Features The Model 2120 can collect and store up to 33.5 hours of SpO and pulse rate information. NONIN nVision™ data retrieval software is available for use with... -
Page 67: Using The Model 2120 With Nvision™ Software
Using the Model 2120 with nVision™ Software The Model 2120 has a Memory Playback feature, allowing stored data to be transferred to NONIN’s nVision™ software for analysis. Use the following procedure to use the Model 2120 with nVision™ software. With the unit off, connect the RS-232 connector port of the Model 2120 to the back of your computer using a null modem cable. -
Page 68: Real-Time Patient Data Output
Port Figure 8.1 The RS232 connector port. The information from the Model 2120 in the real-time mode is sent in an ASCII serial format at 9600 baud with 9 data bits, 1 start bit, and 1 stop bit. The data are output at a rate of once per second (on separate lines). - Page 69 Model 2120 Memory Playback Data Format Data 1 Data 2 Note Checksum Header of first file month Current Time year minute second hour month Stop time of first file saved in memory year minute second hour month Start time of first file saved in memory...
-
Page 71: Care And Maintenance
Field repair of the Model 2120 circuitry is not possible. Do not attempt to open the Model 2120 case or repair the electronics. Opening the case will damage the Model 2120 and void the warranty. If the Model 2120 is not functioning properly, see Troubleshooting on page 15-1. -
Page 72: Cleaning The Model 2120
Clean the Model 2120 with a soft cloth dampened with isopropyl alcohol. Do not pour or spray any liquids onto the Model 2120, and do not allow any liquid to enter any openings in the device. Allow the Model 2120 to dry thoroughly before reusing it. -
Page 73: Theory Of Operation
Chapter 10 Theory of Operation This chapter describes the basic theory of operation for the NONIN Model 2120 Pulse Oximeter and NIBP Monitor. The fundamental principles of pulse oximetry and blood pressure monitoring are included. Chapter Contents Page 10.1 Pulse Oximetry ............10-2 10.2... -
Page 74: Pulse Oximetry
Pulse oximeters use two different wavelengths of light (colors) and thus have the ability to determine one component of blood. The Model 2120 is calibrated to closely approximate functional oxygen saturation values. The Model 2120 oxygen saturation values will closely approximate co-oximeter fractional saturation values if the dysfunctional hemoglobin saturation levels are negligible. - Page 75 Example 1 Example 2 Hb = 96 Hb = 88 COHb = 0.5 COHb = 8 MetHb = 0.6 MetHb = 2 = 97 = 98 = 97.07 = 97.78 The mathematics are fixed in the pulse oximeter hardware and software. The pulse oximeter does all critical computations in software, and there are no critical parts to drift.
-
Page 76: Blood Pressure Measurement
T h e o r y o f O p e r a t i o n 10.2 Blood Pressure Measurement The pressure transducer converts the cuff pressure to an analog output voltage and also detects the small oscillometric waveforms resulting from the patient’s arterial pulses. - Page 77 10 mmHg for longer than 180 seconds. This report demonstrates that the NONIN Model 2120 design is intrinsically safe, and that even in the event of a single fault condition within the unit, neither of the above hazard conditions can occur.
- Page 78 To guard against these possibilities, an independent supervisory system has been implemented in the Model 2120. The supervisory safety system is implemented using a second NIBP microprocessor, with its own clock system, reset controller, and power switch system.
-
Page 79: Specifications
Chapter 11 Specifications OXIMETER Oxygen Saturation Range 0% to 100% (%SpO Pulse Rate Range 18 to 300 pulses per minute Displays Numeric Displays 3-digit LEDs, Tricolor (red, green, amber) Pulse Indicator Amber LED Accuracy Blood Oxygen Saturation 70% to 100% ± 2 digits (%SpO ) (± 1 S.D.) Pulse Rate ± 3% ±1 digit Measurement Wavelengths and Output Power 660 nanometers @ 3 mw nominal Infrared... - Page 80 S p e c i f i c a t i o n s SYSTEM Temperature Operating +32° to +122°F (+0° to +50°C) Storage/Transportation -4° to +122°F (-20° to +50°C) Humidity Operating 10% to 90% noncondensing Storage/Transportation 10% to 95% noncondensing Power Requirements 7.2 volt battery pack (6 cells) or 12 VDC AC Adapter...
-
Page 81: Parts And Accessories
Chapter 12 Parts and Accessories Model Number Description 2120B Battery Pack 2120 Manual Operator’s Manual for the Model 2120 Simple Cuff—Small Small NIBP Cuff Simple Cuff—Standard Standard NIBP Cuff Simple Cuff—Large Large NIBP Cuff Connect-2 Tubing UNI-RA-1 40” 90-degree patient cable UNI-RA-3 120”... - Page 82 Real-Time and Memory Cable (for use between the Model 2120 and a PC running Microsoft Windows 95/98 operating systems) For more information about NONIN parts and accessories, contact your distributor, or contact NONIN at (800) 356-8874 (USA and Canada) or (763) 553-9968. 12-2...
-
Page 83: Service And Support
Thus, there are no critical parts to drift, and no calibration of the pulse oximeter module is required. The Model 2120 NIBP module should be calibrated after every 10,000 checks or once per year, whichever comes first. -
Page 85: Warranty
Model 2120 battery pack and blood pressure module. NONIN warrants the pulse oximetry module of the Model 2120 for a period of three years from the date of purchase, and the blood pressure cuff for a period of 90 days from the date of purchase. -
Page 87: Troubleshooting
Chapter 15 Troubleshooting The following table provides troubleshooting information for issues common to the Model 2120. The table is divided into three columns: Problem, Possible Cause, and Possible Solution. Problem Possible Cause Possible Solution The Model 2120 The battery pack is Check the batteries. - Page 88 There is excessive Shield the sensor from the ambient light. light source. Model 2120 is Apply the sensor to a finger applied to a without fingernail polish or polished fingernail an artificial nail. or artificial nail.
- Page 89 Warm the application site. The finger was Reinsert the finger and removed from the keep the sensor motionless Model 2120. for at least 10 seconds. Model 2120 is not Contact NONIN’s functioning. Customer Support Department. An error code The Model 2120...
- Page 90 Attach the blood pressure will not take connection hose is connection hose to the NIBP readings. not attached. Model 2120. There is a Return the Model 2120 to communication NONIN Customer error. Support for repair or replacement. The unit is in The 2-minute...
- Page 91 The battery is Return the Model 2120 to inoperable. NONIN Customer Support for repair or replacement. If these solutions do not correct the problem, please contact NONIN Customer Support at (800) 356-8874 (USA and Canada) or (763) 553-9968. 3464-001-02 15-5...
Need help?
Do you have a question about the 2120 and is the answer not in the manual?
Questions and answers