Table of Contents
Advertisement
Quick Links
Advertisement
Table of Contents

Related Manuals for Nonin 8600


Summary of Contents for Nonin 8600
- Page 1 Operator’s Manual Models 8600 & 8600M Pulse Oximeters...
- Page 2 References to “NONIN" in this manual shall imply Nonin Medical, Inc. Nonin is a registered trademark of Nonin Medical, Inc. References to “8600” in this manual shall imply Models 8600 and 8600M. © 2004 Nonin Medical, Inc. Authorized EC Representative:...
-
Page 3: Guide To Symbols
• Do not set the alarm volume too low to be heard. Doing so could compromise patient safety. • The audible alarm of the 8600 is for the convenience of the attendant near the patient. It is not intended to call an attendant from another room or from a distance. - Page 4 • Fingernail polish may reduce light transmission and thereby affect SpO accuracy. • The 8600 may not work on all patients. If you are unable to achieve stable readings, discontinue use. • The 8600 may interpret motion artifact of sufficient amplitude and regularity as good perfusion (green).
-
Page 5: Manufacturer's Declaration
Manufacturer’s Declaration Refer to the following table for specific information regarding this device’s compliance to IEC Standard 60601-1-2. Table 1: Electromagnetic Emissions Emissions Test Compliance Electromagnetic Environment— Guidance This device is intended for use in the electromagnetic environment specified below. The customer and/or user of this device should ensure that it is used in such an environment. -
Page 6: Unpacking Your Pulse Oximeter
General The 8600 Pulse Oximeter is small, light weight, and is intended to be portable. It has audible and visual alarms for monitoring patient status. The 8600 may be connected to A/C power or run from its internal battery. It typically operates for 30 hours on a fully charged battery. -
Page 7: Battery Charging
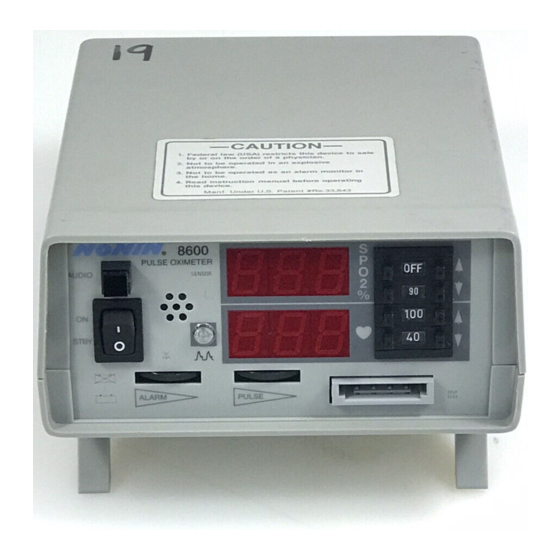
Turning On The Pulse Oximeter Turn on the 8600 by pressing the " I " power switch on the front of the pulse oximeter. Refer to Figure I. When the 8600 is turned on, the displays will cycle through the following sequence before displaying valid data: •... - Page 8 Figure 1: Front View of the 8600 Figure 2: Rear View of the 8600 Figure 3: Labels on the 8600...
-
Page 9: Verifying Operation
Do not immerse the 8600 in liquid, and do not use caustic or abrasive cleaning agents. The 8600 Pulse Oximeter may be cleaned with a mild detergent and a soft cloth or with an isopropyl alcohol wipe. Allow enough time for the 8600 to dry thoroughly before reusing. -
Page 10: Activation Instructions
Features Controls All functions of the 8600 are controlled by switches found on the front and rear of the unit. Refer to Figures I and II for illustrations of these switches. Power Switch Pressing the power switch ON (" I ") causes power to be applied to all internal circuitry. Pressing the power switch to STBY ("... - Page 11 To set up the real-time settings, hold the button for more than 2 seconds on power on. “ ” will appear in the upper LED display, indicating print setup mode. The 8600 automatically advances to the clock AUDIO setting mode. Pressing the button increments the number in the lower LED display.
- Page 12 NOTE: There are 16 settings available for future expansion of the printer settings. Setting for the printer for any one of these values will have no effect on the 8600. Calendar Settings After the printer setting has been displayed in the setup mode, y will appear in the SpO...
- Page 13 • Clock Settings After the calendar settings have been determined in the real-time setup mode, h will appear in the SpO display, indicating the hour. The time is set in a 24-hour format. The hour may be set to 00 through 23. After selecting the hour, the display will show nn indicating the minutes.
- Page 14 Patient Alarm Limits Set the patient alarm condition switches located on the front of the 8600 to the attending physician’s recommendations. These values may be changed at any time and will take effect immediately. Figure 4: Patient Alarm Display Patient Alarm...
-
Page 15: Pulse Volume
Pulse Volume The 8600 may be set such that it will emit a short tone for each pulse detected. Turn the pulse volume control, marked with the symbol, until an audible pulse is heard with each beat. The tone will change pitch as the SpO level changes. - Page 16 Option Switches Refer to Figure 2 for the location of the option switches. Option Switch 1 This switch controls the audible alarm OFF capabilities. down: Audible Alarm May Not Be Disabled Prevents audible alarm from being permanently disabled by the user Audible Alarm May Be Disabled Allows the audible alarm to be permanently disabled by the user via the alarm volume dial turned to Option Switch 2...
-
Page 17: Visual Indicators
After 90 seconds of yellow perfusion, the 8600 will go into sensor alarm mode. • Green indicates the pulse waveform signal is of good quality and SpO data is accurate. - Page 18 TEST illuminates and the audible alarm sounds continuously. This condition can only be cleared by turning the 8600 to STBY ( O ) and then back ON ( I ). This alarm cannot be shut off with the alarm volume control or by...
-
Page 19: Audible Indicators
As the SpO level decreases, the pitch of the pulse tone decreases. If the 8600 loses the pulse, the audible pulse tone will beep at a much higher pitch. The audible pulse tone volume may be varied from OFF to 70 db(A). - Page 20 Sub-D connector labeled as “RECORDING OUTPUT” on the rear of the 8600 (refer to Figure 2). The information from the 8600/8600M in the real-time mode is sent in an ASCII serial format at 9600 baud with 9 data bits, 1 start bit, and 1 stop bit. The data is output at a rate of once per second.
- Page 21 15-pin sub-D connector labeled as “RECORDING OUTPUT” on the rear of the 8600 (refer to Figure 2). The solid-state memory in the 8600M functions much like an endless loop. When the memory fills up, the unit begins overwriting the oldest locations with the latest data.
-
Page 22: Specifications
Specifications 0 to 100% Oxygen Saturation Range (SpO Pulse Rate Range 18 to 300 pulses per minute Displays 3-digit 7-segment LEDs Digital Displays Perfusion indicator Patient Indicator Equipment Indicators Sensor, Self Test, Battery Low, Battery Charging, and Audible Alarm Disabled indicators Measurement Wavelengths 660 nanometers... - Page 23 Failure to release the plastic catches when opening the case will damage the case. The circuit board in the 8600 is a multi-layer board using traces 0.01" wide. Due to the very small trace size, extreme care must be used when replacing components to prevent permanent non-repairable damage to the circuit board.
-
Page 24: Warranty
Warranty NONIN MEDICAL, INCORPORATED, (NONIN) warrants to the purchaser, for a period of three years from the date of delivery, each system exclusive of sensors, cables, and battery charger. NONIN shall repair all systems found to be defective in accordance with this warranty, free of charge, for which NONIN has been notified by the purchaser by serial number that there is a defect, provided said notification occurs within the applicable warranty period. - Page 25 Accessories The following NONIN accessories function with the 8600 Pulse Oximeter: 7708 Battery Charger 110 V / 50-400 Hz (U.S.A.F. Approved) 8000A Battery Charger 220 V / 50 Hz (European Turret) 8000H Reflectance Sensor Holder 8000S Simulator 8000T Sensor Attachment Tape, clear, 100 per box...
-
Page 26: Troubleshooting Guide
Reset 8600 by turning the unit OFF, wait a few seconds, and but SpO and pulse rate turn the unit ON are within alarm limits If any of these solutions do not correct the problem with your 8600, please contact NONIN Customer Support at (800) 356-8874 or (763) 553-9968.
Need help?
Do you have a question about the 8600 and is the answer not in the manual?
Questions and answers