Polycom VVX 201 User Manual
Business media phone
Hide thumbs
Also See for VVX 201:
- User manual (166 pages) ,
- Owner's manual (58 pages) ,
- Getting started (49 pages)
Table of Contents
Advertisement
Quick Links
Advertisement
Table of Contents

Subscribe to Our Youtube Channel
Related Manuals for Polycom VVX 201


Summary of Contents for Polycom VVX 201
- Page 1 Polycom VVX 201 ® Business Media Phone User Guide Version 1...
- Page 2 Polycom, Inc. Open Source Software Used in this Product This product may contain open source software. You may receive the open source software from Polycom up to three (3) years after the distribution date of the applicable product or...
- Page 3 Polycom of shipping or distributing the software to you. To receive software information, as well as the open source software code used in this product, contact Polycom by email at OpenSourceVideo@polycom.com.
-
Page 4: Table Of Contents
Choose a Default Transfer Type ....................15 Transfer a Call .......................... 16 Cancel a Transfer ........................16 Managing Calls on VVX 201 Series Phones ................... 17 Display Calls from the Lines Screen ..................17 Display Calls from the Calls Screen..................17... - Page 5 Ignoring or Rejecting Incoming Calls ....................18 Ignore or Silence an Incoming Call ..................18 Reject Incoming Calls ......................18 Reject Calls from a Contact ..................... 19 Rejecting Calls with Do Not Disturb ..................19 Redirecting Incoming Calls ......................20 Forwarding Incoming Calls to a Contact ..................
- Page 6 Add Favorites ........................... 30 Viewing Favorites ........................30 Reorder Favorites ........................31 Delete Favorites ........................31 Accessing and Sending Messages ................32 Accessing Voice Messages ......................32 Access Voicemail and Video Messages .................. 32 Remove the Message Alert ...................... 32 Customizing Your Phone ...................
- Page 7 Restart the Phone ........................... 45 Update the Phone Configuration ....................46 Test Phone Hardware ........................46 View Software Details ........................46 Updating the Phone Software ......................46 Update the Phone Software ..................... 47 Update Software Later ......................47 Postpone Software Updates ....................47 Exit the Software Update Notification ..................
-
Page 8: Before You Begin
This user guide contains information for the following Polycom ® ® products: ● VVX 201 business media phones Typographic Conventions A few typographic conventions, listed next, are used in Polycom guides to distinguish types of in-text information. Typographic Conventions Convention Description Bold... -
Page 9: Related Documentation
Related Documentation For additional information about the Polycom VVX Business Media Phones, the VVX Camera, and the VVX Expansion Modules, view the following support pages: ● Polycom VVX 201 You can view the following types of documents on each product page: Quick Tips A quick reference on how to use the phone’s most basic features. -
Page 10: Overview Of Polycom Vvx Business Media Phones
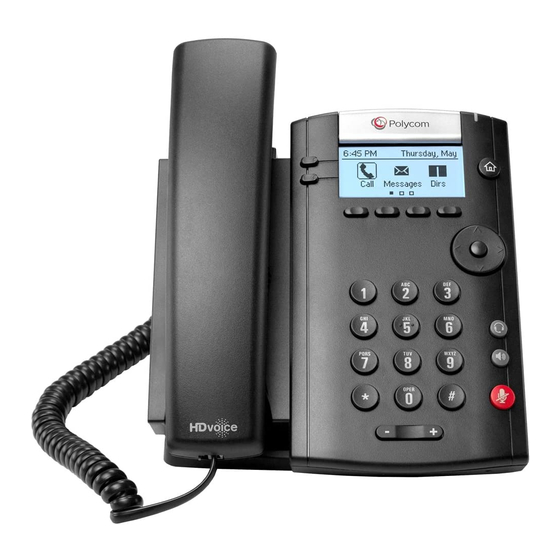
Polycom Voice Support. VVX201 Hardware The following figure displays the hardware features on the VVX 201 business media phone. The table lists each numbered feature shown in this figure. Figure 1: VVX 201 hardware features... - Page 11 VVX 201 Hardware Feature Descriptions Reference Reference Feature Feature Description Number Number Feature Feature Description Hookswitch Cradles the handset and end calls. Line keys Enable you to select a phone line, view calls on a line, or quickly call a favorite contact.
-
Page 12: Securing Your Phone With The Security Slot
Calls Screen The Calls screen is supported on VVX 201 phones. You can access the Calls screen when you have one held call or an active and held call in progress on your phone. The Calls screen is automatically displayed when you have an active call and one or more held calls on your phone. - Page 13 Lines Screen The Lines screen is supported on VVX 201 phones and is the default screen when your phone is not in use. When you have multiple calls on your phone, the number of calls you have is displayed next to the line number.
-
Page 14: Icons And Status Indicators
Description Registered line Phone warning Unregistered line Login credentials invalid Placing a call Shared line Active call using Polycom HD Shared line with a held call Held call Call forwarding is enabled Incoming call New message Active conference Presence status (Available) -
Page 15: Audio Calls
Placing and Answering Audio Calls VVX 201 phones can manage a maximum of 8 active, incoming, and held audio calls at a time. However, you can have only one active call in progress with numerous other incoming calls or calls on hold on all phones. - Page 16 In addition to the Dialer, you can place calls from the Recent Calls list, which has calls that were recently placed, answered, or missed on your phone. 1 Do one of the following: On VVX 201, navigate to Directories > Recent Calls. 2 From the Calls List screen, select a contact and select Dial. Calling Favorites You can call your favorites from the Favorites list or by selecting a favorite on your Home or Lines screen.
- Page 17 Home or Lines screen. » Do one of the following: On VVX 201 series phones, press a line key associated with a favorite on the Lines screen. A call is placed to the favorite automatically.
- Page 18 Call a Contact from the Directory Search Screen You can search for and call contacts from the Search screen in your directory. T 1 Select Directories. 2 Select Search, enter your contact's first or last name, and select Search. 3 Select your contact. 4 In the Contact Information screen, select the contact's number, and select Dial.
-
Page 19: Redial A Number
Redial a Number Your phone automatically keeps a record of all the calls placed on your phone. You can recall the last contact you call using the Redial icon or soft key. » Do one of the following: Select Redial on the Home screen. ... - Page 20 Answer a Call When in a Call When you are in an active call and an incoming call arrives on the same or a different line, a call waiting tone beeps, and the Incoming Call screen is displayed. If you don't answer the call within 10 seconds, the Incoming Call screen disappears, and the Calls screen is displayed.
-
Page 21: Switch Among The Handset, Headset, And Speakerphone
When using the headset, the Headset key glows green if an analog headset is connected or blue if a USB headset is connected. For VVX 201 phones, the headset and speakerphone keys do not glow and the Headset icon displays in the status bar. -
Page 22: Resume A Call On A Vvx Expansion Module
Resume a Call on a VVX Expansion Module You can resume calls placed on hold by other contacts from your VVX Expansion Module. A flashing red LED light on a line key on the expansion module indicates a call is on hold on the contact's line. »... -
Page 23: Transfer A Call
Transfer a Call You can transfer a call to another contact and choose the transfer type you want to use for the call. T 1 During a call, do one of the following Press Transfer to use the default transfer type. ... -
Page 24: Managing Calls On Vvx 201 Series Phones
Managing Calls on VVX 201 Series Phones On VVX 201 phones, you can see the number of calls on the line from the Lines screen, as shown next. On all VVX business media phones, a green light on the line key indicates a line with an active call, and a red light indicates a line with one or more held calls. -
Page 25: Manage A Call From The Calls Screen
Manage a Call from the Calls Screen From the Calls screen, you can manage a call by holding, resuming, or transferring the call, or you can initiate a conference. 1 Select a call. The call is highlighted. 2 Do one of the following: ... -
Page 26: Reject Calls From A Contact
● The message “Do Not Disturb” is displayed in the status bar on all phones. ● For VVX 201 phones, the line icon changes to Note: When you have set your presence status to Do Not Disturb, as well as enabled DND for your phone, the message My Status: Do Not Disturb scrolls under the time display, and the DND icon does not display in the status bar. -
Page 27: Redirecting Incoming Calls
Redirecting Incoming Calls You can redirect incoming calls by forwarding an incoming call to a contact, forwarding all incoming calls to a contact, or diverting calls from a specific contact to another contact. Forwarding Incoming Calls to a Contact You can choose to forward an incoming call to a contact or forward all incoming calls to one of your contacts. Forward an Incoming Call to a Contact You can forward an incoming call directly to a contact without answering the call. -
Page 28: Divert Calls To A Contact
Disable Call Forwarding You can disable call forwarding when you no longer want to forward your calls. T 1 Select Forward. 2 If your phone has multiple lines, select a line. 3 From the Forwarding Type Select screen, select your forwarding type, and select Disable. Divert Calls to a Contact You can divert all incoming calls from a particular contact to another contact. -
Page 29: Conference Calls
You can initiate an audio conference call with two contacts and hold, resume, or split a conference call on your VVX business media phone. VVX 201 phones can manage a maximum of 2 active or held conference calls at a time. However, you can have only one active conference call in progress with numerous other conference calls on hold. -
Page 30: Initiate A Conference Call
Initiate a Conference Call You can initiate a conference by calling two people and selecting the Conference soft key or hard key. Note: When your phone is set up for single key press conferences, you do not need to tap the Conference soft key or press the Conference key a second time to join parties to a conference call. -
Page 31: Hold A Conference Call
Hold a Conference Call When you place a conference call on hold, you place all conference participants on hold. » Select Hold. If you're in the Calls screen, highlight the conference first. ELATED INFORMATION Manage Conference Call Participants Resume a Conference Call Resuming a held conference call enables all participants to hear the audio of everyone on the call. -
Page 32: Call Lists And Directories
Call Lists and Directories All VVX business media phones support a Recent Calls list, a Contact Directory and a Corporate Directory. Note: Your phone may not support all of the features described in this section. Check with your system administrator to find out which features are available on your phone. Recent Calls All VVX business media phones maintain a Recent Calls list that includes missed, received, and placed calls. -
Page 33: Edit Recent Contact Entries
When you filter calls, you can choose to display only missed, received, or placed calls. Or, you can choose to display all call types (the default). 1 Select Type or tap 2 Choose Missed Calls, Received Calls, or Placed Calls. You cannot save your filtered call list results. -
Page 34: Search For A Contact In The Contact Directory
You can perform the following tasks in your Contact Directory: ● Add a contact ● View contact information ● Update a contact’s information ● Delete a contact ELATED INFORMATION Set a Protocol for Placing Calls Automatically Managing the Corporate Directory Add BroadSoft Contacts to the Contact Directory Save a Global Address Book Contact to the Contact Directory Edit Contacts in the Personal Address Book Add Contacts to Your Buddy List... -
Page 35: Add A Contact To The Contact Directory
Add a Contact to the Contact Directory When you add a contact to your Contact directory, you can choose how much information you want to enter for your contact. You are required to only enter a contact number for each new contact. The following is a list of information you can enter for each contact: First and Last Name - ●... -
Page 36: Update A Contact's Information
Update a Contact's Information After you add a contact to your Contact Directory, you can update the contact's information. T 1 From the Contact Directory, select a contact. 2 From the Contact Information screen, do one of the following: Select Edit. ... -
Page 37: Favorites And Contact Lists
4 Select Yes to automatically accept an index number or select Edit Index to enter a unique index number. You can enter a number up to 99 for VVX 201 phone. Viewing Favorites You can view favorites in your Favorites list in the Directory or the New Call screen. Favorites display consecutively according to their index number. -
Page 38: Reorder Favorites
View Favorites from the Lines Screen You can view a list of favorites on the Lines screen on all VVX phones. » From the Home screen, press Reorder Favorites You can change the order in which your favorites display on the Home or Lines screen. T 1 From your Contact Directory, select a contact. -
Page 39: Accessing And Sending Messages
Note: Contact your system administrator or service provider for information on setting or changing your voicemail greeting. Access Voicemail and Video Messages Voicemail is available on all Polycom VVX phones. Note: Contact your system administrator or service provider for information on remotely accessing your voicemail. -
Page 40: Customizing Your Phone
Customizing Your Phone This section explains how to customize your phone so that it is unique to you. Basic customizations include changing the time and date format and updating the screen brightness. Set the Language Your phone supports several languages that you can choose to display. Check with your system administrator to find out which languages are supported on your phone. -
Page 41: Set The Backlight Intensity
Backlight Idle intensity. The backlight timeout period begins after your last key press or the last phone event, such as an incoming call. Backlight Intensity includes the following settings you can choose from: Backlight On ● The brightness of the screen when there is phone activity. Backlight Idle ●... -
Page 42: Changing Audio Settings
1 Navigate to Settings > Basic > Backlight Timeout. 2 From the Backlight Timeout screen, select the number of seconds the phone is idle before the backlight dims. The default is 40 seconds. Change Your Office Hours Changing Audio Settings You control certain audio settings on your phone, including the ringtone for incoming calls from all contacts or a specific contact, where call notifications play, and the volume or the ringtone or call audio. -
Page 43: Set A Ringtone For Individual Contacts
Set a Ringtone for Individual Contacts You can select unique ringtones for various contacts in your directory. This helps you quickly identify callers as your phone rings. 1 From your Contact Directory, select a contact. 2 From the Contact Information screen, select Edit or tap 3 From the Edit Contact screen, select Ring Type and select a ringtone. -
Page 44: Phone Accessories And Computer Applications
● When an analog headset is connected and in use, the headset key glows green. Note that the headset key does not glow on VVX 201 phones. ● When both an analog and USB headset are connected, the USB headset is used automatically for all calls. -
Page 45: Reactivate Headset Memory Mode
Typically, you can work wirelessly up to 300 feet (91 meters) from your phone and still use the EHS controls. Check with your headset's user guide for the precise range restrictions. See Feature Profile 37477: Using Headsets with Polycom Phones on Polycom Support for a list of compatible headsets. - Page 46 EHS. 1 Connect your headset and EHS adapter to your phone. See the Quick Start Guide for your phone on Polycom Voice Support for information on connecting a headset to your phone. 2 Navigate to Settings > Basic > Preferences > Headset > Hookswitch Mode.
-
Page 47: Disconnect Your Headset
to control your phone using your headset, your headset must be in soft phone mode. If you cannot operate the phone from your headset, it is possible your headset is in desk phone mode. » Press and hold the headset hookswitch until you hear a sound or message on the headset. Controlling Calls with Electronic Hookswitch After you have followed the procedures for connecting your headset and enabled EHS, you can use the controls on your headset to answer, mute, and end calls. -
Page 48: Accessibility Features On Your Phone
Accessibility Features on Your Phone This section provides information for the following accessibility features available on VVX business media phones: ● Features for Hearing-Impaired Users ● Features for Vision-Impaired and Blind Users ● Features for Mobility-Impaired Users Features for Hearing-Impaired Users The following table lists the accessibility features on VVX business media phones for hearing-impaired users. - Page 49 screen to flash bright orange for incoming calls (contact your system administrator). Electronic hookswitch support If you use a headset that supports electronic hookswitch (EHS), you can use the controls on your headset to answer and end calls. In addition, you may be able to mute calls and control volume from your headset (see Enable Electronic Hookswitch).
-
Page 50: Features For Vision-Impaired And Blind Users
Features for Vision-Impaired and Blind Users The following table lists the accessibility features on VVX business media phones for visually-impaired and blind users. Accessibility Features on VVX Business Media Phones for Vision-Impaired and Blind Users Accessibility Feature Description Adjustable backlight settings You can change the brightness of the screen by adjusting backlight intensity settings (see Setting the Backlight Intensity... -
Page 51: Features For Mobility-Impaired Users
(see your phone's Start Guide Polycom Voice Support web page). Polycom Desktop You can use your computer's mouse and keyboard to enter information and Connector navigate screens on your VVX phone (see Using the Polycom Desktop application Connector). -
Page 52: Maintaining Your Phone
Maintaining Your Phone When your phone is unable to operate properly, you need to investigate or troubleshoot issues among other tasks your administrator may ask you to perform. This section shows how to perform maintenance tasks on your phone. Investigate Phone Warnings When your phone is unable to perform certain tasks, a Warning icon is displayed in the status bar. -
Page 53: Update The Phone Configuration
Update the Phone Configuration Your system administrator may ask you to update your phone configuration, which you can do without restarting your phone. 1 Navigate to Settings > Basic > Update Configuration. 2 Select Yes. The configuration is updated. Your phone may restart, depending on the phone settings that have changed. Test Phone Hardware Your system administrator may ask you to access a diagnostics menu on your phone to test its hardware. -
Page 54: Update The Phone Software
postpone the software update, or exit the notification. Update the Phone Software When the software update notification is displayed on your phone, you can choose to update your phone's software at that time. » When prompted to update your software, select Update. The phone reboots and the software is updated on the phone. -
Page 55: Troubleshooting
» When prompted to update your software, select Exit. When you exit the notification, the SWUpdate soft key is displayed on the Lines screen. Troubleshooting This section lists potential issues, problems, and common difficulties and possible solutions to guide you towards resolving those issues. - Page 56 feedback of your voice or of their own voice, during the call. If your contacts hear an echo during a call when using your headset, you need to enable echo cancellation on your phone. 1 Navigate to Settings > Basic > Preferences > Headset > Echo Cancellation. 2 Select Enabled.
Need help?
Do you have a question about the VVX 201 and is the answer not in the manual?
Questions and answers