
Subscribe to Our Youtube Channel
Related Manuals for NTI RACKMUX-DS17-NT-4DVIHD


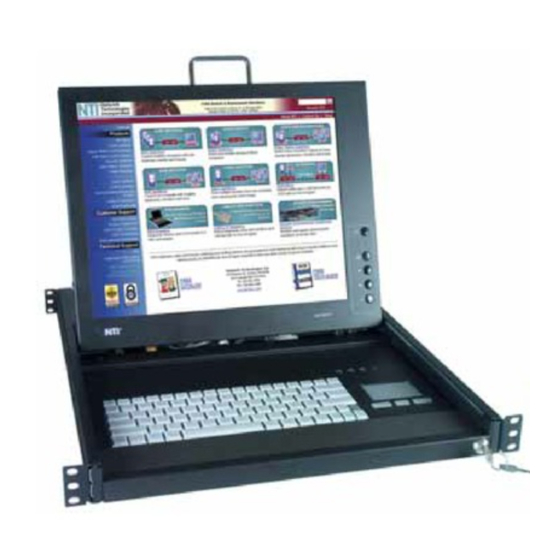
Summary of Contents for NTI RACKMUX-DS17-NT-4DVIHD
- Page 1 RACKMUX Series RACKMUX-DS17-N-4/8/16DVIHD DVI USB SUN KVM Drawer with USB KVM Switch and DVI Video Support Installation and Operation Manual MAN082 Rev Date 7/6/2018...
- Page 2 TRADEMARK RACKMUX is a registered trademark of Network Technologies Inc in the U.S. and other countries. COPYRIGHT Copyright © 2008-2018 by Network Technologies Inc. All rights reserved. No part of this publication may be reproduced, stored in a retrieval system, or transmitted, in any form or by any means, electronic, mechanical, photocopying, recording, or otherwise, without the prior written consent of Network Technologies Inc, 1275 Danner Drive, Aurora, Ohio 44202.
-
Page 3: Table Of Contents
Baud Rate ................................14 Unit Address and Loop Back ..........................15 Command Protocol ..............................16 NTI Switch Control Program For Windows 9X, NT, 2000, XP, And Vista ..............18 SerTest- RS232 Interface Test Program ........................18 Main Options................................18 DISPLAY FUNCTIONS ..............................20 Standard Controls.............................. - Page 4 TABLE OF FIGURES Figure 1- Mount RACKMUX to a standard rack ..........................4 Figure 2- Adjustable rail depth ................................5 Figure 3- Install cage nuts.................................. 5 Figure 4- Install rail assemblies ................................. 6 Figure 5- Adjust distance between rails ............................. 6 Figure 6- Slide the RACKMUX into the rails ............................
-
Page 5: Introduction
Port selection is accomplished through switches on the keyboard tray or keyboard commands. Models Available RACKMUX-DS17-NT-4DVIHD - KVM Drawer with 17" TFT/LCD DVI monitor, trackball mouse and 4-port UNIMUX RACKMUX-DS17-N-4DVIHD - KVM Drawer with 17" TFT/LCD DVI monitor, touchpad mouse and 4-port UNIMUX ... -
Page 6: Materials
NTI RACKMUX KVM Drawer with UNIMUX Switch MATERIALS Materials supplied with this kit NTI RACKMUX-DS17-N(T)-xDVIHD KVM Drawer with USB KVM Switch (where x= 4,8 or 16) Line cord, country specific Set of keys for keylock 2 Rear Mounting Brackets w/ 4 nuts ... -
Page 7: Features And Functions
NTI RACKMUX KVM Drawer with UNIMUX Switch Front View RACKMUX-DS17-NT-8DVIHD Compose Broadcast Command Scan VIDEO 8 VIDEO 7 VIDEO 6 VIDEO 5 VIDEO 4 VIDEO 3 VIDEO 2 VIDEO 1 20 21 Rear View RACKMUX-DS17-NT-8DVIHD FEATURES AND FUNCTIONS Power Button- press to turn the LCD monitor ON and OFF... -
Page 8: Installation
NTI RACKMUX KVM Drawer with UNIMUX Switch INSTALLATION Rack Mounting Instructions The RACKMUX was designed to be mounted to a rack and includes mounting flanges to make attachment easy. The rails that are provided for rack mounting will either be empty studs for insertion through slots in a rear extension bracket, or rail guides for one-man installation to a front and rear bracket set. -
Page 9: One-Man Installation Method
NTI RACKMUX KVM Drawer with UNIMUX Switch One-Man Installation Method If you would like to see a video of this installation, see the “single-person-installation” video . 1. Locate and unpack the hardware bag. Your hardware bag will include all items necessary to install the specific RACKMUX... -
Page 10: Figure 4- Install Rail Assemblies
NTI RACKMUX KVM Drawer with UNIMUX Switch 4. Install the right rail assembly. The end with the label “Right Front” mounts to the front rack support. Install only the center screw through the rail flange to the rack support and cage nut using the #10-32 x 1/2” flat head machine screw provided. (See image below.) -
Page 11: Figure 6- Slide The Rackmux Into The Rails
NTI RACKMUX KVM Drawer with UNIMUX Switch 7. Lineup the rail guides on the RACKMUX drawer with the slots in the front of the left and right rails and slide the drawer into the rack. The rail guides should be positioned such that the wide lip of the guide is on the backside of the rail. Slide the drawer in completely. -
Page 12: Optional Telco 2-Post Mounting
Figure 8- Position RACKMUX with clearance to open Optional Telco 2-Post Mounting If the Telco 2-post mounting bracket kit (NTI# RL-T15-TEL) is to be used, secure the short and long brackets to each side of the drawer as shown in Figure 9. -
Page 13: Connect The Cables
NTI RACKMUX KVM Drawer with UNIMUX Switch Connect The Cables FYI: It is not necessary to turn the CPUs or monitors OFF during this installation. Figure 10 Connect each CPU to the UNIMUX switch using a USB-DHEXT-xx-MM (Required-not supplied) as shown in... -
Page 14: Rs232 Connection
NTI RACKMUX KVM Drawer with UNIMUX Switch RS232 Connection If RS232 control will be used, connect one end of the CAT5 patch cable (supplied) to the port labeled “RS232” on the rear of the RACKMUX. Plug the other end of the CAT5 cable into the RJ45-to-DB9 adapter supplied and connect the adapter to the RS232 port on the control terminal. -
Page 15: Using The Unimux
NTI RACKMUX KVM Drawer with UNIMUX Switch USING THE UNIMUX Once the RACKMUX is properly connected, the UNIMUX switch will enable a connection to be made between the attached CPUs and the monitor, keyboard, and mouse. The UNIMUX can be controlled by three methods: ... -
Page 16: Scan Mode
NTI RACKMUX KVM Drawer with UNIMUX Switch Toggle Scan Mode (The SCAN Mode LED will ON and OFF also toggle ON and OFF) (The Broadcast Mode LED Toggle Broadcast Mode will toggle ON and OFF.) ON and OFF (xxx from 002 to 255. ie. T002... -
Page 17: No Sun Sleep Mode
NTI RACKMUX KVM Drawer with UNIMUX Switch No Sun Sleep Mode Note: It is necessary to configure a Sun CPU (most versions) such that the Sleep Mode is not enabled. If the Sun CPU goes into Sleep Mode either automatically or manually, the user must reboot the Sun CPU in order to resume use of the Sun CPU. -
Page 18: Rs232 Control
RS232 enables the UNIMUX to be remotely controlled via RS232. To control the UNIMUX via RS232 the user has three options: write a program that runs on a PC using the Command Protocol (page 16) use the NTI Switch Control Program (page 18) use the SerTest program (page 18) ... -
Page 19: Unit Address And Loop Back
Note: Pin 4 on the RS232 DIP switch is not used. In order to connect multiple switches (up to 7) with RS232 connections to the same CPU, an NTI Matrix-Y-1 cable must be used. Connect the Matrix-Y-1 cable (sold separately) between the RJ45-to-DB9 serial adapter (supplied) and the CPU as shown in Figure 16. -
Page 20: Command Protocol
Programs that send one character at a time (such as HyperTerminal) cannot be used to control the UNIMUX. Alternatively, the user may use the NTI Switch Control Program or SerTest to control the UNIMUX via RS232 (see page 18). - Page 21 NTI RACKMUX KVM Drawer with UNIMUX Switch Legend: (All numbers must be two digits) Switch (01-7) (Unit Address) Output (User) Port (01) Baud Rate (12 =1200, 24=2400, 48=4800, 96=9600 baud) Input (CPU) Port (01-MAXINPUTS) <CR> Carriage Return (Hex 0xD) Note: For units with one output (user) port, use 01 for the output selection.
-
Page 22: Nti Switch Control Program For Windows 9X, Nt, 2000, Xp, And Vista
Locate the Setup.exe in the directory the program was downloaded to and double-click on it Follow the instructions on the screen Note: In order to use the NTI Switch Control Program to control the UNIMUX, the UNIMUX RS232 port must be set at a baud rate of 9600 bps (see page 14). - Page 23 NTI RACKMUX KVM Drawer with UNIMUX Switch Change Volume for Audio Output/User (not applicable to this model) - change Audio port output volume Read Connection for Output/User - read what input is connected to the specified output Read Connection for Audio Output/User (not applicable to this model)
-
Page 24: Display Functions
DISPLAY FUNCTIONS An NTI RACKMUX with a 17” monitor supports resolutions up to SXGA (1280x1024) with a refresh rate at between 55 and 76Hz. The quality of the image on the LCD monitor is adjustable using an On Screen Display (OSD) menu using the control buttons on the RACKMUX. -
Page 25: Osd Control Menu
NTI RACKMUX KVM Drawer with UNIMUX Switch OSD Control Menu The OSD (On Screen Display) Menu enables the user to select the desired characteristics of the LCD display. To activate the OSD Menu, press the Menu button (above). To turn the Menu back OFF, either select "EXIT" from the main menu or just wait 10-60 seconds and it will automatically be cleared from the screen. -
Page 26: Setup Menu
NTI RACKMUX KVM Drawer with UNIMUX Switch Setup Menu Selecting the Setup menu will bring up a screen in which the user can adjust OSD POSITION-the position of the OSD menus on the LCD display (positions 0-4) OSD TIME-the length of time the user can be idle before the OSD menu automatically exits (adjustable from 10 to 60 seconds) ... -
Page 27: Keyboards
NTI RACKMUX KVM Drawer with UNIMUX Switch KEYBOARDS The keyboard on the RACKMUX is a standard Windows SUN keyboard with 17-key numeric keypad. Note: The “Fn” key is not an active key on this keyboard. Com- Stop Again Props Front... -
Page 28: Troubleshooting
NTI RACKMUX KVM Drawer with UNIMUX Switch TROUBLESHOOTING PROBLEM: Keyboard Errors SOLUTION: Check cable connections on each CPU and the switch. PROBLEM: No Video SOLUTION: Check cable connections on each CPU and the switch. Verify that keyboard and video connect from each CPU to matching ports. -
Page 29: Rackmux Specifications
NTI RACKMUX KVM Drawer with UNIMUX Switch RACKMUX SPECIFICATIONS General Specs Case Material..........Electro-galvanized steel black powdercoated Dimensions WxDxH (in.).......19x21.9x1.75 Supported Rack Depths………………………..Adjustable 22” -39” Input Power............AC 110 or 220V, 50 or 60 Hz Operating Temperature........0-40˚C Storage Temperature…………………………..-20-60˚C Relative Humidity………………………………. 20-90%, non-condensing Approvals............All parts comply with RoHS... -
Page 30: Trackball
NTI RACKMUX KVM Drawer with UNIMUX Switch Trackball Casing Material..........ABS Ball Material ...........Phenolic (metal core) Ball Color ............Black Ball Diameter ..........16mm Tracking Force..........10 grams nominal Resolution............117 pulse per ball revolution Mounting Angle..........Max. 30’ to horizontal plane Lifetime-Ball Revolutions .......>= 1 million Mechanical Buttons ........3 Mechanical switches are supported...
Need help?
Do you have a question about the RACKMUX-DS17-NT-4DVIHD and is the answer not in the manual?
Questions and answers