NTI UNIMUX Series Installation And Operation Manual
4k video usb kvm switch
Hide thumbs
Also See for UNIMUX Series:
- Installation and operation manual (16 pages) ,
- Installation and operation manual (13 pages) ,
- Installation and operation manual (32 pages)

Related Manuals for NTI UNIMUX Series


Summary of Contents for NTI UNIMUX Series
- Page 1 UNIMUX Series UNIMUX-HD4K-x 4K Video USB KVM Switch Installation and Operation Manual UNIMUX-HD4K-32 (Front and Rear View) MAN305 Rev Date 8/6/2019...
- Page 2 TRADEMARK UNIMUX is a trademark of Network Technologies Inc in the U.S. and other countries COPYRIGHT Copyright © 2000, 2019 by Network Technologies Inc. All rights reserved. No part of this publication may be reproduced, stored in a retrieval system, or transmitted, in any form or by any means, electronic, mechanical, photocopying, recording, or otherwise, without the prior written consent of Network Technologies Inc, 1275 Danner Drive, Aurora, Ohio 44202.
-
Page 3: Table Of Contents
Remote Connection ..............................16 Baud Rate ................................16 Command Protocol ..............................16 NTI Switch Control Program For Windows 9X, NT, 2000, XP, Vista,7, 8 and 10 ............ 17 SerTest- RS232 Interface Test Program ........................18 Main Options................................18 KEYBOARD FEATURES .............................. 22 Keyboard-To-Computer Translation .......................... - Page 4 Figure 16- Scan List ..............................13 Figure 17- Administrator Settings..........................14 Figure 18- Port Name List ............................. 15 Figure 19- RS232 Communication Illustrated ....................... 16 Figure 20- Keyboard Layouts ............................22...
-
Page 5: Introduction
MM indicates male-to-male connector USB 2.0 A-B cable for each USB device being connected to the switch. Many are available from NTI in 0.5 meter and 3,6,10 and 15 foot lengths. Go to https://www.vpi.us/c/2-0-usb-cables-159. Cables can be purchased from Network Technologies Inc by calling (800) 742-8324 (800-RGB-TECH) in the US and Canada or... -
Page 6: Features And Functions
NTI UNIMUX SERIES 4K VIDEO USB KVM SWITCH FEATURES AND FUNCTIONS Item Type Description USB Type A Female Transparent USB port for connecting low-, full-, or high-speed USB 2.0 devices For visual indication of connection between the user and a specific CPU. -
Page 7: Rackmounting Instructions
RACKMOUNTING INSTRUCTIONS This NTI switch was designed to be mounted to a rack or to sit on a desktop. It includes rackmount ears to make attachment to a rack easy, and rubber feet to be applied to the bottom of the case if it will instead sit on a flat surface. -
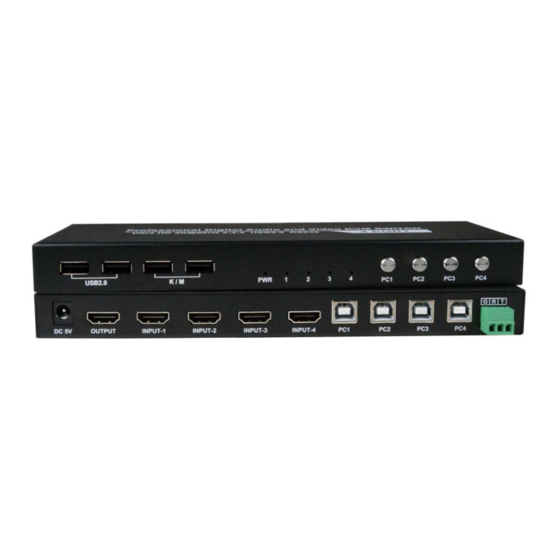
Page 8: Installation
NTI UNIMUX SERIES 4K VIDEO USB KVM SWITCH INSTALLATION It is not necessary to turn the CPUs or monitors OFF during this installation. Connect the cable from a monitor to the HDMI connector labeled “HDMI OUT” on the UNIMUX (See Fig. 3 below.) -
Page 9: Figure 5- Connect The Ac Line Cord
NTI UNIMUX SERIES 4K VIDEO USB KVM SWITCH 5. Connect the AC line cord to the UNIMUX. (See Fig. 5 below.) Figure 5- Connect the AC line cord Connect each CPU to the USB switch using a HD-xx-MM video and USB Type A-B device cable – REQUIRED (not supplied). -
Page 10: Rs232 Connection
NTI UNIMUX SERIES 4K VIDEO USB KVM SWITCH RS232 Connection If the RS232 is going to be used, connect one end of the CAT5 patch cable (supplied) to the port labeled “RS232” on the rear of the UNIMUX. Plug the other end of the CAT5 cable into the RJ45-to-DB9 adapter supplied, and connect the adapter to the RS232 port on the control terminal. -
Page 11: Power-Up Sequence
NTI UNIMUX SERIES 4K VIDEO USB KVM SWITCH Power-Up Sequence The UNIMUX can be powered at any time. The CPUs can be powered at any time although if a CPU needs a keyboard and/or mouse at power-ON it should be powered after connecting to and powering-ON the UNIMUX. -
Page 12: Using The Unimux Switch
NTI UNIMUX SERIES 4K VIDEO USB KVM SWITCH USING THE UNIMUX SWITCH Once the UNIMUX is properly connected, the UNIMUX will enable a connection to be made between the CPUs attached to its VIDEO and CPU ports and the monitor and input devices attached to the MONITOR and DEVICES ports. The LEDs on the control panel of the UNIMUX will illuminate depending on which port (and corresponding CPU) is being connected to the monitor and input devices. -
Page 13: User Access Functions
NTI UNIMUX SERIES 4K VIDEO USB KVM SWITCH USER ACCESS FUNCTIONS Introduction The OSD menu enables a user to name the CPUs connected to the UNIMUX and connect to them using that name from a single keyboard and mouse. The OSD is positioned on the user's monitor, displaying 8 CPU names at a time. The screen can be used for switching as well as editing the CPUs’... -
Page 14: Settings Menu
NTI UNIMUX SERIES 4K VIDEO USB KVM SWITCH To change the way the port list is displayed, the user can click on the "#" sign to have the list displayed numerically, or click in "Name" to have the list displayed alphabetically. -
Page 15: Broadcast Mode
NTI UNIMUX SERIES 4K VIDEO USB KVM SWITCH To respond to the Stop USB Device warning, either click "Enter" or "Esc" with the mouse, or use keyboard keys. Figure 12- Stop USB Device Reminder warning From the Setting Menu the user can also toggle the OSD menu to either be Opaque (have solid color) when on the display, or to be translucent (see-through). -
Page 16: Scan Mode
NTI UNIMUX SERIES 4K VIDEO USB KVM SWITCH Figure 14- Broadcast List From the Broadcast List, click on a port number to toggle its status. Ports displayed in green are included in the broadcast, ports in red are not. The quickly select all ports, click on "Enable All". To quickly deselect all ports, click on "Disable All". -
Page 17: Normal Mode
NTI UNIMUX SERIES 4K VIDEO USB KVM SWITCH Note: The keyboard and mouse must remain idle for the full scan dwell time before the switch selects the next active port. Figure 16- Scan List From the Scan List, click on a port number to toggle its status. Ports displayed in green are included in the scanned, ports in red are not. -
Page 18: Administrator Settings
NTI UNIMUX SERIES 4K VIDEO USB KVM SWITCH Administrator Settings The Administrator Settings menu provides access to specific administrative functions of the UNIMUX. From the Main Menu select Settings, then Administrator Settings. Figure 17- Administrator Settings Click the Port Name List to bring up a page where the names displayed for the UNIMUX and for each port can be edited. -
Page 19: Port Name List
NTI UNIMUX SERIES 4K VIDEO USB KVM SWITCH Port Name List The Port Name List is provided to enable the user to edit the names of the ports and switch. Port names and the switch name can be up to 30 characters in length. The user can customize the UNIMUX to make switching to frequently used ports more easily. -
Page 20: Rs232 Control
NTI UNIMUX SERIES 4K VIDEO USB KVM SWITCH RS232 CONTROL RS232 enables the UNIMUX to be remotely controlled via RS232. To control the UNIMUX via RS232 the user has three options: use a terminal program (e.g. HyperTerminal) from a PC connected to the RJ45 “RS232” port (page 6) ... -
Page 21: Nti Switch Control Program For Windows 9X, Nt, 2000, Xp, Vista,7, 8 And 10
Locate the Setup.exe in the directory the program was downloaded to and double-click on it Follow the instructions on the screen Note: In order to use the NTI Switch Control Program to control the UNIMUX, the UNIMUX RS232 port must be set at a baud rate of 9600 bps. -
Page 22: Sertest- Rs232 Interface Test Program
This software allows a user to test the functions of an NTI server switch, matrix switch or Multi-user/Multi-platform/Single-user switch RS232 interface. The SerTest program is automatically loaded when installing the NTI Switch Control Program as described above. The SerTest program, located in the NTI program group, generates a main menu with the 4 selections described below: Main Options ... - Page 23 NTI UNIMUX SERIES 4K VIDEO USB KVM SWITCH Restore All Units I/O Connections from Units Memory (not applicable to this model) - restore the connections from switch memory bank, command for all switches Change All Units Baud Rate (9600/COM1) (not applicable to this model)
- Page 24 NTI UNIMUX SERIES 4K VIDEO USB KVM SWITCH Firmware Update RS232 is also used when upgrading the firmware for the UNIMUX. To upgrade the firmware, the user must first access the bootloader menu. To access the bootloader menu, 1. Power OFF the UNIMUX 2.
- Page 25 NTI UNIMUX SERIES 4K VIDEO USB KVM SWITCH >d Restoring configuration to default. Please wait..........>u Erasing application memory... Send .hex file using XModem protocol... File transfer OK! >i Send .bin file using XModem protocol... Configuration image file successfully programmed >...
-
Page 26: Keyboard Features
NTI UNIMUX SERIES 4K VIDEO USB KVM SWITCH KEYBOARD FEATURES The keyboard configuration of each CPU is saved in the UNIMUX. For example, if the CPU attached to Port 2 had CAPS LOCK and NUM LOCK selected the last time that CPU was accessed, then they will automatically be set when that CPU is accessed again. -
Page 27: Troubleshooting
NTI UNIMUX SERIES 4K VIDEO USB KVM SWITCH TROUBLESHOOTING PROBLEM: Keyboard Errors SOLUTION: Check cable connections on each CPU and the switch. PROBLEM: No Video Check cable connections on each CPU and the switch. Verify that keyboard and video connect from each CPU SOLUTION: to matching ports.
Need help?
Do you have a question about the UNIMUX Series and is the answer not in the manual?
Questions and answers