Table of Contents
Advertisement
Quick Links
Download this manual
See also:
Instruction Manual
Advertisement
Table of Contents

Subscribe to Our Youtube Channel
Related Manuals for Pro Spot PHS-101


Summary of Contents for Pro Spot PHS-101
- Page 1 Hybrid Spot Battery Powered Resistance Spot Welder Instruction Manual Version 1.7 All Info Copyright © Pro Spot International Inc.
-
Page 2: Table Of Contents
5.5 Welding Electrode Maintenance ........24 All Info Copyright © Pro Spot International Inc. - Page 3 OR INJURY. HELP FAST. * The actual stabilized OCV can only be determined after the KEEP OUT OF REACH OF CHILDREN battery has been disconnected from the charger for 24 hours. Page 2 All Info Copyright © Pro Spot International Inc.
-
Page 4: Quick Start Instructions
BAT 3 BAT 4 Charge Indicator Displays CHARGING CHARGING CHARGING CHARGING DC AMPS DC AMPS DC AMPS DC AMPS BAT 1 BAT 2 BAT 3 BAT 4 HYBRID SPOT PHS-100 Page 3 All Info Copyright © Pro Spot International Inc. -
Page 5: Introduction
You have a welder and support group that will increase your productivity. The integrated features, ease of use, speed and quality welds that your Hybrid Spot offers will become an important part of your business. The following information will be needed when you call Pro Spot: * MODEL TYPE: Hybrid Spot * SERIAL NO:________________ The serial number is located on the back of the unit. -
Page 6: Safety
By observing and following the safety precautions, users of the Hybrid Spot Spot welder will ensure safer working conditions for themselves and their fellow workers. 2.2 Warnings and important notices The following types of safety signs are used on the equipment and in Pro Spot’s instruction manuals: Caution. Attention! Read instruction manual. - Page 7 WARNING! All service and maintenance ATTENTION! Tout le service et l'entretien doivent être must be carried out by Pro Spot service effectués par personnel et soutien de service Pro personnel and service support. Risk for Spot.
-
Page 8: Safety Devices
For best results, let the welder rest when cables are too hot. Cooler weld cables result in better weld performance. 2 Safety Page 7 All Info Copyright © Pro Spot International Inc. -
Page 9: Installation
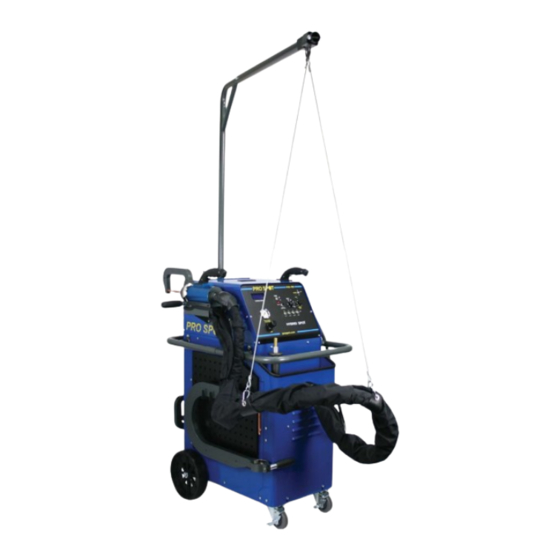
Remove all packaging material from the welder. 3.3 Welder assembly For your convenience, the welder ships fully assembled. Insert the support arm (boom) as shown in Figure 3.1 Figure 3.1 3 Installation Page 8 All Info Copyright © Pro Spot International Inc. -
Page 10: Battery Installation
Place the leads (red on positive and black on negative) on the battery ter- minals and tighten with a 1/2” socket. Do not over tighten. 3 Installation Page 9 All Info Copyright © Pro Spot International Inc. -
Page 11: Connection Of Electrical Supply
IMPORTANT! The air must be clean and free from oil and moisture. Use a filter. IMPORTANT! L'air doit être propre sans huile et Figure 3.2 humidité. Utilisez un filtre. Air supply port 3 Installation Page 9 All Info Copyright © Pro Spot International Inc. -
Page 12: Operation
TIME: The Timer controls the duration of the current applied during the weld cycle. The ideal is to get a weld that uses higher current and shorter time to con- trol heat buildup. WELD CYCLE CHART welder 4 Operation Page 10 All Info Copyright © Pro Spot International Inc. -
Page 13: About Your Welder
Fuses Power Input WELD CABLES CONFIGURATION Back Panel Single-Sided Weld Gun cable Two-Sided spot gun cable Tool board Single-Sided ground cable Two-Sided ground cable Figure 4.2 Back View 4 Operation Page 11 All Info Copyright © Pro Spot International Inc. -
Page 14: Control Panel
Only trained personnel should use this welder. IMPORTANT! Assurez-vous de lire le Mode d’Emploi avant d'opérer le soudeur. Seul le personnel qualifié devrait utiliser ce soudeur. 4 Operation All Info Copyright © Pro Spot International Inc. Page 12... -
Page 15: Checking & Charging Battery Voltage
The weld count indicates the total number of welds on the unit. VERY IMPORTANT: Do not use any other battery than those supplied by Pro Spot. Hybrid Welder Battery Charging Instructions: To charge the batteries in the Hybrid Welder, simply plug the power cord into a 120VAC or 240VAC outlet. -
Page 16: Removing Battery Covers For Service
Always keep electrodes sharpened and properly aligned, this will minimize the need for high weld times & will help to maintain weld quality. 4 Operation Page 15 All Info Copyright © Pro Spot International Inc. -
Page 17: Choosing The Weld Mode
Always keep electrodes sharpened and properly aligned, this will minimize the need for high weld times & will help to maintain weld quality. 4 Operation All Info Copyright © Pro Spot International Inc. Page 15... -
Page 18: Checking Weld Quality
Expect to tear a hole around the weld nugget as the two metals are peeled apart. IMPORTANT: Use the same metal as you are welding. 4 Operation All Info Copyright © Pro Spot International Inc. Page 16... -
Page 19: Double-Sided Welding
Figure 5.1 PS-500 Spot Gun - Component Diagram 5.1.2 Using the Double-Acting Gun Push this button to open electrodes wide. Push this button to close electrodes and weld. 5 Double-Sided Welding All Info Copyright © Pro Spot International Inc. Page 17... -
Page 20: Extension Arms
PS-403 (optional) Wheelhouse Arm C-X Adapter 5.2.1 Switching to extension arms Loosen the handle and pull off the C-arm... Now, insert the extension arm and tighten the handle. 5 Double-Sided Welding All Info Copyright © Pro Spot International Inc. Page 18... -
Page 21: Extension Arms And Welding Electrodes
REMARQUE: PS-025 caps de soudure peuvent être achetés en paquets de 15 à partir de votre distributeur local ou en ligne à www.prospot.com 5 Double-Sided Welding All Info Copyright © Pro Spot International Inc. Page 19... -
Page 22: Ps-500 Electrode Alignment
IMPORTANT! Toujours maintenir l'alignement des électrodes appro- priées. Ne pas le faire peut conduire aux soudures faibles de qualité inférieure! 5 Double-Sided Welding All Info Copyright © Pro Spot International Inc. Page 20... -
Page 23: Removing Welding Electrodes
à l'adresse: www.prospot.com Figure 5.6c: Optional Weld Cap Removal Tool Welding Cap Piston Electrode Extension Arm Electrode Figure 5.6 Removing Welding Electrodes 5 Double-Sided Welding All Info Copyright © Pro Spot International Inc. Page 21... -
Page 24: Welding Electrode Maintenance
5.6 Wheel House Arm The wheel house adapter allows access to hard to reach areas such as the wheel house PS-52-5/8: Wheel House Arm PS-1101-CM: PS-1133-5/8: 60mm Electrode Shank Electrode 5 Double-Sided Welding All Info Copyright © Pro Spot International Inc. Page 22... -
Page 25: X-Adapter (Optional)
IMPORTANT! Ne serrez pas le collier avant de glisser l’ Électrode Rétreci dans le tube. Le collier est conçu pour empêcher l’ Électrode Rétreci de tomber du tube quand le pistolet est complètement ouvert. 5 Double-Sided Welding All Info Copyright © Pro Spot International Inc. Page 23... -
Page 26: Using The X-Adapter
Welding Cap (PS-407) 90°Electrode - Lower Pivot Axle Tapered 45°Electrode - Lower (PS-412) (PS-406) Electrode (PS-422) (PS-405) Figure 5.8 45° Arm Set Figure 5.7 90° Arm Set 5 Double-Sided Welding All Info Copyright © Pro Spot International Inc. Page 24... -
Page 27: Single-Sided Welding
Single-Sided Welding (cosmetic repair only) Washer Welding Nail Welding Contact Shrinking Bolt and Nut Welding Rivet Welding Spot Hammer Dent Pulling Pro Pull Dent Removal Figure 6.2 Single-Sided applications 6 Single-Sided Welding All Info Copyright © Pro Spot International Inc. Page 25... - Page 28 6 Single-Sided Welding All Info Copyright © Pro Spot International Inc. Page 26...
-
Page 29: Single-Sided Spot Welding
5. Ground the working area (refer to section 6.1 "Single-Sided Welding Overview"). 6. Position single sided gun over work area and push the trigger to weld. 7. Repeat as needed. 6 Single-Sided Welding All Info Copyright © Pro Spot International Inc. Page 27... -
Page 30: Nut Welding
Pro Spot online store. Astuce: noix de différentes tailles sont disponibles chez votre distribu- teur local Spot Pro ou sur le web à la boutique Pro Spot en ligne. Figure 6.15 Nuts are held in place during welding with a shrinking electrode. -
Page 31: Moulding Clip Rivet Welding
Pro Spot online store. Astuce: Vous pouvez acheter un marteau glissant avec crochet de votre distributeur locale Pro Spot ou sur le web à la boutique Pro Spot en ligne. Figure 6.24 Washers are held in place during welding with magnetic adapter electrode. -
Page 32: Contact Shrinking
4. Ground the working area (refer to section 6.1 "Single-Sided Welding Overview"). 5. Position the contact shrinking electrode over the high spot, apply some pres- sure and push the trigger to weld. 6. Repeat as needed. 6 Single-Sided Welding All Info Copyright © Pro Spot International Inc. Page 30... -
Page 33: Pro Pull Dent Pulling (Optional)
Block window size: N-38 0.75" (19mm) dia. PP-10-01 CLP-75 Removable weld shaft. The weld current is transferred through the shaft and NO CABLE is required to transfer the current 6 Single-Sided Welding All Info Copyright © Pro Spot International Inc. Page 31... -
Page 34: Pro Pull Assembly
Aim, position & fire! Pull dent with Auto Twist gun to release tip. Blocking. 6.9.5 Paintless Dent Pulling With Pro Pull Glue Adapter for Paintless Dent Removal 6 Single-Sided Welding All Info Copyright © Pro Spot International Inc. Page 32... -
Page 35: Troubleshooting
6. Single Sided gun trigger does not work or seems intermittent. The welder is programmed with 5 sec delay between welds to conserve power and prevent overheating. Electrode Squeeze Force vs Gauge Pressure 7 Troubleshooting All Info Copyright © Pro Spot International Inc. Page 33... - Page 36 Pro Spot International, Inc. 5932 Sea Otter Place Carlsbad, CA 92010 Toll Free: (877) PRO SPOT Fax: (760) 407-1414 E-mail: info@prospot.com Web: www.prospot.com...
Need help?
Do you have a question about the PHS-101 and is the answer not in the manual?
Questions and answers