
Related Manuals for Pro Spot PR-111


Summary of Contents for Pro Spot PR-111
- Page 1 PR-111, PR-112 & PR-113 Inverter Plasma Cutter Series Punktschweißgerät Resistance Spot Welder Kurzanleitung Instruction Manual Inst Version 1.0 All Info Copyright © Pro Spot International Inc.
-
Page 2: Contact Information
& development department, a fabrication facility and production lines for the various welders. Pro Spot International exports its products worldwide, export sales are managed through our headquarter offi ce. The company owns numerous patents for our ingenious application tools, machines, and procedures. -
Page 3: Safety Rules And General Warnings
CAUTION! BEFORE INSTALLING, OPERATING OR CARRYING OUT MAINTENANCE ON THE PLASMA CUTTER, READ THE CONTENTS OF THIS MANUAL CAREFULLY, PAYING PAR- TICULAR ATTENTION TO THE SAFETY RULES. In the event of these instructions not being clear, please contact your supplier. CONGRATULATIONS ON YOUR NEW PURCHASE! YOU ARE NOW IN THE POSSESSION OF ONE OF THE SAFEST AND MOST TECHNOLOGI- CALLY ADVANCED PLASMA CUTTERS ON THE MARKET. -
Page 4: Cutting Fumes And Gases
1-Split or leather gloves 2-Split or leather aprons 3-Shin-guards 4-Safety shoes 5-Safety mask (or even better helmet) large enough to cover the whole of the face, equipped with safety lenses able to lter all the radiation and reduce the intensity of the light absorbed by the eye. CAUTION! Never, under any circumstances, look at an electric arc without eye protection. -
Page 5: General Information
NOISE Noise is generated during the cutting process. The noise level depends on the cutting parameters used. CAUTION! Noise can damage hearing Wear adequate hearing protection. BURNS The operator should be adequately protected during cutting operations. This should be routine practice. CAUTION! Do not point the torch jet at people or foreign bodies. - Page 6 Oil in the air is a severe problem and must be avoided. The unit is also equipped with an air lter which captures water and oil vapor. PR-111: Model 30A - 40A: The vapor collected can be drained out turning the drain knob located on the air lter. Three Position Drain knob, select the desired position: 1.
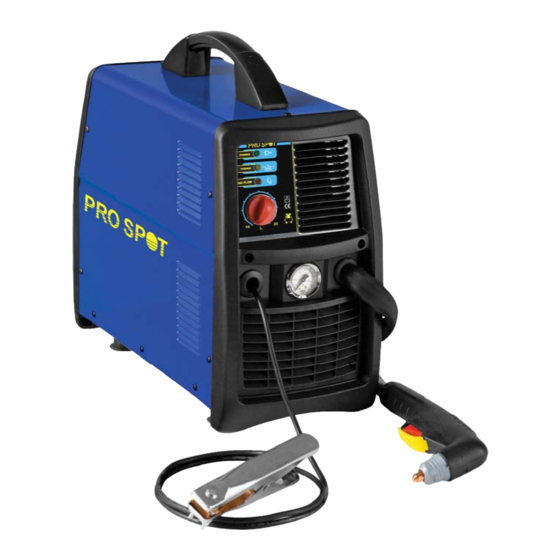
- Page 7 FUNCTIONS PR-111 30A - 40A MODEL 1.ON/FF Switch – In the ON position the machine is ready for normal operation. All system control circuits are activated. OFF position deactivates control circuits. 2.Output Current Knob - Adjusts the cutting current supplied by the machine according to the thickness of material/speed.
- Page 8 PR-112/113 45A MODEL 1.ON/FF Switch – In the ON position the machine is ready for normal operation. All system control circuits are activated. OFF position deactivates control circuits. 2.Output Current Knob - Adjusts the cutting current supplied by the machine according to the thickness of material/speed.
- Page 9 CUTTING OPERATION PRELIMINARIES WARNING: unplug the unit from the power supply before assemble or disassemble piled parts, single parts, parts of the torch, torch assemblies or cables. Check and follow instructions as foreseen in the paragraphs “Safety and Installation” of the present instructions manual.
- Page 10 CUTTING A. Cutting with a Hand Torch The torch can be comfortably held in one hand or steadied with two hands. Choose the technique that feels most comfortable and allows good control and movement. Position the index nger or thumb to press the control switch on the torch handle. For edge starts, hold the torch perpendicular to the workpiece with the front of the tip on the edge of the workpiece at the point where the cut is to start.
-
Page 11: Torch Consumable Parts Selection
To change the torch consumable parts use the following procedure: Position the torch with the shield cup facing upward to prevent these parts from falling out when the cup is removed. PR-112/113 Torch for models 30A / 40A PR-111 Torch for model 45A Use: Use: - 0,90 mm ø... -
Page 12: Operating Faults
OPERATING FAULTS During cutting operations performance faults may arise which are not caused by plant malfunctioning but by other operational faults such as: Insuf cient penetration : too high cutting speed; torch is too tilted; piece is too thick; cutting current too low; torch parts are worn out;... -
Page 13: Compressed Air Filter
UNIT Keep the cutting or gouging area and the area around the machine clean and free of combustible materials. No debris should be allowed to collect , this could obstruct air ow to the machine. Inspect the unit every 3-4 months (depending on how often the unit is used) and use compressed air to remove any dust deposits. -
Page 14: Trobleshooting
TROBLESHOOTING SYMPTOM POSSIBLE CAUSE AND REMEDY GREEN LED OFF, Fan not operat-ing. No Input 1. Plug unit into 230V outlet. Power. 2. Reset Breaker. GREEN LED ON, YELLOW Overtemperature 1. Make sure the unit has not been operated LED ON. Unit is overheated. beyond duty cycle limits. - Page 15 LISTA RICAMBI TORCIA / TORCH PARTS LIST / LISTA DE REPUESTOS DE LA ANTORCHA / LISTE PIÈCES DE RECHANGE DE LA TORCHE PT40-60 CORPO TORCIA TORCH HEAD ELETTRODO ELECTRODE DIFFUSORE AIR DIFFUSER CAPPA 1,0 (40-45A) TIP D.1,0 (40-45A) CAPPA 0,9 (30-40A) TIP D.0,8 (30-40A) CAPPA 0,8 (20-30A) TIP D.0,8 (20-30A)
- Page 16 SCHEMA ELETTRICO / WIRING DIAGRAM / ESQUEMA ELECTRICO / SCHÉMA ÉLECTRIQUE - MOD.30A...
- Page 17 PR-111 ESPLOSO / PARTS DRAWING / DESPIECE / VUE ÉCLATÉE - MOD.30A PR-111 LISTA RICAMBI / PARTS LIST / LISTA DE REPUESTOS / LISTE PIÈCES DE RECHANGE - MOD.30A PRESSACAVO CABLE CLAMP DADO PER PRESSACAVO NUT FOR CABLE CLAMP TARGA ADESIVA...
- Page 18 SCHEMA ELETTRICO / WIRING DIAGRAM / ESQUEMA ELECTRICO / SCHÉMA ÉLECTRIQUE PR-111 - MOD.40A...
- Page 19 PR-111 ESPLOSO / PARTS DRAWING / DESPIECE / VUE ÉCLATÉE - MOD.40A...
- Page 20 PR-111 LISTA RICAMBI / PARTS LIST / LISTA DE REPUESTOS / LISTE DES PIÈCES DE RECHANGE - MOD.40A PRESSACAVO CABLE CLAMP DADO PER PRESSACAVO NUT FOR CABLE CLAMP TARGA ADESIVA REGULATION PLATE ETICHETTA FRONTALE FRONT LABEL MANOPOLA POTENZ. POTENTIOMETER KNOB...
- Page 21 LISTA RICAMBI TORCIA / TORCH PARTS LIST / LISTA DE REPUESTOS DE LA ANTORCHA / PR-112/113 LISTE PIÈCES DE RECHANGE DE LA TORCHE PT-80 CORPO TORCIA TORCH HEAD ELETTRODO ELECTRODE DIFFUSORE AIR DIFFUSER CAPPA 1,0 (40-50A) TIP D.1,0 (40-50A) CAPPA 0,9 (30-40A) TIP D.0,9 (30-40A) UGELLO SHIELD CUP...
- Page 22 SCHEMA ELETTRICO / WIRING DIAGRAM / ESQUEMA ELECTRICO / SCHÉMA ÉLECTRIQUE PR-112/113 - MOD.45A...
- Page 23 PR-112/113 ESPLOSO / PARTS DRAWING / DESPIECE / VUE ÉCLATÉE - MOD.45A...
- Page 24 LISTA RICAMBI / PARTS LIST / LISTA DE REPUESTOS / LISTE DES PIÈCES DE RECHANGE - MOD.45A PR-112/113 GUSCIO FRONTALE FRONT FRAME MANOMETRO GAUGE D.40 ETICHETTA FRONTALE FRONT LABEL MANOPOLA POTENZIOM. POTENTIOMETER KNOB INSERTO PER MANOM. GAUGE GROMMET PRESSACAVO CABLE CLAMP INTERRUTTORE 20A SWITCH 20 A...
- Page 25 NOTES...
- Page 26 NOTES...
- Page 27 NOTES...
- Page 28 Pro Spot international, Inc. 5932 Sea Otter Place Carlsbad, CA 92010 Toll Free (US Only): (877) PRO SPOT Phone: (760) 407-1414 Fax: (760) 407-1421 E-mail: info@prospot.com Web: www.prospot.com All Info Copyright © Pro Spot International Inc.
Need help?
Do you have a question about the PR-111 and is the answer not in the manual?
Questions and answers